In this blog, I will show you how to secure the pre-boot environment by enabling Fedora UEFI Secure Boot with custom keys and self-signing all bootloader(s), kernel(s), and module(s) with your private key in order to boot the operating system safely.
Secure Boot is based on the idea that UEFI firmware should only pass control to the operating system if it can cryptographically validate boot components against a pre-distributed set of public keys and hashes. When you turn on the computer, the firmware verifies each boot component's signature or computed SHA-256 hash. If the signatures or hashes of all of the boot components are valid, the computer will be allowed to complete its boot process, and the firmware will hand over control to the operating system.
To keep this guide simple and secure, I installed a fresh copy of Fedora 38 Workstation under KVM virtualization with Secure Boot enabled. This virtual machine will be used to test all the steps I'll take, such as key creation and enrollment, signing various binaries, and so on. I strongly advise you to do the same before enrolling your custom keys on your real computer. Experiment with all of the commands on the virtual machine first, and then apply them to your actual computer if you're satisfied with the results.
Important: If you use Fedora 38 as a KVM virtualization host (hypervisor), the default UEFI secure variable space for the guest virtual machine is much smaller. This will result in an error when attempting to update the UEFI revocation list file (dbx). As a result, you must use a larger 4M UEFI secure variable space. Fortunately, Fedora includes it as well. All you have to do is change the path in the configuration JSON file.
On the Fedora 38 KVM virtualization host, run the following command as root:
# sed -i 's/ovmf/ovmf-4m/g' \
    /usr/share/qemu/firmware/30-edk2-ovmf-x64-sb-enrolled.json
If you’ve already created other UEFI-enabled guest virtual machines, you’ll need to reset NVRAM for them to work properly.
# virsh start <your-virtual-machine-name> --reset-nvram
If you haven't already installed KVM virtualization on your computer, see my other blog post on how to properly install KVM on Your Linux distribution. I've also written guides on installing a guest operating system in KVM virtualization using the GUI tool virt-manager and the command-line tool virt-install. Take a look at all of them.
So let's get started.
Table of Contents
- 1. Overview of Secure Boot Keys
- 2. Backup the Original Secure Boot Keys
- 3. Remove the Original Secure Boot Keys
- 4. Generate Your Own Secure Boot Keys
- 5. Convert Certificates to AUTH Format
- 6. Enroll Your Keys in UEFI Secure Boot Chain
- 7. Sign Boot Binaries
- 8. Sign Kernel Modules
- 9. Add Microsoft Keys to UEFI Secure Boot
- 10. Add OEM Key to UEFI Secure Boot (If Any)
- 11. Conclusion
- Watch on YouTube
Before you can start configuring Secure Boot, you must first install a few packages. So, start the Fedora virtual machine and install the following packages:
$ sudo dnf install efitools keyutils mokutil openssl pesign sbsigntools \
    kernel-devel-$(uname -r)
1. Overview of Secure Boot Keys
The UEFI specification provides four types of Secure Boot keys that can be included in your firmware. To list them all, use the following command:
$ efi-readvar1.1 Platform Key (PK)
This is the top-level key used in Secure Boot. Platform Key (PK) creates a relationship of trust between the platform owner and the platform firmware. UEFI Secure Boot only supports a single PK in a system. If a PK already exists, you will be unable to add another unless the existing one is removed. The PK holder has the ability to replace an existing PK as well as update/replace the Key Exchange Key (KEK). The PK is usually owned by the OEM, which has complete control over the secure boot key chain. So, if you want total control over the Secure Boot process, you must replace the PK with your own.
Find out who is currently in possession of the PK.
$ efi-readvar -v PK
Variable PK, length 976
PK: List 0, type X509
  Signature 0, size 948, owner a0baa8a3-041d-48a8-bc87-c36d121b5e3d
    Subject:
      CN=Red Hat Secure Boot (PK/KEK key 1), [email protected]
    Issuer:
      CN=Red Hat Secure Boot (PK/KEK key 1), [email protected]
As you can see, Red Hat owns the PK because KVM is a product of Red Hat Inc. If you check it on your actual computer, it is usually owned by the OEM.
To view the public key in the PK, use the following command:
$ mokutil --pkIn this tutorial, you will replace Red Hat's PK with your own.
1.2 Key Exchange Key (KEK)
In the Secure Boot key hierarchy, the KEK comes next. KEKs create a relationship of trust between the platform firmware and the operating system. KEKs are used to sign Signatures Database (db) and Forbidden Signatures Database (dbx). On most systems, there will be one or more KEKs. KEKs are used by vendors who need to update the db or dbx. Vendors include OEMs such as Acer, Dell, and others, as well as operating system providers such as Microsoft. Microsoft KEK comes pre-installed on almost all computers.
Take a look at the KEKs that have been installed.
$ efi-readvar -v KEK
Variable KEK, length 2536
KEK: List 0, type X509
 Signature 0, size 948, owner a0baa8a3-041d-48a8-bc87-c36d121b5e3d
  Subject:
   CN=Red Hat Secure Boot (PK/KEK key 1), [email protected]
  Issuer:
   CN=Red Hat Secure Boot (PK/KEK key 1), [email protected]
KEK: List 1, type X509
 Signature 0, size 1532, owner 77fa9abd-0359-4d32-bd60-28f4e78f784b
  Subject:
   C=US, ST=Washington, L=Redmond, O=Microsoft Corporation, CN=Microsoft Corporation KEK CA 2011
  Issuer:
   C=US, ST=Washington, L=Redmond, O=Microsoft Corporation, CN=Microsoft Corporation Third Party Marketplace Root
As you can see, you have two KEKs installed. One is provided by the hardware manufacturer, in this case, Red Hat, and the other by Microsoft Corporation.
To view public keys in the KEK, run the following command:
$ mokutil --kekIn this tutorial, you'll delete both of these keys in KEK and replace them with your own. However, later in the tutorial, I will show you how to re-add OEM and Microsoft keys if you so desire.
1.3 Signature Database (db)
The Signature Database (db) is essentially a whitelist of boot binaries. The db will contain public keys with a minimum key strength of RSA-2048 or SHA-256 hashes.
Binaries with signatures that can be validated by a public key in the db will be allowed to execute at boot. Similarly, binaries without a signature, but with a computed SHA-256 hash that matches a trusted hash in the db will also be allowed to execute at boot.
Examples of binaries include boot managers, boot loaders, kernels, and kernel modules.
The majority of computers come pre-installed with two Microsoft keys in the db. The OEM of your computer may also have its own key installed.
Take a look at the dbs that have been installed.
$ efi-readvar -v db
Variable db, length 3143
db: List 0, type X509
 Signature 0, size 1515, owner 77fa9abd-0359-4d32-bd60-28f4e78f784b
  Subject:
   C=US, ST=Washington, L=Redmond, O=Microsoft Corporation, CN=Microsoft Windows Production PCA 2011
  Issuer:
   C=US, ST=Washington, L=Redmond, O=Microsoft Corporation, CN=Microsoft Root Certificate Authority 2010
db: List 1, type X509
 Signature 0, size 1572, owner 77fa9abd-0359-4d32-bd60-28f4e78f784b
  Subject:
   C=US, ST=Washington, L=Redmond, O=Microsoft Corporation, CN=Microsoft Corporation UEFI CA 2011
  Issuer:
   C=US, ST=Washington, L=Redmond, O=Microsoft Corporation, CN=Microsoft Corporation Third Party Marketplace Root
As you can see, you have two dbs installed. Both were pre-installed by Microsoft. The first db (List 0) is used to validate the Microsoft Windows operating system, while the second db (List 1) is used to validate Microsoft Corporation-approved third-party vendors.
To view the public keys and hashes that have been added to the db, run the following command:
$ mokutil --dbYou will delete both of these dbs and replace them with your own. This method has both advantages and disadvantages.
The advantages include complete control over which binaries can be loaded. The kernel and most kernel modules will already be signed (in this case) with Fedora's built-in Fedora kernel signing key. Other than that, each binary must be signed with your own private key. As a result, your Secure Boot is completely secure. Nothing can sneak up on you unless you give it permission to.
The disadvantage is that you must sign everything (though not many) that will be loaded during the booting process, which may be inconvenient if you are not technically savvy. Furthermore, the majority of vendors are Microsoft-certified, and if the software/hardware of such a vendor is involved in the boot process and you do not have their keys installed, the system will not boot. In order for it to boot again, you must sign each of them with your own private key.
I suggest you start with your own keys and self-sign anything that prevents the secure boot process. If you dual boot with Microsoft Windows, you can even use your private key to sign the MS Windows bootloader. You will have no problem.
And, if you think it's too much, you can always restore both Microsoft and OEM keys, as I'll show later in this article.
1.4 Forbidden Signature Database (dbx)
The Forbidden Signature Database (dbx) is a kind of anti-db. It includes public keys with a minimum key strength of RSA-2048 or SHA-256 hashes that can be used to validate the undesired binary that you do not want the computer to execute when it boots.
Take a look at the keys and hashes that have been added.
$ efi-readvar -v dbx
Variable dbx, length 17836
dbx: List 0, type SHA256
 Signature 0, size 48, owner 77fa9abd-0359-4d32-bd60-28f4e78f784b
  Hash:80b4d96931bf0d02fd91a61e19d14f1da452e66db2408ca8604d411f92659f0a
 Signature 1, size 48, owner 77fa9abd-0359-4d32-bd60-28f4e78f784b
  Hash:f52f83a3fa9cfbd6920f722824dbe4034534d25b8507246b3b957dac6e1bce7a
 Signature 2, size 48, owner 77fa9abd-0359-4d32-bd60-28f4e78f784b
  Hash:c5d9d8a186e2c82d09afaa2a6f7f2e73870d3e64f72c4e08ef67796a840f0fbd
 Signature 3, size 48, owner 77fa9abd-0359-4d32-bd60-28f4e78f784b
  Hash:1aec84b84b6c65a51220a9be7181965230210d62d6d33c48999c6b295a2b0a06
 Signature 4, size 48, owner 77fa9abd-0359-4d32-bd60-28f4e78f784b
  Hash:c3a99a460da464a057c3586d83cef5f4ae08b7103979ed8932742df0ed530c66
 Signature 5, size 48, owner 77fa9abd-0359-4d32-bd60-28f4e78f784b
  Hash:58fb941aef95a25943b3fb5f2510a0df3fe44c58c95e0ab80487297568ab9771
....
....
The output shows that there are many SHA-256 hashes. By comparing the owner GUID to the one in the KEK (List 1), you can conclude that they belong to Microsoft.
If a binary matches a key or hash in both the db and the dbx, the dbx takes precedence and the binary is not allowed to execute.
To view the public keys and hashes in the dbx, run the following command:
$ mokutil --dbxIn this tutorial, I'll remove all of the keys and hashes from this dbx. You already have your own custom db list. If you don't want a binary to execute at boot, don't add it to the db list in the first place.
This is not the case with vendors such as Microsoft or Red Hat, who will have already signed a large number of binaries with the same private key, only to discover later that some of them have been compromised or are out of date. As a result, such binaries are added to the dbx blacklist.
To enable Secure Boot, you must have PK, KEK, and db. dbx is optional.
Later in this tutorial, if you want to add the Microsoft list of prohibited hashes to dbx, I'll show you how to do so by using the most recent UEFI revocation list file.
2. Backup the Original Secure Boot Keys
Before you can generate your own keys and add them to UEFI Secure Boot, make a backup of the original keys somewhere safe in case you need to use them later.
I will create some directories to save various keys. You can create directories wherever you want and name them whatever you want.
$ sudo -i
# mkdir -vp /keys/{auth,bak,cfg,esl,ms,oem}
Now, make a backup of the original keys.
# efi-readvar > /keys/bak/all-efi-keys-original.txt

# efi-readvar -v PK  -o /keys/bak/PK-original.esl
# efi-readvar -v KEK -o /keys/bak/KEK-original.esl
# efi-readvar -v db  -o /keys/bak/db-original.esl
# efi-readvar -v dbx -o /keys/bak/dbx-original.esl
List your backups.
# ls -lh /keys/bak/
total 88K
-rw-r--r--. 1 root root  56K Aug  6 19:14 all-efi-keys-original.txt
-rw-------. 1 root root 3.1K Aug  6 19:15 db-original.esl
-rw-------. 1 root root  18K Aug  6 19:15 dbx-original.esl
-rw-------. 1 root root 2.5K Aug  6 19:14 KEK-original.esl
-rw-------. 1 root root  976 Aug  6 19:14 PK-original.esl
3. Remove the Original Secure Boot Keys
Now that you've saved the original UEFI Secure Boot keys that came with the computer, you can safely remove them.
Boot into the firmware of your computer.
# systemctl reboot --firmware-setupBecause different firmwares have different methods for removing keys, I will only show how to remove them in the firmware of the KVM virtual machine.
On the firmware main screen, select the 'Device Manager' option.
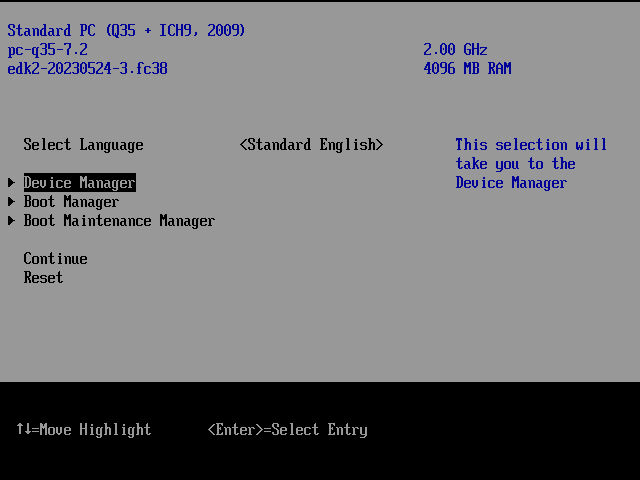
Choose the 'Secure Boot Configuration' option. Scroll down to 'Reset Secure Boot Keys' and press [Enter]. Select [Yes] and then press the [Enter] key.
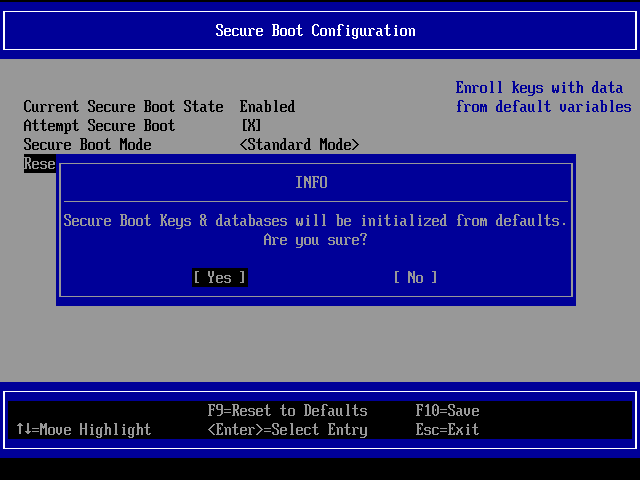
All of your UEFI Secure Boot keys have been removed. Press the [Esc] button twice and then press 'Reset' to reboot the system and return to the operating system.

After rebooting, confirm that all entries in the Secure Boot chain have been removed.
$ efi-readvar
Variable PK has no entries
Variable KEK has no entries
Variable db has no entries
Variable dbx has no entries
Variable MokList has no entries
The output shows that all entries in the Secure Boot chain have been removed.
Now, check the status of Secure Boot.
$ sudo bootctl status 2>&1 | grep 'Secure Boot'
   Secure Boot: disabled (setup)
As you can see, Secure Boot has been disabled, and the platform is in setup mode, which means you need to provide a Platform Key (PK).
4. Generate Your Own Secure Boot Keys
With all of the UEFI Secure Boot keys removed, you must now generate your own Secure Boot keys.
Microsoft recommends that the keys are of the type EFI_CERT_X509_GUID, with the public key algorithm RSA, a public key length of 2048 bits or higher, and the signature algorithm sha256RSA.
I will generate keys with RSA-4096 bit strength, which is supported by the vast majority of modern computers. If your machine cannot handle 4096 bits, generate keys with 2048 bits instead.
Switch to the super user.
$ sudo -i4.1 X509 Certificate for Platform Key
Create a new file called PK.cfg.
# vim /keys/cfg/PK.cfgAdd the following lines to it. Make the necessary changes to suit your preferences. Changes that are possible are highlighted in amber. The Email address is optional. The flag 'CA:FALSE' indicates that the certificate was not issued by a Certificate Authority and that it was instead self-signed.
[ req ]
default_bits         = 4096
encrypt_key          = no
string_mask          = utf8only
utf8                 = yes
prompt               = no
distinguished_name   = my_dist_name
x509_extensions      = my_x509_exts

[ my_dist_name ]
commonName           = SysGuides Platform Key
emailAddress         = [email protected]

[ my_x509_exts ]
keyUsage             = digitalSignature
extendedKeyUsage     = codeSigning
basicConstraints     = critical,CA:FALSE
subjectKeyIdentifier = hash
For more information on the options and extensions in the config file, see help man openssl-req and man x509v3_config.
Create an X509 certificate key pair for Platform Key (PK) using the 'PK.cfg' file. The X509 certificate must be in PEM format. I will set the validity period to 15 years.
# openssl req -x509 -sha256 -days 5490 -outform PEM \
    -config /keys/cfg/PK.cfg \
    -keyout /keys/PK.key -out /keys/PK.pem
Now, take a look at the PK public key.
# openssl x509 -text -noout -inform PEM -in /keys/PK.pem

Certificate:
 Data:
  Version: 3 (0x2)
  Serial Number:
   3d:ae:08:c7:7c:8f:7d:62:be:54:b6:7a:2f:fe:12:15:b0:54:17:07
  Signature Algorithm: sha256WithRSAEncryption
  Issuer: CN = SysGuides Platform Key, emailAddress = [email protected]
  Validity
   Not Before: Aug  6 13:59:56 2023 GMT
   Not After : Aug 17 13:59:56 2038 GMT
  Subject: CN = SysGuides Platform Key, emailAddress = [email protected]
  Subject Public Key Info:
   Public Key Algorithm: rsaEncryption
    Public-Key: (4096 bit)
    Modulus:
     00:e0:99:56:dc:1b:08:64:f3:a1:01:2b:42:4d:e7:
     60:d6:f7:5a:6d:2b:6d:15:d8:4b:16:c8:4f:08:9e:
     26:3b:14:41:21:0d:59:65:25:4f:3a:04:c8:5a:ab:
     af:0a:e7:dd:c9:d5:a8:40:ce:6e:98:e4:26:c0:7a:
     56:55:be:d0:11:a3:ec:7d:b6:ba:04:07:97:d5:eb:
     c1:22:36:62:ac:64:ab:a1:a8:84:1f:53:0d:98:c9:
     50:2e:20:4b:00:06:c2:eb:3f:07:68:38:6b:e5:65:
     76:c4:47:7e:25:27:35:81:9b:80:63:89:0e:72:87:
     11:27:ac:65:13:91:df:bd:4a:87:65:14:a3:74:97:
     df:3b:e2:13:a7:36:02:94:2e:a0:2d:ed:b8:09:2c:
     6f:72:a3:76:bb:82:2a:bb:c8:f4:ad:9a:2e:ea:2a:
     b6:4f:87:9c:b4:60:2f:41:8f:e6:f3:b9:01:a7:13:
     7d:e8:63:0a:28:f9:7e:7c:7f:16:d0:00:b4:19:eb:
     5f:33:86:51:d2:57:b8:67:84:f4:cb:23:9e:23:4d:
     32:53:13:8b:48:cf:be:6e:82:b7:30:9e:fc:3a:a6:
     42:85:eb:a3:05:6c:44:10:af:32:bb:a3:c6:b5:e8:
     f8:1f:2c:f5:49:1d:f7:e0:9c:6f:83:68:10:11:dd:
     e9:c1:ad:eb:ad:d1:3f:be:de:25:25:c5:22:62:c4:
     8f:97:03:62:f3:21:5a:54:c0:27:e0:c1:b2:59:c4:
     35:39:3f:8f:f9:16:d1:81:2a:30:19:0a:e4:19:a4:
     01:4b:76:17:9b:85:e2:0d:8a:d4:18:f5:dc:2d:b2:
     99:d6:18:ba:fb:ab:81:4f:bf:87:7e:d2:a7:d1:09:
     02:05:f3:19:89:77:a0:be:e2:ae:42:4c:d0:d6:7c:
     62:9f:bb:6b:95:b3:a9:ea:db:d2:57:f9:2f:02:3c:
     ad:61:fc:ec:2c:e6:b7:6f:0a:3e:9e:57:d7:3c:b4:
     19:23:89:ca:e4:ac:a3:1e:42:a4:e7:9d:5e:9e:cd:
     89:29:af:34:b3:62:3e:3c:eb:61:d7:17:ea:4e:48:
     8c:bd:bb:40:16:c2:a5:f2:d2:6e:6a:35:f0:fc:c7:
     ad:b5:b9:44:7c:0c:d1:fa:7a:ea:4d:9b:f0:85:26:
     ce:27:2b:2b:18:17:ab:a4:00:76:ad:4d:0c:b8:e4:
     31:51:54:18:9d:38:5f:1e:2b:35:e1:15:dd:7d:79:
     39:2f:68:0b:06:c2:85:ac:55:1a:ac:44:35:47:e5:
     4c:3a:c5:81:db:c1:b3:04:ac:67:6a:87:c5:f2:30:
     62:ae:49:c6:45:8d:20:2a:f7:20:db:bb:5c:5c:53:
     5c:99:8d
    Exponent: 65537 (0x10001)
  X509v3 extensions:
   X509v3 Key Usage:
    Digital Signature
   X509v3 Extended Key Usage:
    Code Signing
   X509v3 Basic Constraints: critical
    CA:FALSE
   X509v3 Subject Key Identifier:
    60:29:D6:51:44:02:B4:FB:4D:A3:6A:90:E1:E0:6D:B7:41:C7:6F:AA
 Signature Algorithm: sha256WithRSAEncryption
 Signature Value:
  2f:41:3b:80:03:b3:09:83:98:b0:ed:3e:91:30:ae:a5:92:a8:
  4b:6f:86:7b:23:84:65:e7:fe:80:cd:2d:4e:b8:5c:91:66:4d:
  f4:ee:22:44:15:e9:96:b5:e3:31:3d:14:c9:ec:72:8d:7d:0a:
  b0:30:5b:12:c2:37:05:87:f6:74:df:07:48:08:19:c2:73:9c:
  10:ac:0c:54:a5:fc:be:5d:b6:28:a3:87:24:d3:94:d9:5c:49:
  55:d1:bd:52:a8:56:1a:05:b5:67:99:1c:61:68:b5:94:bf:32:
  b4:4f:68:c1:03:12:e1:d2:b9:aa:98:e5:37:48:4a:06:73:4c:
  11:ae:00:31:1c:61:b4:2e:46:f0:b2:72:a5:13:ff:51:54:f6:
  fe:d2:d5:ca:e4:f2:f2:14:e0:3a:53:5d:c1:3f:db:b5:99:1d:
  13:99:65:eb:d0:75:f2:84:19:94:69:c2:a9:78:f8:03:80:1c:
  1c:7a:7e:b3:b2:15:08:14:d5:e5:45:d4:3c:a8:75:6a:3a:47:
  dd:3a:75:d9:a2:7d:9a:c3:5c:29:51:a9:96:05:a7:ea:d6:71:
  ac:4a:27:da:a7:64:bc:df:af:95:20:70:45:74:7d:ce:fb:ec:
  46:79:c7:db:f4:a2:11:fd:44:15:d6:4c:37:69:fe:8d:23:3c:
  9a:f1:e6:12:8e:46:08:ed:e7:5b:8b:7e:70:5c:be:26:47:58:
  7b:44:cd:e3:e8:9b:6f:20:fd:00:fa:0b:e3:5c:9a:fe:60:42:
  68:61:9b:5f:b6:11:6b:55:87:de:d8:0b:69:34:a7:9c:b0:18:
  7e:ec:1b:bb:b4:d9:71:76:43:c2:7b:6d:12:9d:f2:0f:84:9f:
  fc:3e:4d:63:cc:70:e8:91:a9:26:30:1e:30:97:71:e4:9b:7d:
  30:c2:9d:c2:c0:57:5e:95:c4:af:4d:7c:ae:85:de:c1:15:50:
  03:ac:43:58:7a:93:32:2c:ce:77:9a:ba:d6:ae:d8:6b:a5:04:
  0d:7e:84:80:b5:b2:dd:e7:60:29:63:24:7f:50:6c:e3:be:b6:
  f9:a1:b2:ff:ec:ee:e8:65:80:cc:22:82:1a:ec:f2:76:37:26:
  9a:58:bd:3e:94:f0:29:91:87:0b:a1:6f:a6:78:a2:f0:d4:d4:
  76:8e:11:a5:09:3e:d0:9a:13:91:49:17:0a:28:e3:72:b4:48:
  08:9c:48:b9:5f:89:f9:2c:a6:46:9b:b5:bc:00:94:6f:f2:10:
  2b:cc:d9:72:47:7e:12:93:21:ed:81:07:71:6b:64:23:46:1d:
  3b:9a:5b:46:b9:ef:43:4d:e1:51:65:76:3f:56:63:8a:d5:25:
  7b:2d:8c:69:d6:74:76:a8
4.2 X509 Certificate for Key Exchange Key
Copy and save the previously created PK.cfg file as KEK.cfg.
# cp -v /keys/cfg/{PK,KEK}.cfgThen, in KEK.cfg, change the commonName.
# sed -i 's/Platform Key/Key Exchange Key/g' /keys/cfg/KEK.cfgAnd using KEK.cfg file, generate an X509 certificate key pair for Key Exchange Key (KEK).
# openssl req -x509 -sha256 -days 5490 -outform PEM \
    -config /keys/cfg/KEK.cfg \
    -keyout /keys/KEK.key -out /keys/KEK.pem
View the KEK public key.
# openssl x509 -text -noout -inform PEM -in /keys/KEK.pem4.3 X509 Certificate for Signature Database
Repeat the same process for Signature Database (db) as well.
# cp -v /keys/cfg/{PK,db}.cfg

# sed -i 's/Platform Key/Signature Database/g' /keys/cfg/db.cfg

# openssl req -x509 -sha256 -days 5490 -outform PEM \
    -config /keys/cfg/db.cfg \
    -keyout /keys/db.key -out /keys/db.pem

# openssl x509 -text -noout -inform PEM -in /keys/db.pem
The RSA-4096 bits private and public keys for PK, KEK, and db have been created.
# ls -l /keys | grep -v ^d
total 24
-rw-------. 1 root root 3272 Aug  6 19:34 db.key
-rw-r--r--. 1 root root 1952 Aug  6 19:34 db.pem
-rw-------. 1 root root 3268 Aug  6 19:34 KEK.key
-rw-r--r--. 1 root root 1944 Aug  6 19:34 KEK.pem
-rw-------. 1 root root 3272 Aug  6 19:29 PK.key
-rw-r--r--. 1 root root 1935 Aug  6 19:29 PK.pem
5. Convert Certificates to AUTH Format
To enroll keys in Secure Boot, they must be in AUTH format. To do so, first convert your public keys (pem) to EFI Signature List (esl) format, then to EFI Signature List with an authentication header (auth) format by signing with your private key.
You must provide a unique ID in the 8-4-4-4-12 format for the EFI_CERT_X509_GUID type signature. The uuidgen command can be used to generate this.
Generate a unique ID.
# echo "$(uuidgen --random)" > /keys/guid.txt

# cat /keys/guid.txt
11658e3d-a75c-4335-83f7-7286930b76d2
Create a PK ESL file.
# cert-to-efi-sig-list -g "$(< /keys/guid.txt)" \
    /keys/PK.pem /keys/esl/PK.esl
Next, create a PK AUTH file. You must sign using the PK public and private keys for this (PK.pem and PK.key).
# sign-efi-sig-list -g "$(< /keys/guid.txt)" \
    -t "$(date +'%F %T')" \
    -c /keys/PK.pem -k /keys/PK.key \
    PK \
    /keys/esl/PK.esl /keys/auth/PK.auth
Create a KEK AUTH file in the same way. You must also sign with the PK public and private keys (PK.pem and PK.key) for this.
# cert-to-efi-sig-list -g "$(< /keys/guid.txt)" \
    /keys/KEK.pem /keys/esl/KEK.esl

# sign-efi-sig-list -g "$(< /keys/guid.txt)" \
    -t "$(date +'%F %T')" \
    -c /keys/PK.pem -k /keys/PK.key \
    KEK \
    /keys/esl/KEK.esl /keys/auth/KEK.auth
Finally, in the same way, create a db AUTH file. For this, you must sign using the KEK public and private keys (KEK.pem and KEK.key).
# cert-to-efi-sig-list -g "$(< /keys/guid.txt)" \
    /keys/db.pem /keys/esl/db.esl

# sign-efi-sig-list -g "$(< /keys/guid.txt)" \
    -t "$(date +'%F %T')" \
    -c /keys/KEK.pem -k /keys/KEK.key \
    db \
    /keys/esl/db.esl /keys/auth/db.auth
The PK, KEK, and db AUTH files have been created.
# ls -l /keys/auth/
total 12
-rw-------. 1 root root 3574 Aug  6 19:44 db.auth
-rw-------. 1 root root 3558 Aug  6 19:44 KEK.auth
-rw-------. 1 root root 3550 Aug  6 19:44 PK.auth
6. Enroll Your Keys in UEFI Secure Boot Chain
Now that you've converted your public keys to AUTH format, you must enroll them in the UEFI Secure Boot chain.
You must first enroll db.auth, then KEK.auth, and finally PK.auth.
# efi-updatevar -f /keys/auth/db.auth db
# efi-updatevar -f /keys/auth/KEK.auth KEK
# efi-updatevar -f /keys/auth/PK.auth PK
Check that all of the public keys have been successfully enrolled.
# efi-readvar
Variable PK, length 1431
PK: List 0, type X509
    Signature 0, size 1403, owner 11658e3d-a75c-4335-83f7-7286930b76d2
        Subject:
            CN=SysGuides Platform Key, [email protected]
        Issuer:
            CN=SysGuides Platform Key, [email protected]
Variable KEK, length 1439
KEK: List 0, type X509
    Signature 0, size 1411, owner 11658e3d-a75c-4335-83f7-7286930b76d2
        Subject:
            CN=SysGuides Key Exchange Key, [email protected]
        Issuer:
            CN=SysGuides Key Exchange Key, [email protected]
Variable db, length 1443
db: List 0, type X509
    Signature 0, size 1415, owner 11658e3d-a75c-4335-83f7-7286930b76d2
        Subject:
            CN=SysGuides Signature Database, [email protected]
        Issuer:
            CN=SysGuides Signature Database, [email protected]
Variable dbx has no entries
Variable MokList has no entries
You have now finished enrolling your keys. But don't restart your computer just yet. You still need to sign your boot binaries to finish the process.
7. Sign Boot Binaries
To enable Secure Boot and boot into the operating system, the bootloader and kernel must first be signed.
Find your bootloader. To find out which bootloader(s) are active on your computer, run the following command and scroll down to the bottom.
# bootctl status --no-pager
System:
      Firmware: n/a (n/a)
 Firmware Arch: x64
   Secure Boot: disabled (disabled)
  TPM2 Support: yes
  Boot into FW: supported
 ...
 ...
 Boot Loaders Listed in EFI Variables:
        Title: Fedora
           ID: 0x0003
       Status: active, boot-order
    Partition: /dev/disk/by-partuuid/864da83f-ba87-457d-9f0d-1b470c29cf6b
         File: └─/EFI/fedora/shimx64.efi
....
....
As shown in the output, the active bootloader is /boot/efi/EFI/fedora/shimx64.efi. If you are dual booting with another operating system, there may be more active bootloaders. You must sign all of them.
Find out who has already signed the shimx64.efi.
# pesign -S -i /boot/efi/EFI/fedora/shimx64.efi
---------------------------------------------
certificate address is 0x7fd480f79cc8
Content was not encrypted.
Content is detached; signature cannot be verified.
The signer's common name is Microsoft Windows UEFI Driver Publisher
No signer email address.
No signing time included.
There were certs or crls included.
---------------------------------------------
It has been signed by Microsoft. However, because the Microsoft keys have already been removed from the db (section 3), and there is no Microsoft public key to validate the bootloader signature, you cannot boot into the Fedora operating system.
As a result, you must sign the bootloader using your own private key. You can either replace the Microsoft signature with your own or just append it. I will replace it with my own.
Make a backup of the original shimx64.efi.
# cp -v /boot/efi/EFI/fedora/shimx64.efi /keys/bak/Remove the Microsoft signature. The pesign tool does not yet support in-place writing, so you must first output to a different file. I'll name the output file shimx64.efi.empty.
# pesign -r -u0 -i /boot/efi/EFI/fedora/shimx64.efi \
    -o /boot/efi/EFI/fedora/shimx64.efi.empty
Examine the shimx64.efi.empty file to ensure the Microsoft signature has been removed.
# pesign -S -i /boot/efi/EFI/fedora/shimx64.efi.empty
No signatures found.
Sign the shimx64.efi.empty file with your db private and public keys and replace the original shimx64.efi bootloader.
# sbsign /boot/efi/EFI/fedora/shimx64.efi.empty \
    --key /keys/db.key --cert /keys/db.pem \
    --output /boot/efi/EFI/fedora/shimx64.efi
warning: data remaining[811008 vs 937152]: gaps between PE/COFF sections?
Signing Unsigned original image
You will get a warning that says something like 'data remaining[811008 vs 937152]: gaps between PE/COFF sections?' I did some research, and it appears that these are harmless and can be safely ignored.
Check the shimx64.efi bootloader once more. It should now have your signature.
# pesign -S -i /boot/efi/EFI/fedora/shimx64.efi
---------------------------------------------
certificate address is 0x7fac6b580cc8
Content was not encrypted.
Content is detached; signature cannot be verified.
The signer's common name is SysGuides Signature Database
The signer's email address is [email protected]
Signing time: Sun Aug 06, 2023
There were certs or crls included.
---------------------------------------------
You can now remove the shimx64.efi.empty file.
# rm /boot/efi/EFI/fedora/shimx64.efi.emptyAs for the kernel, it will already be pre-signed by Fedora.
# pesign -S -i /boot/vmlinuz-$(uname -r)
---------------------------------------------
certificate address is 0x7f167c1bb348
Content was not encrypted.
Content is detached; signature cannot be verified.
The signer's common name is Fedora Secure Boot Signer
No signer email address.
Signing time: Fri Jul 28, 2023
There were certs or crls included.
---------------------------------------------
certificate address is 0x7f167c1bb928
Content was not encrypted.
Content is detached; signature cannot be verified.
The signer's common name is kernel-signer
No signer email address.
Signing time: Fri Jul 28, 2023
There were certs or crls included.
---------------------------------------------
When a kernel is loaded, its signature is validated against the public X509 keys in the built-in kernel system Keyring (.builtin_trusted_keys) and the third-party kernel platform Keyring (.platform).
Let's see who has keys stored in the built-in kernel system Keyring .builtin_trusted_keys.
# keyctl list %:.builtin_trusted_keys
1 key in keyring:
887633754: ---lswrv 0 0 asymmetric: Fedora kernel signing key: 3d0980de84d5707136de8549e7e9649fef5acef0
As you can see, a Fedora kernel signing key already exists. So, there is no need to sign the kernel because it is already signed by Fedora and not by any third party. If you enable Secure Boot right now and reboot, everything should work perfectly.
However, I'm going to sign this kernel anyway, just to demonstrate how to sign a kernel if you use a custom kernel or dual boot with a kernel that hasn't been signed by Fedora.
# sbsign /boot/vmlinuz-$(uname -r) \
    --key /keys/db.key --cert /keys/db.pem \
    --output /boot/vmlinuz-$(uname -r)
Image was already signed; adding additional signature
Recheck the kernel for signatures. It now includes your signature.
# pesign -S -i /boot/vmlinuz-$(uname -r)
---------------------------------------------
certificate address is 0x7f21f7bbb348
Content was not encrypted.
Content is detached; signature cannot be verified.
The signer's common name is Fedora Secure Boot Signer
No signer email address.
Signing time: Fri Jul 28, 2023
There were certs or crls included.
---------------------------------------------
certificate address is 0x7f21f7bbb928
Content was not encrypted.
Content is detached; signature cannot be verified.
The signer's common name is kernel-signer
No signer email address.
Signing time: Fri Jul 28, 2023
There were certs or crls included.
---------------------------------------------
certificate address is 0x7f21f7bbc090
Content was not encrypted.
Content is detached; signature cannot be verified.
The signer's common name is SysGuides Signature Database
The signer's email address is [email protected]
Signing time: Sun Aug 06, 2023
There were certs or crls included.
---------------------------------------------
Now that the bootloader and kernel have been signed, reboot the computer to enable Secure Boot.
# rebootAfter the reboot, confirm that secure boot is enabled on the system.
$ mokutil --sb-state
SecureBoot enabled

$ sudo bootctl status 2>&1 | grep 'Secure Boot'
   Secure Boot: enabled (user)
As you can see, Secure Boot has been enabled, and the platform is in user mode, indicating that Secure Boot is active.
Also look at the kernel platform keyring (.platform), which contains keys from third-party platform providers as well as custom public keys. It should now include your Signature Database (db) key.
$ sudo keyctl list %:.platform
1 key in keyring:
121611513: ---lswrv 0 0 asymmetric: SysGuides Signature Database: 845847f350ad5ea7f7350aedb8c834fc33440aa5
You now have a computer with a pre-boot environment secured with your own custom keys.
8. Sign Kernel Modules
Like the kernel, the kernel modules that come with Fedora have already been pre-signed by the Fedora kernel signing key.
8.1 Check If the Kernel Module Is Already Signed
Change to the super user.
$ sudo -iFollow the steps below to find out if the module has already been signed. I'll use the kvm_intel module as an example, but it could be any other kernel module that comes with the Fedora Linux distribution.
# lsmod | grep kvm
kvm_intel             454656  0
kvm                  1318912  1 kvm_intel
irqbypass              12288  1 kvm

# modinfo -F signer kvm_intel
Fedora kernel signing key
As seen in the output, the Fedora kernel signing key is used to sign the module. If there is no output, it is not signed. The kernel system Keyring (.builtin_trusted_keys) is used to validate the signature.
# keyctl list %:.builtin_trusted_keys
1 key in keyring:
270110816: ---lswrv 0 0 asymmetric: Fedora kernel signing key: 3d0980de84d5707136de8549e7e9649fef5acef0
8.2 Example 1: Sign VirtualBox Kernel Modules
When you enable UEFI Secure Boot and attempt to run the VirtualBox guest virtual machine, the following error will occur:

According to the error description, you must sign the kernel modules vboxdrv, vboxnetflt, vboxnetadp, and vboxpci.
So first, check if the vboxdrv kernel module is loaded.
# lsmod | grep vboxdrvThere is no output. This indicates that the vboxdrv kernel module is not loaded.
Now, verify if the VirtualBox kernel modules have been installed.
# find /lib/modules/$(uname -r) -type f \
    \( -name '*vboxdrv*' -o -name '*vboxnetflt*' \
    -o -name '*vboxnetadp*' -o -name '*vboxpci*' \)
/lib/modules/6.4.7-200.fc38.x86_64/misc/vboxdrv.ko
/lib/modules/6.4.7-200.fc38.x86_64/misc/vboxnetflt.ko
/lib/modules/6.4.7-200.fc38.x86_64/misc/vboxnetadp.ko
Except for vboxpci, I have all other modules installed. My setup probably doesn't require it, but it could have been installed on yours.
The syntax for signing the kernel module is as follows:
/usr/src/kernels/$(uname -r)/scripts/sign-file \
  sha256 \
  your_db_private_key \
  your_db_public_key \
  kernel_module
Sign all kernel modules using your db keys.
# /usr/src/kernels/$(uname -r)/scripts/sign-file \
    sha256 \
    /keys/db.key \
    /keys/db.pem \
    /lib/modules/$(uname -r)/misc/vboxdrv.ko

# /usr/src/kernels/$(uname -r)/scripts/sign-file \
    sha256 \
    /keys/db.key \
    /keys/db.pem \
    /lib/modules/$(uname -r)/misc/vboxnetflt.ko

# /usr/src/kernels/$(uname -r)/scripts/sign-file \
    sha256 \
    /keys/db.key \
    /keys/db.pem \
    /lib/modules/$(uname -r)/misc/vboxnetadp.ko
Verify that the modules have been signed.
# modinfo -F signer /lib/modules/$(uname -r)/misc/vboxdrv.ko
SysGuides Signature Database

# modinfo -F signer /lib/modules/$(uname -r)/misc/vboxnetflt.ko
SysGuides Signature Database

# modinfo -F signer /lib/modules/$(uname -r)/misc/vboxnetadp.ko
SysGuides Signature Database
Reboot or manually load the kernel modules.
# modprobe vboxdrv
# modprobe vboxnetflt
# modprobe vboxnetadp
Verify that the VirtualBox kernel modules have been loaded properly.
# lsmod | grep vbox
vboxnetadp             28672  0
vboxnetflt             40960  0
vboxdrv               651264  2 vboxnetadp,vboxnetflt
You can now run guest virtual machines in VirtualBox without any issues.
8.3 Example 2: Sign Nvidia Kernel Modules
If you have Nvidia drivers installed, you will most likely be unable to boot into the graphical user interface. If this occurs, switch to text-based TTY by pressing <Ctrl>+<Alt>+<F3>. Once the Nvidia Kernel modules have been properly signed, you can boot to the GUI.
Signing the Nvidia kernel modules is similar to signing the VirtualBox kernel modules. The only difference between the two is that Nvidia modules are compressed. You must first uncompress them, sign the modules, and then compress them back.
So, first, find the location of the kernel modules.
# find /lib/modules/$(uname -r) -type f -name 'nvidia*'
/lib/modules/6.4.7-200.fc38.x86_64/extra/nvidia-uvm.ko.xz
/lib/modules/6.4.7-200.fc38.x86_64/extra/nvidia.ko.xz
I'm running commands on a computer that has an old Nvidia card. If you are using a new Nvidia card, you may get the results differently. Notice that Nvidia kernel modules, unlike VirtualBox kernel modules, are compressed. The modules cannot be signed when they are compressed.
So, first, uncompress them.
# cd /lib/modules/$(uname -r)/extra

# unxz nvidia.ko.xz nvidia-uvm.ko.xz

# ls
nvidia.ko  nvidia-uvm.ko
Check if they have already been signed.
# modinfo -F signer nvidia.ko
# modinfo -F signer nvidia-uvm.ko
No output. So they have not been signed. Now go ahead and sign them with your keys.
# /usr/src/kernels/$(uname -r)/scripts/sign-file \
    sha256 \
    /keys/db.key \
    /keys/db.pem \
    nvidia.ko

# /usr/src/kernels/$(uname -r)/scripts/sign-file \
    sha256 \
    /keys/db.key \
    /keys/db.pem \
    nvidia-uvm.ko
Verify the modules have been signed.
# modinfo -F signer nvidia.ko
SysGuides Signature Database

# modinfo -F signer nvidia-uvm.ko
SysGuides Signature Database
And compress them back.
# xz nvidia.ko nvidia-uvm.ko

# ls
nvidia.ko.xz  nvidia-uvm.ko.xz
You may now reboot the computer to the GUI without any issues. After restarting, check the status of the modules.
# lsmod | grep nvidia
nvidia              10612736  55
drm                   630784  4 nvidia
8.4 Remove the Signature from the Kernel Module
To remove the existing signature from the kernel module, use the strip command-line tool. For instance, if you wish to remove the signature from the vboxdrv.ko kernel module that you previously signed, use the following command.
# strip -g /lib/modules/$(uname -r)/misc/vboxdrv.koConfirm if the signature has been removed.
# modinfo -F signer /lib/modules/$(uname -r)/misc/vboxdrv.koNo output, which means the signature is removed from the module.
9. Add Microsoft Keys to UEFI Secure Boot
If you want to dual boot into Microsoft Windows or simply use Microsoft-signed products, you should add the Microsoft keys to the UEFI Secure Boot as well.
The Microsoft KEK and db keys can be downloaded from this link: 'Keys Required for Secure Boot on All PCs'.
9.1 Microsoft Key Exchange Key (KEK)
The following two Microsoft KEK certificates are required to enable the revocation of bad images by updating the dbx, as well as possibly updating the db to prepare for newer Windows-signed images.
Get the Microsoft Corporation KEK CA 2011 certificate. The certificate will be in the DER format.
# curl -L https://go.microsoft.com/fwlink/p/?linkid=321185 \
    -o /keys/ms/MicCorKEKCA2011_2011-06-24.der
Get the Microsoft Corporation KEK 2K CA 2023 certificate.
# curl -L https://go.microsoft.com/fwlink/p/?linkid=2239775 \
    -o /keys/ms/microsoft_corporation_kek_2k_ca_2023.crt
The Microsoft Corporation KEK 2K CA 2023 certificate is base64 encoded. You must first convert it. Thanks to Sean for showing me how to convert. The command is as follows:
# openssl enc -d -in /keys/ms/microsoft_corporation_kek_2k_ca_2023.crt \
    -out /keys/ms/microsoft_corporation_kek_2k_ca_2023.b64

# openssl x509 -in /keys/ms/microsoft_corporation_kek_2k_ca_2023.b64 \
    -outform DER -out /keys/ms/microsoft_corporation_kek_2k_ca_2023.der
Once you have both DER certificates, generate EFI Signature List (ESL) files from Microsoft certificates using the Microsoft GUID 77fa9abd-0359-4d32-bd60-28f4e78f784b.
# sbsiglist --type x509 \
    --owner "77fa9abd-0359-4d32-bd60-28f4e78f784b" \
    /keys/ms/MicCorKEKCA2011_2011-06-24.der \
    --output /keys/esl/MicCorKEKCA2011_2011-06-24.esl

# sbsiglist --type x509 \
    --owner "77fa9abd-0359-4d32-bd60-28f4e78f784b" \
    /keys/ms/microsoft_corporation_kek_2k_ca_2023.der \
    --output /keys/esl/microsoft_corporation_kek_2k_ca_2023.esl
Combine the two ESL keys into one.
# cat /keys/esl/{MicCorKEKCA2011_2011-06-24,microsoft_corporation_kek_2k_ca_2023}.esl \
    > /keys/esl/KEK_MS.esl
Create the Microsoft KEK AUTH file from the KEK_MS.esl file by signing it with your PK private and public keys. You must add the append option '-a' since we are appending Microsoft KEK keys rather than replacing existing ones.
# sign-efi-sig-list -a -g "77fa9abd-0359-4d32-bd60-28f4e78f784b" \
    -t "$(date +'%F %T')" \
    -k /keys/PK.key -c /keys/PK.pem \
    KEK \
    /keys/esl/KEK_MS.esl \
    /keys/auth/KEK_MS.auth
9.2 Microsoft Signature Database (db)
Microsoft also provides two X509 certificates for the Signature Database (db). One is required to allow the Windows OS Loader to load, while the other is required to allow UEFI drivers and applications from third-party vendors.
Get the Microsoft Windows Production PCA 2011 certificate. The certificate will be in the DER format.
# curl -L https://go.microsoft.com/fwlink/p/?linkid=321192 \
    -o /keys/ms/MicWinProPCA2011_2011-10-19.der
Download the Microsoft Windows UEFI CA 2023 certificate for third-party vendors.
# curl -L https://go.microsoft.com/fwlink/?linkid=2239776 \
    -o /keys/ms/windows_uefi_ca_2023.crt
The Microsoft Windows UEFI CA 2023 certificate is also base64 encoded. You must also convert it first. The command is as follows:
# openssl enc -d -in /keys/ms/windows_uefi_ca_2023.crt \
    -out /keys/ms/windows_uefi_ca_2023.b64

# openssl x509 -in /keys/ms/windows_uefi_ca_2023.b64 \
    -outform DER -out /keys/ms/windows_uefi_ca_2023.der
Using the Microsoft GUID 77fa9abd-0359-4d32-bd60-28f4e78f784b, generate EFI Signature List (ESL) files from Microsoft certificates.
# sbsiglist --type x509 \
    --owner "77fa9abd-0359-4d32-bd60-28f4e78f784b" \
    /keys/ms/MicWinProPCA2011_2011-10-19.der \
    --output /keys/esl/MicWinProPCA2011_2011-10-19.esl

# sbsiglist --type x509 \
    --owner "77fa9abd-0359-4d32-bd60-28f4e78f784b" \
    /keys/ms/windows_uefi_ca_2023.der \
    --output /keys/esl/windows_uefi_ca_2023.esl
Combine the two ESL keys into one.
# cat /keys/esl/{MicWinProPCA2011_2011-10-19,windows_uefi_ca_2023}.esl \
    > /keys/esl/db_MS.esl
Create the Microsoft db AUTH file from the db_MS.esl file by signing it with your KEK private and public keys. You must include the append option '-a' because we are appending db keys rather than replacing them.
# sign-efi-sig-list -a -g "77fa9abd-0359-4d32-bd60-28f4e78f784b" \
    -t "$(date +'%F %T')" \
    -k /keys/KEK.key -c /keys/KEK.pem \
    db \
    /keys/esl/db_MS.esl \
    /keys/auth/db_MS.auth
9.3 Microsoft Forbidden Signature Database (dbx)
You must also include Microsoft's Forbidden Signature Database (dbx). The database contains a number of certificates, keys, and hashes that are used to identify bad images.
Get the most recent UEFI Revocation List File. I will download the one that is compatible with the x64 (64-bit) processor architecture. The downloads are available on the 'UEFI REVOCATION LIST FILE' page.
# curl -L https://uefi.org/sites/default/files/resources/x64_DBXUpdate.bin \
    -o /keys/ms/x64_DBXUpdate.bin
9.4 Enroll Microsoft Keys and Hashes in the UEFI Secure Boot
Remove the immutable attribute of PK, KEK, and db from the efivars before adding Microsoft KEK, db, and dbx to Secure Boot.
# chattr -i /sys/firmware/efi/efivars/{PK,KEK,db}-*Remove the Platform Key (PK) to temporarily disable Secure Boot so that you can append the Microsoft KEK, db, and dbx keys to the UEFI firmware.
# efi-updatevar -d 0 -k /keys/PK.key PKEnroll Microsoft KEK, db, and dbx keys/hashes in the UEFI Secure Boot chain. You must first enroll x64_DBXUpdate.bin, then db_MS.auth, followed by KEK_MS.auth.
# efi-updatevar -f /keys/ms/x64_DBXUpdate.bin dbx
# efi-updatevar -a -f /keys/auth/db_MS.auth db
# efi-updatevar -a -f /keys/auth/KEK_MS.auth KEK
Finally, re-enroll your Platform Key (PK) in the Secure Boot chain.
# efi-updatevar -f /keys/auth/PK.auth PKSet the efivar's immutable attribute back.
# chattr +i /sys/firmware/efi/efivars/{PK,KEK,db,dbx}-*

# lsattr /sys/firmware/efi/efivars/{PK,KEK,db,dbx}-*
----i----------------- /sys/firmware/efi/efivars/PK-8be4df61-93ca-11d2-aa0d-00e098032b8c
----i----------------- /sys/firmware/efi/efivars/KEK-8be4df61-93ca-11d2-aa0d-00e098032b8c
----i----------------- /sys/firmware/efi/efivars/db-d719b2cb-3d3a-4596-a3bc-dad00e67656f
----i----------------- /sys/firmware/efi/efivars/dbx-d719b2cb-3d3a-4596-a3bc-dad00e67656f
Now, take a look at all of the EFI variables in the Secure Boot chain.
# efi-readvar -v PK
Variable PK, length 1431
PK: List 0, type X509
 Signature 0, size 1403, owner 11658e3d-a75c-4335-83f7-7286930b76d2
  Subject:
   CN=SysGuides Platform Key, [email protected]
  Issuer:
   CN=SysGuides Platform Key, [email protected]

# efi-readvar -v KEK
Variable KEK, length 4505
KEK: List 0, type X509
 Signature 0, size 1411, owner 11658e3d-a75c-4335-83f7-7286930b76d2
  Subject:
   CN=SysGuides Key Exchange Key, [email protected]
  Issuer:
   CN=SysGuides Key Exchange Key, [email protected]
KEK: List 1, type X509
 Signature 0, size 1532, owner 77fa9abd-0359-4d32-bd60-28f4e78f784b
  Subject:
   C=US, ST=Washington, L=Redmond, O=Microsoft Corporation, CN=Microsoft Corporation KEK CA 2011
  Issuer:
   C=US, ST=Washington, L=Redmond, O=Microsoft Corporation, CN=Microsoft Corporation Third Party Marketplace Root
KEK: List 2, type X509
 Signature 0, size 1478, owner 77fa9abd-0359-4d32-bd60-28f4e78f784b
  Subject:
   C=US, O=Microsoft Corporation, CN=Microsoft Corporation KEK 2K CA 2023
  Issuer:
   C=US, O=Microsoft Corporation, CN=Microsoft RSA Devices Root CA 2021

# efi-readvar -v db
Variable db, length 4484
db: List 0, type X509
 Signature 0, size 1415, owner 11658e3d-a75c-4335-83f7-7286930b76d2
  Subject:
   CN=SysGuides Signature Database, [email protected]
  Issuer:
   CN=SysGuides Signature Database, [email protected]
db: List 1, type X509
 Signature 0, size 1515, owner 77fa9abd-0359-4d32-bd60-28f4e78f784b
  Subject:
   C=US, ST=Washington, L=Redmond, O=Microsoft Corporation, CN=Microsoft Windows Production PCA 2011
  Issuer:
   C=US, ST=Washington, L=Redmond, O=Microsoft Corporation, CN=Microsoft Root Certificate Authority 2010
db: List 2, type X509
 Signature 0, size 1470, owner 77fa9abd-0359-4d32-bd60-28f4e78f784b
  Subject:
   C=US, O=Microsoft Corporation, CN=Windows UEFI CA 2023
  Issuer:
   C=US, ST=Washington, L=Redmond, O=Microsoft Corporation, CN=Microsoft Root Certificate Authority 2010

# efi-readvar -v dbx
Variable dbx, length 17836
dbx: List 0, type SHA256
 Signature 0, size 48, owner 77fa9abd-0359-4d32-bd60-28f4e78f784b
  Hash:80b4d96931bf0d02fd91a61e19d14f1da452e66db2408ca8604d411f92659f0a
 Signature 1, size 48, owner 77fa9abd-0359-4d32-bd60-28f4e78f784b
  Hash:f52f83a3fa9cfbd6920f722824dbe4034534d25b8507246b3b957dac6e1bce7a
 Signature 2, size 48, owner 77fa9abd-0359-4d32-bd60-28f4e78f784b
  Hash:c5d9d8a186e2c82d09afaa2a6f7f2e73870d3e64f72c4e08ef67796a840f0fbd
 Signature 3, size 48, owner 77fa9abd-0359-4d32-bd60-28f4e78f784b
  Hash:1aec84b84b6c65a51220a9be7181965230210d62d6d33c48999c6b295a2b0a06
 Signature 4, size 48, owner 77fa9abd-0359-4d32-bd60-28f4e78f784b
  Hash:c3a99a460da464a057c3586d83cef5f4ae08b7103979ed8932742df0ed530c66
 Signature 5, size 48, owner 77fa9abd-0359-4d32-bd60-28f4e78f784b
  Hash:58fb941aef95a25943b3fb5f2510a0df3fe44c58c95e0ab80487297568ab9771
....
....
Reboot your computer.
# rebootAfter the reboot, examine the kernel platform keyring (.platform). This keyring contains keys from third-party platform providers as well as custom public keys. It should now include both the Microsoft and your custom Signature Database (db) keys.
$ sudo keyctl list %:.platform
3 keys in keyring:
930205328: ---lswrv 0 0 asymmetric: SysGuides Signature Database: 845847f350ad5ea7f7350aedb8c834fc33440aa5
687539015: ---lswrv 0 0 asymmetric: Microsoft Corporation: Windows UEFI CA 2023: aefc5fbbbe055d8f8daa585473499417ab5a5272
132804630: ---lswrv 0 0 asymmetric: Microsoft Windows Production PCA 2011: a92902398e16c49778cd90f99e4f9ae17c55af53
The Microsoft KEK, db, and dbx (revocation list) have been added. You can now use any Microsoft product on your computer.
10. Add OEM Key to UEFI Secure Boot (If Any)
If your computer came with an OEM KEK or db key, you may need to enroll it as well, as it may be needed for system restoration or OTA updates.
As an example, in this section, I'll re-enroll the Red Hat KEK key that I previously backed up. Because KVM is a Red Hat product, it is obviously an OEM. If you look at your actual computer, your hardware OEM may have also enrolled a KEK or db key.
The ESL that I had backed up from the original KEK is KEK-original.esl.
Change to super user.
$ sudo -iExtract the certificates from the /keys/bak/KEK-original.esl file. The certificates extracted will be in DER format.
# sig-list-to-certs /keys/bak/KEK-original.esl /keys/oem/KEK
X509 Header sls=976, header=0, sig=932
file /keys/oem/KEK-0.der: Guid a0baa8a3-041d-48a8-bc87-c36d121b5e3d
Written 932 bytes
X509 Header sls=1560, header=0, sig=1516
file /keys/oem/KEK-1.der: Guid 77fa9abd-0359-4d32-bd60-28f4e78f784b
Written 1516 bytes
In total, two certificates in DER format were extracted. Based on the GUID, you can conclude that KEK-1.der is from Microsoft. The certificate of interest is KEK-0.der, so let's find out who owns it.
# openssl x509 -noout -subject -dates -inform DER -in /keys/oem/KEK-0.der
subject=CN = Red Hat Secure Boot (PK/KEK key 1), emailAddress = [email protected]
notBefore=Oct 31 11:15:37 2014 GMT
notAfter=Oct 25 11:15:37 2037 GMT
The certificate, as shown, belongs to Red Hat and is valid until October 25, 2037.
So I'll add this certificate to my Key Exchange Key (KEK). I will first convert it to ESL format using Red Hat's GUID a0baa8a3-041d-48a8-bc87-c36d121b5e3d. Then to AUTH format, using the same GUID and signing with my PK keys. When signing into the AUTH format, make sure to include the append (-a) option.
# sbsiglist --type x509 \
    --owner "a0baa8a3-041d-48a8-bc87-c36d121b5e3d" \
    /keys/oem/KEK-0.der \
    --output /keys/esl/KEK_RH.esl

# sign-efi-sig-list -a -g "a0baa8a3-041d-48a8-bc87-c36d121b5e3d" \
    -t "$(date +'%F %T')" \
    -k /keys/PK.key -c /keys/PK.pem \
    KEK \
    /keys/esl/KEK_RH.esl \
    /keys/auth/KEK_RH.auth
Append the Red Hat key to the Key Exchange Key.
# chattr -i /sys/firmware/efi/efivars/KEK-*
# efi-updatevar -a -f /keys/auth/KEK_RH.auth KEK
# chattr +i /sys/firmware/efi/efivars/KEK-*
Now check if the Red Hat key has been added to the Key Exchange Key.
# efi-readvar -v KEK
Variable KEK, length 5481
KEK: List 0, type X509
 Signature 0, size 1411, owner 11658e3d-a75c-4335-83f7-7286930b76d2
  Subject:
   CN=SysGuides Key Exchange Key, [email protected]
  Issuer:
   CN=SysGuides Key Exchange Key, [email protected]
KEK: List 1, type X509
 Signature 0, size 1532, owner 77fa9abd-0359-4d32-bd60-28f4e78f784b
  Subject:
   C=US, ST=Washington, L=Redmond, O=Microsoft Corporation, CN=Microsoft Corporation KEK CA 2011
  Issuer:
   C=US, ST=Washington, L=Redmond, O=Microsoft Corporation, CN=Microsoft Corporation Third Party Marketplace Root
KEK: List 2, type X509
 Signature 0, size 1478, owner 77fa9abd-0359-4d32-bd60-28f4e78f784b
  Subject:
   C=US, O=Microsoft Corporation, CN=Microsoft Corporation KEK 2K CA 2023
  Issuer:
   C=US, O=Microsoft Corporation, CN=Microsoft RSA Devices Root CA 2021
KEK: List 3, type X509
 Signature 0, size 948, owner a0baa8a3-041d-48a8-bc87-c36d121b5e3d
  Subject:
   CN=Red Hat Secure Boot (PK/KEK key 1), [email protected]
  Issuer:
   CN=Red Hat Secure Boot (PK/KEK key 1), [email protected]
Enabling Fedora UEFI Secure Boot with your custom keys and self-signed bootloader, kernel, and modules is now complete.
11. Conclusion
Congratulations, you've finished securing your pre-boot environment by enabling Fedora UEFI Secure Boot with custom keys. Although the process has been laborious and time-consuming, having full control over the secure boot of your computer is well worth the effort. Don't forget to password protect your computer's UEFI firmware. Anybody who gets access to your unprotected firmware can easily reset your custom keys and take control of your computer.