How to Install Fedora 37 with Snapper and Grub-Btrfs for Full System Rollback

Install Fedora 37 with Snapper and Grub-Btrfs - Feature Image

In this blog, I will show you how to install Fedora 37 with snapper and grub-btrfs packages, allowing you to take snapshots of the / and /home subvolume as well as perform a full system rollback on the / volume if something goes wrong.

Fedora 37 includes the latest GNOME 43 desktop, which seeks to improve the user experience. Apart from some package upgrades and downgrades, not much has changed under the hood compared to Fedora 36.

Just like the RPM database was relocated to /usr (/usr/lib/sysimage/rpm) in Fedora 36, I anticipated the DNF database to be relocated to /usr in Fedora 37. But, sadly, this did not happen. It is still held back in /var/lib/dnf. The good news is that this will happen in Fedora 38 with the new DNF5 package manager.

If both databases were in /usr, you could have completely excluded the /var directory from the rollback regime. The /usr could then be rolled back as a unit and there would be no mismatch in the database regarding packages. This would prevent any failed or undesired changes to the operating system.

So, to avoid package mismatches between the two databases, I need to keep the /var directory in the rollback regime. I will, however, exclude the /var/log directory so that log data are not lost during rollbacks. You may add more directories if you wish.

If you prefer to install Fedora 37 with LUKS Full Disk Encryption and Full System Rollback feature, please visit my other article ‘How to Install Fedora 37 with LUKS Full Disk Encryption, Snapper, and Grub-Btrfs for Full System Rollback

So let’s get started.

Table of Contents

1. Disk Layout for Fedora 37

I’ll be using a 100 GiB hard disk, and this is how the disk partition looks. No separate swap partition is needed because Fedora automatically generates a SwapOnZRAM on boot.

NAME         SIZE  FSTYPE LABEL   MOUNTPOINT
/dev/vda     100G              
├─/dev/vda1  512M  vfat   EFI     /boot/efi
└─/dev/vda2 99.5G  btrfs  FEDORA  /

These are the subvolumes that will be created from the btrfs volume (/dev/vda2).

NAME               MOUNTPOINT          TYPE
[main]             /                   mainvolume
home               /home               subvolume 
var/log            /var/log            subvolume
.snapshots         /.snapshots         subvolume
home/.snapshots    /home/.snapshots    subvolume

Below are the directories for which subvolumes are created and the reasons for doing so.

/home

Contains user data. It is created to keep user data separate and also to avoid loss of user data on / volume rollbacks.

/var/log

Contains log files. It is created to avoid the loss of log data during rollbacks.

/.snapshots

Contains snapshots of / volume. Allows you to undo any changes or completely roll back a snapshot from the GRUB menu.

/home/.snapshots

Contains snapshots of /home subvolume. Allows you to undo any changes in the /home directory. No rollbacks from the GRUB menu on the /home directory.

Depending on your needs, you may also want to create some additional subvolumes. For example, /opt, /var/www, /var/lib/libvirt/images, and so on.

2. Install Fedora 37 Workstation

Boot your system using the Fedora 37 Workstation installer in UEFI mode. On the welcome screen, select the Install to Hard Drive option. Next, select your LanguageKeyboard, and configure Time & Date. Following that, from the INSTALLATION SUMMARY screen, select Installation Destination.

You should now be on the INSTALLATION DESTINATION screen. To proceed, pick the Advanced Custom (Blivet-GUI) radio button and then hit the Done button.
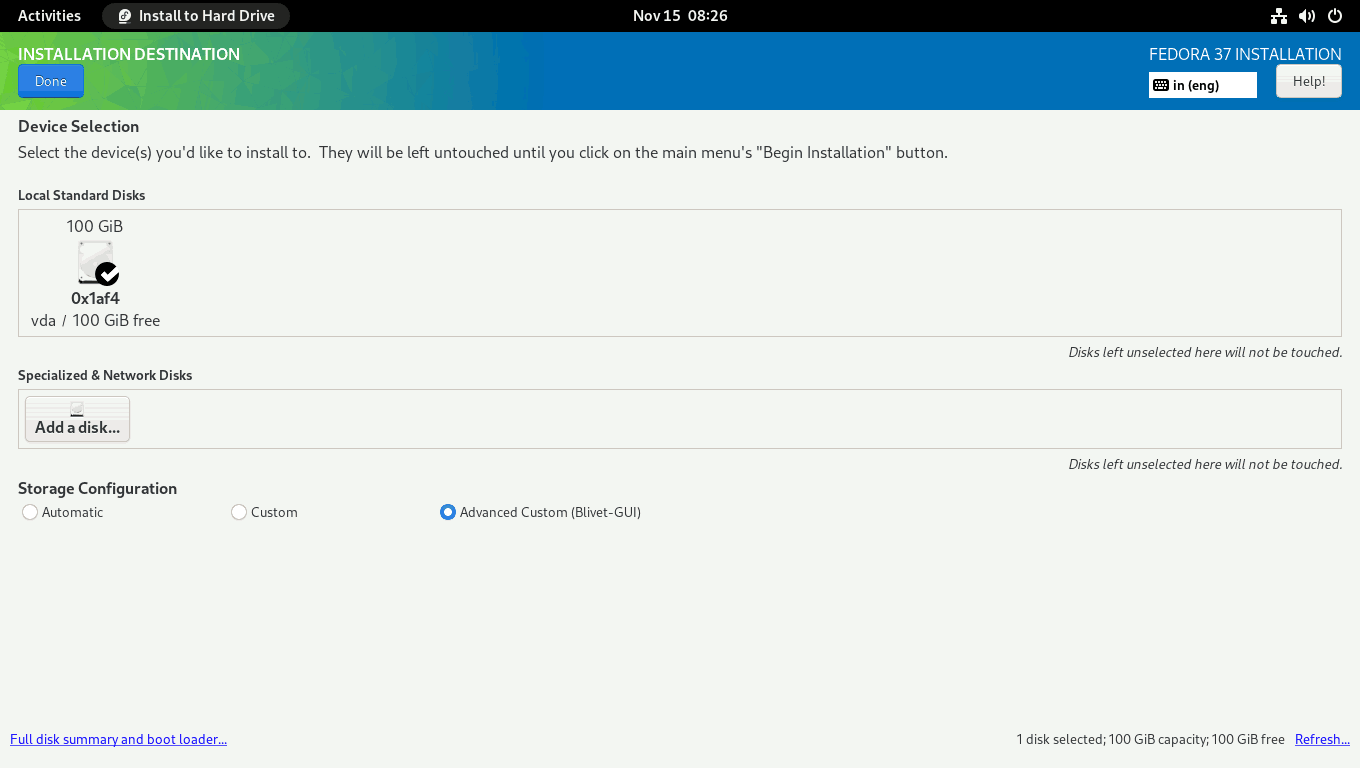
Install Fedora 37 with Snapper and Grub-Btrfs Blivet

On the BLIVET GUI PARTITIONING screen, create the partitions, file systems, and btrfs subvolumes necessary to install Fedora 37 Workstation.

First, you need to create and mount the EFI partition. Select the free space and click the + sign to create a partition.
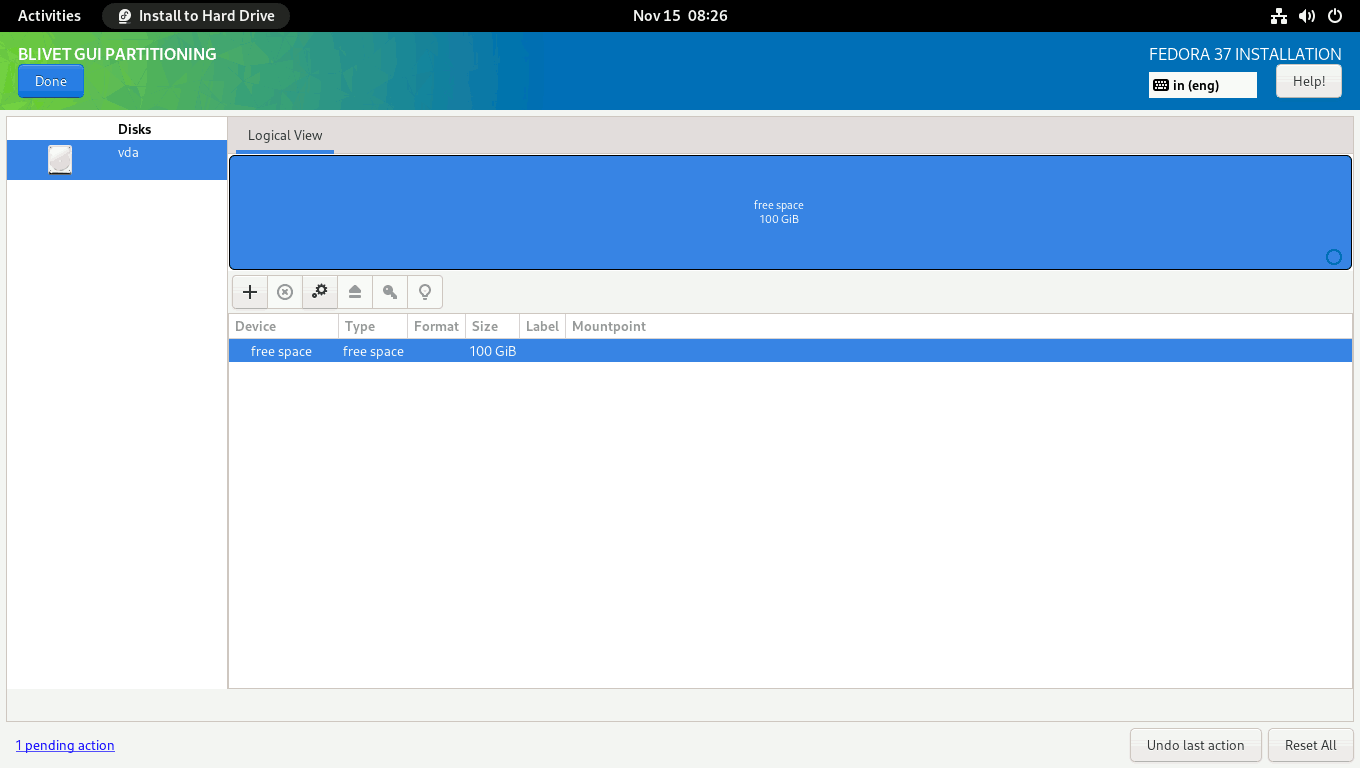
Install Fedora 37 with Snapper and Grub-Btrfs Blivet Partition

Set the partition Size to 512 MiB, the Filesystem to EFI System Partition, and the Mountpoint to /boot/efi.
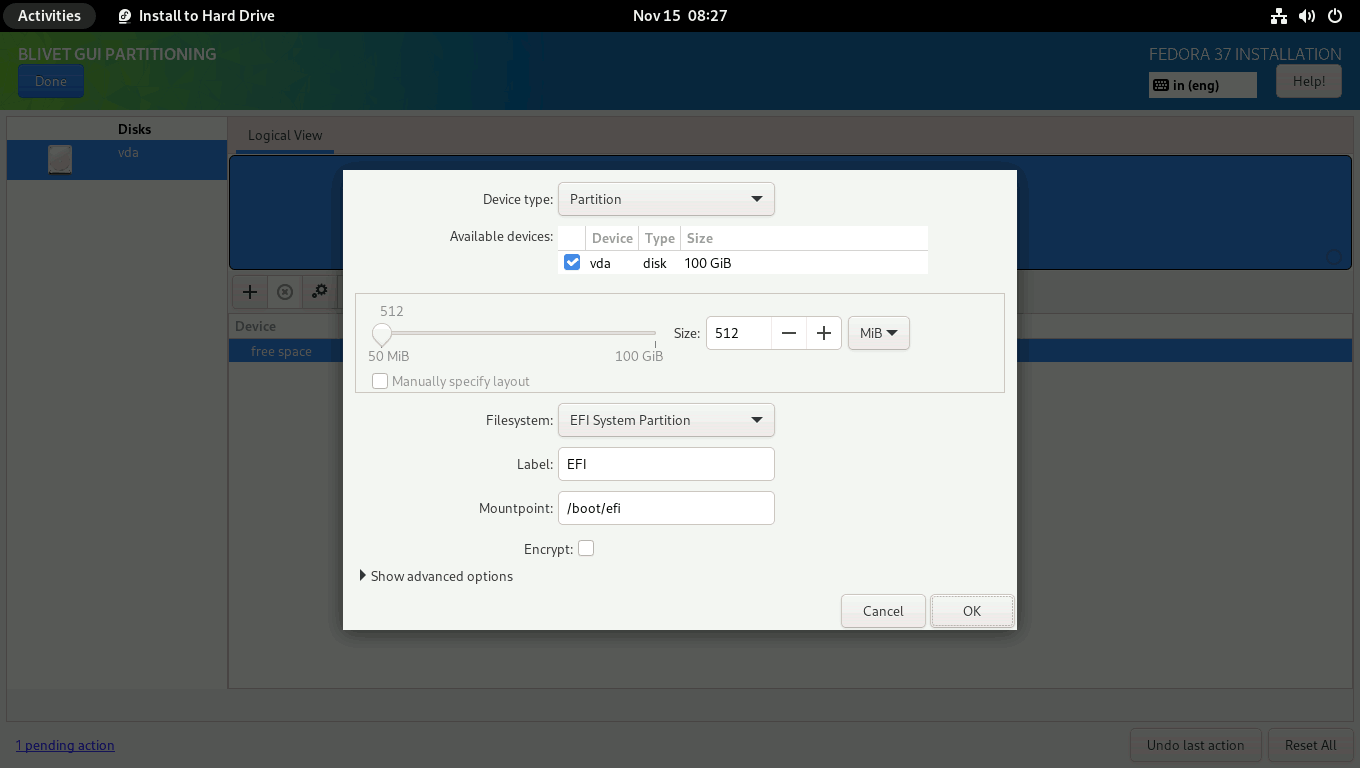
Install Fedora 37 with Snapper and Grub-Btrfs Blivet EFI

Then, you need to create a btrfs volume where you can create all the subvolumes needed to install Fedora 37 Workstation.

Select the free space again and click on the + sign to create a Btrfs volume. Set the Filesystem to btrfs and the Mountpoint to /. I used the entire remaining space. However, you can specify the size you want for the btrfs volume.
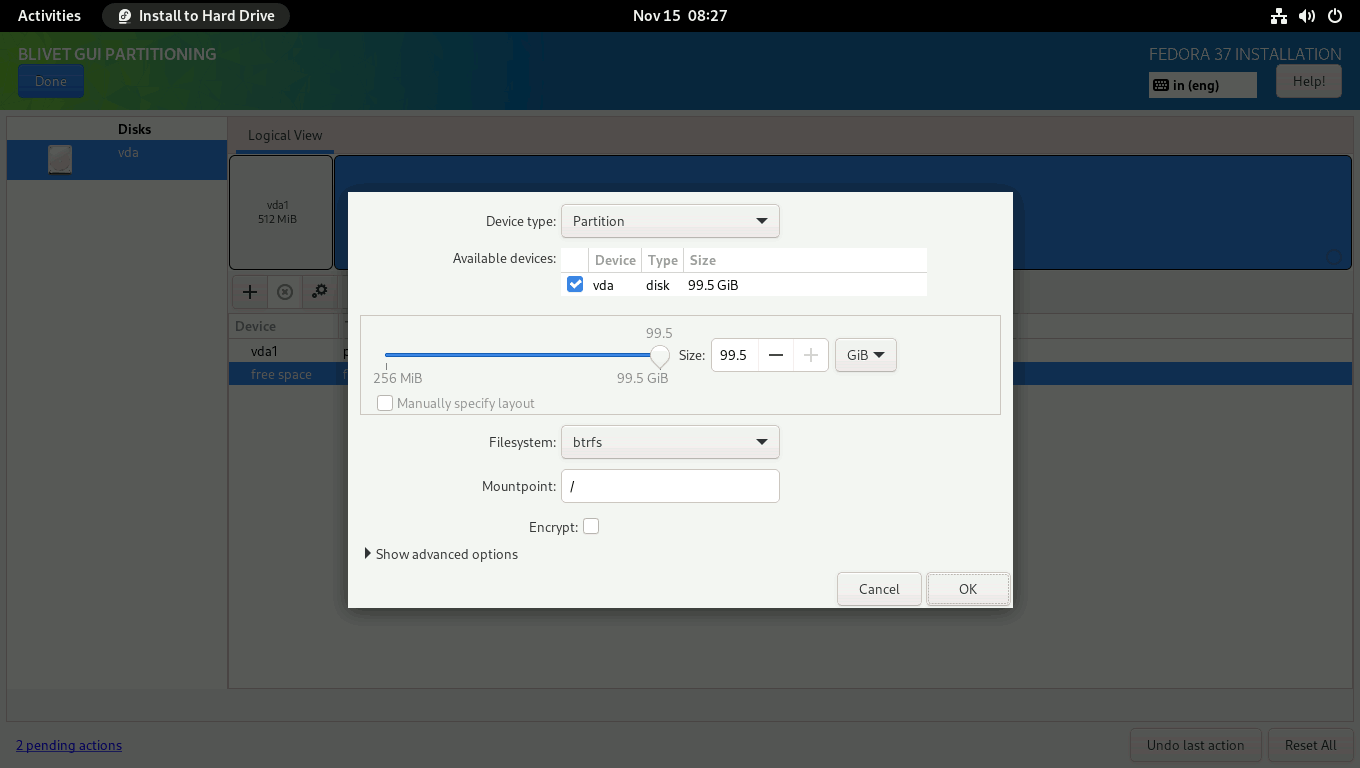
Install Fedora 37 with Snapper and Grub-Btrfs Blivet BTRFS

Next, you must create a home subvolume. (1) Select the Btrfs Volume from the left panel, and (2) click on the + sign on the right panel.
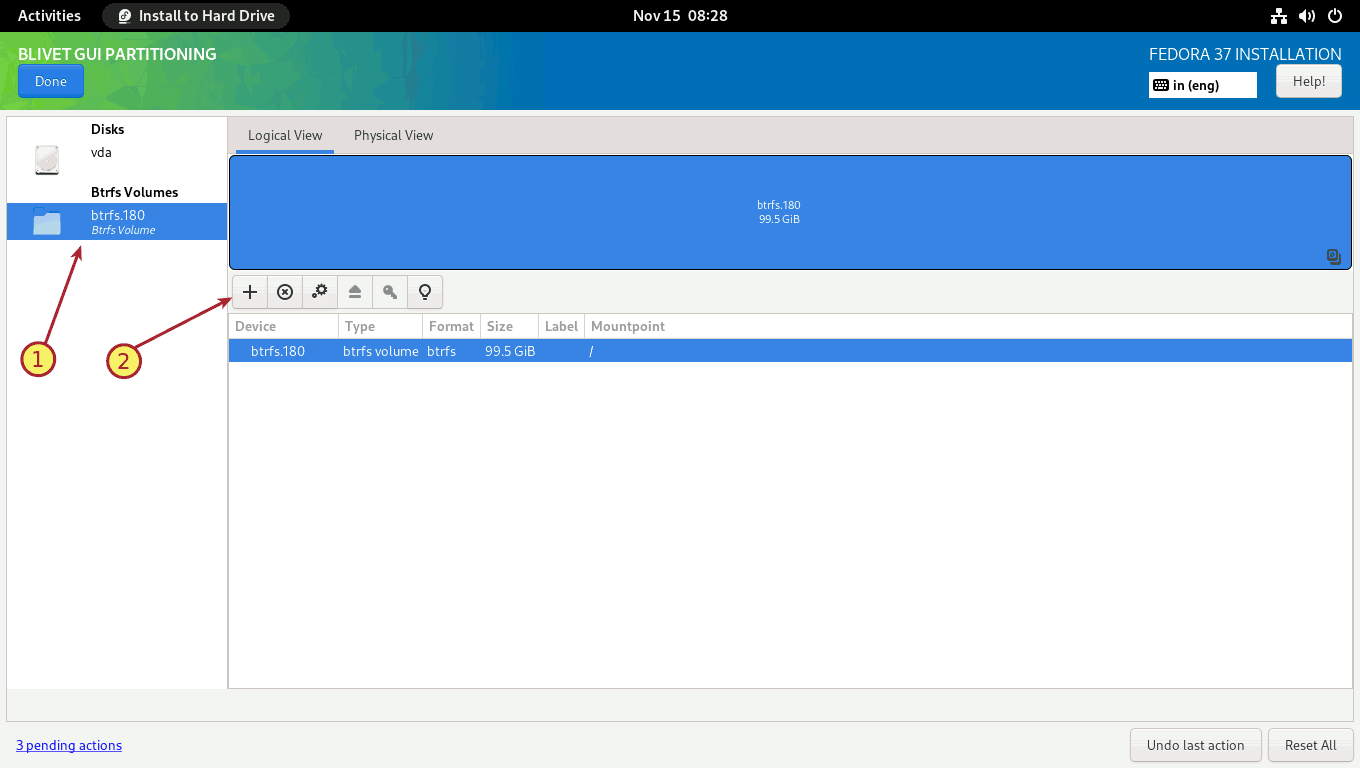
Install Fedora 37 with Snapper and Grub-Btrfs Blivet Subvolume

Create a home subvolume. Enter the Name as home and Mountpoint as /home. Click OK to finish.
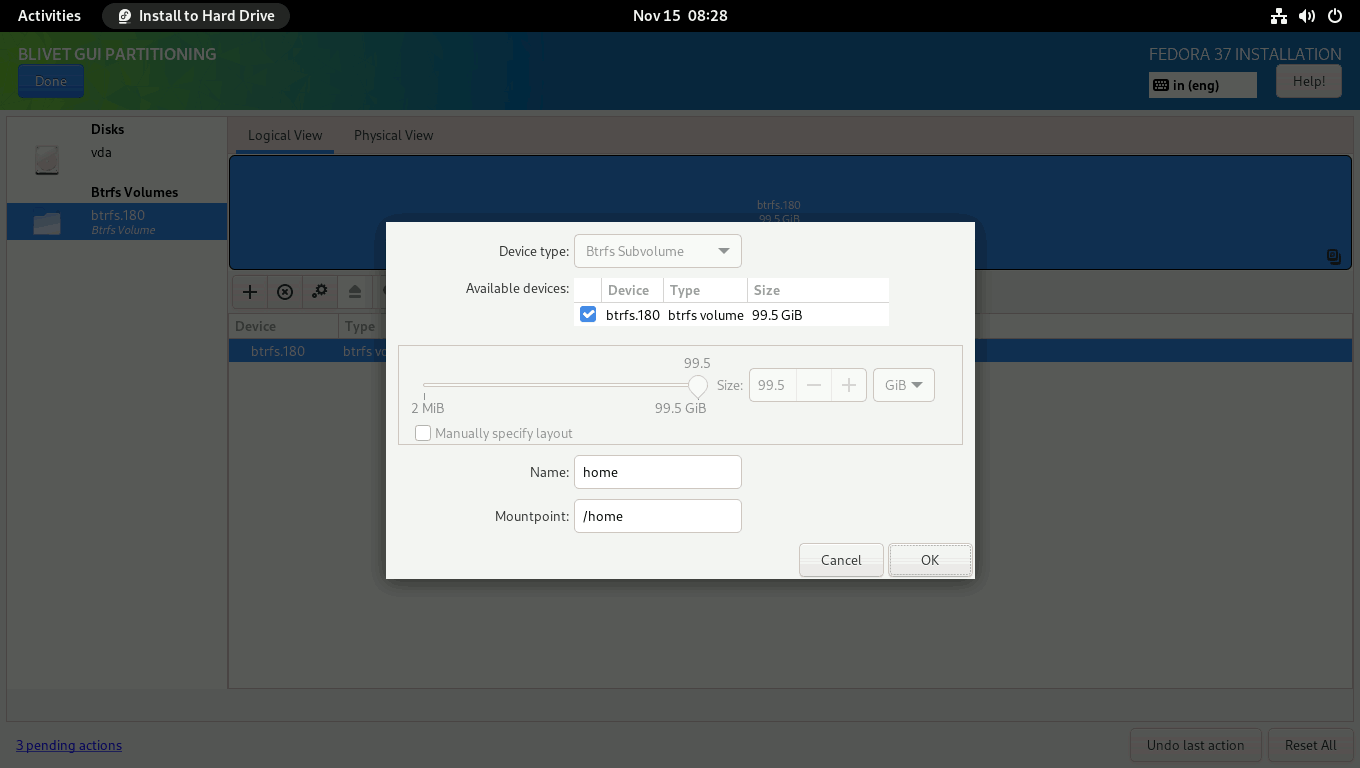
Install Fedora 37 with Snapper and Grub-Btrfs Blivet Home

I will create the remaining subvolumes when the installation is finished. This is because the Anaconda installer does not allow you to create subvolumes with slashes (/) in their names, such as var/log.

For now, click Done to finish creating subvolumes.

On the SUMMARY OF CHANGES screen, double-check that everything is properly defined. To finalize the changes, click the Accept Changes button.

Install Fedora 37 with Snapper and Grub-Btrfs Summary

You will be returned to the INSTALLATION SUMMARY screen. Press the Begin Installation button to start the installation process. The installation process will start. Just sit back and relax.

Install Fedora 37 with Snapper and Grub-Btrfs Installation

When the installation is finished, click the Finish installation button and restart the system.

The last phase of the installation procedure will start. Click the Start Setup button to complete the remaining customization steps, such as setting a new login, password, and so on.

You will then be logged into the Fedora 37 Workstation with the all-new Gnome 43 desktop interface.
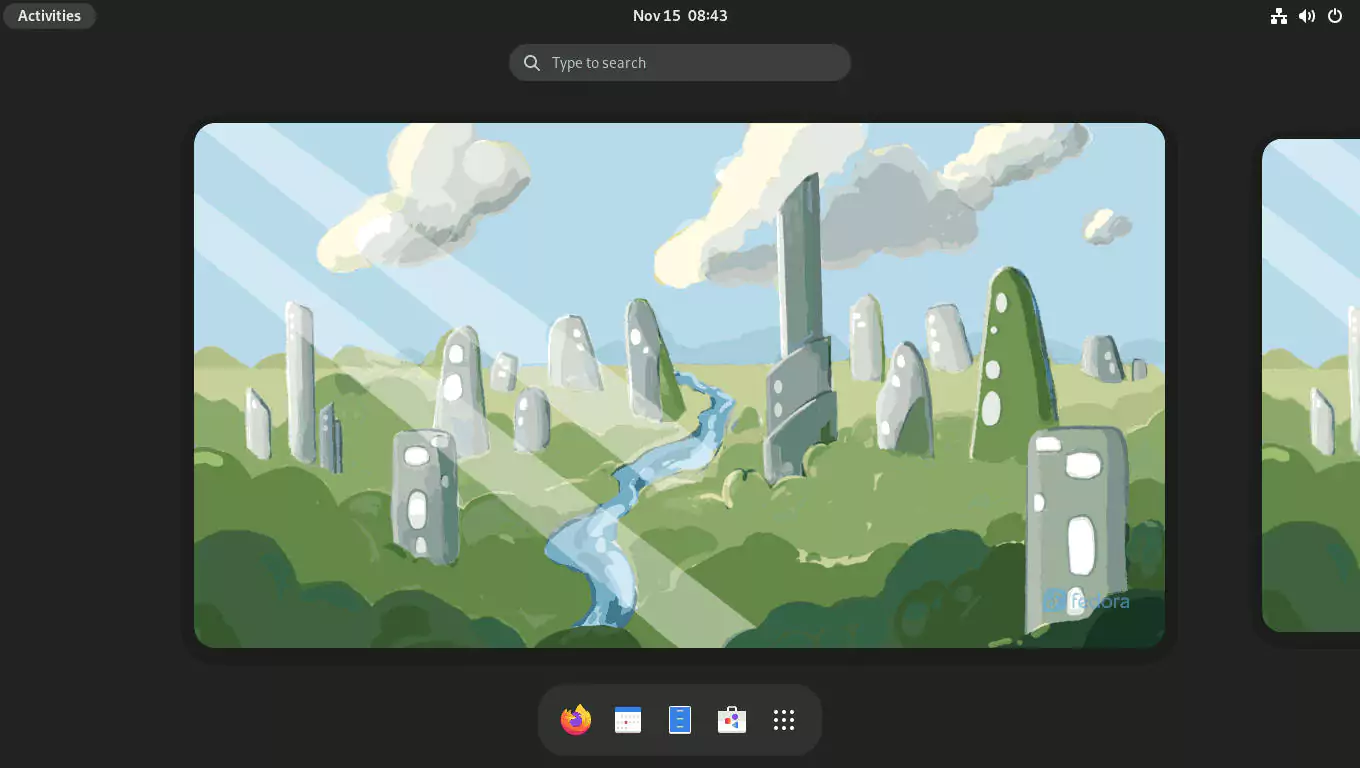
Install Fedora 37 with Snapper and Grub-Btrfs Blivet NOME 43

Now, open the Gnome terminal.

Set the btrfs volume label. I named the btrfs volume FEDORA, but you may name it whatever you want.

$ sudo btrfs filesystem label / FEDORA

$ sudo btrfs filesystem show /
Label: 'FEDORA'  uuid: ff003a16-2819-493a-b4a5-4a8dec85ea7d
	Total devices 1 FS bytes used 6.40GiB
	devid    1 size 99.50GiB used 9.02GiB path /dev/vda2

Create the /var/log subvolume.

$ sudo mv -v /var/log /var/log-old
$ sudo btrfs subvolume create /var/log
$ sudo cp -arv /var/log-old/. /var/log/
$ sudo restorecon -RFv /var/log
$ sudo rm -rvf /var/log-old

In the /etc/fstab file, add the newly created /var/log subvolume. The updated line is displayed in amber. Replace UUID with your setup’s UUID.

$ sudo vi /etc/fstab
UUID=ff003a16-2819-493a-b4a5-4a8dec85ea7d /         btrfs defaults 0 0
UUID=0799-62F5                            /boot/efi vfat  umask=0077,shortname=winnt 0 2
UUID=ff003a16-2819-493a-b4a5-4a8dec85ea7d /home     btrfs subvol=home,compress=zstd:1 0 0
UUID=ff003a16-2819-493a-b4a5-4a8dec85ea7d /var/log  btrfs subvol=var/log,compress=zstd:1 0 0

Reload the /etc/fstab file to mount all filesystems.

$ sudo systemctl daemon-reload
$ sudo mount -va

Your setup should now look somewhat like this.

$ lsblk -p
NAME        MAJ:MIN RM  SIZE RO TYPE MOUNTPOINTS
/dev/zram0  251:0    0  3.8G  0 disk [SWAP]
/dev/vda    252:0    0  100G  0 disk 
├─/dev/vda1 252:1    0  512M  0 part /boot/efi
└─/dev/vda2 252:2    0 99.5G  0 part /var/log
                                     /home
                                     /

Finally, list all subvolumes.

$ sudo btrfs subvolume list /
ID 256 gen 61 top level 5 path home
ID 257 gen 51 top level 5 path var/lib/machines
ID 258 gen 65 top level 5 path var/log

The var/lib/machines subvolume is created by systemd implicitly in Fedora 37 Workstation for systemd-nspawn containers.

The Fedora 37 Workstation installation is now complete.

3. Install and Configure Snapper

Install snapper and the optional package python3-dnf-plugin-snapper. The python3-dnf-plugin-snapper package allows you to create pre and post snapshots every time you install a package on the system with the dnf package manager.

$ sudo dnf install snapper python3-dnf-plugin-snapper

Create new snapper configurations named root and home for the Btrfs volume at / and /home, respectively.

$ sudo snapper -c root create-config /
$ sudo snapper -c home create-config /home

Verify the snapper configuration files have been created.

$ sudo snapper list-configs
Config | Subvolume
-------+----------
home   | /home    
root   | /

Allow the regular user to list snapshots. Add your user name in the snapper’s root and home configurations.

$ sudo snapper -c root set-config ALLOW_USERS=$USER SYNC_ACL=yes
$ sudo snapper -c home set-config ALLOW_USERS=$USER SYNC_ACL=yes

Change the group permissions of the /.snapshots and /home/.snapshots directories to your user name.

$ sudo chown -R :$USER /.snapshots
$ sudo chown -R :$USER /home/.snapshots

Finally, in the /etc/fstab file, add the newly created snapshots subvolumes. The updated lines are displayed in amber.

$ sudo vi /etc/fstab
UUID=ff003a16-2819-493a-b4a5-4a8dec85ea7d /                btrfs defaults 0 0
UUID=0799-62F5                            /boot/efi        vfat  umask=0077,shortname=winnt 0 2
UUID=ff003a16-2819-493a-b4a5-4a8dec85ea7d /home            btrfs subvol=home,compress=zstd:1 0 0
UUID=ff003a16-2819-493a-b4a5-4a8dec85ea7d /var/log         btrfs subvol=var/log,compress=zstd:1 0 0
UUID=ff003a16-2819-493a-b4a5-4a8dec85ea7d /.snapshots      btrfs subvol=.snapshots,compress=zstd:1 0 0
UUID=ff003a16-2819-493a-b4a5-4a8dec85ea7d /home/.snapshots btrfs subvol=home/.snapshots,compress=zstd:1 0 0

Reload the /etc/fstab file.

$ sudo systemctl daemon-reload
$ sudo mount -va

Your setup should look something like this.

$ lsblk -p /dev/vda
NAME        MAJ:MIN RM  SIZE RO TYPE MOUNTPOINTS
/dev/vda    252:0    0  100G  0 disk 
├─/dev/vda1 252:1    0  512M  0 part /boot/efi
└─/dev/vda2 252:2    0 99.5G  0 part /home/.snapshots
                                     /.snapshots
                                     /home
                                     /var/log
                                     /

And your subvolumes will look like this.

$ sudo btrfs subvolume list /
ID 256 gen 86 top level 5 path home
ID 257 gen 70 top level 5 path var/lib/machines
ID 258 gen 89 top level 5 path var/log
ID 259 gen 82 top level 5 path .snapshots
ID 260 gen 82 top level 256 path home/.snapshots

Enable snapshot booting by appending the SUSE_BTRFS_SNAPSHOT_BOOTING="true" option to the /etc/default/grub file.

$ echo 'SUSE_BTRFS_SNAPSHOT_BOOTING="true"' | sudo tee -a /etc/default/grub

Because snapshot booting is now enabled, you must make changes to the /boot/efi/EFI/fedora/grub.cfg file as well.

$ sudo sed -i '1i set btrfs_relative_path="yes"' /boot/efi/EFI/fedora/grub.cfg

Update the grub.cfg file.

$ sudo grub2-mkconfig -o /boot/grub2/grub.cfg

Finally, disable the GRUB menu auto-hide feature.

$ sudo grub2-editenv - unset menu_auto_hide

The snapper configuration is now complete.

List the snapshots for / volume. For the root, you may use snapper -c root ls or simply snapper ls. Both provide the same output.

$ snapper ls
 # | Type   | Pre # | Date | User | Cleanup | Description | Userdata
---+--------+-------+------+------+---------+-------------+---------
0  | single |       |      | root |         | current     |

List the snapshots for /home subvolume.

$ snapper -c home ls
 # | Type   | Pre # | Date | User | Cleanup | Description | Userdata
---+--------+-------+------+------+---------+-------------+---------
0  | single |       |      | root |         | current     |

At this stage, you do not have any snapshots, we will create some later.

4. Install and Configure Grub-Btrfs

Consider the following scenario: you make a mistake, and the system fails to start properly the next time. You may want to revert to a previously working snapshot and reboot again.

The grub-btrfs package provides this functionality. The package adds “Fedora Linux snapshots” to the GRUB menu and allows you to boot to a snapshot in read-only mode to test it before rolling back to it in read-write mode.

So, clone the grub-btrfs repository.

$ git clone https://github.com/Antynea/grub-btrfs
$ cd grub-btrfs
$ git switch Add-systemd-volatile

The setup is initially configured to work with Arch and Gentoo out of the box. To make it work with Fedora, you must make a few changes to the grub-btrfs config file.

$ sed -i 's/#GRUB_BTRFS_SYSTEMD_VOLATILE=/GRUB_BTRFS_SYSTEMD_VOLATILE=/' config
$ sed -i 's/#GRUB_BTRFS_GRUB_DIRNAME=/GRUB_BTRFS_GRUB_DIRNAME=/' config
$ sed -i '/#GRUB_BTRFS_MKCONFIG=/c\GRUB_BTRFS_MKCONFIG=/sbin/grub2-mkconfig' config
$ sed -i 's/#GRUB_BTRFS_SCRIPT_CHECK=/GRUB_BTRFS_SCRIPT_CHECK=/' config

Then install it.

$ sudo make INITCPIO=true install

Update the grub.cfg file. You will receive the ‘No snapshots found’ error since you have not yet created any snapshots, but don’t worry, it will function properly after you do.

$ sudo grub2-mkconfig -o /boot/grub2/grub.cfg

Finally, enable the grub-btrfs.path

$ sudo systemctl enable --now grub-btrfs.path

Your grub-btrfs installation is now complete. You may now delete the cloned grub-btrfs repository.

$ cd ..
$ rm -rvf grub-btrfs

5. Test the Snapper’s Undochange and Rollback Features.

I will run three tests here to ensure that everything is working properly and that there are no issues.

Test 1: Undo the Changes Made by the DNF Installer

In this test, I will install a small package called ps_mem using the dnf package manager. After it has been installed, I will check the system to see what changes have been made. I will then attempt to undo the changes and see if I can restore the system to its pre-installation state.

Install the ps_mem package. It displays the core memory used per program (not per process).

$ sudo dnf install ps_mem

Run the ps_mem program.

$ sudo ps_mem
 Private  +   Shared  =  RAM used	Program

144.0 KiB +  16.5 KiB = 160.5 KiB	fusermount3
288.0 KiB +  14.5 KiB = 302.5 KiB	mcelog
316.0 KiB +  41.5 KiB = 357.5 KiB	rtkit-daemon
432.0 KiB +  51.5 KiB = 483.5 KiB	gnome-session-ctl
...
 45.5 MiB +   7.2 MiB =  52.8 MiB	gnome-software
 50.6 MiB +   3.8 MiB =  54.4 MiB	python3.11
209.8 MiB +  25.3 MiB = 235.1 MiB	gnome-shell
361.4 MiB +   1.8 MiB = 363.1 MiB	packagekitd
---------------------------------
                          1.2 GiB
=================================

The ps_mem package has been successfully installed. Check the snapper for snapshots.

$ snapper ls
 # | Type   | Pre # | Date                                 | User | Cleanup | Description                 | Userdata
---+--------+-------+--------------------------------------+------+---------+-----------------------------+---------
0  | single |       |                                      | root |         | current                     |         
1  | pre    |       | Tuesday 15 November 2022 10:18:12 AM | root | number  | /usr/bin/dnf install ps_mem |         
2  | post   |     1 | Tuesday 15 November 2022 10:18:19 AM | root | number  | /usr/bin/dnf install ps_mem |

As you can see, the pre (#1) and the post (#2) snapshots have been created for the ps_mem package.

Let me examine the changes it has made to the system, between snapshots #1 and #2.

$ snapper status 1..2
+..... /boot/grub2/grub.cfg.new
+..... /usr/bin/ps_mem
c..... /usr/lib/sysimage/rpm/rpmdb.sqlite-shm
c..... /usr/lib/sysimage/rpm/rpmdb.sqlite-wal
+..... /usr/share/doc/ps_mem
+..... /usr/share/doc/ps_mem/LICENSE
+..... /usr/share/man/man1/ps_mem.1.gz
c..... /var/cache/dnf/packages.db
+..... /var/cache/man/2957
c..... /var/lib/dnf/history.sqlite-shm
c..... /var/lib/dnf/history.sqlite-wal
-..... /var/lib/dnf/rpmdb_lock.pid
+..... /var/lib/os-prober/mount

Now I’ll undo the changes.

$ sudo snapper undochange 1..2
create:1 modify:5 delete:7

Check again to ensure that the package ps_mem has been successfully uninstalled.

$ sudo ps_mem
sudo: ps_mem: command not found

Cool! The undo has been successful. But, because I want to keep the package ps_mem, I’ll undo the changes once again. This time from snapshot #2 to snapshot #1.

$ sudo snapper undochange 2..1
create:7 modify:5 delete:1

Now run the ps_mem again to see if it exists.

$ sudo ps_mem
 Private  +   Shared  =  RAM used	Program

144.0 KiB +  17.5 KiB = 161.5 KiB	fusermount3
288.0 KiB +  15.5 KiB = 303.5 KiB	mcelog
316.0 KiB +  42.5 KiB = 358.5 KiB	rtkit-daemon
432.0 KiB +  52.5 KiB = 484.5 KiB	gnome-session-ctl
...
 45.5 MiB +   7.2 MiB =  52.8 MiB	gnome-software
 50.6 MiB +   3.8 MiB =  54.4 MiB	python3.11
209.9 MiB +  25.3 MiB = 235.2 MiB	gnome-shell
361.4 MiB +   1.8 MiB = 363.1 MiB	packagekitd
---------------------------------
                          1.2 GiB
=================================

Test 1 is successful.

Test 2: Undo the Changes Made by the GNOME Software

While you can easily create pre-post snapshots when using the command-line dnf package installer, this is not the case when using the GNOME Software to install a package. Hopefully, the next major upgrade to the new package manager DNF5 with a new libdnf5 library and a new DNF Daemon will resolve this issue.

For now, the only way to create a pre-post snapshot while using the GNOME Software is to create them manually.

So, in this test, I will install a package called Audacious using the GNOME Software. To install Audacious, I will manually create pre and post snapshots for both the / and /home directories to capture all the files that will be added or altered. Then I’ll try to undo all of the changes and see if I can get the system back to its pre-installation state.

Before you install Audacious, create a manual ‘pre‘ snapshot for both the / and /home directories.

$ sudo snapper -c root create -t pre -c number -d 'Before Audacious'
$ sudo snapper -c home create -t pre -c number -d 'Before Audacious'

List the snapshots.

$ snapper -c root ls
 # | Type   | Pre # | Date                                 | User | Cleanup | Description                 | Userdata
---+--------+-------+--------------------------------------+------+---------+-----------------------------+---------
0  | single |       |                                      | root |         | current                     |         
1  | pre    |       | Tuesday 15 November 2022 10:18:12 AM | root | number  | /usr/bin/dnf install ps_mem |         
2  | post   |     1 | Tuesday 15 November 2022 10:18:19 AM | root | number  | /usr/bin/dnf install ps_mem |         
3  | pre    |       | Tuesday 15 November 2022 10:30:10 AM | root | number  | Before Audacious            |         
$ snapper -c home ls
 # | Type   | Pre # | Date                                 | User | Cleanup | Description      | Userdata
---+--------+-------+--------------------------------------+------+---------+------------------+---------
0  | single |       |                                      | root |         | current          |         
1  | pre    |       | Tuesday 15 November 2022 10:30:19 AM | root | number  | Before Audacious |

As you can see, a manual ‘pre‘ snapshot for both directories has been created.

Launch the GNOME Software and install the Audacious package.
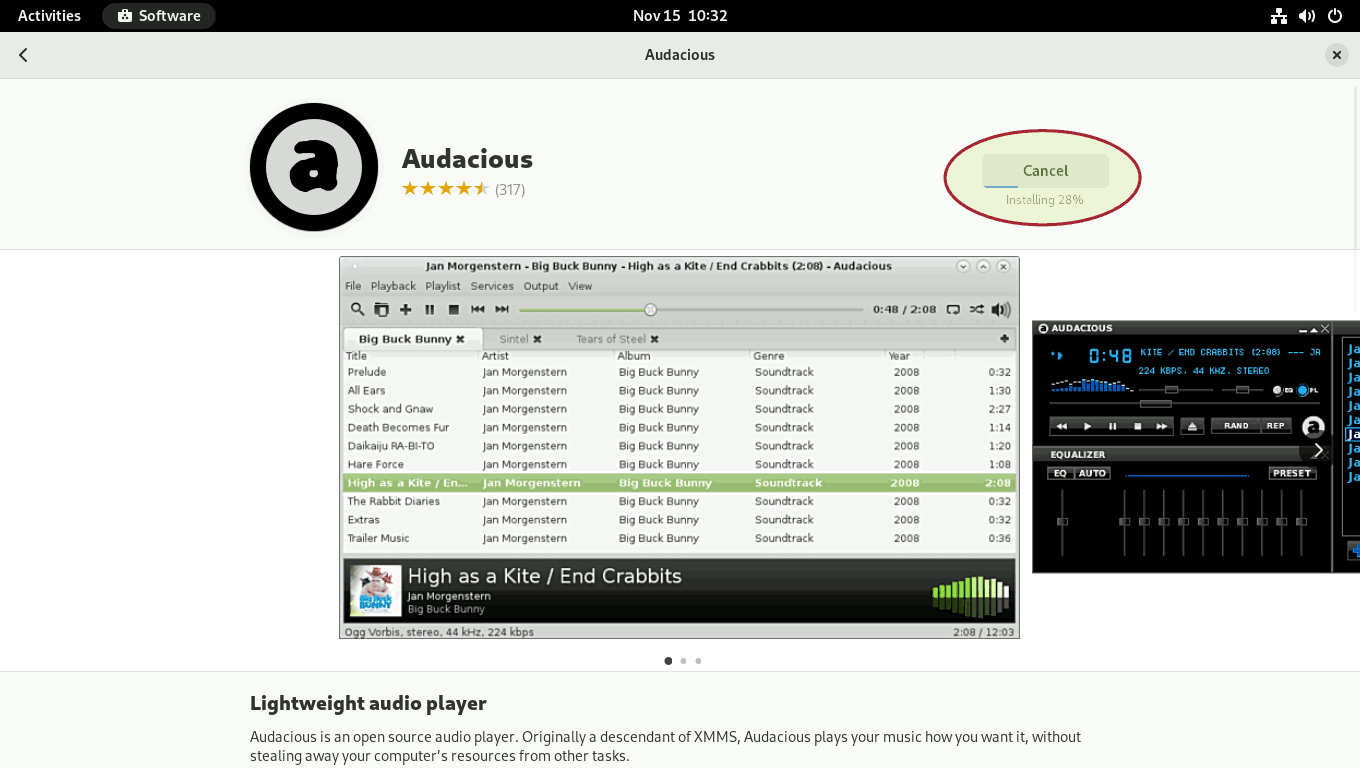
Install Fedora 37 with Snapper and Grub-Btrfs Audacious Install

Launch the Audacious to test if it is installed.
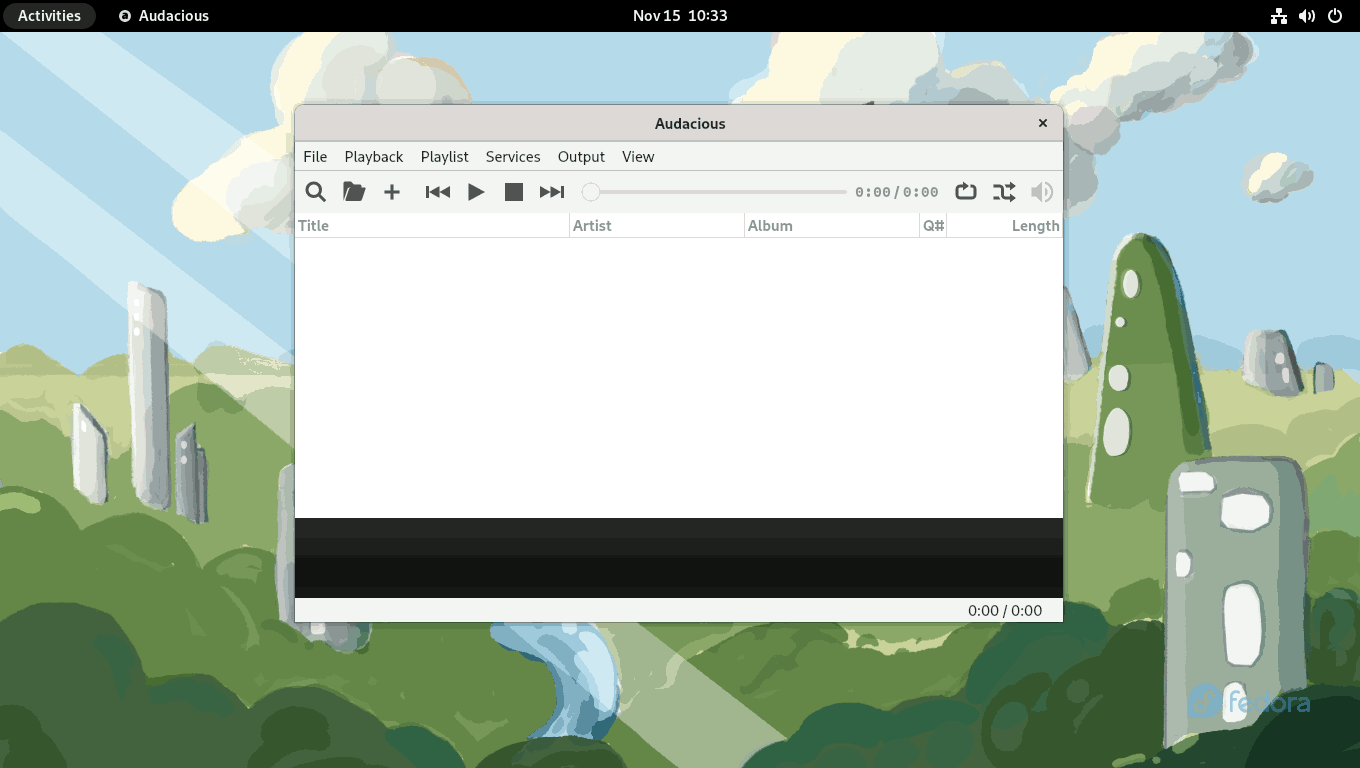
Install Fedora 37 with Snapper and Grub-Btrfs Audacious Open

The Audacious has been successfully installed.

Now, create a ‘post‘ snapshot for the previously created ‘pre’ snapshot for both directories.

$ sudo snapper -c home create -t post --pre-number 1 -c number -d 'After Audacious'
$ sudo snapper -c root create -t post --pre-number 3 -c number -d 'After Audacious'

List the snapshots.

$ snapper -c root ls
 # | Type   | Pre # | Date                                 | User | Cleanup | Description                 | Userdata
---+--------+-------+--------------------------------------+------+---------+-----------------------------+---------
0  | single |       |                                      | root |         | current                     |         
1  | pre    |       | Tuesday 15 November 2022 10:18:12 AM | root | number  | /usr/bin/dnf install ps_mem |         
2  | post   |     1 | Tuesday 15 November 2022 10:18:19 AM | root | number  | /usr/bin/dnf install ps_mem |         
3  | pre    |       | Tuesday 15 November 2022 10:30:10 AM | root | number  | Before Audacious            |         
4  | post   |     3 | Tuesday 15 November 2022 10:34:04 AM | root | number  | After Audacious             |         

$ snapper -c home ls
 # | Type   | Pre # | Date                                 | User | Cleanup | Description      | Userdata
---+--------+-------+--------------------------------------+------+---------+------------------+---------
0  | single |       |                                      | root |         | current          |         
1  | pre    |       | Tuesday 15 November 2022 10:30:19 AM | root | number  | Before Audacious |         
2  | post   |     1 | Tuesday 15 November 2022 10:33:52 AM | root | number  | After Audacious  |

Review the changes made to the system between the pre and post snapshots.

$ snapper -c home status 1..2
c..... /home/madhu/.bash_history
c..... /home/madhu/.cache/gnome-software/appstream/components.xmlb
+..... /home/madhu/.cache/gnome-software/odrs/audacious.desktop.json
...
-..... /home/madhu/.local/share/gvfs-metadata/root-f6371618.log
c..... /home/madhu/.local/state/wireplumber/restore-stream

$ snapper -c root status 3..4
c..... /boot/grub2/grub-btrfs.cfg
....x. /etc/dconf/db/distro
c...x. /etc/dconf/db/gdm
...
....x. /var/lib/flatpak/oci/fedora.index.gz
c..... /var/lib/PackageKit/transactions.db

This is the total number of files added, removed, or modified.

$ snapper -c home status 1..2 | wc -l
91

$ snapper -c root status 3..4 | wc -l
3513

I’ll now undo the changes in the / and /home directories.

$ sudo snapper -c home undochange 1..2
create:2 modify:8 delete:81

$ sudo snapper -c root undochange 3..4
create:7 modify:15 delete:3491

The Audacious package will be completely removed from the system. However, if you launch the GNOME Software and check, it will show that the program is still installed. Just restart the packagekit service, log out, and then log back in to update the changes in the GNOME Software.

$ sudo systemctl restart packagekit
$ gnome-session-quit
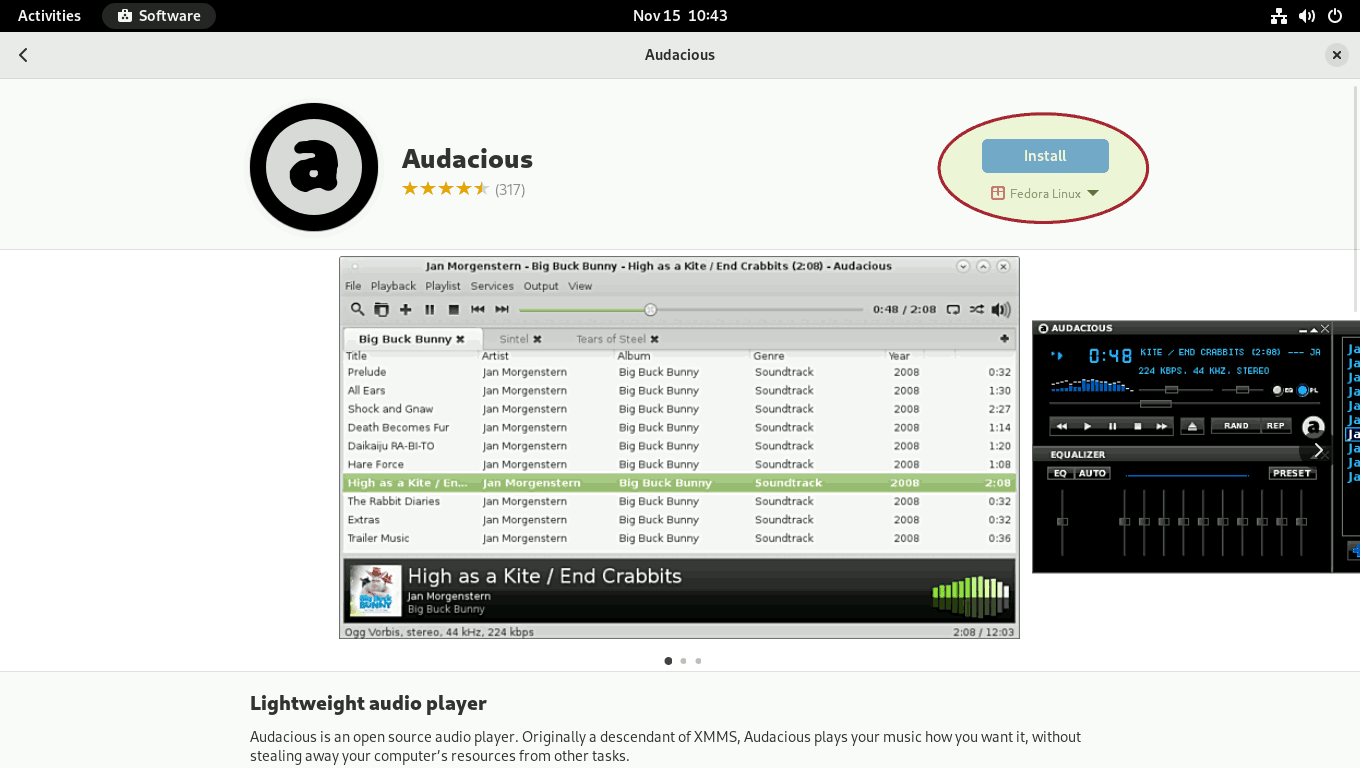
Install Fedora 37 with Snapper and Grub-Btrfs Audacious Clean

Test 2 is successful.

When you undo changes, snapshot links in the GRUB menu are sometimes deleted as well. Check /boot/grub2/grub-btrfs.cfg file to ensure that snapshots have not been deleted from the GRUB menu. To rebuild links in the GRUB menu, run the following command.

$ sudo grub2-mkconfig -o /boot/grub2/grub.cfg

Since you removed the Audacious package, and if you do not intend to use it again, there is no reason to keep its pre-post snapshots. So you can delete those snapshots as well.

$ sudo snapper -c home delete 1-2
$ sudo snapper -c root delete 3-4

List the snapshots. All the snapshots related to Audacious have been deleted.

$ snapper -c home ls
 # | Type   | Pre # | Date | User | Cleanup | Description | Userdata
---+--------+-------+------+------+---------+-------------+---------
0  | single |       |      | root |         | current     |         

$ snapper -c root ls
 # | Type   | Pre # | Date                                 | User | Cleanup | Description                 | Userdata
---+--------+-------+--------------------------------------+------+---------+-----------------------------+---------
0  | single |       |                                      | root |         | current                     |         
1  | pre    |       | Tuesday 15 November 2022 10:18:12 AM | root | number  | /usr/bin/dnf install ps_mem |         
2  | post   |     1 | Tuesday 15 November 2022 10:18:19 AM | root | number  | /usr/bin/dnf install ps_mem |

Test 3: Rollback to a Previous Snapshot from the GRUB Menu

In this rollback test, I will delete the most critical files and directories on which the Linux operating system relies. These include Linux kernel and initramfs files in the /boot directory, the /etc directory, which contains all configuration files, and the /usr directory, which contains all drivers, kernel modules, and library files.

Once I delete these files and directories, I will be unable to issue any commands because the Linux OS is pretty much dead, and the system will undoubtedly fail the next time it boots. So I’ll hard boot the system and see if I can save the day by rolling back to a working snapshot.

So, before I delete them, here’s how they appear.

$ sudo du -sch /boot /etc /usr
180M	/boot
32M	/etc
5.3G	/usr
5.5G	total

Now delete the files and directories.

$ sudo rm -rf /boot/{vmlinuz,initramfs}* /etc /usr

Boom!!! All of the critical files have been deleted. Your Linux system has been rendered inoperable.

Restart the system. Your system should now fail to boot and display an error message similar to this.

Install Fedora 37 with Snapper and Grub-Btrfs Boot Error

Return to the GRUB menu and this time boot from snapshot #2.

Install Fedora 37 with Snapper and Grub-Btrfs Snapshots Menu
Install Fedora 37 with Snapper and Grub-Btrfs Snapshot No 2
Install Fedora 37 with Snapper and Grub-Btrfs Snapshot Latest

Open the terminal and make sure everything is back to normal.

$ sudo ls /boot /etc /usr

Because you booted into the snapshot, the ‘/‘ file system is read-only.

$ sudo btrfs property get -ts /
ro=true

Now that everything appears to be operating properly, it is time to roll back this snapshot in read-write mode.

$ snapper ls
 # | Type   | Pre # | Date                                 | User | Cleanup | Description                 | Userdata
---+--------+-------+--------------------------------------+------+---------+-----------------------------+---------
0  | single |       |                                      | root |         | current                     |         
1  | pre    |       | Tuesday 15 November 2022 10:18:12 AM | root | number  | /usr/bin/dnf install ps_mem |         
2- | post   |     1 | Tuesday 15 November 2022 10:18:19 AM | root | number  | /usr/bin/dnf install ps_mem |         

$ sudo snapper --ambit classic rollback 2
Ambit is classic.
Creating read-only snapshot of current system. (Snapshot 3.)
Creating read-write snapshot of snapshot 2. (Snapshot 4.)
Setting default subvolume to snapshot 4.

$ sudo reboot

After the reboot, check the system once again.

$ sudo du -sch /boot /etc /usr
180M	/boot
32M	/etc
5.3G	/usr
5.5G	total

$ sudo btrfs property get -ts /
ro=false

$ snapper ls
 # | Type   | Pre # | Date                                 | User | Cleanup | Description                 | Userdata     
---+--------+-------+--------------------------------------+------+---------+-----------------------------+--------------
0  | single |       |                                      | root |         | current                     |              
1  | pre    |       | Tuesday 15 November 2022 10:18:12 AM | root | number  | /usr/bin/dnf install ps_mem |              
2  | post   |     1 | Tuesday 15 November 2022 10:18:19 AM | root | number  | /usr/bin/dnf install ps_mem |              
3  | single |       | Tuesday 15 November 2022 11:31:10 AM | root | number  | rollback backup             | important=yes
4* | single |       | Tuesday 15 November 2022 11:31:11 AM | root |         | writable copy of #2         |

$ sudo btrfs subvolume list /
ID 256 gen 203 top level 5 path home
ID 257 gen 183 top level 5 path var/lib/machines
ID 258 gen 204 top level 5 path var/log
ID 259 gen 204 top level 5 path .snapshots
ID 260 gen 183 top level 256 path home/.snapshots
ID 261 gen 125 top level 259 path .snapshots/1/snapshot
ID 262 gen 194 top level 259 path .snapshots/2/snapshot
ID 263 gen 193 top level 259 path .snapshots/3/snapshot
ID 264 gen 203 top level 259 path .snapshots/4/snapshot

$ sudo btrfs subvolume get-default /
ID 264 gen 203 top level 259 path .snapshots/4/snapshot

You successfully restored the system with the latest working snapshot in read and write mode.

After a successful rollback, always ensure that the grub.cfg file is updated so that the snapshots on the grub-btrfs menu are always in sync.

$ sudo grub2-mkconfig -o /boot/grub2/grub.cfg

Test 3 is successful.

6. Conclusion

You have now installed and configured Fedora 37 to properly rollback to any snapshots. Going from here, you can also configure the snapper to take snapshots at predetermined intervals. Visit the Arch Wiki’s Snapper page for more information.
Watch on YouTube

Comments

55 responses to “How to Install Fedora 37 with Snapper and Grub-Btrfs for Full System Rollback”

  1. Andrey82 Avatar
    Andrey82

    You are amazing!I was looking for something similar and you are my savior!) Thank you very much for such detailed instructions and videos.

    1. Madhu Desai Avatar

      Thanks. You should read the updated version of this guide, ‘How to Install Fedora 38 with Snapshot and Rollback Support‘.

  2. mendres82 Avatar
    mendres82

    Hello, thanks for your guide. There are some things I’d like to add though:
    Before installing grub-btrfs on my working machine, I tried different BTRFS partitioning schemes within a Virtual Machine, but I have never been able to successfully boot from a snapshot with /var being writable, which is why gdm wouldn’t start.

    In general, systemd-volatile is a workaround to that issue, but there are two major caveats: first off all, it creates an empty /var folder, which is obviously writable – but it’s not the system’s one. Which leads to my second point: because of that problem, Add-systemd-volatile branch has been deleted and won’t be updated any further. While you can still install grub-btrfs from that branch, there are no fixes included from master branch.

    So I went the route to install grub-btrfs from master branch and added GRUB_BTRFS_SNAPSHOT_KERNEL_PARAMETERS=”rd.live.overlay.overlayfs=1 systemd.unit=multi-user.target to the config, which just was added recently. While still not being to able to boot into the graphical user interface from a snapshot, Runlevel 3 is enough for me to get things done when shit hits the fan.

    Please also note that now grub-btrfsd is used instead of grub-btrfs.path and you have to install inotify-tools first to update grub automatically.

    1. Madhu Desai Avatar

      Hello, mendres82. Thank you for your input. Probably you haven’t seen my most recent article on this. I have resolved all of the problems. Please take a look at this page ‘How to Install Fedora 38 with Snapshot and Rollback Support‘. Please let me know if this addresses all of your concerns.

      1. mendres82 Avatar
        mendres82

        Hello, thanks again for your work. If only I had found the new article earlier, that would have saved me a lot of tinkering 🙂 While I didn’t have the time to test out the recommended file system layout yet, I’ll have to look into that later.

  3. Bastian Avatar
    Bastian

    Hey, thanks for the guide.
    I am new to linux and was wondering is it possible to apply this by having the /home on a different disk than the root (/)? I have an SSD and HDD, so I want to mount /home on the HDD and the rest on SSD.
    I tried but i failed to mount /home/.snapshots as a subvolume of /home.

    Thank you in advance

  4. Jonas Avatar
    Jonas

    I followed your guide (F37 with Snapper, Grub-Btrfs, LUKS) and did the test from here above.

    In test 3 after I make my system unusable. I try to boot into the snapshot. But boot gets stuck with the last line printed being „gdm.service“. Do I have to start all over? What could have gone wrong?

    Greetings, Jonas

    1. Madhu Desai Avatar

      When you boot into the operating system, the /var/lib/gdm directory must be writable. However, when you boot into a snapshot from the GRUB menu, you are booting into a read-only snapshot.

      The GRUB_BTRFS_SYSTEMD_VOLATILE option in the /etc/default/grub-btrfs/config file should take care of this issue. It worked flawlessly in Fedora 37. I encountered the issue you mentioned while testing in Fedora 38 Beta. However, when I tested it in Fedora 38 Final release, it worked perfectly.

      In any case, I believe it is preferable to create a separate subvolume for the /var/lib/gdm directory, so that it is always writable and not subject to the rollback regime. I’m writing a new Fedora 38 guide with some changes and will post it in a day or two. I’ll fix this in the updated guide.

      1. Jonas Avatar
        Jonas

        Thanks a lot. I‘ll be waiting. Do you have a donate button or something. I‘d be happy to buy you a beer!

        1. Madhu Desai Avatar

          I’ve completed half of the guide and will publish it within the next few hours. The LUKS version will be available tomorrow.

          I have not yet set up a donation page. This, however, is something I intend to do.

  5. ezpz Avatar
    ezpz

    this as a kick-start file would rock, especially with F38s immediate release.

  6. Jonas Avatar
    Jonas

    This is a very comprehensive guide. I especially appreciate that you included tests for the setup.

    When can we expect an updated version of your guide for Fedora 38?

    Thanks in advance!

    1. Madhu Desai Avatar

      Thanks. When it comes to snapshots and rollbacks, nothing has changed between Fedora 37 and Fedora 38. I’ll post an updated version in another 2-3 days.

  7. Eric M Avatar
    Eric M

    When snapper prunes old snapshots per the configured retention policy in

    /etc/snapper/configs/root
    

    does it also automatically update grub or would we need to run

    sudo grub2-mkconfig -o /boot/grub2/grub.cfg 
    

    daily to stay in sync?

    1. Madhu Desai Avatar

      Hello, Eric. Snapper and grub-btrfs are two different applications. It is up to the grub-btrfs daemon to monitor what happens in snapper and automatically update the GRUB.

      I put it to the test by manually creating a single-type snapshot with the timeline cleanup algorithm enabled. Then I checked the /boot/grub2/grub-btrfs.cfg file, the snapshot entry was automatically added. Next, I deleted the snapshot and checked the grub-btrfs.cfg file again, and the snapshot entry was indeed removed automatically.

      So, I believe it will update automatically with timeline snapshots also with cleanup algorithm enabled. When you rollback from a snapshot, you only need to run ‘sudo grub2-mkconfig -o /boot/grub2/grub.cfg’ to manually update the GRUB.

      1. Eric M Avatar
        Eric M

        Great – thanks!

  8. Julien Avatar
    Julien

    At the end of test 3, is it possible to delete all the snapshots to return to the state before test 1? Thanks in advance for your answer.

    1. Madhu Desai Avatar

      Hello, Julien. I apologize for the delay in responding; I was very busy.

      To return to the state before test 1, repeat the steps outlined in this comment. Simply substitute this for step 8.
      # \cp -arvf /.snapshots/1/snapshot/. .

      Then, after rebooting, delete all of your snapshots, like…
      $ sudo snapper delete 1-4

      I hope everything goes well for you.

      1. Julien Avatar
        Julien

        Thank you for your answer. In fact I expressed myself badly I was trying
        to do exactly what the person to whom you answered in the comment was
        trying to do but for Fedora 36. Indeed I installed and configured Fedora
        36 by following your guide
        https://sysguides.com/fedora-36-with-luks-full-disk-encryption/ without
        creating the “snapshots” sub-volume and by stopping at the end of step
        5. I then installed and configured snapper and grub-btrfs following your
        guide
        https://sysguides.com/install-fedora-37-with-luks-full-disk-encryption-snapper-grub-btrfs/
        from step 6 to the end, performing the 3 tests in step 8. So what would
        be the instructions in my case to set snapshot 4 as the new system base
        before I can delete all the snapshots?

        1. Madhu Desai Avatar

          In the Fedora 36 guide, I had a separate /var subvolume. Fedora, unlike other Linux distributions, maintains two databases, one in /usr and one in /var. With the database in /var outside of the snapshots rollback regime, the difference between the two databases grew so large over time that it broke the system. I was unaware of the error at the time. As a result, I created an updated version for Fedora 37. I strongly advise you to disregard the Fedora 36 guide and instead follow the Fedora 37 guide.

          In Fedora 38, both databases are being relocated to /usr. You can then create a separate /var volume in Fedora 38. For the time being, you have no choice but to keep /var in the rollback regime.

          1. Julien Avatar
            Julien

            Thank you for your help. I confirm that your guide for Fedora 37 applies perfectly for Fedora 36 and that it was possible for me to successfully define snapshot 4 as a new system base by following your instructions. There was just one erroneous instruction that I corrected: “mount -o subvolid=5 /dev/vda2 /mnt” should be replaced with “mount -o subvolid=5 /dev/mapper/luks-$(cryptsetup luksUUID /dev/vda2) /mnt”. Have you considered updating your guide for Fedora 37 to include these instructions that might help other users? Also, could you help me to have an azerty keyboard instead of qwerty when I have to enter my password in the LUKS prompt?

          2. Madhu Desai Avatar

            Thank you for informing me. It was a mix-up. As you have commented on the guide without LUKS encryption, I mentioned /dev/vda2. You are correct; /dev/mapper/luks-xxx should be used for Fedora 37 with LUKS Full Disk Encryption.

          3. Madhu Desai Avatar

            Sorry, I forgot about azerty keyboard. I’ll check and get back to you.

  9. Evert-Jan Avatar
    Evert-Jan

    Lately I installed snapper and grub-btrfs on Fedora 37 including the configurations from this guide. On completion I rebooted and voilla I got welcomed with the Grub menu featuring my latest snapshots. Trying to boot into a snapshot wasn’t possible somehow. I got an error:

    "Grub unkown TPM error
    
    Please press Any Key....."
    

    but after some googling I found I had to go into the Grub commandline and type:

    rmmod tpm
    

    After one succesful boot into a snapshot, creating a new subvolume for @var and creating some new snapshots each time I tried to update the grub.cfg file by issuing the

      sudo grub2-mkconfig -o /boot/grub2/grub.cfg
    

    command I got this error message:

    mkdir: cannot create directory ‘/var/lib/os-prober/mount’: No such file or directory
    

    Alsoo with os-prober. So I decided to recreate the os-prober directory manually in ‘/var/lib/’ and since then the error messages went away. However it did not populate the Grub menu with snapshots after updating the grub.cfg file. Even worse os-prober detected Windows 10 installed on a second ssd drive on my dual boot computer, but did not create an entry in Grub. I can can only boot to Fedora 37.

    If you you have any suggestion, please tell me how to get back to a clean working Grub menu.

    1. Madhu Desai Avatar

      Hello, Evert-Jan. A few points.

      1. If TPM is enabled in your UEFI settings, try to disable it and see if the error continues.
      2. In Fedora, creating a separate /var subvolume is a bad idea. I made the same mistake with Fedora 35 and 36. While other distros can do this, Fedora, unlike other distros, keeps the details of the package in two databases, one in /usr (/usr/lib/sysimage/rpm) and the other in /var (/var/lib/dnf). So, over time, the difference between the two databases will be significant enough to affect Fedora’s operation.
      3. To clean up, delete all snapshots and make the current rolled-back snapshot the new root (with ID=5). The steps are here. But before you attempt, take a backup.
  10. Cris Avatar
    Cris

    Hi.
    Just installed Fedora Cinnamon and everything works excellent, but also installed Fedora in another disk with KDE, and If I add the SUSE_BTRFS_SNAPSHOT_BOOTING=”true”

    Cant boot anymore.

    Really needs to add this line?

    1. Madhu Desai Avatar

      You require this line. It sets the GRUB_CMDLINE_LINUX variable, which is required for rollbacks. See line 69 of the file /etc/grub.d/10_linux. The issue might be elsewhere.

      1. zpangwin Avatar
        zpangwin

        I too am running into issues when SUSE_BTRFS_SNAPSHOT_BOOTING=”true”. Coincidentally, I am also on Fedora Cinnamon but doubt that DE really has much to do with it. I suspect in my case, it may be due to using a more complex subvol structure that the guide uses (e.g. I have subvol=fedora/rootfs for / instead of subvol=/, as I am looking to also have a multi-boot setup with several distros installed on the same encrypted BTRFS partition, with each distro under its respective subvol and a flat structure within each disto subvol, e.g. subvol=fedora/snapshots/rootfs rather than the default)

        What happens for me with SUSE_BTRFS_SNAPSHOT_BOOTING enabled is that when I select my normal BLS entries for Fedora, it ends up booting to Emergency Mode and I have to sign under the root account. It does generate an /run/initramfs/rdsosreport.txt and I was able to capture one of these to a non-encrypted HDD. I am not sure what to look for in there… the file had ~ 1700 lines but grepping it for Error didn’t find anything useful. If I find anything later, I will try to update.

        For now, I just used a live disc to comment out the SUSE_BTRFS_SNAPSHOT_BOOTING line and regenerate my grub. That fixed things to the point I can again boot to F37 via my BLS entries. I have everything else from the guide working + I am able to chainload to the grub menus for my other installed distros. So hopefully I can figure out this out and post back the missing piece.

  11. dapper Avatar
    dapper

    Hi, thanks for the step by step walkthrough for beginner like me. I did a fresh install of fedora 37 and follow exactly each steps, but when i boot into one of the snapshot from grub it boot into a black screen with cursor. the main system still boot fine.
    I then upgrade my system including new kernel, and now the snapshots grub get empty out ( i mean it still shows the snapshot list but no kernel in there to choose from ).
    It also shows me error message… //grub-core/commands/efi /tmp.c:150 unknown error.
    Please help me look into this, and if I can’t boot snapshot from grub, is there anyway to boot snapshot from live fedora usb. I really need an option to roll back when boot fail cause it happens to me all the time

    1. Madhu Desai Avatar

      Boot into the BTRFS main / volume normally, then run the command “grub2-mkconfig -o /boot/grub2/grub.cfg” and try booting with the snapshot from the GRUB menu again. Please let me know what happened.

      If not, there might be a mistake somewhere. Run the commands below and copy the results to pastebin.pl (or, any other). I’ll see if I can identify any mistakes.

      # lsblk -pf
      # btrfs subvolume list /
      # btrfs subvolume get-default /
      # cat /etc/default/grub
      # cat /boot/efi/EFI/fedora/grub.cfg
      # systemctl status grub-btrfs.path
      # grep -v '^#' /etc/default/grub-btrfs/config | sed '/^$/d'
      # grep 'systemd.volatile' /etc/grub.d/41_snapshots-btrfs

      1. dapper Avatar
        dapper

        this is what i get

        [dapper@fedora ~]$ sudo grub2-mkconfig -o /boot/grub2/grub.cfg
        Generating grub configuration file …
        Adding boot menu entry for UEFI Firmware Settings …
        Detecting snapshots …
        strings: ‘/tmp/grub-btrfs.p0n2gzrLdm/.snapshots/21/snapshot/usr/bin/init’: No such file
        Found snapshot: 2023-01-07 15:12:37 | .snapshots/21/snapshot | single | lutris config              |
        strings: ‘/tmp/grub-btrfs.p0n2gzrLdm/.snapshots/20/snapshot/usr/bin/init’: No such file
        Found snapshot: 2023-01-06 23:52:49 | .snapshots/20/snapshot | single | essentials kde             |
        strings: ‘/tmp/grub-btrfs.p0n2gzrLdm/.snapshots/19/snapshot/usr/bin/init’: No such file

        It’s a long list because i have many snapshots, and the snapshot list on grub still an empty shell.

        Below is the result of comments you suggested.

        https://pastebin.pl/view/cdb37e94

        1. Madhu Desai Avatar

          I checked the output and found nothing wrong with it. I attempted to recreate the steps to get the same error as yours, but unfortunately, I couldn’t.

          So, my best guess is that you’re getting this error because the snapshot is looking for some file in the /tmp directory, which is no longer available. Because Fedora mounts /tmp with tmpfs at boot, and it is cleared at every boot, the error occurs. The /tmp directory is not part of the ‘/’ file system rollback regime. You may read more about it here.

          Rollback has also some other limitations. You can look into those here.

          I notice you’ve rolled back into snaphot #15. Does snapshot #15 boot properly?

          1. dapper Avatar
            dapper

            I was able to boot into one of the snapshot by adding the rootflag parameter, and rollback test worked. that’s good enough for me knowing i have the option incase something go wrong. thanks very for the tutorial and taking the time to look into it.

          2. Madhu Desai Avatar

            I’m glad everything worked out in the end for you.

            Not related to this, when you rollback to a certain snapshot and wish to make that snapshot the main ‘/’ volume replacing the original ‘/’ main volume, and delete all the snapshots, you can follow these procedures.

            https://sysguides.com/install-fedora-37-with-snapper-and-grub-btrfs/#comment-251

            In the preceding example, I’ve chosen snapshot #4; you may use whatever snapshot number you choose.

          3. Adrian Avatar
            Adrian

            Could you lay out the steps you took?

          4. propper Avatar
            propper

            Hi there, I have the same problem. What do you guys mean with adding the “rootflag” parameter? Is it someting like this?

            set root=(hd0,6)
            set prefix=(hd0,6)/boot/grub
            insmod normal
            normal
            
  12. Morgan Avatar
    Morgan

    Great tutorial, I was wondering how I would go about getting this working with my root (/) being on a sub volume (such as ‘root’ like on a default Fedora install) rather than the main volume?

    I tried it but setting btrfs_relative_path=”yes” causes the system to fail to boot. I assume it is because the relative path means ID=5 or something and so grub fails when my root is on a subvol such as ID=256 or whatever it gets assigned when created?

    1. Madhu Desai Avatar

      Hello, Morgan. I ran some experiments a while back to check whether I could rollback to a snapshot if the ‘/’ file system is on a subvolume (root). But I was unsuccessful. I intend to research openSUSE and see if I can replicate it. Because Fedora’s Anaconda installer is so limited, I’m looking for any other way to install Fedora with the appropriate layout. I’ll let you know if I’m successful.

      1. Morgan Avatar
        Morgan

        Thanks Madhu. I actually looked into how OpenSUSE does it and it is the same as this tutorial with / on the main volume and then everything else on sub volumes. I did think perhaps it just isn’t possible but I know custom Ubuntu installs with / on the @ sub volume work with grub-btrfs so I am going to look there next and see if I can figure it out.

  13. Ajay J Avatar
    Ajay J

    Hi, Thanks for another good tutorial on the elusive – snapper + fedora btrfs setup. I followed all the instructions and all went well except running grub2-mkconfig. When I ran it the first time, it gave this error,
    ‘/tmp/grub-btrfs.75IgfKUz1q//usr/bin/init’: No such file
    Followed by the actual snapshot. But the grub menu still worked as expected. After some time now, I just updated the system and ran grub2-mkconfig and now I don’t see any more snapshots. snapper ls .. shows all the snapshots. Output of this command is below. Same snapshots appear in grub menu as well.
    Detecting snapshots …
    strings: ‘/tmp/grub-btrfs.75IgfKUz1q//usr/bin/init’: No such file
    Found snapshot: – path | | N/A | N/A |
    strings: ‘/tmp/grub-btrfs.75IgfKUz1q//usr/bin/init’: No such file
    Found snapshot: – path | | N/A | N/A |
    strings: ‘/tmp/grub-btrfs.75IgfKUz1q//usr/bin/init’: No such file
    Found snapshot: – path | | N/A | N/A |
    Is something wrong in the grub-btrfs? Or something missing in it’s config? All snapshots are present in /.snapshots.

    1. Madhu Desai Avatar

      Hello, Ajay. Open the /etc/default/grub-btrfs/config file and double-check the following lines:
      GRUB_BTRFS_SYSTEMD_VOLATILE=true
      GRUB_BTRFS_GRUB_DIRNAME="/boot/grub2"
      GRUB_BTRFS_MKCONFIG=/sbin/grub2-mkconfig
      GRUB_BTRFS_SCRIPT_CHECK=grub2-script-check

      Update the grub.cfg again:
      sudo grub2-mkconfig -o /boot/grub2/grub.cfg

      Make sure grub-btrfs.path is active and no errors:
      sudo systemctl status grub-btrfs.path

      1. kyle Avatar
        kyle

        I also ran into the same problem as Ajay above. Initially it ran fine, but broken after system update. My snapshot list on grub is just an empty shell now with nothing inside to choose from to boot. I double checked the config file above, and grub-btrfs.path all correct.
        Is there anything else i can try.
        Thanks

        1. Madhu Desai Avatar

          Hi, Kyle. Could you please do the same as I suggested in the following comment?
          https://sysguides.com/install-fedora-37-with-snapper-and-grub-btrfs/#comment-283

  14. chris Avatar
    chris

    In the Fedora 36 guide, you disabled COW for /var, is that something that should still be done?

    1. Madhu Desai Avatar

      Disable COW to only directories if they contain databases or sparse files such as qcow2. For example, on my regular system, I disabled COW in the directories listed below.

      /var/log
      /var/www
      /var/lib/mysql
      /var/lib/libvirt/images

  15. mike Avatar
    mike

    I cant undo anychanges. it keeps telling me that it failed because directory is not empty

    1. Madhu Desai Avatar

      Do you encounter this problem when undoing changes to any pre-post snapshots, or only for a specific pre-post snapshot? Also, are there any new snapshots after the one you’re trying to undo?

  16. David Avatar
    David

    Hello and thank you.
    Very comprehensive.
    However, for some reason my installation is not using EFI partition but rather Bios Boot.
    Could you recommend the appropriate changes to your guide for this situation.

    1. Madhu Desai Avatar

      Hello, David. If you use bios boot instead of UEFI, you just need to make one change. When installing Fedora, instead of creating a 512MiB EFI partition in the Anaconda installer, create a BIOS Boot partition. A 2MiB partition will be created for the bios, and you do not need to mount it anywhere; simply continue installation normally, as shown in the tutorial.

      Wherever you find the part where you have to modify the /boot/efi/EFI/fedora/grub.cfg file, just ignore that part.

  17. Sanjibukai Avatar
    Sanjibukai

    Hello and thank you for that wonderful guide.
    I followed everything and after the last snapper test (when we successfully recover from the rm)…
    How can we get back to the initial state without having any snapshot?
    The snapper ls is showing that the snapshot 4* is the current loaded snapshot (hence the *)..
    I tried sudo snapper delete 1-4 but it just deleted 1-3 but not 4…
    So is there a way to delete all the snapshots?

    1. Madhu Desai Avatar

      Hello, Sanjibukai. Please accept my apologies for the delay in responding.

      Snapshot #4 cannot be deleted as it is mounted as the / filesystem and is active. When you say, “How can we get back to the initial state without having any snapshot?” I presume you want to make snapshot #4 the new base for the / filesystem.

      If that’s the case, here’s what I came up with: To begin, replace the original / (ID=5) with snapshot #4, reboot, and then delete snapshot #4.

      There could be another better way to do this, but for now, this is what I got. I’ll let you know if I come across a better solution. Please test it on a virtual machine before applying it on a real machine. I tried it on a virtual machine, and to me, it worked fine.

      Replace /:
      $ sudo -i
      # mount -o subvolid=5 /dev/vda2 /mnt
      # cd /mnt
      # rm -rvf !(home|.snapshots|var)
      # cd var
      # rm -rvf !(log)
      # cd ..
      # \cp -arvf /.snapshots/4/snapshot/. .
      # cd
      # umount /mnt

      Set the default mount:
      # btrfs subvolume set-default 5 /

      Verify. You should get ‘ID 5 (FS_TREE)’ as the output:
      # btrfs subvolume get-default /
      ID 5 (FS_TREE)

      Reboot:
      # reboot

      After rebooting, now you can delete snapshot #4.
      $ sudo snapper delete 4

      Update grub:
      $ sudo grub2-mkconfig -o /boot/grub2/grub.cfg

      Now, verify:
      $ snapper ls

      I hope it works well for you.

      1. Madhu Desai Avatar

        The only difference is that my root is a subvol.

        That’s why rollback isn’t working. If ‘/’ file system is mounted on a subvolume, rollback doesn’t work. It has to be mounted as a Main volume.

        1. invra Avatar
          invra

          how do i change that?
          oh i didnt get to the rollback part yet. my system breaks at point 3 . Install and Configure Snapper

          1. Madhu Desai Avatar

            Converting a “root” subvolume mounted on ‘/’ to a Main volume is a big headache. In my opinion, you’ll be better off installing it from scratch. You can test everything on a virtual machine, just like in the guide, to check whether everything works as expected.

            You don’t need to create a separate /tmp subvolume because Fedora mounts /tmp with a tmpfs filesystem. In an earlier version of this post, I made the same mistake. Also, because you created a separate /var subvolume, the /var/log subvolume is unnecessary.

        2. invra Avatar
          invra

          how can i move the install to the main volume

Leave a Reply

Your email address will not be published. Required fields are marked *