The Virtual Machine Manager, or virt-manager, is a graphical application for creating and managing guest virtual machines. You can use the virt-manager application to create new virtual machines, install guest OS in virt-manager using a wizard or manually, configure virtual machine resource allocation, and manage virtual hardware. It also provides an overview of virtual machines that are currently running and their live performance.
In this blog, I’ll show you how to create virtual machines in KVM virt-manager. If you want to install the guest virtual machine using the command-line interface, see my other article 'How to Install a KVM Guest OS from the Command-Line'.
Before proceeding, ensure that the KVM hypervisor has been installed and that the host is ready for virtualization. If you haven't already installed the KVM hypervisor on your Linux distribution, visit my other blog "How Do I Properly Install KVM on Linux".
The operating system I chose for the guest virtual machine for this blog is Rocky 9 Enterprise Linux. You may, however, choose any other operating system.
So, let’s begin.
Table of Contents
- 1. Create a Virtual Machine Using the Wizard
- 2. Overview (Advanced Options)
- 3. CPUs
- 4. Memory
- 5. Boot Options
- 6. Storage
- 7. Network
- 8. Guest Agent Channel
- 9. Video
- 10. TPM
- 11. Conclusion
- 12. Watch on YouTube
1. Create a Virtual Machine Using the Wizard
Launch the Virtual Machine Manager application.
Before you can begin creating a guest virtual machine, you must first enable XML editing. You will need to edit some XML components later.
Go to Edit > Preferences and Enable XML editing.
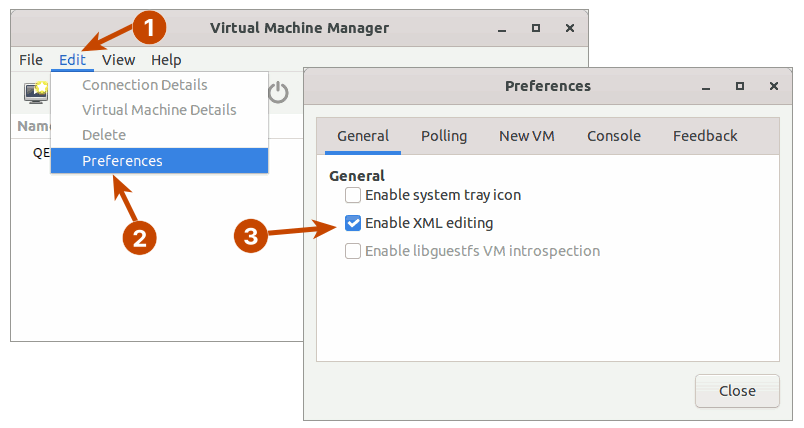
After that, click the computer icon in the upper left corner.
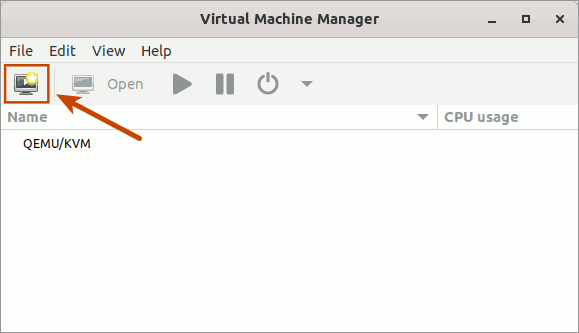
This will launch a wizard that will guide you through the process of creating a new virtual machine in five easy steps.
Step 1 & 2: Choose How You Want to Install
The step 1 of the wizard is to select how you want to install the operating system. And step 2 of the wizard is to provide the installation source for the option you selected in step 1.
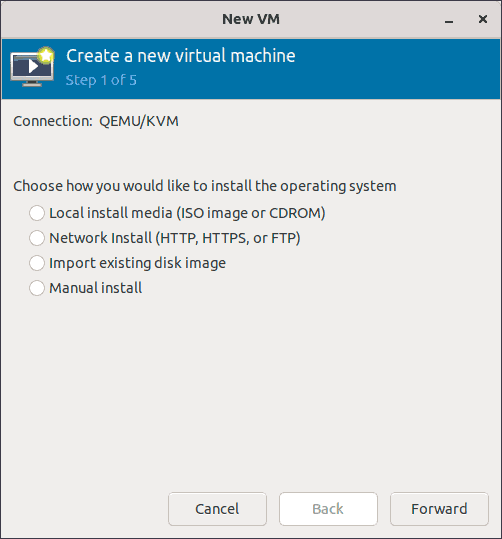
If you are installing the operating system from an ISO image, choose the first option in Step 1 of the wizard.
In step 2 of the wizard, select an ISO image.
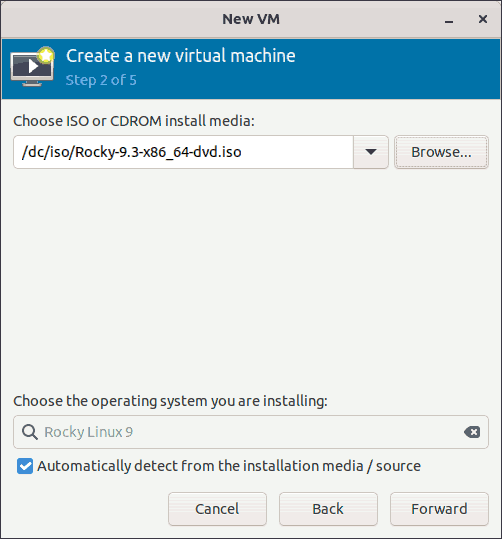
Before you select the ISO image, make sure it is the proper OS installer.
$ osinfo-detect /dc/iso/Rocky-9.3-x86_64-dvd.iso
Media is bootable.
Media is an installer for OS 'Rocky Linux 9 (x86_64)'
In this case, it's the Rocky Linux 9 installer.
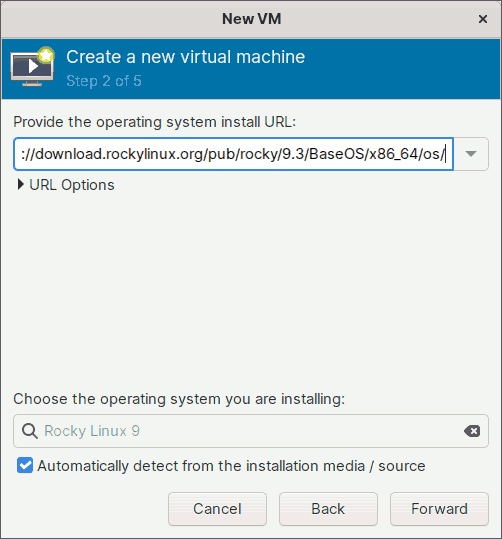
If you want to install an operating system over a network, choose the second option in Step 1 of the wizard.
In step 2, you must provide the URL for the installation tree. For example, to install Rocky Linux version 9.3 over the network, you must provide the URL for the installation tree, such as:
https://download.rockylinux.org/pub/rocky/9.3/BaseOS/x86_64/os/
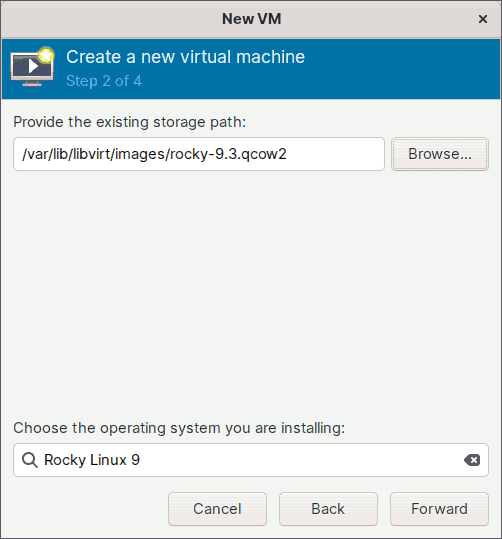
Choose the third option in step 1 if you've already downloaded the ready-to-use virtual disk image that most operating system distributors provide.
For example, you may have already downloaded a ready-to-use virtual disk image with the Rocky Linux 9.3 operating system pre-installed.
Before installing, you must first prepare the virtual disk image for use with KVM virtualization.
Copy the downloaded qcow2 image to the '/var/lib/libvirt/images/' directory. Give any relevant name.
$ sudo cp -v Rocky-9-GenericCloud-LVM.latest.x86_64.qcow2 \
    /var/lib/libvirt/images/rocky-9.3.qcow2
If you use any Linux distribution based on Red Hat, you must set the appropriate SELinux file contexts.
$ sudo restorecon -Fv /var/lib/libvirt/images/rocky-9.3.qcow2Then, run the following command to set the root password and uninstall the cloud-init program. For the sake of simplicity, I'll set the root password to 'abcd1234'. But make sure you use a strong password.
$ sudo virt-customize -a /var/lib/libvirt/images/rocky-9.3.qcow2 \
    --root-password password:abcd1234 \
    --uninstall cloud-init
[   0.0] Examining the guest ...
[  16.1] Setting a random seed
[  16.1] Setting the machine ID in /etc/machine-id
[  16.1] Uninstalling packages: cloud-init
[  21.0] Setting passwords
[  22.6] SELinux relabelling
[  33.6] Finishing off
This virtual disk can now be used in step 2 of the wizard.
Alternatively, if you have a qcow2, or raw virtual disk image, with an operating system that you have installed previously, you can also use that here.
Finally, if you want to install the virtual machine manually, choose the fourth option in Step 1 of the wizard.
I will, however, install the Rocky Linux version 9.3 operating system using the ISO image that I downloaded from the Rocky Linux website.
Step 3: Set Memory and CPU
In step 3 of the wizard, you must specify how much host memory and how many virtual CPUs the guest virtual machine will have.
I'll set the memory to 4 GiB (4096 MiB) and the CPU to 1. You can, however, customize them to suit your needs.
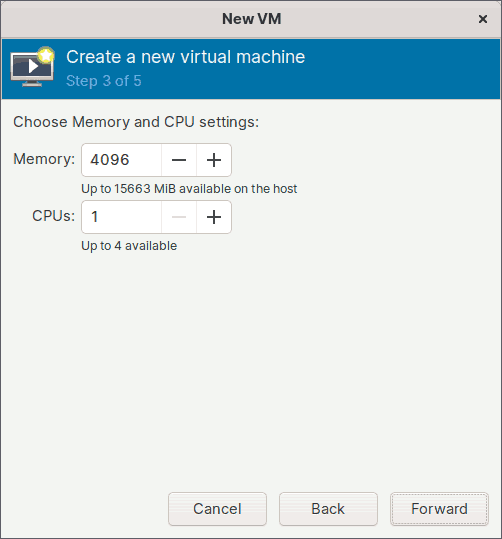
Keep in mind that the amount of memory and CPU count you enter here are both fixed. You may also want to enable the hot plug feature, which allows you to add memory or CPUs while the guest virtual machine is running. I will show you how to enable the hot plugging feature while explaining the advanced settings.
For now, I'll press the Forward button to proceed to the next step.
Step 4: Enable Storage
Step 4 of the wizard is about allocating storage space for the guest virtual machine.
I will set the disk image size to 40 GiB, but you can adjust it to suit your needs.
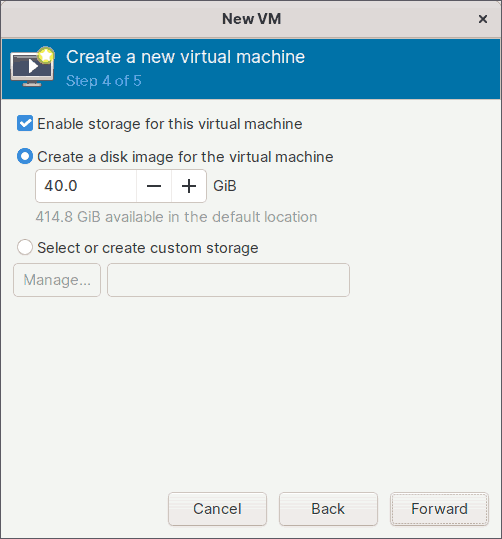
The virtual storage disk created will be of type qcow2, and it will be saved in the default directory-based storage pool of the KVM hypervisor, which is /var/lib/libvirt/images/.
If you want to create storage on other types of storage pools, select the option 'Select or create custom storage' instead.
If you haven't already created a storage pool and are interested in doing so, check out my other blog 'How to Create and Manage Storage Pools and Volumes'.
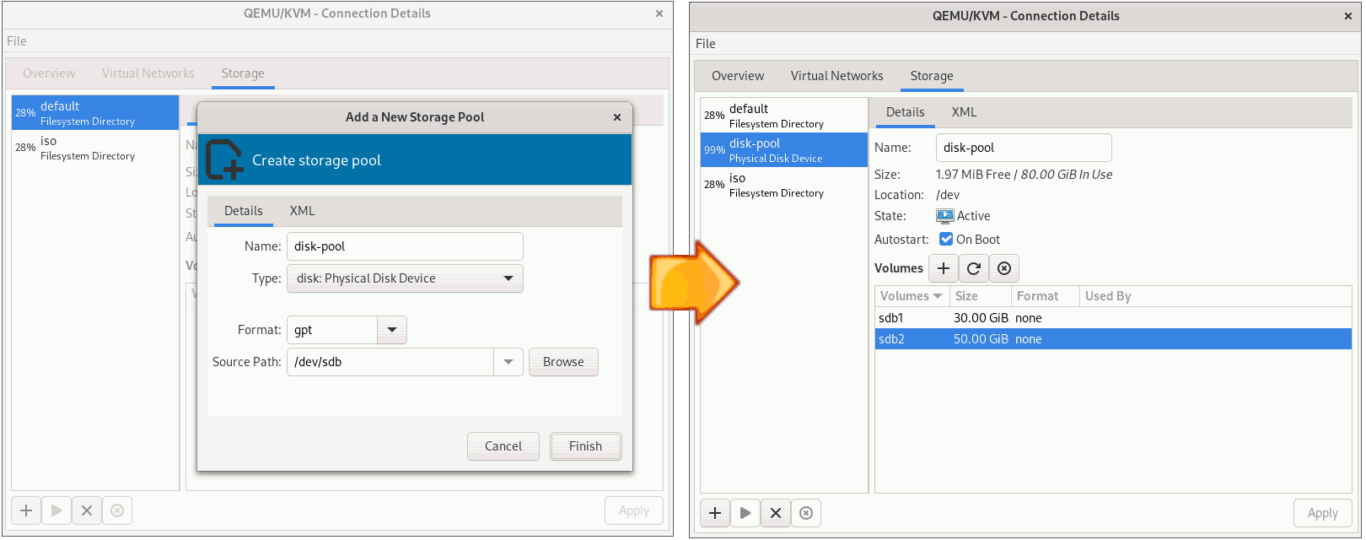
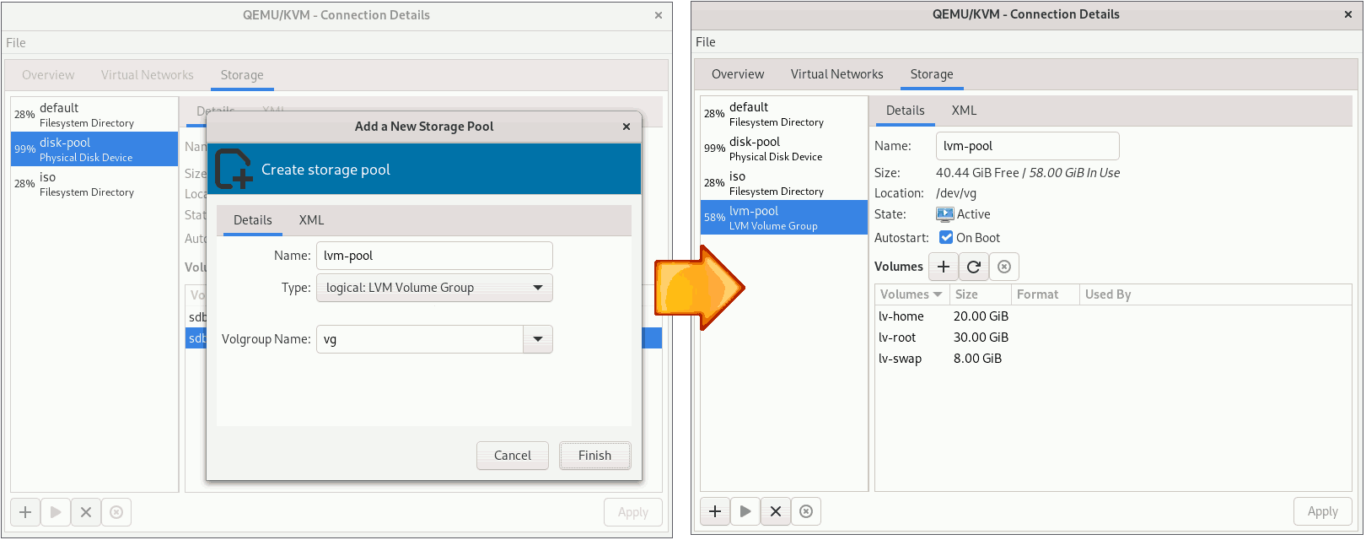
Instead of virtual disks, you can use this setup to install Rocky Linux on a physical partition or even an LVM logical volume.
You can use the physical partition as your storage.
Or, you can also use the logical volume for storage.
Please keep in mind that you can only take internal snapshots of your virtual machine if you use the qcow2 storage type. If you install the operating system on a virtual machine that uses another type of storage, such as raw, physical partition, or LVM logical volume, you will be unable to take internal snapshots.
I will, however, let the Virtual Machine Manager create a storage device for me. I've already set the storage size to 40 GiB and will keep it that way.
Click the [Forward] button to continue.
Step 5: Set the Virtual Machine Name
This is the final configuration screen of the Virtual Machine Creation Wizard.
Enter the name of the guest virtual machine. I'll give it the name 'rocky-9.3-server-gui'.
Also, check the 'Customize configuration before install' option to continue configuring the advanced options.

Finally, click the [Finish] button to complete the wizard.
2. Overview (Advanced Options)
Here, you can further customize the settings and fine-tune your guest virtual machine. I will just highlight some of the most important features here. Evaluate these features and, if necessary, implement them; otherwise, discard them.
The overview section allows you to configure basic information about the guest virtual machine.
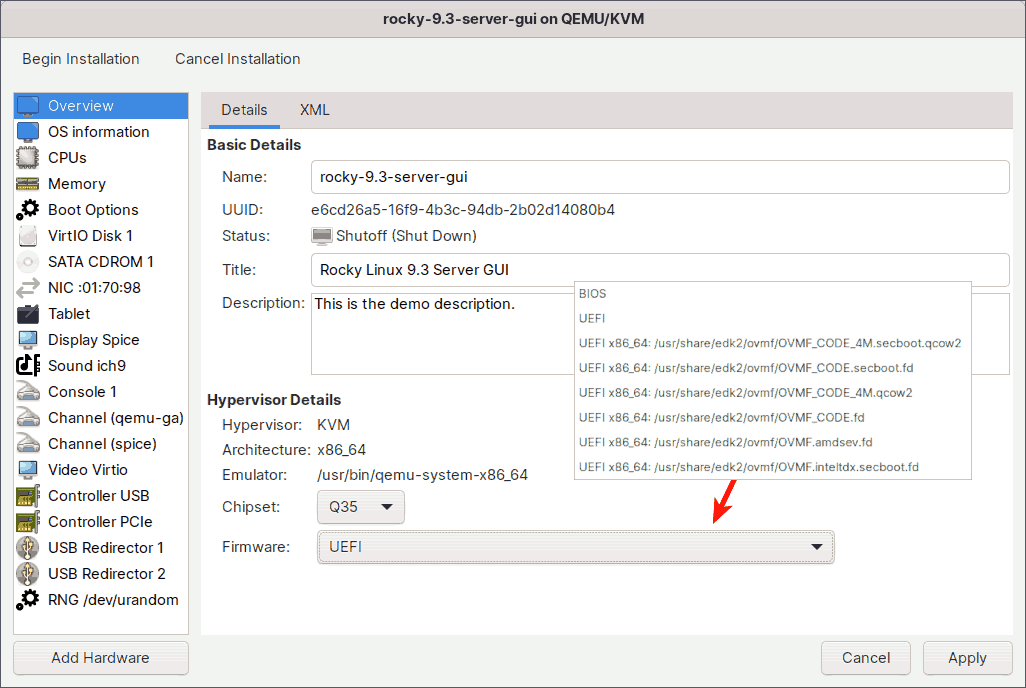
In addition to the name, which should be unique among all guests on the hypervisor, you can provide a title and description to help you identify the guest virtual machine in the Virtual Machine Manager.
KVM supports two types of chipsets: i440FX and Q35. The older i440FX only supports PCI, whereas the new Q35 natively supports PCIe, allowing GPU pass through. So, make sure you have the Q35 chipset selected. This is also the default.
Choose what kind of firmware you would like to have on your guest virtual machine.
The two most significant are:
BIOS:
The BIOS option will be selected by default. When using this firmware, you will be able to take internal snapshots both offline and online, which is very useful when experimenting with something. The majority of modern computers, however, use UEFI, and BIOS is considered legacy.
UEFI:
Use this option if you want the virtual machine to boot with UEFI firmware, Secure Boot enabled, and Microsoft certificates pre-enrolled. At the time of writing, you can only take internal snapshots offline with this firmware, not online.
To find out what other firmwares can do, open the terminal and navigate to /usr/share/qemu/firmware/, where you can find information about these firmwares.
$ ls -1 /usr/share/qemu/firmware/
30-edk2-ovmf-4m-qcow2-x64-sb-enrolled.json
31-edk2-ovmf-2m-raw-x64-sb-enrolled.json
40-edk2-ovmf-4m-qcow2-x64-sb.json
41-edk2-ovmf-2m-raw-x64-sb.json
50-edk2-ovmf-4m-qcow2-x64-nosb.json
50-edk2-ovmf-x64-microvm.json
51-edk2-ovmf-2m-raw-x64-nosb.json
60-edk2-ovmf-x64-amdsev.json
60-edk2-ovmf-x64-inteltdx.json
For example, if you want to learn about the features of the UEFI firmware, you can look at its json file.
$ cat /usr/share/qemu/firmware/30-edk2-ovmf-4m-qcow2-x64-sb-enrolled.json
{
    "description": "OVMF with SB+SMM, SB enabled, MS certs enrolled",
    "interface-types": [
        "uefi"
    ],
    "mapping": {
        "device": "flash",
        "mode" : "split",
        "executable": {
            "filename": "/usr/share/edk2/ovmf/OVMF_CODE_4M.secboot.qcow2",
            "format": "qcow2"
        },
        "nvram-template": {
            "filename": "/usr/share/edk2/ovmf/OVMF_VARS_4M.secboot.qcow2",
            "format": "qcow2"
        }
    },
...
...
As you can see, using the UEFI firmware gives your guest virtual machine, Secure Boot with System Management Mode, with Secure Boot enabled, and Microsoft certificates pre-enrolled.
I'll be using UEFI firmware for this tutorial.
3. CPUs
In the CPUs section, a number of CPU-related settings can be set.
3.1. Enable the CPU Hot Plug/Unplug
At step 3 of the wizard, you assigned the guest virtual machine 1 fixed virtual CPUs (vCPU). If you want, you can also enable the vCPU Hot Plug/Unplug feature. This allows you to change the number of vCPUs dynamically while the guest virtual machine is running.
To enable the vCPU Hot Plug/Unplug feature, first set the 'vCPU allocation' slot to the maximum number of vCPUs that you want to hotplug into the running guest.
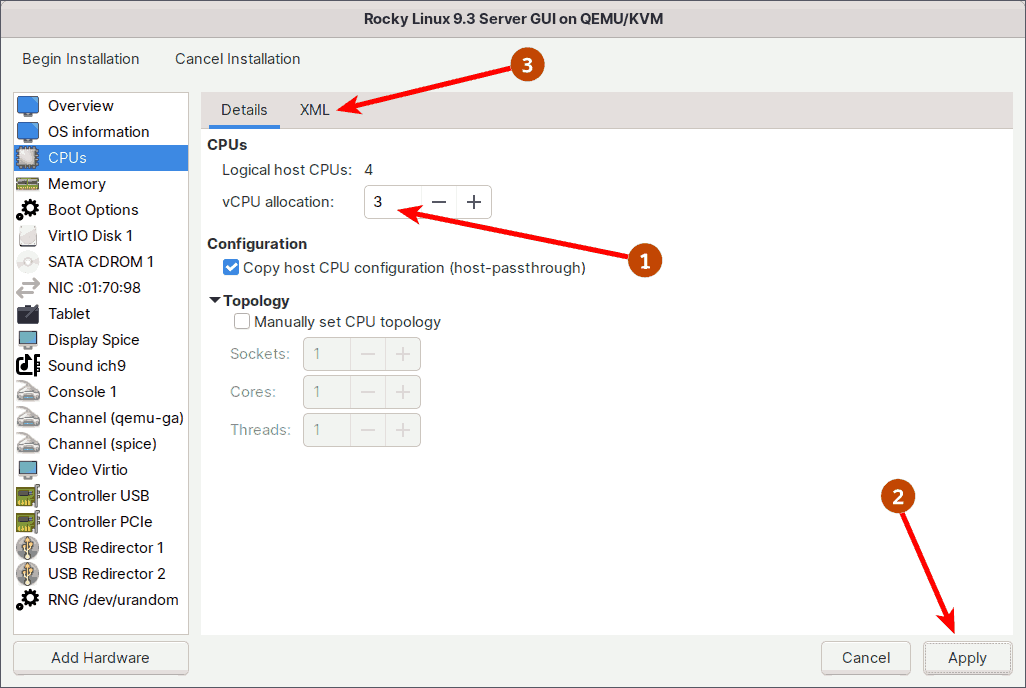
I'm running an old 4th Generation Intel I5, which has only 4 CPUs. As a result, I'll limit the maximum number of vCPUs to 3. If you have a recent processor, you will have more CPUs and can set the maximum to even more.
Next, in the XML tab, set the current number of vCPUs you want the guest to have every time it boots. I'll set the current number of virtual CPUs back to 1.
Note: If XML editing is disabled, enable it in Virtual Machine Manager (Edit -> Preferences -> General).
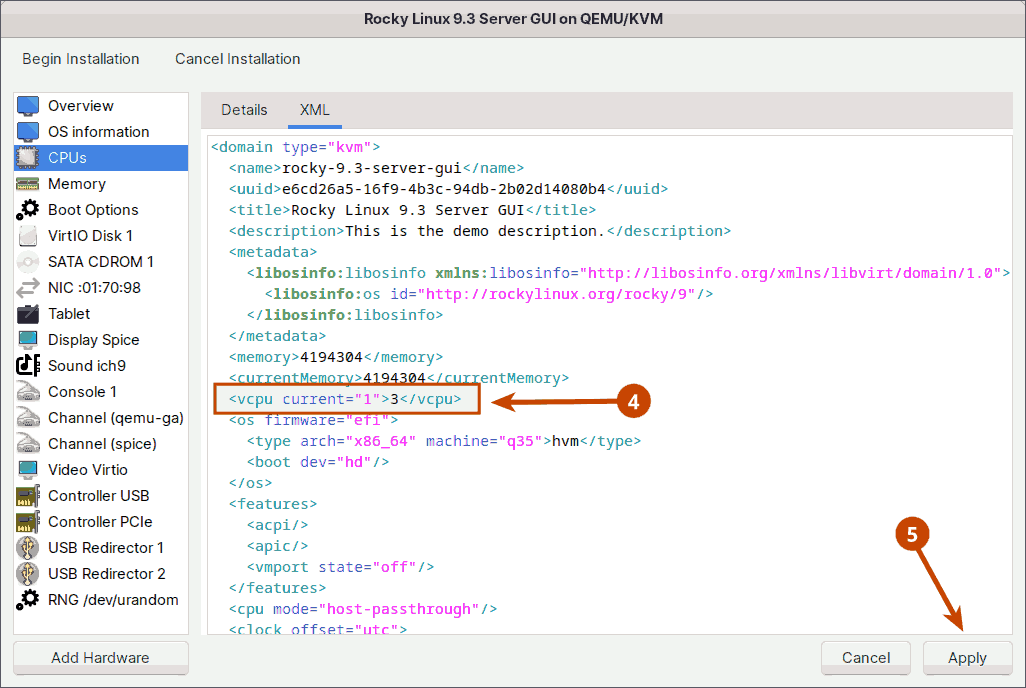
As shown in the image above, I've set the current vCPUs to 1 and the maximum vCPUs to 3. So, when I boot the guest virtual machine, I'll start with one vCPU, with two more available for hot plugging later. If your processor is newer and has more CPUs, you can, for example, set the current to 4 and the maximum to 8 vCPUs.
To dynamically increase (or decrease) the number of vCPUs of a running virtual machine, for example, to 2, run the following command on the host machine.
$ sudo virsh setvcpus rocky-9.3-server-gui 2 --live3.2. Choose a CPU Model
The KVM comes with a number of standard CPU models. If you need a specific CPU model for your virtual machine, you can choose from the CPU models list.
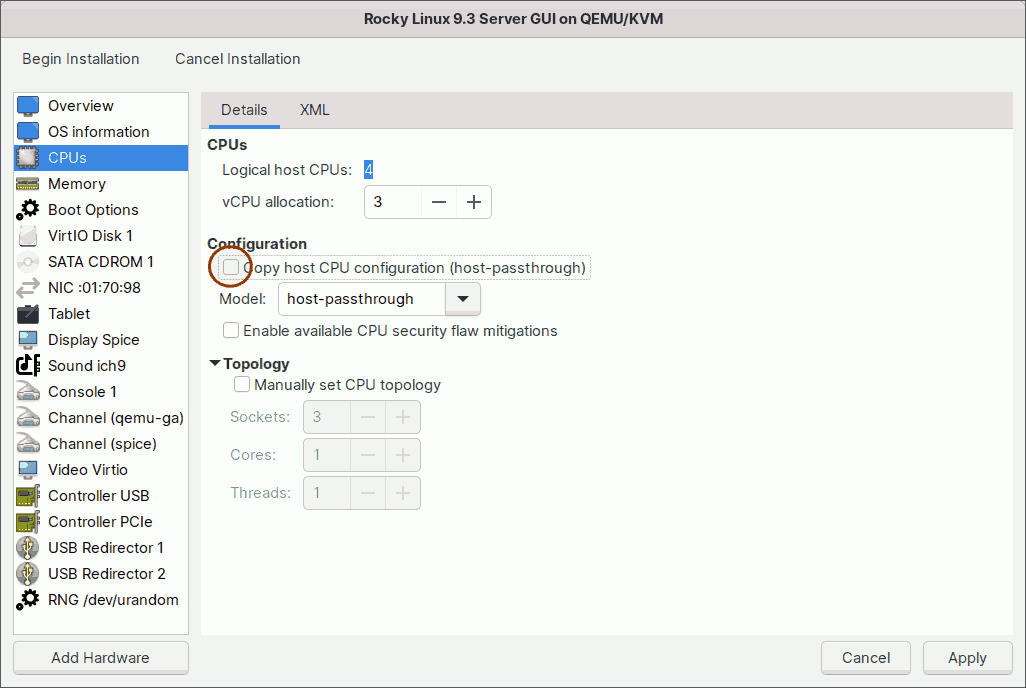
To see all available models, uncheck the 'Copy host CPU configuration' checkbox or run the following command in the host terminal.
$ sudo virsh domcapabilities --arch $(uname -m) | grep "model usable='yes'"Alternatively, you can change the CPU type by specifying the mode. To see what modes are available, run the following command in the host terminal.
$ sudo virsh domcapabilities --arch $(uname -m) | grep 'mode name'Among all available modes/models, these are the two most important:
host-passthrough
When the mode is set to 'host-passthrough', the host CPU's model and features are exactly passed on to the guest virtual machine. This is the recommended and default option as well. The disadvantage is that live migration to different hosts with different hardware will be impossible.
host-model
You can also set the mode to 'host-model'. In this mode, a CPU model similar to the host CPU is first chosen from the CPU models list. Then, to get as close as possible to the host CPU, additional features are added. This will not exactly match the host CPU like 'host-passthrough', but it will provide many of the benefits of host-passthrough while also making live migration safe.
To find out which CPU model and features will be assigned to the guest virtual machine if the mode is set to 'host-model', run the following command on your host.
$ sudo virsh capabilities --xpath '//cpu'3.3. Manually Set CPU Topology
This option allows you to apply a specific CPU topology to the virtual CPUs in your guest virtual machine.
If you want to simulate any number of sockets, Red Hat recommends using only a single core and a single thread and not over committing virtual CPUs for optimal performance.
4. Memory
In the same step 3 of the wizard, you also set the amount of memory to a fixed 4 GiB. If you want, you can also enable the memory Hot Plug/Unplug feature in the same way you did for the CPU.
For the memory hot plug/unplug feature, I will keep the current memory allocation of 4 GiB while increasing the maximum allocation to 8 GiB.
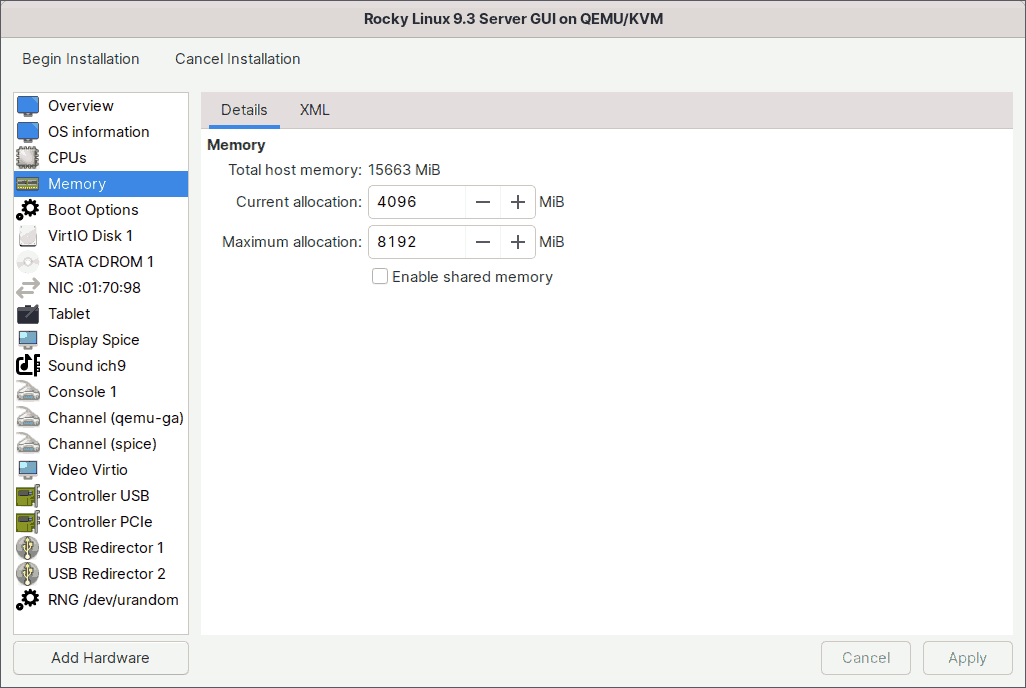
As shown in the image above, I've set the current memory to 4 GiB and the maximum memory to 8 GiB. So, when I boot the guest virtual machine, it will start with 4 GiB of memory and will have an additional 4 GiB (up to 8 GiB) available for hot plugging later.
To dynamically increase (or decrease) the memory of a running virtual machine, for example, to 6 GiB, run the following command on the host machine.
$ sudo virsh setmem rocky-9.3-server-gui 6G --currentIf you want to share files between the host and guest virtual machines, enable the shared memory option. There are a few more steps you must complete before you can begin sharing files with the guest virtual machine.
I've also written blogs about how to share files between the host and guest virtual machines: 'Share Files Between KVM Host and Linux Guest' and 'Share Files Between the KVM Host and Windows Guest'. Take a look at them both.
5. Boot Options
This section allows you to customize the guest virtual machine's boot options.
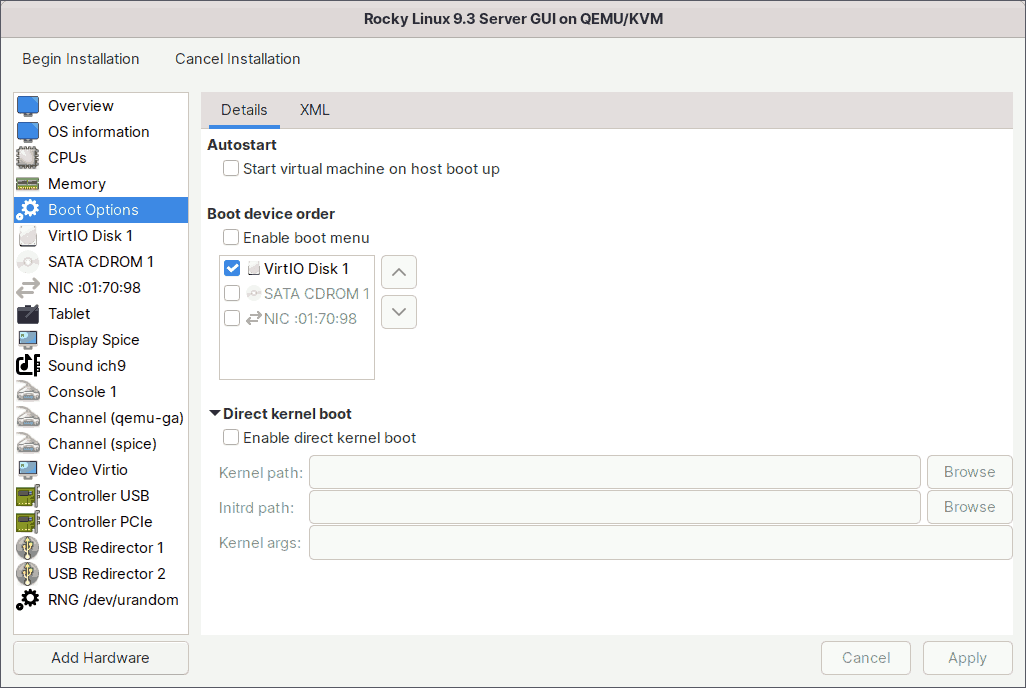
Check the 'Start virtual machine on host boot up' box if you want this guest virtual machine to boot automatically whenever the host machine boots.
Check the 'Enable boot menu' box if you want the boot menu to appear every time the guest virtual machine starts. The menu will appear for a second or two, and if you press the Escape key during that time, you will be given several boot options, including the iPXE.
If you want to boot into a different kernel than the one on the boot device, enable direct kernel boot. You can specify the paths to the alternative kernel and initial ramdisk files on the host system. You also have the option to pass kernel arguments to the loaded kernel.
6. Storage
This section lets you fine-tune your virtual disk in a variety of ways.
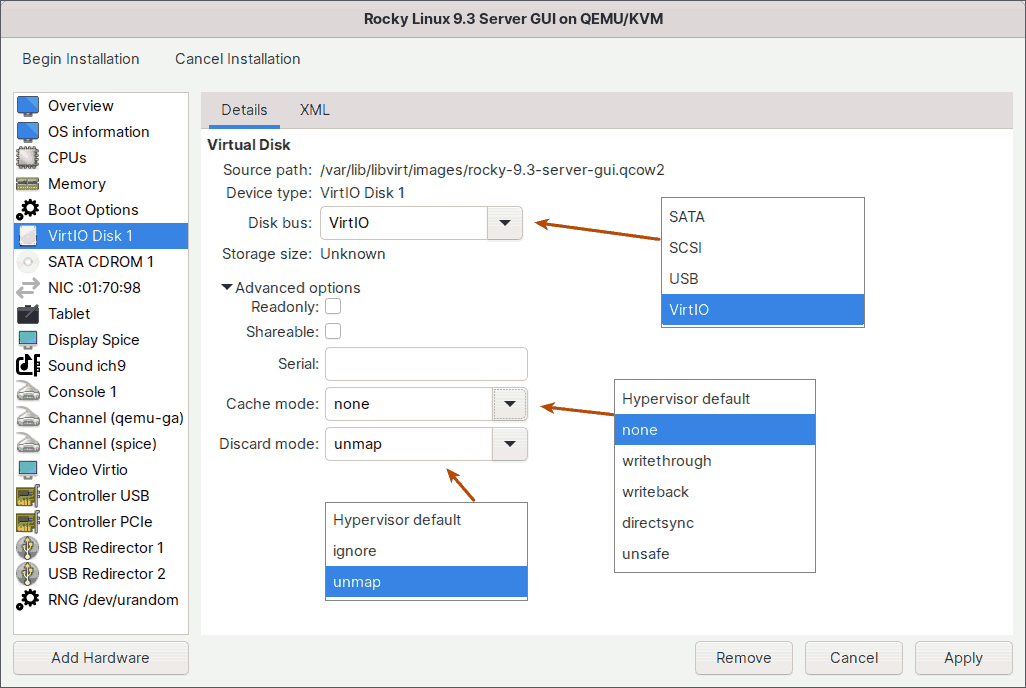
6.1. Disk Bus
This option lets you choose which type of disk bus the guest virtual machine should emulate for its disk device.
SATA
SATA, which stands for Serial Advanced Technology Attachment, is the most commonly used interface in desktops and laptops to connect storage devices such as hard disk drives, optical drives, and solid-state drives.
SCSI
SCSI, or Small Computer System Interface, is commonly used in servers and workstations that require high throughput and reliability. It is commonly used to connect and communicate with devices like hard disks, optical drives, scanners, and printers.
USB
USB, which stands for Universal Serial Bus, is a common plug-and-play connection for a wide range of devices. In general, USB is used to connect different types of external devices to computers.
VirtIO
Finally, we have the VirtIO disk bus. While you can use the other three disk buses, they will be slower than VirtIO because the hypervisor must emulate the physical device. This emulation is inefficient and time consuming.
The VirtIO disk bus, on the other hand, is purpose-built and optimized for virtualization. As a result, there will be no processing overhead and the performance will be optimal.
This is also the recommended choice.
If you are creating a Microsoft Windows VM, you cannot use the VirtIO bus right away because Microsoft does not recognize it. To make the VirtIO drivers available to Windows guests, you must first download the virtio-win.iso image. For more information, see the section titled 'Install VirtIO Drivers for Windows Guests' in my other blog post 'How Do I Properly Install KVM on Linux'.
6.2. Advanced Options
Readonly
Choose this option if you want to make the virtual disk read-only rather than writeable. In this case, it makes no sense because we are installing Rocky Linux and need to write to the disk. When you want to share data on the disk with read-only access, you usually use this option.
Shareable
Check the Shareable box, if you want a single virtual disk to be shared by multiple cluster-aware guests. Shared disks should not be used in every situation. Shared disks are only appropriate for applications, such as clustered database servers, and other highly available services. Attaching a shared disk to multiple guests, which are not cluster-aware, increases the likelihood of data corruption, because their disk reads and writes are not coordinated.
Serial
If you have any software licensed to the hard disk serial number and you want to run it on a guest virtual machine, you can enter the serial number here.
If you want to know the serial number of your hard disk, go to your terminal and run any of the following commands.
## Type 1
$ lsblk -dpo name,serial,type,tran /dev/sda

## Type 2
$ sudo hdparm -I /dev/sda | grep 'Serial Number'

## Type 3
$ udevadm info --query=all --name=/dev/sda | grep ID_SERIAL
6.3. Cache Mode
KVM provides multiple storage caching strategies when configuring a guest VM. Each guest disk interface can have one of the following cache modes.
None
Recommended. The host page cache is bypassed and I/O happens directly between the hypervisor user space buffers and the storage device. Because the actual storage device may report a write as completed when placed in its write queue only, the guest's virtual storage adapter is informed that there is a writeback cache. The guest would be expected to send down flush commands as needed to manage data integrity. Performance-wise, it is equivalent to direct access to your host's disk.
Writethrough
Writes are reported as completed only when the data has been committed to the storage device. The host page cache is used in what can be termed a writethrough caching mode. The guest's virtual storage adapter is informed that there is no writeback cache, so the guest would not need to send down flush commands to manage data integrity. The storage behaves as if there is a writethrough cache.
Writeback
The host page cache is used and writes are reported to the guest as completed when they are placed in the host page cache. The normal page cache management will handle commitment to the storage device. Additionally, the guest's virtual storage adapter is informed of the writeback cache, so the guest would be expected to send down flush commands as needed to manage data integrity.
Directsync
Writes are reported as completed only when the data has been committed to the storage device, and when it is also desirable to bypass the host page cache. Like writethrough, it is helpful to guests that do not send flushes when needed. It was the last cache mode added, completing the possible combinations of caching and direct access semantics.
Unsafe
The key aspect of this “unsafe” mode, is that all flush commands from the guests are ignored. Using this mode implies that the user has accepted the trade-off of performance over the risk of data loss in case of a host failure. Useful, for example, during guest installation, but not for production workloads.
6.4. Discard Mode
There are two different modes here - ignore and unmap. When you delete files in the guest VM, the changes are immediately reflected in the guest file system. However, the qcow2 disk image associated with the VM does not shrink to reflect the newly freed space. With the unmap option selected, you can reclaim that free space.
You can also manually reclaim free space. Run the following command on the host to reclaim free space while the guest virtual machine is running.
$ sudo virsh domfstrim rocky-9.3-server-gui --minimum 07. Network
This section allows you to configure the network device interface.
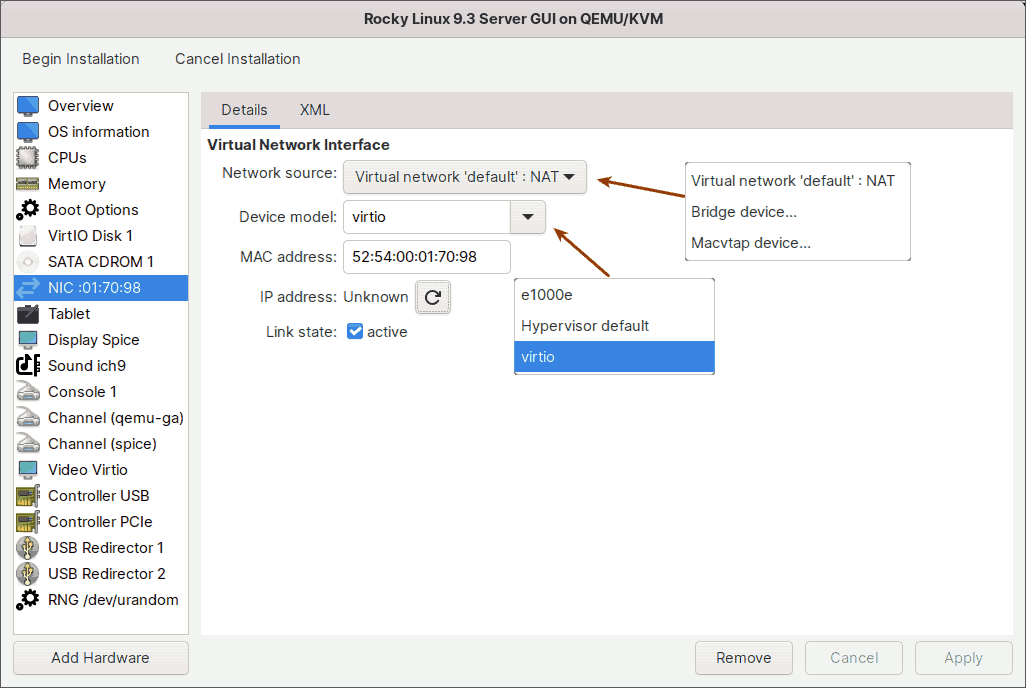
7.1. Network Source
Default NAT
By default, all virtual machines on the host are connected to the same NAT-type virtual network called 'default'.
Please keep in mind that virtual machines on the 'default' network will only have outbound network access. That is, virtual machines will have complete network access, but devices outside the host will be unable to communicate with virtual machines on the host. Only the host computer will have complete access to the virtual machines.
The virtual machine, for example, can browse the internet, but cannot host a web server that is accessible to the outside world. Not even from your own mobile device on the same network. Only the host computer, and of course, other virtual machines connected to the same 'default' network, can access the web server.
From a security standpoint, this network is the best option because you have exclusive access to the virtual machine.
Bridge Device
If you want virtual machines to be directly visible on the same physical network as the host and accessible to external devices, you must use a network bridge.
Choose this bridge option, and point it to the bridge connection name. You will then have a network that is accessible to other physical machines on the same network as yours, as well as the outside world.
Before opting for this option, however, make sure you have already established a network bridge connection on your host.
If you have not yet created a network bridge and would like to do so on your host computer, please see my other blog post, 'How to Properly Install KVM on Linux'.
Virtual machines that use this bridge device will receive IP addresses from the same pool as your host computer.
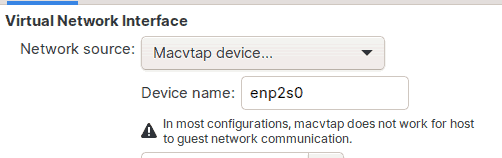
Macvtap Device
If you don't want to go through the hassle of manually creating a network bridge, but still want the virtual machine to be accessible from the outside world, including other devices on the same network as yours, you can use the macvtap option.
All you have to do is select the macvtap device option, and point it to the network interface device name of your host computer, which in my case is enp2s0.
The virtual machine will then receive an IP address from the same pool as your host computer, which is typically the DHCP server on your modem.
However, keep in mind that your host computer should not have any network bridges configured for this to work.
Your virtual machine will then be accessible to the outside world, with one exception: your host computer cannot access the virtual machine.
For example, suppose you run a web server on your virtual machine and set up the network to use macvtap device. The web page you hosted on your virtual machine will then be accessible to the outside world. The web page is also accessible to other devices on the same physical network as yours, such as your mobile phone.
The only computer that does not have access to the virtual machine is your own host computer. You cannot ping the virtual machine from your host, nor can you ssh in. You should work directly in the Virtual Machine Manager graphical console. This is the difference between the macvtap network and the network bridge.
7.2. Device Model
When it comes to device models, you have two choices: e1000e and VirtIO.
e1000e is an emulated version of the Linux Base Driver for Intel 825 series Gigabit Ethernet Network Connections.
The VirtIO, on the other hand, is a para-virtualized driver designed specifically for virtualization.
In comparison to the e1000e, the VirtIO has no overhead and it passes network traffic between the virtual machine and the host in the most straightforward way possible.
VirtIO is the recommended option.
8. Guest Agent Channel
The QEMU Guest Agent Channel establishes a private communication channel between the host physical machine and the guest virtual machine, allowing you to send commands to the guest virtual machine's operating system. The guest operating system, then responds asynchronously to these commands.

For example, after creating the Rocky Linux 9 guest virtual machine, you can use these commands, among many others, from the host, to communicate with the guest virtual machine.
### Shutdown guest virtual machine safely using the guest agent.
$ sudo virsh shutdown rocky-9.3-server-gui --mode=agent

### Query the guest operating system's IP address via the guest agent.
$ sudo virsh domifaddr rocky-9.3-server-gui --source agent

### Show a list of mounted filesystems in the running guest.
$ sudo virsh domfsinfo rocky-9.3-server-gui

### Instructs the guest to trim its filesystem.
$ sudo virsh domfstrim rocky-9.3-server-gui
Qemu agent support also enables better integration with the guest. For example, it allows copy and paste between the guest and host operating systems, as well as dynamic resolution changes when the client window is resized or full-screen.
Also, please keep in mind that once you've added this Guest Agent Channel and created the guest virtual machine, you'll need to install daemon packages in the guest virtual machine's operating system for this to work properly. For Linux, the packages are qemu-guest-agent and spice-vdagent.
9. Video
The Video section allows you to configure various video settings.
Here you can select which video device model will be attached to the guest. The video settings that are valid depend on the hypervisor. Recent KVM options include Virtio, QXL, VGA, Ramfb, and Bochs.
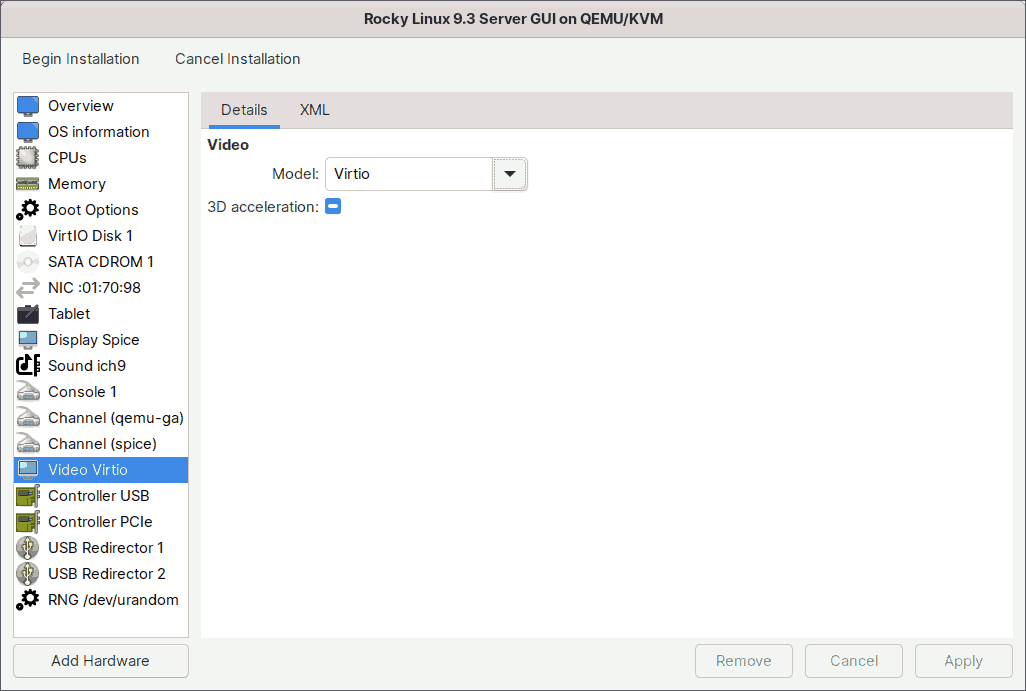
The most important models are QXL, which is the default for Windows virtual machines, and VirtIO, which is the default for Linux virtual machines.
Screen Resolution:
If you want the virtual machine screen to have a specific resolution at boot, you can specify it in the XML tab of the video section.
This is especially useful when you want to install an operating system without a graphical user interface. With such interfaces the display will generally have a standard resolution of 1024x768 and sometimes even less.
So for this virtual machine, I will set the display resolution to Widescreen 1360x768.
First, insert the following line.
<resolution x="1360" y="768"/>
For some reason, if the number is not divisible by 16, the display becomes distorted for me. For example, if I set 1366x768, 1366 is not divisible by 16, so the display of the virtual machine will be distorted. As a result, I’ve set the resolution to 1360x768.

Next, if you want to use the same widescreen resolution during pre-boot or while installing the operating system, you should set it in the UEFI firmware as well. I'll show you how once I've completed configuring advanced options.
10. TPM
The next important option to consider is TPM (Trusted Platform Module).
The TPM technology is designed to provide hardware-based security functions. You can enable the TPM device in a virtual machine to have access to TPM functionality. The TPM device can be either TPM 1.2 or TPM 2.0.
The device could be a TPM passthrough or a TPM emulator. TPM passthrough allows a single virtual machine to access the host's TPM. The TPM emulator, on the other hand, allows each virtual machine its own private TPM.
In the TPM emulator, KVM supports two models: TPM Interface Specification (TIS) and Command-Response Buffer (CRB). Both support versions 1.2 and 2.0.
In this tutorial, I will enable the TPM emulator with CRB version 2.0. To do so, click the 'Add Hardware' button in the bottom left corner of the window and select the TPM device.

After that, assuming you've finished with the advanced settings, click the Begin Installation button in the upper left corner of the window.
Continue to press the [Esc] button until the firmware settings window appears.
Go to 'Device Manager', then 'OVMF Platform Configuration', and set the preferred resolution to 1360x768.
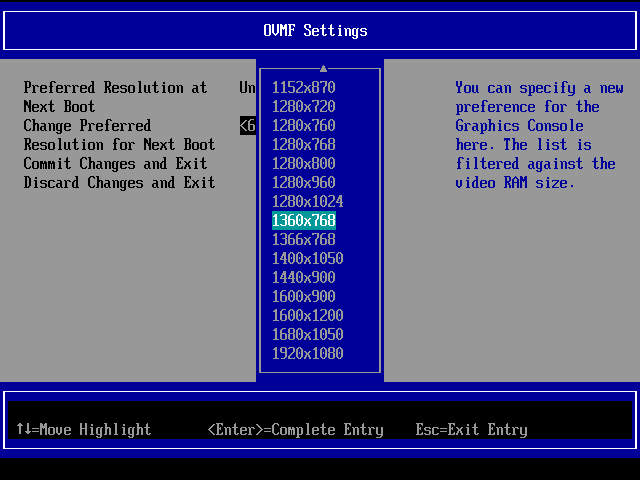
Click the 'Commit Changes and Exit' button to set and save your new resolution. Restart the virtual machine.
Note: When you restart the virtual machine, you may receive the error ‘No bootable option or device was found’. To resolve this, just force shut down the virtual machine and remount the Rocky Installer ISO.
The Rocky 9.3 Installer starts.
If the screen does not automatically resize, go to the 'View' menu and select 'Resize to VM'.

Follow the standard installation procedure of the guest operating system and you have successfully finished the installation of a guest virtual machine using the Virtual Machine Manager (virt-manager).
11. Conclusion
In this blog, you learned how to install a KVM guest virtual machine using the graphical Virtual Machine Manager application. With the guest VM installed, you can now start experimenting with whatever you want.
Going forward, if you want to share files between the KVM host and the Linux guests, visit my other blog, 'Share Files Between KVM Host and Linux Guest Using Virtiofs', to learn how.