In this post, I'll show you how to install WordPress on Fedora Linux, as well as the Apache web server, the MariaDB database server, and the PHP scripting language.
WordPress is one of the most popular website content management systems. Installing WordPress locally on your computer is useful if you want to learn how to use it or if you want to test different components such as themes, fonts, layouts, and colors before applying them to your production site.
The localhost is set up with the following details:
- Operating System: Fedora Workstation 39
- Hostname: wpress.sysguides.home
- IP Address: 192.168.1.39/24
So let's get straight to the terminal and start installing the necessary packages required to set up WordPress on localhost.
Table of Contents
- 1. Install Apache HTTP Server
- 2. Add TLS encryption to an Apache HTTP Server
- 3. Install MariaDB Database Server
- 4. Install PHP Scripting Language
- 5. Install WordPress Content Management System
- Watch on YouTube
1. Install Apache HTTP Server
The Apache HTTP Server (httpd) is a free and open-source cross-platform web server software developed and maintained by the Apache Software Foundation.
Install the httpd package.
$ sudo dnf install httpd httpd-toolsVerify the installed Apache Server version.
$ httpd -v
Server version: Apache/2.4.57 (Fedora Linux)
Server built:   Jul 20 2023 00:00:00
Open the /etc/httpd/conf/httpd.conf configuration file and set your server name. Also, in the <Directory "/var/www/html"> directive, change AllowOverride to All.
$ sudo vim /etc/httpd/conf/httpd.conf
...
ServerName wpress.sysguides.home:80
...
<Directory "/var/www/html">
    ...
    AllowOverride All
    ...
</Directory>
...
Check the configuration to see if there are any errors.
$ sudo apachectl configtest
Syntax OK
Open TCP port 80 (HTTP) in the local firewall.
$ sudo firewall-cmd --add-service=http --permanent

$ sudo firewall-cmd --reload

$ sudo firewall-cmd --list-services
dhcpv6-client http mdns samba-client ssh
Enable and start the httpd service.
$ sudo systemctl enable --now httpdSet the httpd server's IP address in the /etc/hosts file.
$ sudo vim /etc/hosts
...
...
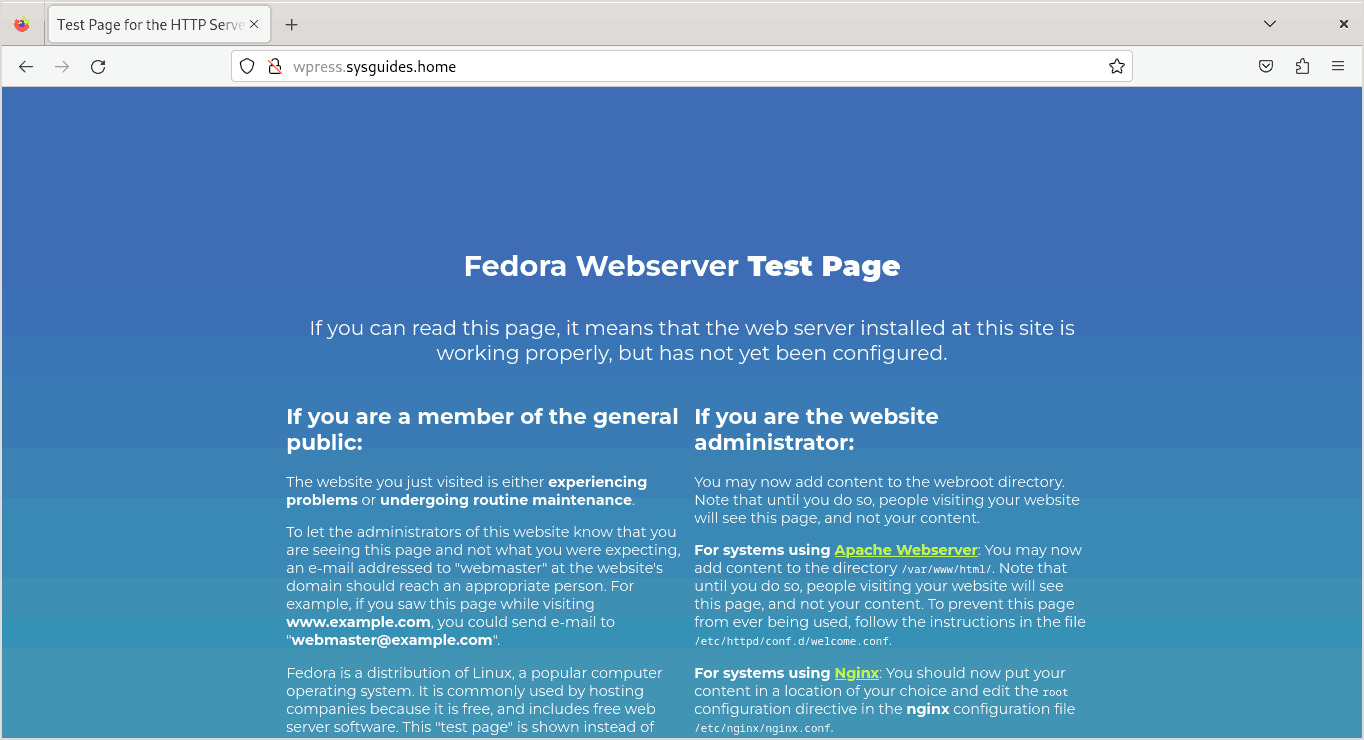
192.168.1.39 wpress.sysguides.homeNow, open a web browser and type http://wpress.sysguides.home or just localhost into the address bar. You should see a webpage something like this.
2. Add TLS encryption to an Apache HTTP Server
By default, Apache provides the content to clients using an unencrypted HTTP connection. However, you may wish to add TLS encryption to an Apache HTTP Server as well, so that it can simulate the actual production website.
First, you must install the mod_ssl module. This module offers strong cryptography to the Apache HTTP server via the Secure Sockets Layer (SSL) and Transport Layer Security (TLS) protocols.
$ sudo dnf install mod_sslThen, you need to generate a self-signed TLS certificate using the openssl command-line tool to enable HTTPS connections.
To generate your private key and public certificate, run the following command. Answer questions and provide information based on your setup. When prompted for the Common Name, enter your server name, which in my case is wpress.sysguides.home.
I’ve set the certificate’s validity to one year (365 days), but you can change the number of days to extend it.
$ sudo dnf install openssl

$ sudo openssl req -x509 -newkey rsa:4096 -sha256 -days 365 -nodes \
  -out /etc/pki/tls/certs/wpress.sysguides.home.crt \
  -keyout /etc/pki/tls/private/wpress.sysguides.home.key
...
Country Name (2 letter code) [XX]:IN
State or Province Name (full name) []:Karnataka
Locality Name (eg, city) [Default City]:Bengaluru
Organization Name (eg, company) [Default Company Ltd]:SysGuides
Organizational Unit Name (eg, section) []:WebDev
Common Name (eg, your name or your server's hostname) []:wpress.sysguides.home
Email Address []:[email protected]
Review the newly generated certificate.
$ openssl x509 -text -noout \
  -in /etc/pki/tls/certs/wpress.sysguides.home.crt
Open the /etc/httpd/conf.d/ssl.conf file and edit/add the following lines.
$ sudo vim /etc/httpd/conf.d/ssl.conf
...
<VirtualHost _default_:443>
    ...
    ServerName wpress.sysguides.home:443
    SSLCertificateFile /etc/pki/tls/certs/wpress.sysguides.home.crt
    SSLCertificateKeyFile /etc/pki/tls/private/wpress.sysguides.home.key
    ...
</VirtualHost>

<VirtualHost *:80>
    ServerName wpress.sysguides.home
    Redirect permanent / https://wpress.sysguides.home
</VirtualHost>
In the above config file,
- The <VirtualHost default:443> directive specifies the HTTPS server name and the location of the TLS certificate.
- The <VirtualHost *:80> directive directs the server to redirect to HTTPS if the address is specified in HTTP.
Now open TCP port 443 (HTTPS) in the local firewall:
$ sudo firewall-cmd --add-service=https --permanent

$ sudo firewall-cmd --reload

$ sudo firewall-cmd --list-services
dhcpv6-client http https mdns samba-client ssh
Restart the httpd service.
$ sudo systemctl restart httpdOpen a web browser and now type https://wpress.sysguides.home in the address bar to open a web page with an HTTPS connection. Since you are using a self-signed certificate, you will receive a warning message. Don't worry; simply accept the risk and continue.
3. Install MariaDB Database Server
Now that your Apache web server is operational with TLS encryption, you need to install the MariaDB relational database management system to store your website data.
Now install the MariaDB database server.
$ sudo dnf install mariadb-serverVerify the installed version.
$ mariadb -V
mariadb  Ver 15.1 Distrib 10.5.21-MariaDB, for Linux (x86_64) using  EditLine wrapper
If your file system is BTRFS, you must disable CoW on the MariaDB database file. Otherwise, database access will be sluggish.
Only run the following command if your file system is BTRFS. If not, skip the command and move on to the next.
$ sudo chattr -R +C /var/lib/mysql/Enable and start the mariadb service.
$ sudo systemctl enable --now mariadbThe installation of MariaDB is complete.
4. Install PHP Scripting Language
The final component to be installed in the LAMP stack is PHP. PHP is a widely-used general-purpose scripting language that is especially well suited for web development.
WordPress recommends PHP 7.4 or higher. At the time of writing, PHP version 8.2 is available in the Fedora repository.
So let's install PHP 8.2 with some recommended extensions. To learn more about these extensions, refer to the page PHP Extensions.
$ sudo dnf install php php-fpm php-mysqlnd php-opcache php-gd \
  php-xml php-mbstring php-curl php-pecl-imagick php-pecl-zip libzip
Verify the installed PHP version.
$ php -v
PHP 8.2.10 (cli) (built: Aug 29 2023 15:31:38) (NTS gcc x86_64)
Copyright (c) The PHP Group
Zend Engine v4.2.10, Copyright (c) Zend Technologies
    with Zend OPcache v8.2.10, Copyright (c), by Zend Technologies
When you install WordPress, you'll need to download/upload images, videos, plugins, themes, and other files. By default, the post/upload size, execution/input time, and RAM limit are all set to be pretty small. As a result, you might want to consider increasing them.
Open the /etc/php.ini file and modify the following lines. The new sizes that have been set are adequate, but you can adjust them if necessary to meet your needs.
$ sudo vim /etc/php.ini
...
max_execution_time = 300
max_input_time = 300
memory_limit = 512M
post_max_size = 256M
upload_max_filesize = 256M
...
Enable and start the php-fpm service.
$ sudo systemctl enable --now php-fpmRestart the httpd service.
$ sudo systemctl restart httpdCreate a small PHP script to test the configuration of PHP and its extensions.
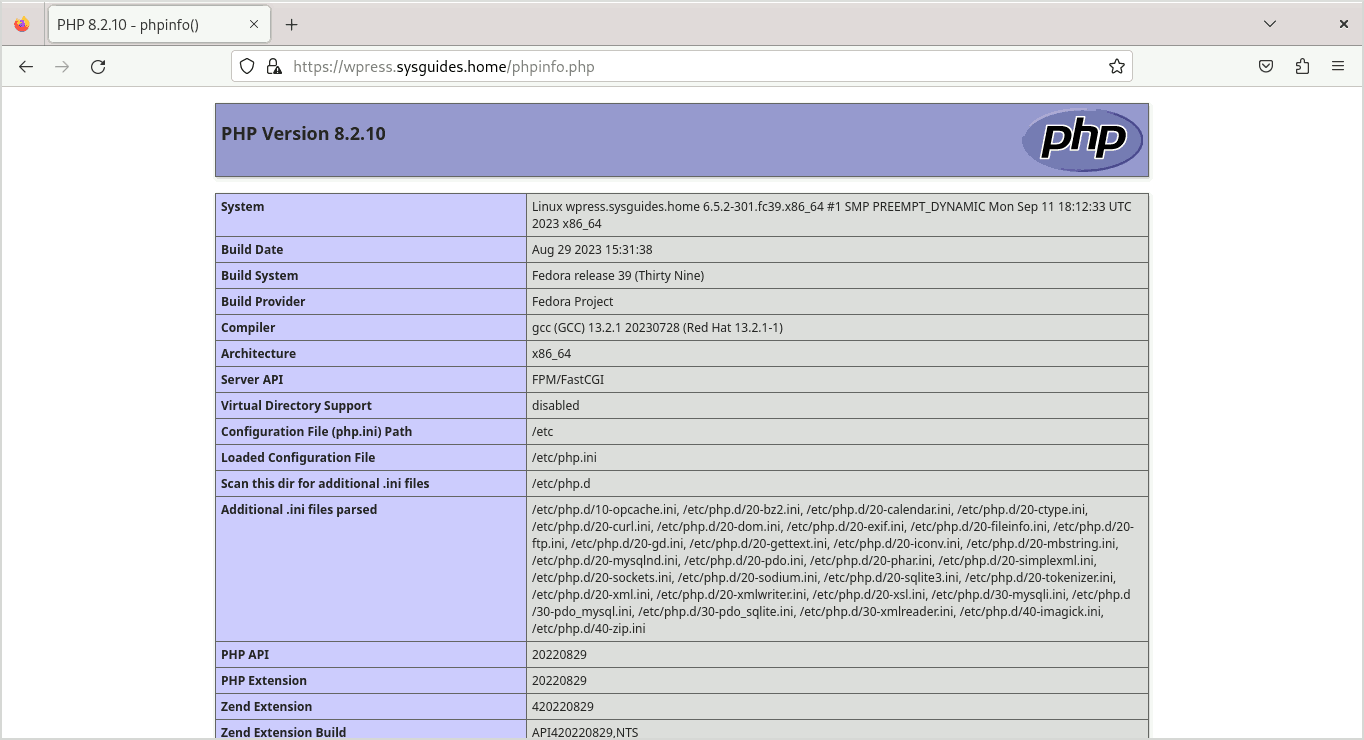
$ echo '<?php phpinfo(); ?>' | sudo tee -a /var/www/html/phpinfo.phpNow open a web browser and type https://wpress.sysguides.home/phpinfo.php into the address bar to see all of the information on PHP and its extensions.
5. Install WordPress Content Management System
Now that you have installed all the components in the LAMP stack, it is time to install and configure WordPress CMS.
Download the most recent WordPress package into the /var/www/html/ directory.
$ sudo wget https://www.wordpress.org/latest.tar.gz -P /var/www/html/Extract the latest.tar.gz file.
$ sudo tar -xvf /var/www/html/latest.tar.gz -C /var/www/html/ \
    --strip-components=1
You can now delete the file latest.tar.gz. You no longer require it.
$ sudo rm -vi /var/www/html/latest.tar.gzMake a copy of wp-config-sample.php and save it as wp-config.php.
$ sudo cp -v /var/www/html/{wp-config-sample.php,wp-config.php}Usually, the wp-config.php file will be in DOS format with CRLF line terminators. So convert it to UNIX format.
$ sudo dos2unix /var/www/html/wp-config.phpCreate a new .htaccess (Hypertext Access) file. It’s a configuration file that Apache-based web servers use.
$ sudo touch /var/www/html/.htaccessFor some reason, the uploads directory is missing within the wp-content directory. So create it.
$ sudo mkdir -v /var/www/html/wp-content/uploadsYou must now create a MariaDB database for WordPress to use. The database will contain all of your website’s data.
You must also assign a user with full access to this database. For this, I’ll use my Fedora distribution’s regular login user.
So, in a shell variable, define a database name, a user to access this database, and the user’s password. I’m going to name the database wpressdb, and the user password will be ‘mydbpassword‘ for the sake of simplicity. However, you must use a strong password.
$ DBNAME="wpressdb"

$ DBUSER="$USER"

$ echo $DBUSER
madhu

$ DBUSERPASS="mydbpassword"
Create a database.
$ sudo mariadb -e "CREATE DATABASE ${DBNAME}"Create a user who will have access to the database.
$ sudo mariadb -e "CREATE USER ${DBUSER} IDENTIFIED BY '${DBUSERPASS}'"Give the user full access to the database.
$ sudo mariadb -e "GRANT ALL PRIVILEGES ON ${DBNAME}.* TO ${DBUSER} IDENTIFIED BY '${DBUSERPASS}'"To make the changes take effect immediately, use the Flush Privileges command.
$ sudo mariadb -e "FLUSH PRIVILEGES"Confirm that user madhu has access to the wpressdb database.
$ sudo mariadb -e "SELECT Host,Db,User FROM mysql.db WHERE Db='${DBNAME}'"
+------+----------+-------+
| Host | Db       | User  |
+------+----------+-------+
| %    | wpressdb | madhu |
+------+----------+-------+
The same information should be included in the WordPress configuration file as well.
$ sudo sed -i "s/database_name_here/${DBNAME}/" /var/www/html/wp-config.php
$ sudo sed -i "s/username_here/${DBUSER}/" /var/www/html/wp-config.php
$ sudo sed -i "s/password_here/${DBUSERPASS}/" /var/www/html/wp-config.php
Once you have installed WordPress on your localhost, it’s important to keep it up to date with the latest version as soon as it becomes available. However, unlike WordPress on public hosts, when you try to update the localhost version, it will not automatically update. By adding the FS_METHOD constant to the WordPress config file, WordPress will be able to update automatically.
$ echo "define('FS_METHOD','direct');" | sudo tee -a /var/www/html/wp-config.phpYou may also want to include the WP_ALLOW_REPAIR constant, which when set activates the native WordPress feature for repairing corrupted database tables.
$ echo "define('WP_ALLOW_REPAIR', true);" | sudo tee -a /var/www/html/wp-config.phpNow, generate WordPress salts. WordPress salts are random strings of code that comprise eight variables and are used to encrypt your login information. They add to your password to further safeguard your WordPress login credentials. This protects your credentials against brute-force assaults and other hacking tactics.
$ curl -S https://api.wordpress.org/secret-key/1.1/salt/
define('AUTH_KEY',         '<&y>nef0v{75.bd;O=CjC3k44y3l-f3@aRO3g>.Wu}OSmYNk0jy~3jW&V[Fhp+`L');
define('SECURE_AUTH_KEY',  'osbfFQ>QN$VGcTIZJ!&[qa8(J,f%}+|ATK{mqke;J+887/jp+{3vFK>D^>Nai:#/');
define('LOGGED_IN_KEY',    'X>-(qcl-AN^!816#o)wE%yzGZxx49</f1Mny,u]f5l2n18[rmNF~`8>ME!#EHo8e');
define('NONCE_KEY',        'inyauz&DU|&Q7igC_IL!R;]CnUhuXDp$s:zL>4J2Qs/ 6kwa{[?! v-|5Xv-r8}N');
define('AUTH_SALT',        '=*MQ7_C(I)+0IjUahQ5mxxlvw%`C`$MaM-e<ZyC?i1U{B;n$4F.7c^iuk4;9J%MD');
define('SECURE_AUTH_SALT', 'qnHx.t/jefMrh,-|5/<`0P^UlR[h^[|`q53Dw%&~T*_oUWb-ZM#EGM[}P-)?+pQW');
define('LOGGED_IN_SALT',   '+4%b%4|Jfb|vmII]kQx;nP1c^Ok7,@wo+=|@wz,+XiL>?(o@;s79F-(c58<K> 1i');
define('NONCE_SALT',       'l[iI*n|,j=Qqop7@|z|.[bH(T3:e`_+EVw5.8o%-1@3Ax;vO`R}xVPh)]p/m+ /[');
Copy all the generated salts. Open the /var/www/html/wp-config.php file.
$ sudo vim /var/www/html/wp-config.phpAnd replace this,
define( 'AUTH_KEY',         'put your unique phrase here' );
define( 'SECURE_AUTH_KEY',  'put your unique phrase here' );
define( 'LOGGED_IN_KEY',    'put your unique phrase here' );
define( 'NONCE_KEY',        'put your unique phrase here' );
define( 'AUTH_SALT',        'put your unique phrase here' );
define( 'SECURE_AUTH_SALT', 'put your unique phrase here' );
define( 'LOGGED_IN_SALT',   'put your unique phrase here' );
define( 'NONCE_SALT',       'put your unique phrase here' );
with this.
define('AUTH_KEY',         '<&y>nef0v{75.bd;O=CjC3k44y3l-f3@aRO3g>.Wu}OSmYNk0jy~3jW&V[Fhp+`L');
define('SECURE_AUTH_KEY',  'osbfFQ>QN$VGcTIZJ!&[qa8(J,f%}+|ATK{mqke;J+887/jp+{3vFK>D^>Nai:#/');
define('LOGGED_IN_KEY',    'X>-(qcl-AN^!816#o)wE%yzGZxx49</f1Mny,u]f5l2n18[rmNF~`8>ME!#EHo8e');
define('NONCE_KEY',        'inyauz&DU|&Q7igC_IL!R;]CnUhuXDp$s:zL>4J2Qs/ 6kwa{[?! v-|5Xv-r8}N');
define('AUTH_SALT',        '=*MQ7_C(I)+0IjUahQ5mxxlvw%`C`$MaM-e<ZyC?i1U{B;n$4F.7c^iuk4;9J%MD');
define('SECURE_AUTH_SALT', 'qnHx.t/jefMrh,-|5/<`0P^UlR[h^[|`q53Dw%&~T*_oUWb-ZM#EGM[}P-)?+pQW');
define('LOGGED_IN_SALT',   '+4%b%4|Jfb|vmII]kQx;nP1c^Ok7,@wo+=|@wz,+XiL>?(o@;s79F-(c58<K> 1i');
define('NONCE_SALT',       'l[iI*n|,j=Qqop7@|z|.[bH(T3:e`_+EVw5.8o%-1@3Ax;vO`R}xVPh)]p/m+ /[');
Scroll to the top of the same /var/www/html/wp-config.php file and double-check that the correct values have been replaced with the ones you set in shell variables.
/** The name of the database for WordPress */
define( 'DB_NAME', 'wpressdb' );

/** Database username */
define( 'DB_USER', 'madhu' );

/** Database password */
define( 'DB_PASSWORD', 'mydbpassword' );
Scroll down to the bottom of the same /var/www/html/wp-config.php file and verify that the WordPress constants have been added.
...
define('FS_METHOD','direct');
define('WP_ALLOW_REPAIR', true);
Recursively change the ownership of the /var/www/html directory to apache.
$ sudo chown -R apache: /var/www/htmlYou must grant SELinux write permissions to the /var/www/html/ directory.
$ sudo semanage fcontext --add --seuser system_u \
    --type httpd_sys_rw_content_t '/var/www/html(/.*)?'
Recursively restore the default SELinux security contexts of the /var/www/html directory.
$ sudo restorecon -RFv /var/www/htmlEnable httpd_can_network_connect SELinux boolean value. When enabled, this boolean allows HTTP scripts and modules from initiating a connection to a network or remote port.
$ sudo setsebool -P httpd_can_network_connect onFinally, double-check your directory permissions and SELinux contexts. This is what it should look like.
$ sudo ls -alhZ /var/www/html/
total 216K
drwxr-xr-x. 1 apache apache system_u:object_r:httpd_sys_rw_content_t:s0  564 Sep 26 19:09 .
drwxr-xr-x. 1 root   root   system_u:object_r:httpd_sys_content_t:s0      22 Sep 13 08:11 ..
-rw-r--r--. 1 apache apache system_u:object_r:httpd_sys_rw_content_t:s0    0 Sep 26 18:59 .htaccess
-rw-r--r--. 1 apache apache system_u:object_r:httpd_sys_rw_content_t:s0  405 Feb  6  2020 index.php
-rw-r--r--. 1 apache apache system_u:object_r:httpd_sys_rw_content_t:s0  20K Jan  1  2023 license.txt
-rw-r--r--. 1 apache apache system_u:object_r:httpd_sys_rw_content_t:s0   20 Sep 25 21:52 phpinfo.php
-rw-r--r--. 1 apache apache system_u:object_r:httpd_sys_rw_content_t:s0 7.3K Jul  5 23:11 readme.html
-rw-r--r--. 1 apache apache system_u:object_r:httpd_sys_rw_content_t:s0 7.1K May 13 03:05 wp-activate.php
drwxr-xr-x. 1 apache apache system_u:object_r:httpd_sys_rw_content_t:s0 2.8K Aug 29 19:44 wp-admin
-rw-r--r--. 1 apache apache system_u:object_r:httpd_sys_rw_content_t:s0  351 Feb  6  2020 wp-blog-header.php
-rw-r--r--. 1 apache apache system_u:object_r:httpd_sys_rw_content_t:s0 2.3K Jun 14 19:41 wp-comments-post.php
-rw-r--r--. 1 apache apache system_u:object_r:httpd_sys_rw_content_t:s0 3.2K Sep 26 19:03 wp-config.php
-rw-r--r--. 1 apache apache system_u:object_r:httpd_sys_rw_content_t:s0 3.0K Feb 23  2023 wp-config-sample.php
drwxr-xr-x. 1 apache apache system_u:object_r:httpd_sys_rw_content_t:s0   58 Sep 26 18:59 wp-content
-rw-r--r--. 1 apache apache system_u:object_r:httpd_sys_rw_content_t:s0 5.6K May 31 00:18 wp-cron.php
drwxr-xr-x. 1 apache apache system_u:object_r:httpd_sys_rw_content_t:s0 9.6K Aug 29 19:44 wp-includes
-rw-r--r--. 1 apache apache system_u:object_r:httpd_sys_rw_content_t:s0 2.5K Nov 27  2022 wp-links-opml.php
-rw-r--r--. 1 apache apache system_u:object_r:httpd_sys_rw_content_t:s0 3.9K Jul 16 17:46 wp-load.php
-rw-r--r--. 1 apache apache system_u:object_r:httpd_sys_rw_content_t:s0  49K Jul 17 18:48 wp-login.php
-rw-r--r--. 1 apache apache system_u:object_r:httpd_sys_rw_content_t:s0 8.4K Jun 22 20:06 wp-mail.php
-rw-r--r--. 1 apache apache system_u:object_r:httpd_sys_rw_content_t:s0  26K Jul 25 12:05 wp-settings.php
-rw-r--r--. 1 apache apache system_u:object_r:httpd_sys_rw_content_t:s0  34K Jun 19 23:57 wp-signup.php
-rw-r--r--. 1 apache apache system_u:object_r:httpd_sys_rw_content_t:s0 4.8K Jun 22 20:06 wp-trackback.php
-rw-r--r--. 1 apache apache system_u:object_r:httpd_sys_rw_content_t:s0 3.2K Jun 14 19:41 xmlrpc.php
WordPress configuration is now complete.
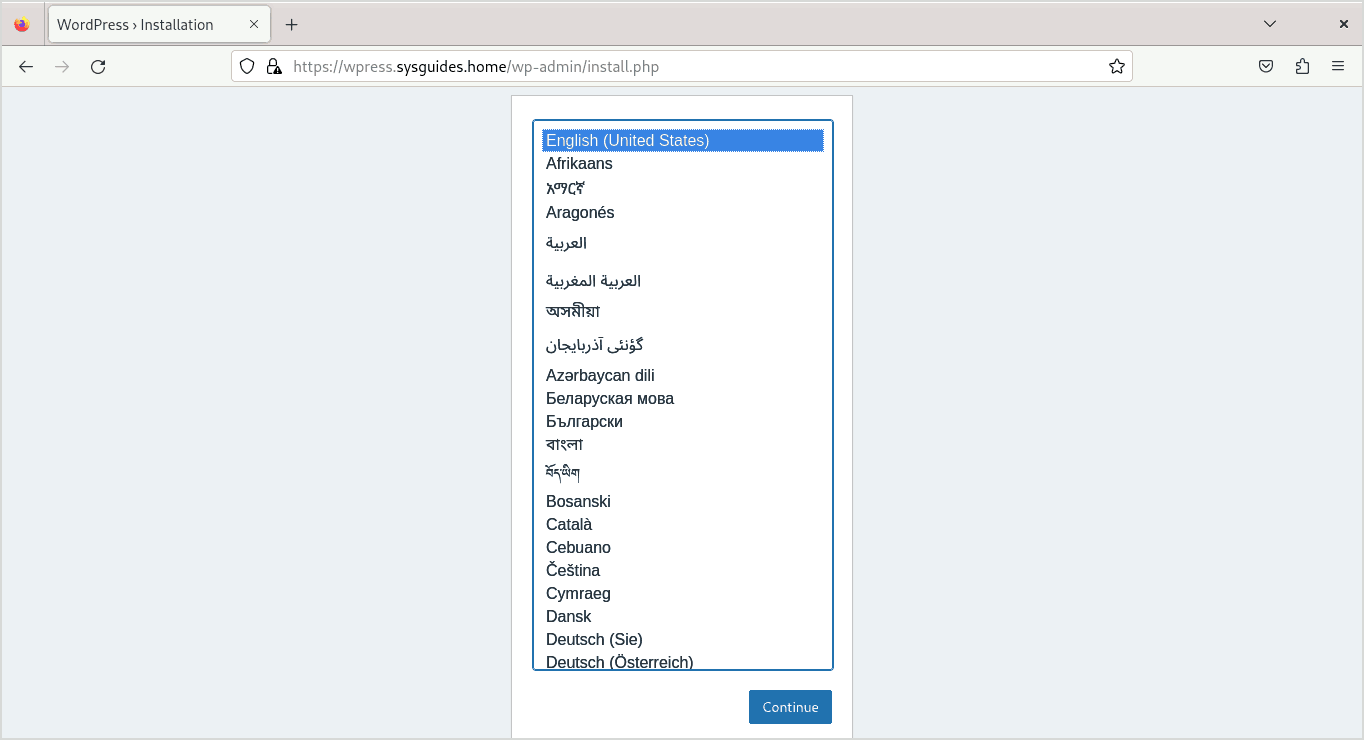
Open a web browser and enter 'https://wpress.sysguides.home' or 'localhost' into the address bar. The installation of WordPress will begin.
Select your language, then press Continue to proceed.
You must provide some details. Give your website a suitable title. A username and password to access WordPress Dash, as well as an email address. Then click the ‘Install WordPress‘ button to continue.

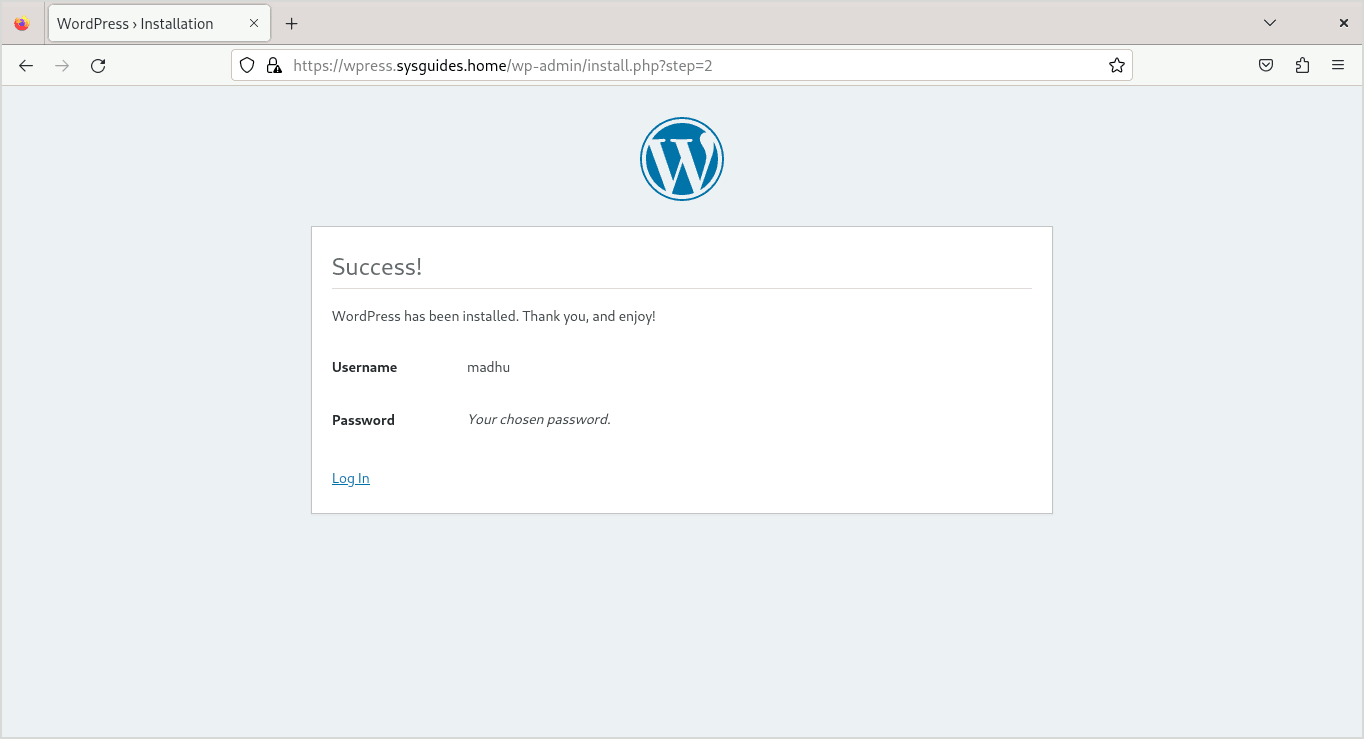
If everything goes smoothly, you'll receive a success message. Hit the 'Log In' button.
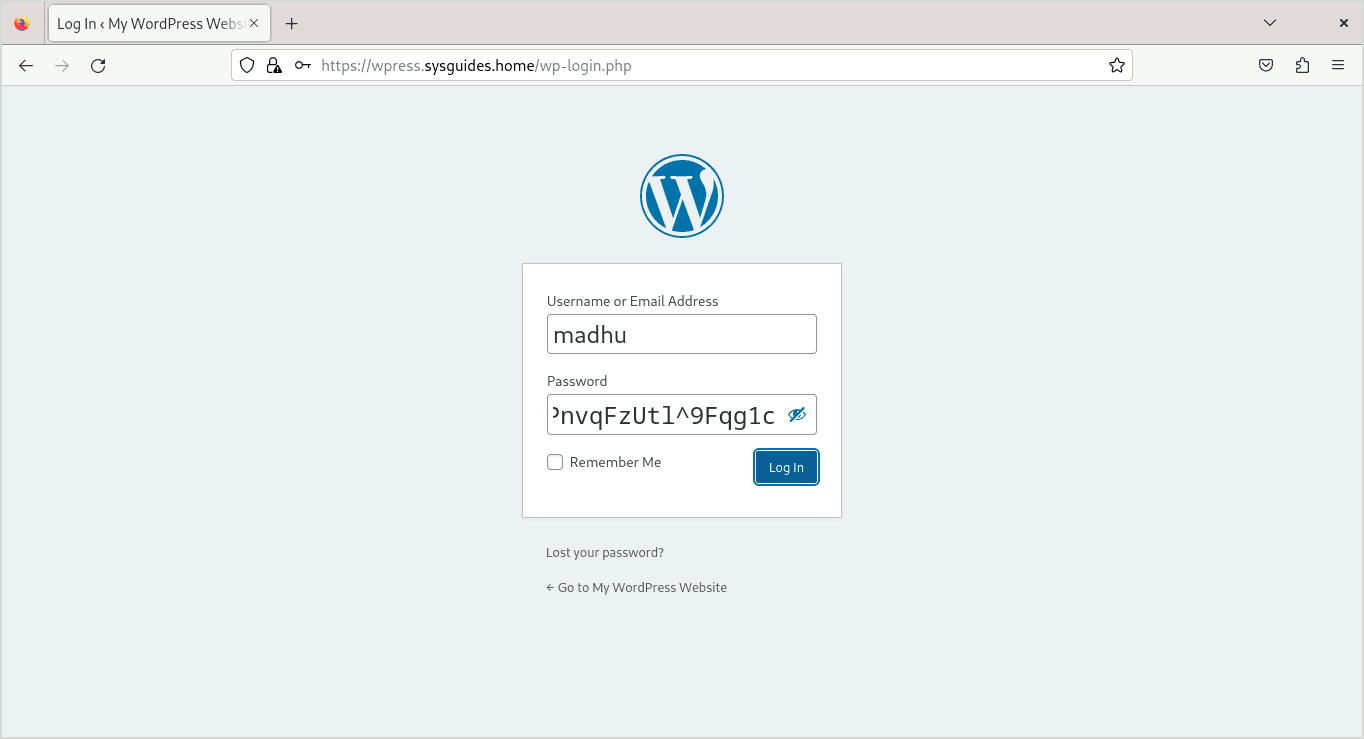
To log in, enter your username and password.
You will be taken to the WordPress Dashboard screen.
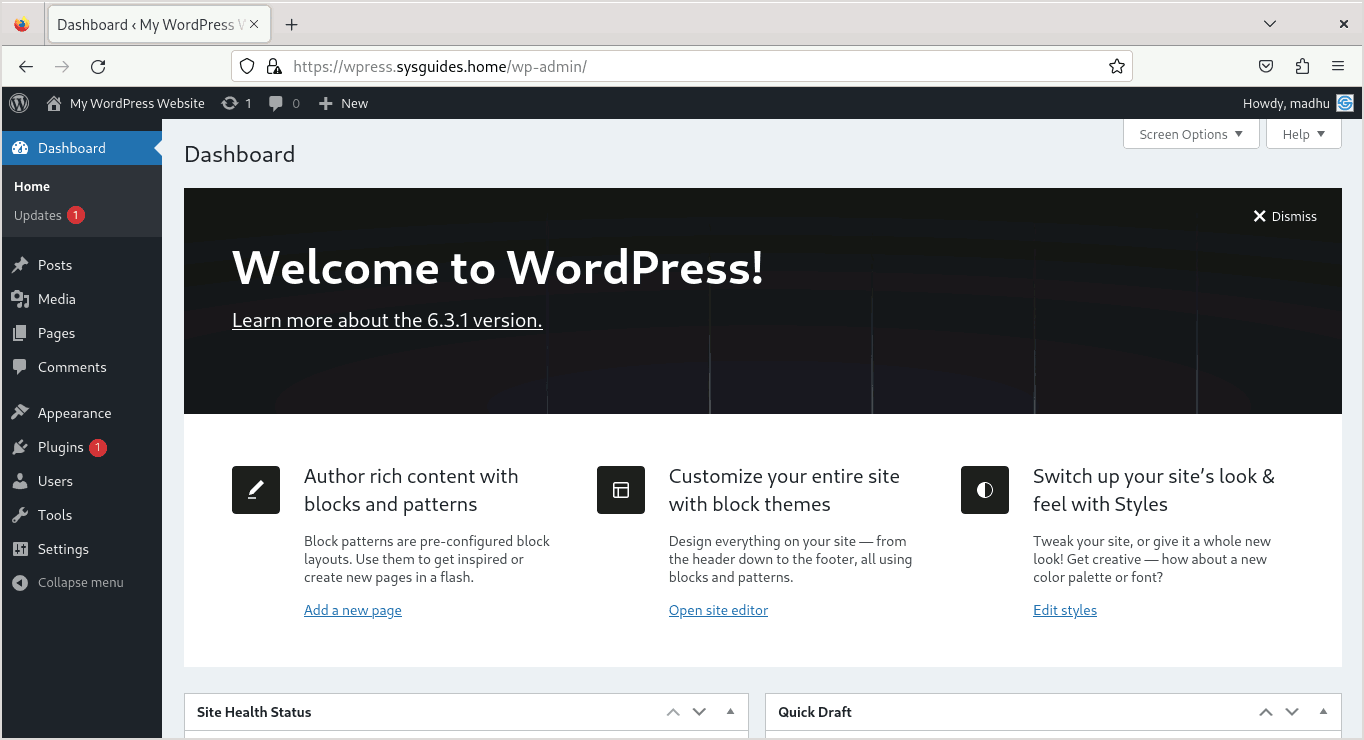
Your WordPress CMS has now been successfully installed. You can now begin building your dream website.