
In this post, I'll show you how to use virtiofs to share files between a KVM host and a Linux guest.
While existing remote file systems like NFS and 9P can be used to share files between the KVM host and Linux guest, there will be some communication overhead because these systems were designed for network architecture.
As a result, a new file system known as virtiofs was created. Virtiofs is a shared file system that allows virtual machines to access a directory tree on the host. It is designed to provide the semantics and performance of the local filesystem.
To demonstrate this, I'll share my home directory on the host system with the Debian 12 guest virtual machine. You may, however, choose any other location on the host or even a different Linux distribution for the guest virtual machine.
So let’s begin.
Table of Contents
- 1. Set Up a Shared Directory
- 2. Mount a Shared Directory on the Guest Virtual Machine
- 3. Watch on YouTube
1. Set Up a Shared Directory
A directory can be shared either graphically or via the command line. I'll show you both methods. Select the one that best meets your needs.
Method 1: Using Virtual Machine Manager
Launch the Virtual Machine Manager application.
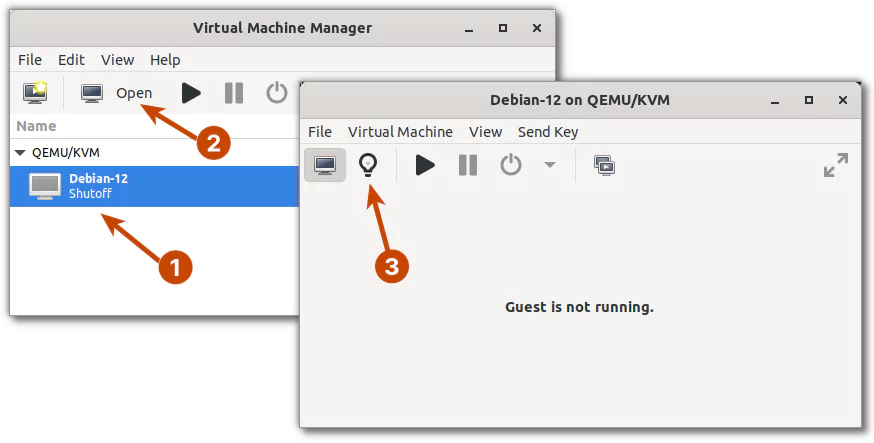
Select the Linux guest on which you want to mount the shared directory of the host. Then, click the Open button. In the new window that appears, click the lightbulb icon in the toolbar to show virtual hardware details.
You must enable shared memory backing. Memory backing enables how virtual memory pages are backed by host pages.
On the left panel, select Memory, and on the right panel, check the Enable shared memory checkbox. Then press the Apply button.

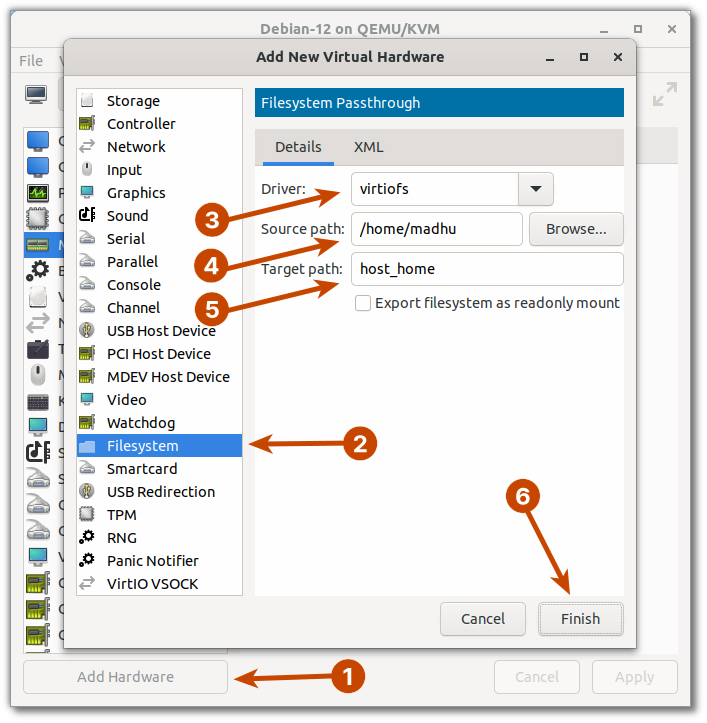
Next, on the left bottom, click the Add Hardware button. In the new window that appears, select the Filesystem option from the left panel.
In the right panel, set the driver to virtiofs. Set the source path to the directory on the host that you want to share with the Linux guest virtual machine. I'll be sharing my home directory, so I'll set the path to /home/madhu. Then, in the target path, enter any arbitrary string. This string will be used to identify the shared directory that will be mounted within the guest. I'll set it to host_home, but you can change it to whatever you want. Complete the process by hitting the Finish button.
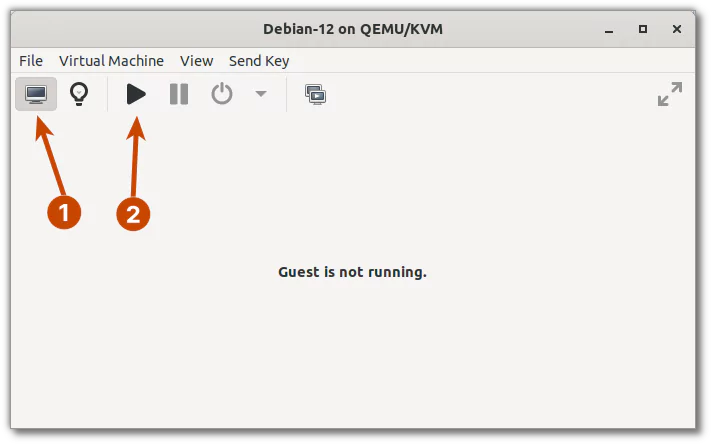
Finally, run the Debian-12 guest virtual machine by clicking the computer monitor icon and then the play icon in the toolbar.
Method 2: Using virt-xml Command-Line Tool
If your host system lacks a graphical user interface or you just prefer to use the command-line interface to configure your shared directory, you can use the virt-xml command-line tool.
The following method is similar to what you did in the previous section using the Virtual Machine Manager, but this time through a command-line interface.
Ensure that the guest virtual machine is shut down.
$ sudo virsh list --all
 Id   Name        State
----------------------------
 -    Debian-12   shut off
First, you must enable shared memory.
$ sudo virt-xml Debian-12 --edit \
    --memorybacking source.type=memfd,access.mode=shared
In the above command:
- source.type=memfd: This defines memory backing source type. memfd is a specialized anonymous memory-backed file.
- access.mode=shared: This enables memory to be shared rather than kept private.
Confirm that the shared memory is properly configured.
$ sudo virsh dumpxml Debian-12 --xpath '//memoryBacking'
<memoryBacking>
  <source type="memfd"/>
  <access mode="shared"/>
</memoryBacking>
Next, you need to set up the shared directory on the host.
$ sudo virt-xml Debian-12 --add-device \
    --filesystem driver.type=virtiofs,source.dir=/home/madhu,target.dir=host_home
In the above command:
- driver.type=virtiofs: The hypervisor driver used to provide the filesystem, in this case, virtiofs.
- source.dir=/home/madhu: The directory on the host computer you want to share with the Linux guest virtual machine. In this case, it's my home directory on the host computer.
- target.dir=host_home: The arbitrary string used to identify the shared directory to be mounted within the guest. I named it 'host_home', but you name it whatever you want.
Confirm that the shared directory is properly configured.
$ sudo virsh dumpxml Debian-12 --xpath '//filesystem'
<filesystem type="mount" accessmode="passthrough">
  <driver type="virtiofs"/>
  <source dir="/home/madhu"/>
  <target dir="host_home"/>
  <address type="pci" domain="0x0000" bus="0x07" slot="0x00" function="0x0"/>
</filesystem>
Now, start the Debian-12 guest virtual machine.
$ sudo virsh start Debian-12
Domain 'Debian-12' started
2. Mount a Shared Directory on the Guest Virtual Machine
Connect to your guest virtual machine via graphical/serial console or ssh.
In the guest virtual machine, launch the terminal emulator. Create a directory where you want to mount the shared directory. I will create a directory named 'Host-Home' in the Debian guest's home. You can create a directory anywhere and call it whatever you want.
madhu@debian:~$ mkdir -v ~/Host-Home
mkdir: created directory '/home/madhu/Host-Home'
To temporarily mount the shared directory, use the following command.
madhu@debian:~$ sudo mount -v -t virtiofs host_home ~/Host-Home
mount: host_home mounted on /home/madhu/Host-Home.
The host_home is the arbitrary string you specified previously to identify the shared directory.
To permanently mount the shared directory within the guest, open the /etc/fstab file and add the following line.
madhu@debian:~$ sudo vim /etc/fstab
...
...
host_home  /home/madhu/Host-Home  virtiofs  defaults  0  0
Finally, mount all filesystems mentioned in /etc/fstab.
madhu@debian:~$ sudo systemctl daemon-reload

madhu@debian:~$ sudo mount -va
/                        : ignored
/boot/efi                : already mounted
/home                    : already mounted
none                     : ignored
/home/madhu/Host-Home    : successfully mounted
Verify if the shared directory has been mounted.
madhu@debian:~$ ls ~/Host-Home/
Desktop  Documents  Downloads  Music  Pictures  Public  Templates  Videos
That's all. The shared directory that you selected is now mounted in the guest virtual machine.