
A storage pool is a quantity of storage that has been set aside to be used by guest virtual machines in KVM virtualization. You can manage a variety of storage-based solutions such as directories, partitions, disks, and many more. In this blog, though, I will only focus on how to create and manage storage pools and volumes in KVM virtualization that is directory-based. Once you have figured out how to manage one type of storage pool, managing another will be a lot easier.
The following are the storage pool types that are supported by Red Hat-based distributions:
- Directory-based storage pools
- Partition-based storage pools
- Disk-based storage pools
- iSCSI-based storage pools
- LVM-based storage pools
- NFS-based storage pools
- SCSI-based storage pools with vHBA devices
- Multipath-based storage pools
- RBD-based storage pools
Once a storage pool has been created and started, storage volumes can be created within it and assigned to guests by name rather than the target path on the host machine.
When you install KVM virtualization on your computer, a directory-based storage pool named default with the directory path /var/lib/libvirt/images will be automatically created for you.
$ sudo virsh pool-list
 Name      State    Autostart
-------------------------------
 default   active   yes
In addition to this, you can also set up your own storage pool(s) to better arrange your storage volumes or ISO files.
In this tutorial, I will set up a new directory-based storage pool called vmdisks and point it to the /vmdisks directory. You may, however, give the storage pool any name you wish and place it in any directory you choose.
Table of Contents
- 1. Create a Storage Pool
- 2. Security and Permissions
- 3. Create a Storage Volume
- 4. Delete a Storage Volume
- 5. Remove a Storage Pool
- 6. Conclusion
- Watch on YouTube
1. Create a Storage Pool
A storage pool can be created using both the virsh command-line tool and the Virtual Machine Manager. I'll show you both; pick your preferred method. The virsh command-line tool allows you to define all parameters, whereas Virtual Machine Manager gives a graphical way of creating simpler storage pools.
1.1 Using the virsh Command-Line Tool
The first step in creating a storage pool is to define it.
$ sudo virsh pool-define-as \
    --name vmdisks \
    --type dir \
    --target /vmdisks
Verify that the storage pool vmdisks has been defined.
$ sudo virsh pool-list --all
 Name      State      Autostart
---------------------------------
 default   active     yes
 vmdisks   inactive   no
The storage pool has been defined, however, it is currently inactive.
After you've defined the storage pool, you must build it and then start it. The following command will combine the two processes into a single step. The --build option will create the target path directory.
$ sudo virsh pool-start --build vmdisksVerify that the storage pool vmdisks is now active and that the /vmdisks directory is created.
$ sudo virsh pool-list
 Name      State    Autostart
-------------------------------
 default   active   yes
 vmdisks   active   no

$ ls -ld /vmdisks
drwx--x--x. 1 root root 0 Aug 20 18:42 /vmdisks
Configure the pool to start automatically at boot.
$ sudo virsh pool-autostart vmdisks

$ sudo virsh pool-list
 Name      State    Autostart
-------------------------------
 default   active   yes
 vmdisks   active   yes
Finally, review the storage pool information.
$ sudo virsh pool-info vmdisks
Name:           vmdisks
UUID:           a042e968-5249-43d2-a3f8-954830485635
State:          running
Persistent:     yes
Autostart:      yes
Capacity:       600.00 GiB
Allocation:     59.29 GiB
Available:      540.71 GiB
1.2 Using the Virtual Machine Manager
In this part, I'll show you how to set up the same directory-based storage pool using Virtual Machine Manager.
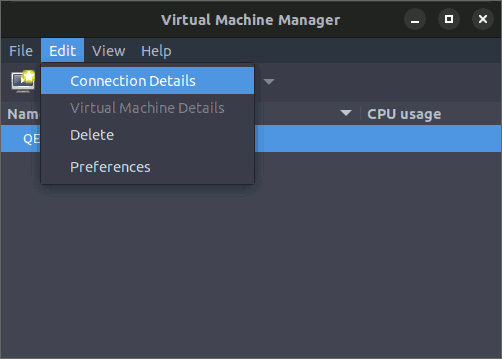
Open the Virtual Machine Manager, then click the Edit menu item and select 'Connection Details'.
In the 'Connection Details' window, select the Storage tab, then click the '+' button at the bottom left of the window.
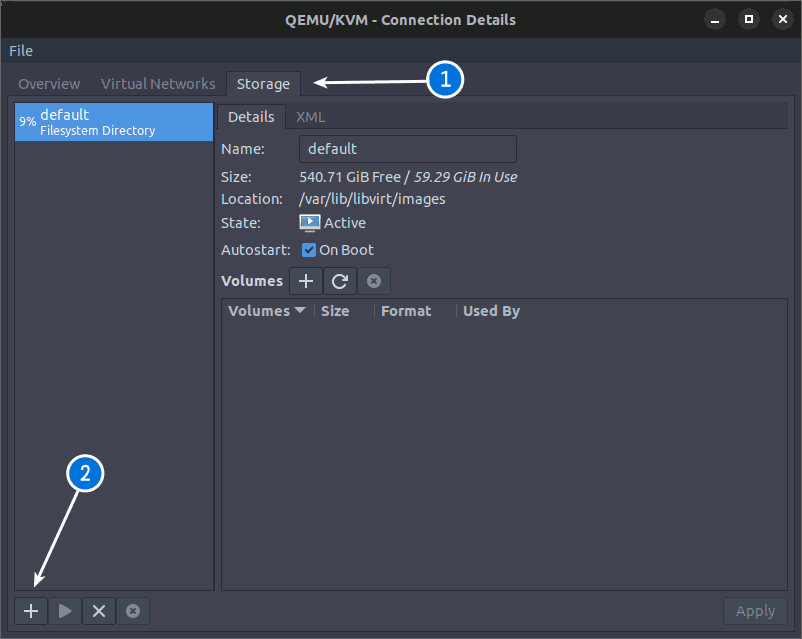
A new window will appear, allowing you to add a storage pool. (1) Input the name of the storage pool, (2) choose 'dir: Filesystem Directory', (3) enter the target directory, and (4) click the Finish button.

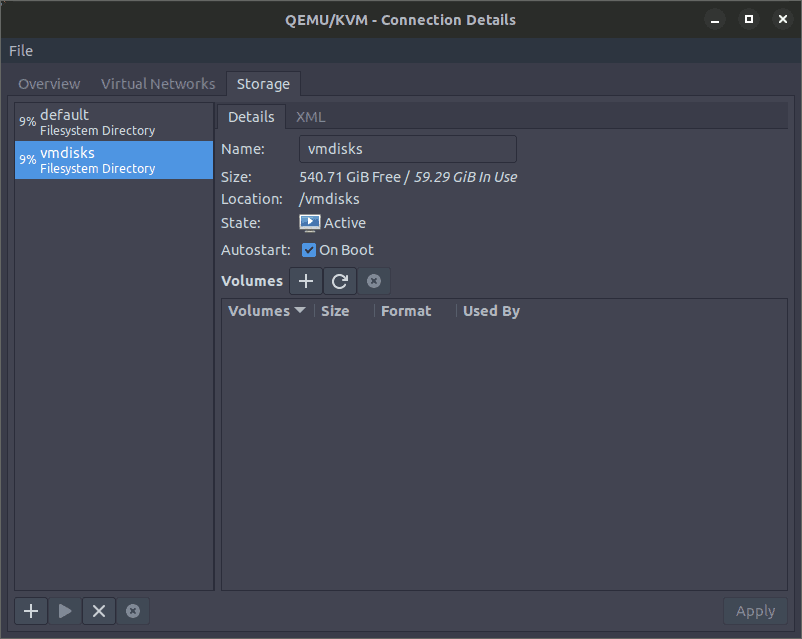
A directory-based storage pool named vmdisks with the target directory path /vmdisks has been created. You can now close the window.
2. Security and Permissions
After you've created a storage pool, you'll need to add SELinux context and certain permissions to the /vmdisks directory so that KVM virtual machines can function smoothly and you have full access to virtual machine resources.
2.1 Disable Copy-on-Write
When using the BTRFS filesystem and QCOW2 images as storage volumes in virtual machines, I/O performance suffers. This is because both the BTRFS filesystem and the QCOW2 images use Copy-on-Write (CoW). The virtual machine may potentially freeze if there is a lot of I/O activity on it.
Therefore, if you are using the BTRFS filesystem, you should disable the CoW feature in the /vmdisks directory.
$ sudo chattr -R +C /vmdisks

$ sudo lsattr -d /vmdisks
---------------C------ /vmdisks
2.2 Enable SELinux Confinement
You need to set the right SELinux context for the vmdisks directory. SELinux provides two levels of protection for KVM virtualization: (1) basic protection and (2) sVirt protection.
In the SELinux basic protection, the host operating system is protected against a compromised guest virtual machine process. Any storage volume associated with a virtual machine must be labeled with system_u:object_r:virt_image_t.
So, label the directory with the proper context.
$ sudo semanage fcontext --add \
    --seuser system_u \
    --type virt_image_t \
    '/vmdisks(/.*)?'

$ sudo restorecon -RFv /vmdisks

$ ls -dZ /vmdisks
system_u:object_r:virt_image_t:s0 /vmdisks
In the SELinux sVirt protection, individual guest virtual machines are protected from each other. In Red Hat-based distributions, when SELinux basic protection is set, sVirt protection is enabled by default.
In the sVirt model, each virtual machine runs under its own restricted domain with a unique category appended, for example, system_u:system_r:svirt_t:s0:c10,c30. This prevents one QEMU process from accessing file resources assigned for another QEMU process.
To see if SELinux sVirt protection is enabled, start a virtual machine and check the SELinux context of its storage volume. You may not have any virtual machines installed as of yet; I will show you how to do so later in this blog.
$ sudo ls -Z rocky-9.qcow2
system_u:object_r:svirt_image_t:s0:c661,c1010 rocky-9.qcow2
If you wish to disable SELinux sVirt protection, edit the /etc/libvirt/qemu.conf file and change the setting to security_driver="none".
2.3 Provide System-Wide Permission
There are two ways to connect to the KVM hypervisor: (1) using "qemu:///session" to connect as a regular user to a per-user instance, or (2) using "qemu:///system" to connect as a root user to a system-wide instance.
When connecting to the hypervisor, it is always recommended to use the system instance, because when libvirt is run as root, it has access to all of the host's resources. This is also what Virtual Machine Manager defaults to.
So, to connect to the system instance as a regular user without using the "sudo" command every time, follow these steps.
Make the regular user a member of the libvirt group.
$ sudo usermod -aG libvirt $USERDefine the environment variable LIBVIRT_DEFAULT_URI in the local ~/.bashrc file of the user.
$ echo "export LIBVIRT_DEFAULT_URI='qemu:///system'" >> ~/.bashrc
$ source ~/.bashrc
You can now manage the storage pool and virtual machines as a regular user in the system instance.
$ virsh uri
qemu:///system

$ virsh pool-list
 Name      State    Autostart
-------------------------------
 default   active   yes
 vmdisks   active   yes
2.4 Set Access Control List
By default, the root user owns the /vmdisks directory and its contents. When you start a virtual machine, the ownership of the storage volumes in the /vmdisks directory will be changed to 'qemu' to give the QEMU process better access to host resources. When you shut down the virtual machine, the ownership will be restored back to whoever owned it earlier.
To give the regular user access to the /vmdisks directory, instead of changing the directory's default ownership and permissions, it is better to set the ACL.
Before you set new ACL permissions, make sure you recursively remove any existing ACL permissions from the /vmdisks directory.
$ sudo setfacl -R -b /vmdisksNow, recursively set the permission to a regular user. The capital 'X' specifies that the 'execute' bit must only be applied to parent and child directories (if any) and not to child files.
$ sudo setfacl -R -m u:$USER:rwX /vmdisksThe command above only changes the permissions of existing directories or files in /vmdisks. Any new directories or files you create under /vmdisks will not have any special permissions applied to them.
To solve this, you must set the ACL special 'default' permission. You can only apply the ACL default permissions to directories, not files.
$ sudo setfacl -m d:u:$USER:rwx /vmdisksVerify the ACL permissions.
$ ls -ld /vmdisks
drwxrwx--x+ 1 root root 0 Aug 20 20:28 /vmdisks

$ getfacl /vmdisks
getfacl: Removing leading '/' from absolute path names
# file: vmdisks
# owner: root
# group: root
user::rwx
user:madhu:rwx
group::--x
mask::rwx
other::--x
default:user::rwx
default:user:madhu:rwx
default:group::--x
default:mask::rwx
default:other::--x
You now have full access to the /vmdisks directory as a regular user.
3. Create a Storage Volume
Now that you've created a storage pool, it's time to populate it with some storage volumes. I'll show you some examples, you can change them as per your needs.
3.1 Using the virsh Command-Line Tool
The following is the syntax for creating storage volumes. To get more information, type virsh help vol-create-as.
virsh vol-create-as <pool> <name> <capacity> \
  [--allocation <string>] [--format <string>] \
  [--backing-vol <string>] [--backing-vol-format <string>] \
  [--prealloc-metadata] [--print-xml]
To create a raw format storage volume of 10 GiB.
$ virsh vol-create-as vmdisks raw-disk.img 10G --format raw

$ virsh vol-info --pool vmdisks raw-disk.img
Name:           raw-disk.img
Type:           file
Capacity:       10.00 GiB
Allocation:     10.00 GiB

$ ls -lhs /vmdisks/raw-disk.img
10G -rw-------+ 1 root root 10G Aug 20 22:55 /vmdisks/raw-disk.img
To create a qcow2 format storage volume of 10 GiB.
$ virsh vol-create-as vmdisks qcow2-disk.qcow2 10G --format qcow2 \
    --allocation 0 --prealloc-metadata

$ virsh vol-info --pool vmdisks qcow2-disk.qcow2
Name:           qcow2-disk.qcow2
Type:           file
Capacity:       10.00 GiB
Allocation:     1.75 MiB

$ ls -lhs /vmdisks/qcow2-disk.qcow2
1.8M -rw-------+ 1 root root 11G Aug 20 23:07 /vmdisks/qcow2-disk.qcow2
To install a KVM virtual machine named rocky-9 with Rocky 9 Linux operating system with a qcow2 format storage volume of 20 GiB in text-only mode using the serial console.
$ sudo virt-install \
    --name rocky-9 \
    --memory 2048 \
    --vcpus 2 \
    --disk pool=vmdisks,size=20,format=qcow2 \
    --location /Data/OS/Rocky-9.0-x86_64-minimal.iso \
    --os-variant rocky9.0 \
    --network network=default \
    --graphics none \
    --extra-args 'console=ttyS0,115200n8 --- console=ttyS0,115200n8'
If you want to learn more about installing Linux operating systems solely through the command-line interface, please visit my other blog 'How to Install a KVM Guest OS from the Command-Line'.
After the operating system is installed and the virtual machine is shut down, verify rocky-9 storage volume.
$ virsh domstate rocky-9
shut off

$ virsh domblklist rocky-9 --details
 Type   Device   Target   Source
--------------------------------------------------
 file   disk     vda      /vmdisks/rocky-9.qcow2
 file   cdrom    sda      -

$ virsh vol-info --pool vmdisks rocky-9.qcow2
Name:           rocky-9.qcow2
Type:           file
Capacity:       20.00 GiB
Allocation:     1.26 GiB

$ ls -lhs /vmdisks/rocky-9.qcow2
1.3G -rw-------+ 1 root root 21G Aug 20 23:50 /vmdisks/rocky-9.qcow2
Finally, display all storage volumes in detail.
$ virsh vol-list --pool vmdisks --details
 Name               Path                        Type   Capacity    Allocation
-------------------------------------------------------------------------------
 qcow2-disk.qcow2   /vmdisks/qcow2-disk.qcow2   file   10.00 GiB   1.75 MiB
 raw-disk.img       /vmdisks/raw-disk.img       file   10.00 GiB   10.00 GiB
 rocky-9.qcow2      /vmdisks/rocky-9.qcow2      file   20.00 GiB   1.26 GiB
If at any point, the newly created storage volume is not reflected in the storage pool, simply refresh the storage pool.
$ virsh pool-refresh vmdisks
Pool vmdisks refreshed
3.2 Using the Virtual Machine Manager
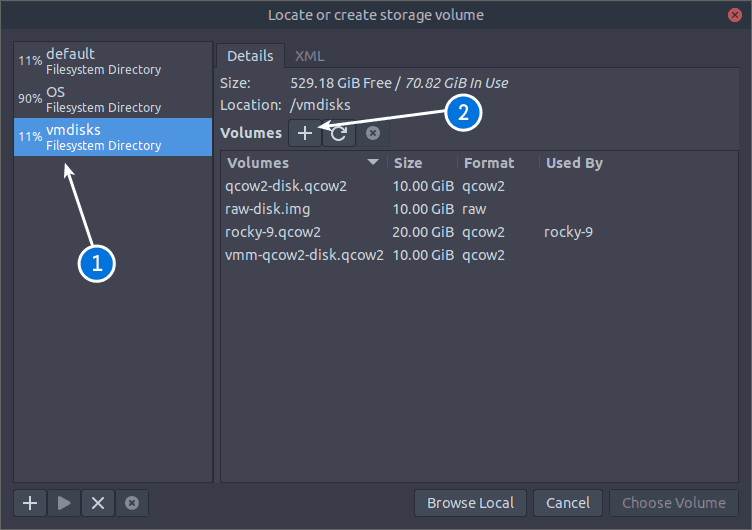
To create a storage volume in the Virtual Machine Manager, go to the 'Edit' menu and select 'Connection Details'. In the window that appears, click the 'Storage' tab, then select the vmdisks storage pool from the left panel.
You will get all the details on vmdisks storage pool.
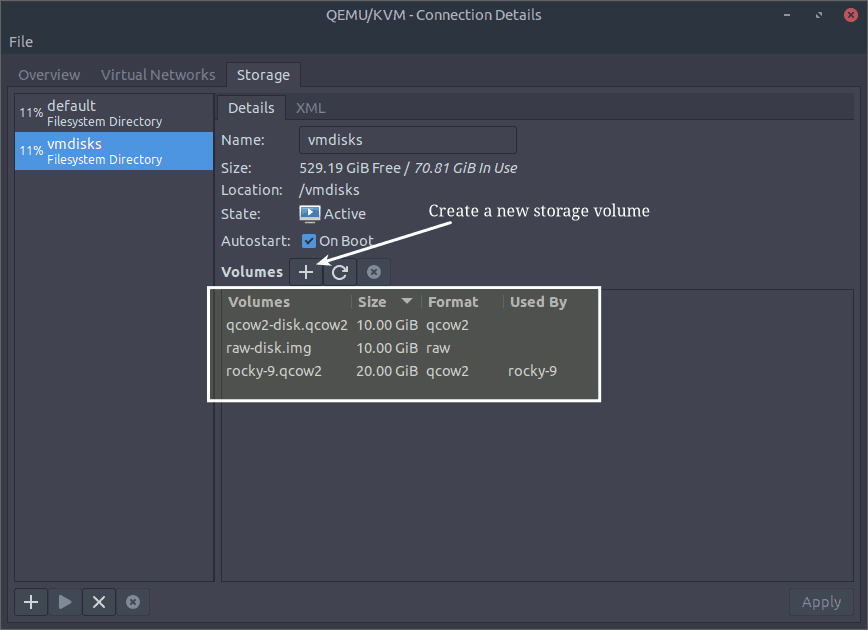
In the screen capture shown above, you can see all of the existing storage volumes that are part of the vmdisks storage pool.
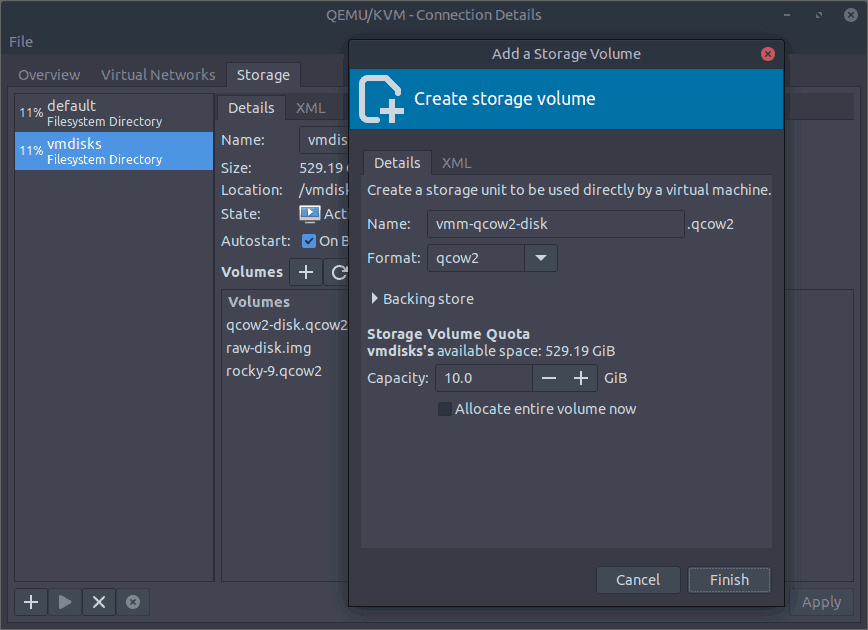
To add a new storage volume, click the '+' button. A new window for creating a storage volume will appear. You can enter the details of the storage volume you want to create here, as shown in the screen capture below.
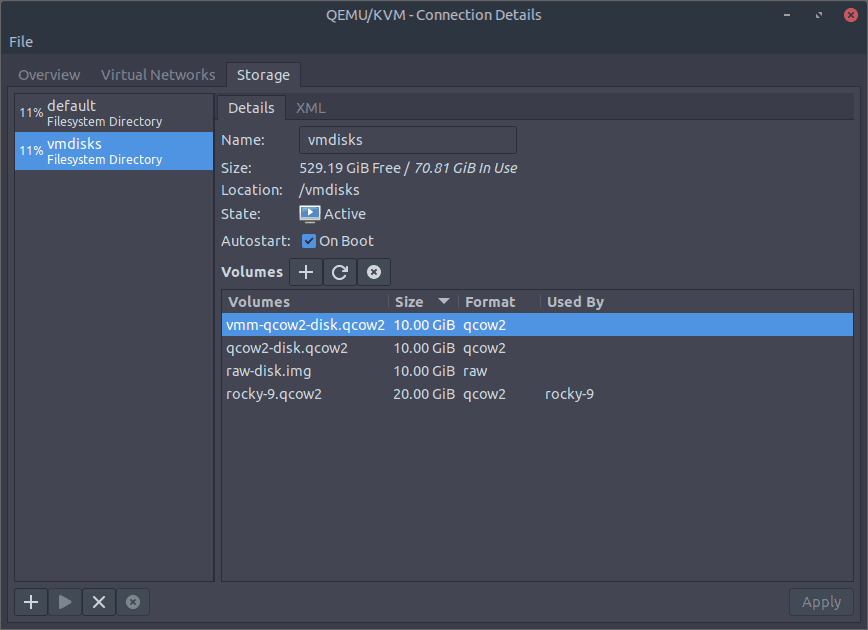
When done, you should be able to see the new storage volume.
To install a KVM virtual machine with storage volume created in the vmdisks storage pool using the Virtual Machine Manager, click the button with the computer icon in the top left corner.
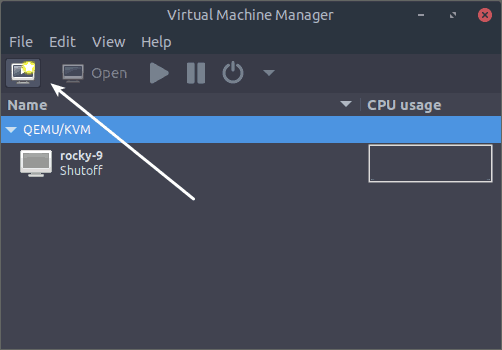
This will launch a wizard that will allow you to create a new virtual machine in five simple steps. Follow the steps normally until step 4, then select the radio button 'Select or create custom storage' and click the 'Manage' button.
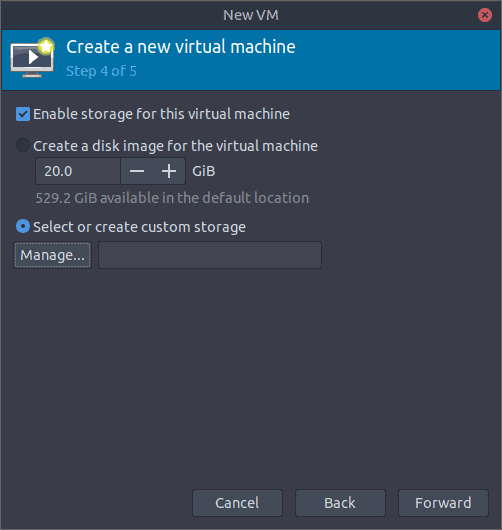
You will be shown a window for creating a new storage volume just like figure 6 above in the blog. Create a storage volume and complete the wizard to begin installing the operating system into the virtual machine.
If you want to know more about installing operating systems using the Virtual Machine Manager, please see my other blog, 'How to Install Guest OS in Virt-Manager: A Quick Intro'.
4. Delete a Storage Volume
To delete a storage volume using the virsh command-line interface, use the command below. Here, I'll delete the raw-disk.img storage volume.
$ virsh vol-delete --pool vmdisks raw-disk.img
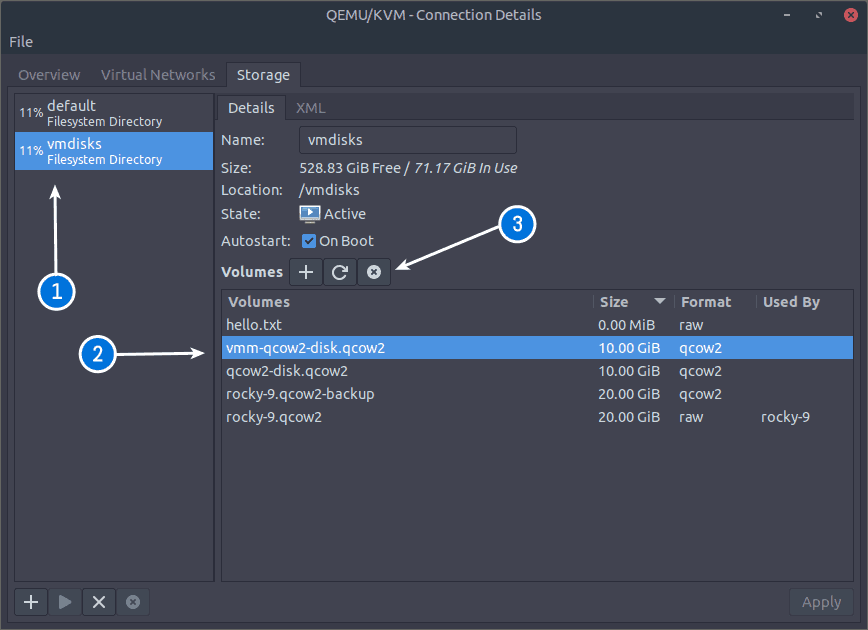
Vol raw-disk.img deletedTo delete a storage volume from the Virtual Machine Manager, follow these steps. Select the vmdisks storage pool in the 'Connection Details' window. Choose the storage volume to be deleted and click the delete button. As an example, I'll delete the vmm-qcow2-disk.qcow2 storage volume.
5. Remove a Storage Pool
If you no longer need the storage pool and wish to remove it, you must first stop the storage pool and release the resources that it is currently using. This prevents any negative impact on other guest virtual machines that use the storage pool.
To remove the vmdisks storage pool using the virsh Command line, follow the steps below.
Stop (destroy) the storage pool you want to remove.
$ virsh pool-destroy vmdisks
Pool vmdisks destroyed
Now, remove the storage pool by undefining it.
$ virsh pool-undefined vmdisks
Pool vmdisks has been undefined
Confirm the vmdisks storage pool is undefined (removed).
$ virsh pool-list --all
 Name      State    Autostart
-------------------------------
 default   active   yes
You can also use Virtual Machine Manager to remove the storage pool. Simply open the 'Connection Details' window, (1) choose the vmdisks storage pool from the left panel, (2) stop the storage pool, and (3) delete the storage pool.
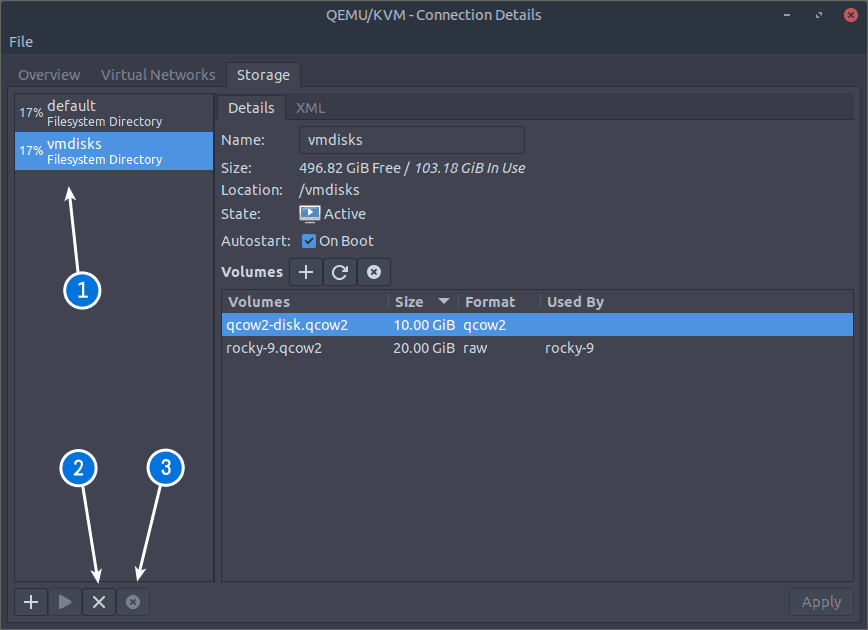
The /vmdisks directory and its contents will not be automatically deleted. If you want to delete it, you must do so manually.
6. Conclusion
Now that you have learned how to create a directory-based storage pool and storage volume, you can now experiment with creating other types of storage pools as well to better meet your requirements.
I hope you found this tutorial useful, and please leave comments if you have any questions or suggestions.