You can install multiple operating systems even if your system only has one hard drive.
There are many reasons why you might want a dual-boot system. Whatever the reason, the most obvious advantage is the ability to optimize hardware performance across all operating systems.
So, in this blog post, I will show you how to properly dual-boot Windows 11 and Ubuntu.
I am assuming you already have a system running some edition of Windows 11. For this tutorial, I'll use Windows 11 Home as an example. However, it could be any edition of Windows 11, or even Windows 10.
So let’s begin.
Table of Contents
- 1. Disk Partition Layout for Dual-boot
- 2. Adjust Partition Sizes in Windows 11
- 3. Disable Hibernation in Windows 11
- 4. Install Ubuntu Desktop 24.04 LTS
- 5. Enable ZRAM on Ubuntu Desktop
- 6. Enroll the Machine Owner Key
- 7. Install System Rescue Toolkit
- 8. Watch on YouTube
1. Disk Partition Layout for Dual-boot
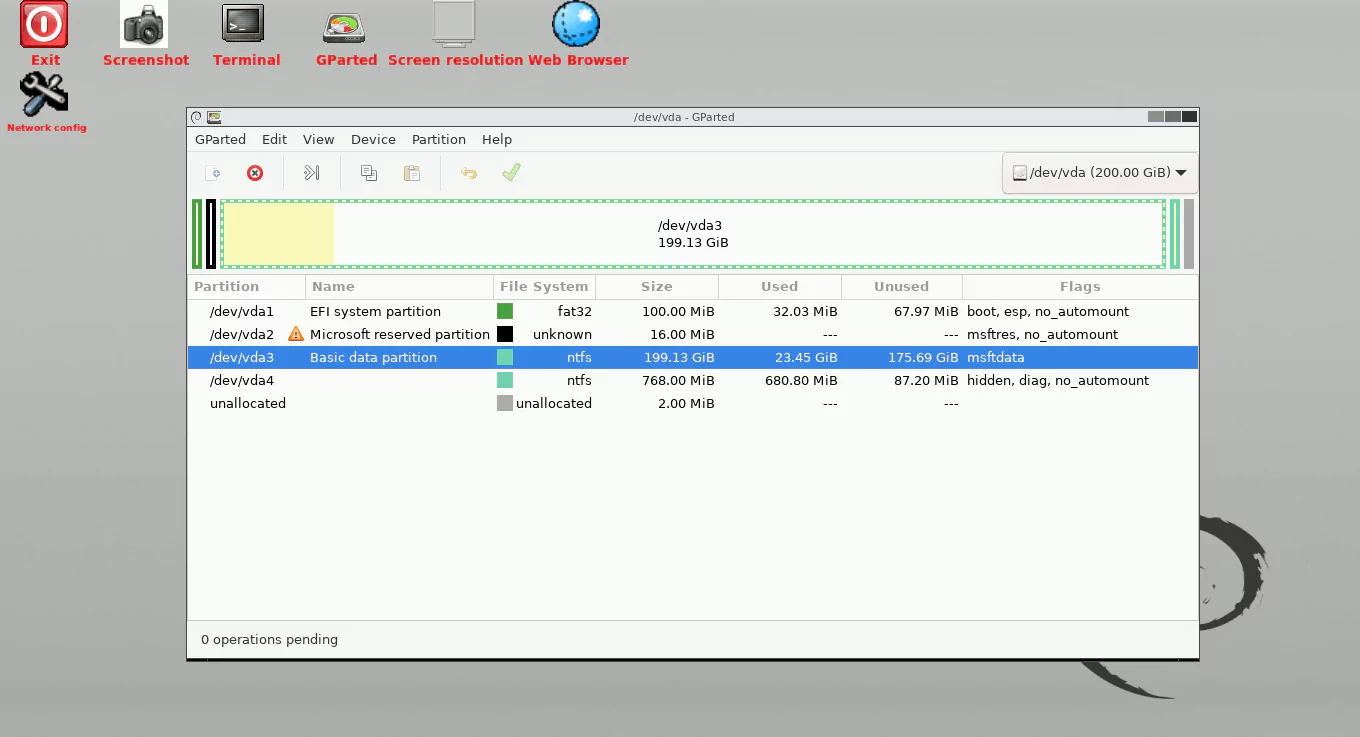
For this tutorial, I'll be using a 200 GiB disk.
Here is how the partitions appear on my Windows 11.

Based on the partition layout shown above, to properly install Ubuntu for a dual-boot system, I need to make the following changes:
- There isn't enough free disk space to accommodate the Ubuntu Linux operating system. So I'll have to shrink the Windows partition to make room for Ubuntu. I'll set the size of the Windows partition to 100 GiB.
- The EFI System Partition is only 100 MiB. This is insufficient if I intend to include Linux distributions. So I need to make it bigger. I'm going to expand this partition to 1 GiB.
- The recovery partition is 768 MiB in size, with approximately 83 MiB of free space. Microsoft recommends having 250 MiB of free space for future updates. So I'm going to expand this recovery partition to 1 GiB.
- I'll add SystemRescue to the dual-boot. SystemRescue is a Linux system rescue toolkit that can be booted and used to manage or repair your system and data in the event of a crash on both Linux and Windows computers. It only takes 1 GiB of space.
- I will use the remaining space, which is approximately 98 GiB, to install Ubuntu Linux.
For more information about Windows partitions, refer to the page: 'UEFI/GPT-based hard drive partitions'.
By the end of this blog, after everything has been configured, this is how the partitions appear.

To resize partitions, you'll need a bootable GParted Live image. GParted is a free partition manager that allows you to create, resize, copy, and move partitions without losing data.
You can download the ISO from here: 'GParted Download Link'.
After downloading the ISO image, make a bootable GParted Live USB image using a third-party tool such as Rufus. There are already numerous tutorials online on how to use Rufus.
2. Adjust Partition Sizes in Windows 11
Insert the bootable GParted Live USB image that you created earlier, and boot your computer.
IMPORTANT: Before you resize your partitions in Windows 11, make sure you have turned off Bitlocker. Otherwise, you risk bricking your computer. You can enable it later, after all Windows partitions have been recreated.
In the GParted boot menu, select the first option and press [Enter]. Next, select your key map. Then, choose your language. Finally, press [Enter] once more to start X.
You will now be in the GParted desktop environment.
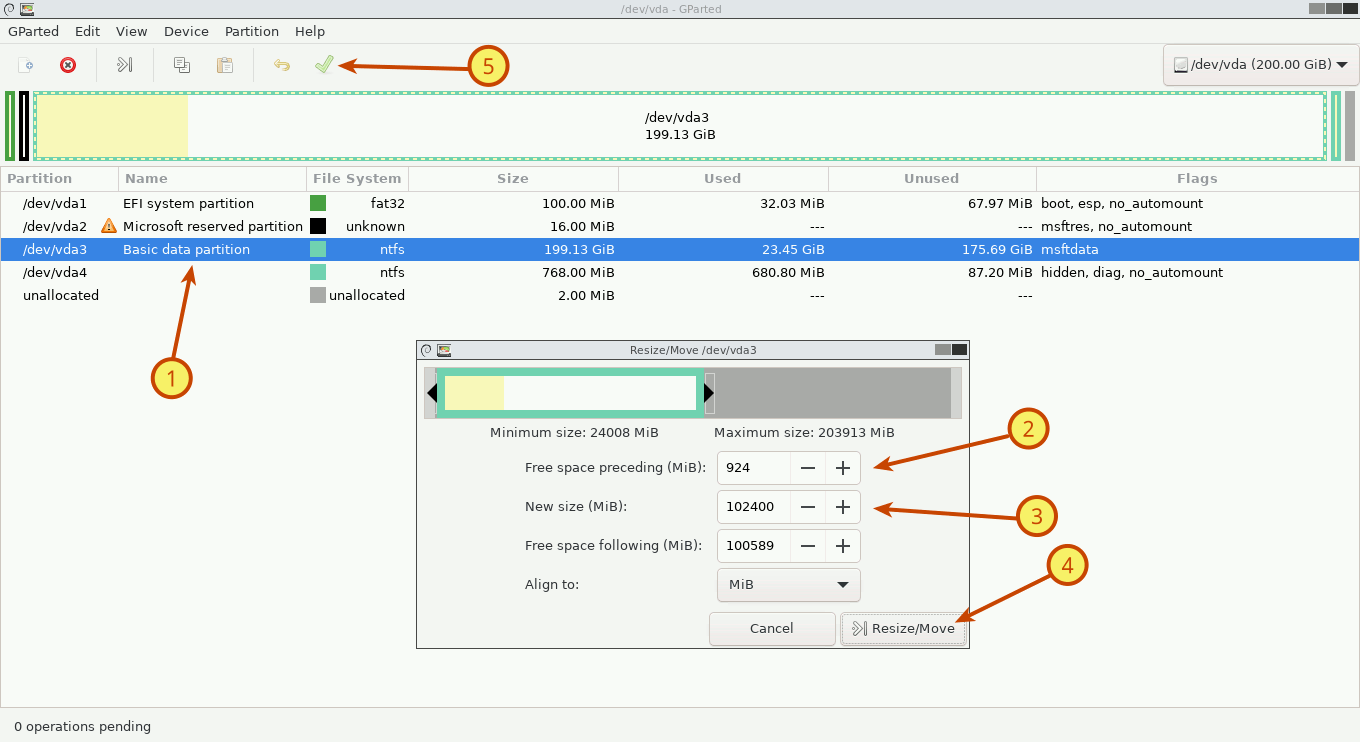
First, shrink the Windows partition to 100 GiB to make room for the Ubuntu Linux operating system.
Right-click on the 'Basic data partition' (for me, it is /dev/vda3) and click on the 'Resize/Move' option.
Since you also need to enlarge the EFI System Partition from 100 MiB to 1 GiB (1024 MiB), set the 'Free space preceding' value to 924 MiB (1024-100=924) and press [Enter].
Next, change the 'New size' value to 102400 MiB (100x1024=102400, i.e. 100 GiB) and press [Enter].
Then, press the 'Resize/Move' button and finally press the 'Apply' button to start the moving and resizing process.
The resizing process will begin after a few warnings. Because you are shrinking the partition on both sides (left and right), the data must be moved. So it will take some time depending on the size of the partition you want to move and the files it contains. So, please be patient. For me, it took about 20 minutes.
After the resizing process is finished, this is how the partitions look.
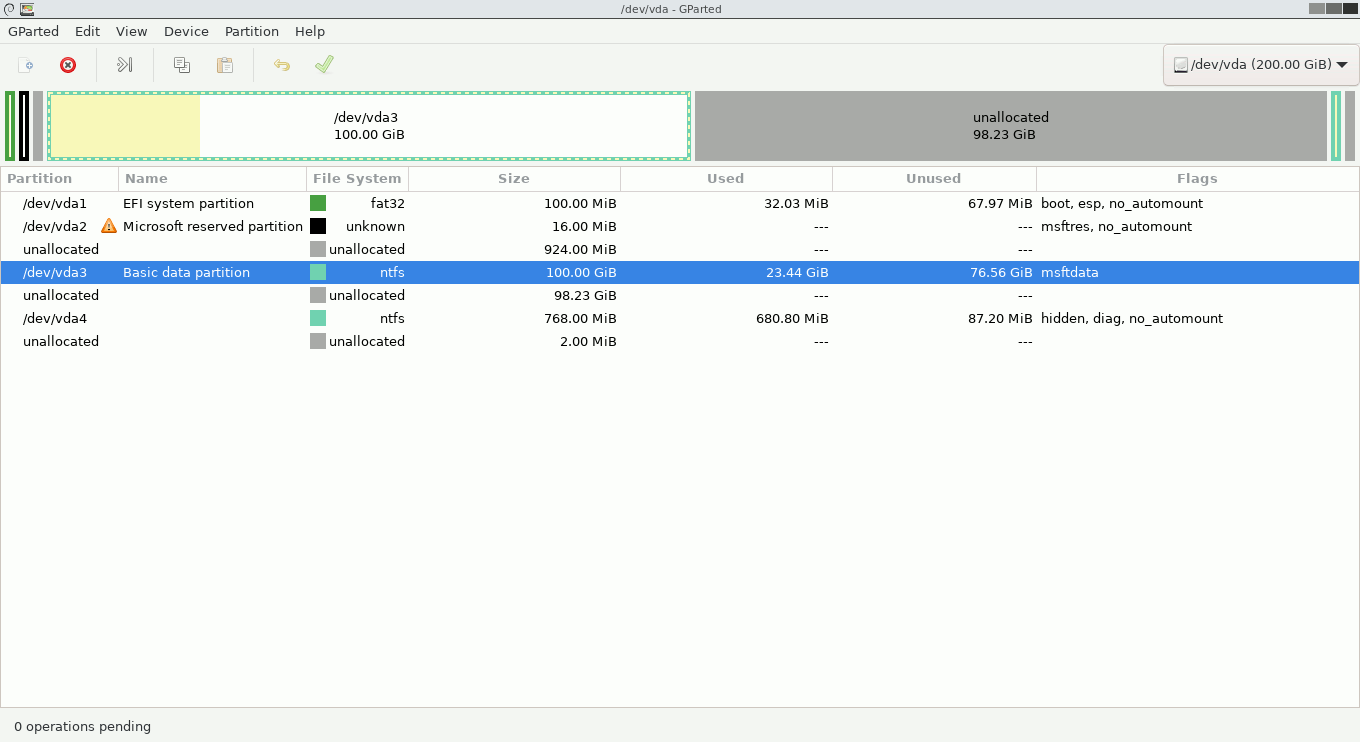
As you can see from the picture above, the Windows partition has shrunk to 100 GiB. You have 924 MiB of unallocated space on the left side of the Windows partition and approximately 98 GiB of unallocated space on the right.
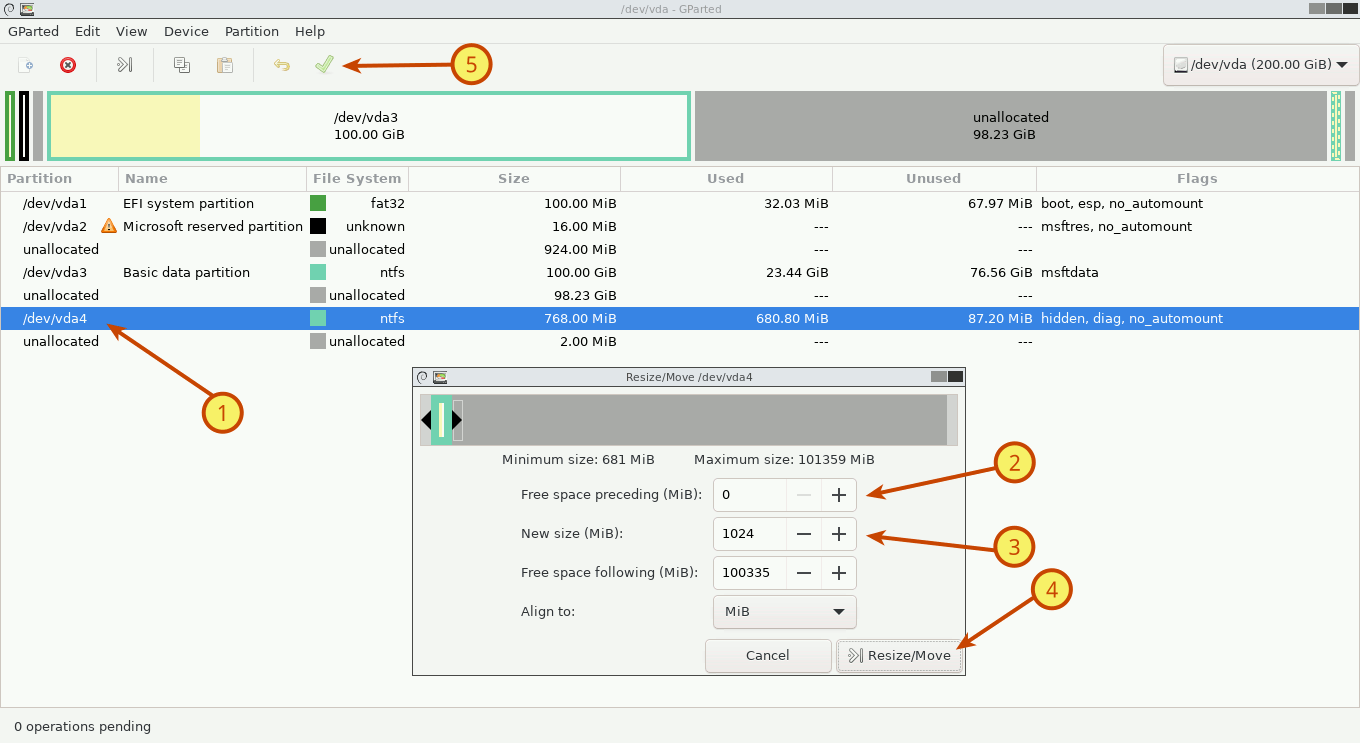
The next step is to move the Windows Recovery Partition directly next to the Windows 11 partition. This is what Microsoft recommends. Microsoft also recommends having 250 MiB of free space in the recovery partition. So the recovery partition will also need to be enlarged.
Right-click on the recovery partition (for me, it is /dev/vda4) and click on the 'Resize/Move' option.
Change the 'Free space preceding' value to 0 and press [Enter]. Then, change the 'New size' value to 1024 MiB (1 GiB) and press [Enter].
Then, press the 'Resize/Move' button and finally press the 'Apply' button to start the resizing process.
This is how the partition looks after it has been moved and resized. It took me about 8 seconds to finish the job.
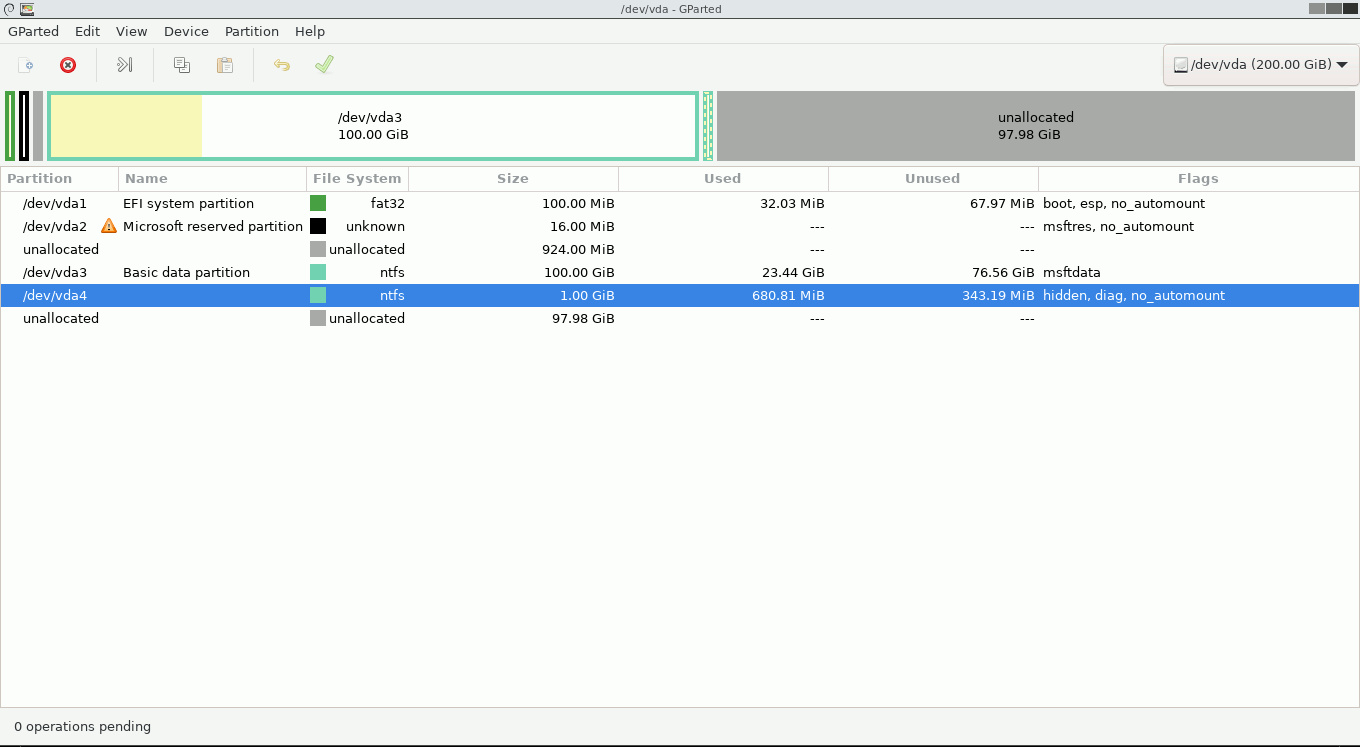
As you can see from the picture above, the Microsoft Reserved Partition has been moved directly next to the Windows partition and enlarged in size to 1 GiB. The roughly 98 GiB of unallocated space has been moved to the far end.
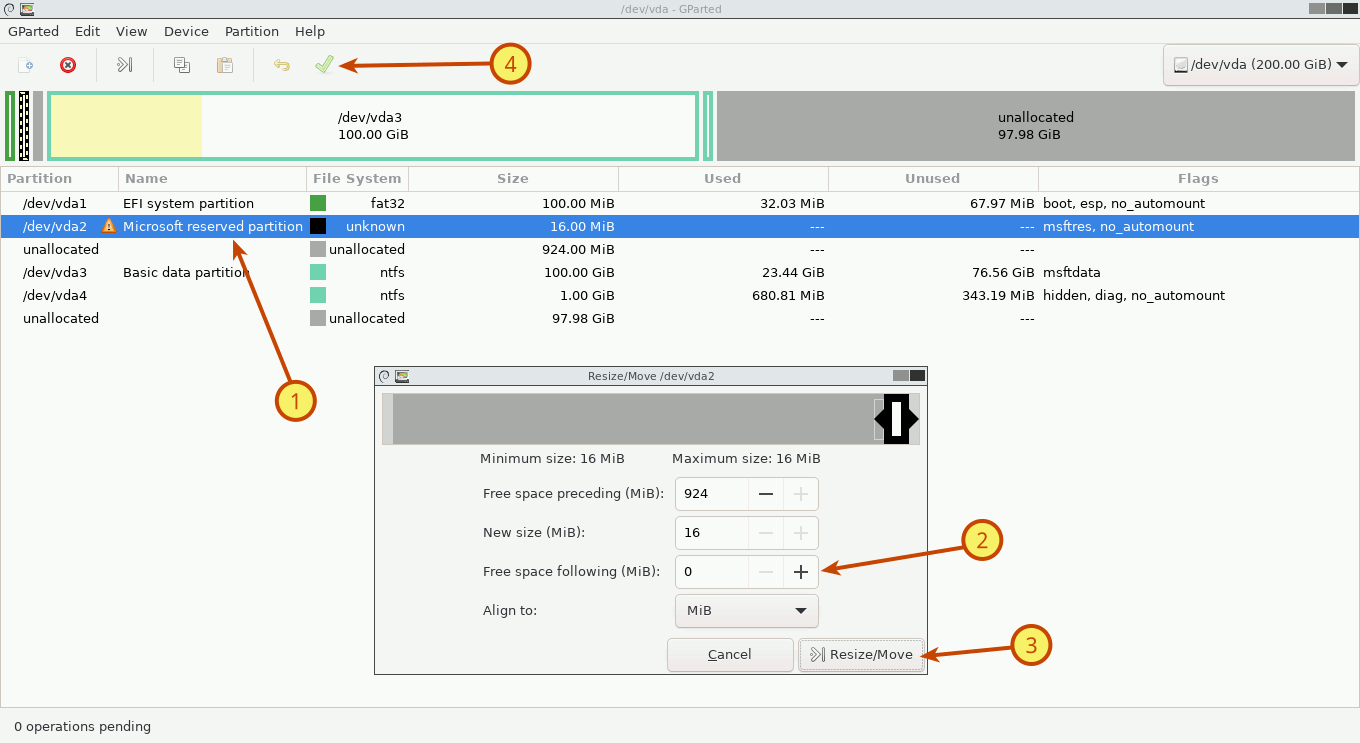
Next, move the Microsoft Reserved Partition just before the Windows 11 partition.
Right-click on the Microsoft Reserved Partition (for me, it is /dev/vda2) and click on the 'Resize/Move' option.
Change the 'Free space following' value to 0 and press [Enter].
Then, press the 'Resize/Move' button and finally press the 'Apply' button to start the resizing process.
This is how the Microsoft Reserved Partition looks after it has been moved. It took me about 1 second to finish the job.
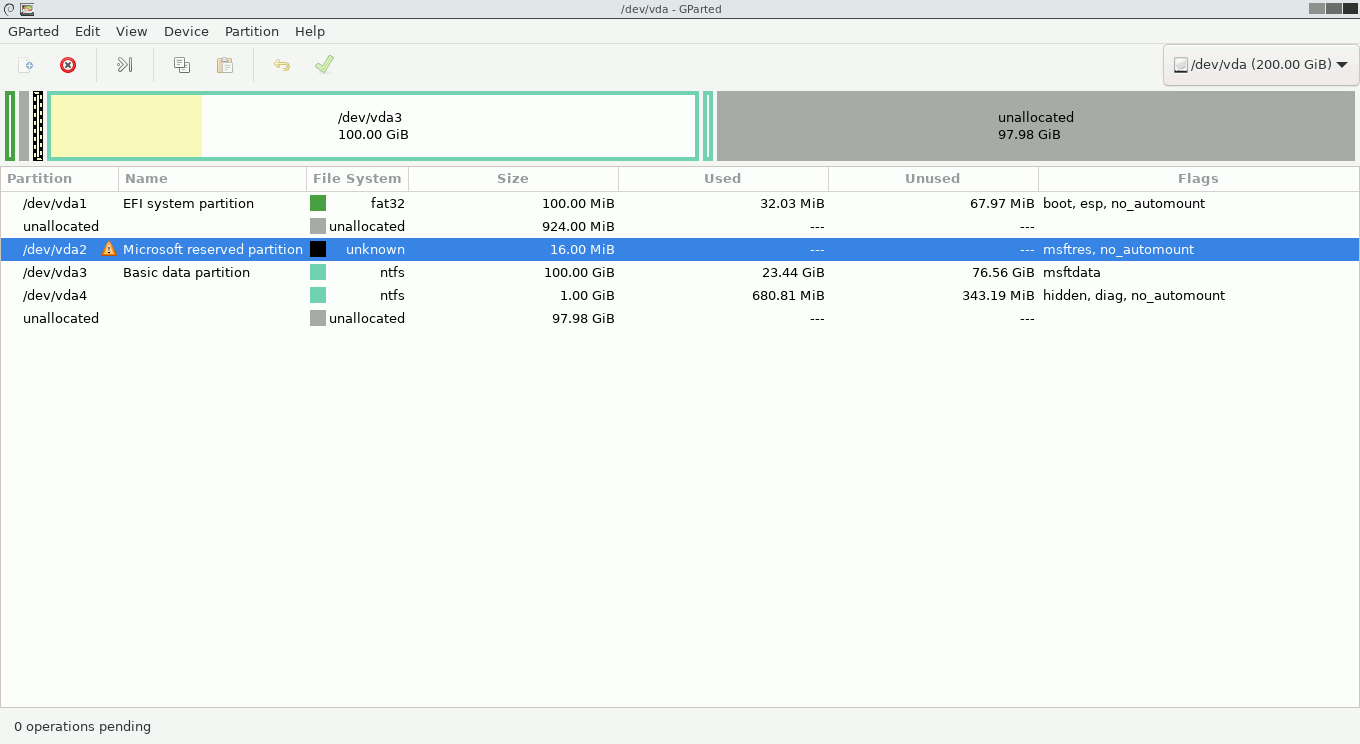
As you can see from the picture above, the Microsoft Reserved Partition has been moved directly before the Windows partition. The unallocated 924 MiB of space has been moved to the left or right next to the EFI System partition.
Finally, you need to enlarge the EFI System Partition from 100 MiB to 1 GiB. But there is a problem here. When you previously shrank or enlarged the partitions, the file systems on them shrank or enlarged automatically. This is not the case for EFI System Partition, as its file system is FAT32. The FAT32 file system will not automatically resize. You have to do it manually.
So, before you enlarge the EFI System Partition, make a backup of its contents.
Right-click on the EFI System Partition (for me, it is /dev/vda1) and click on the 'Information' option.
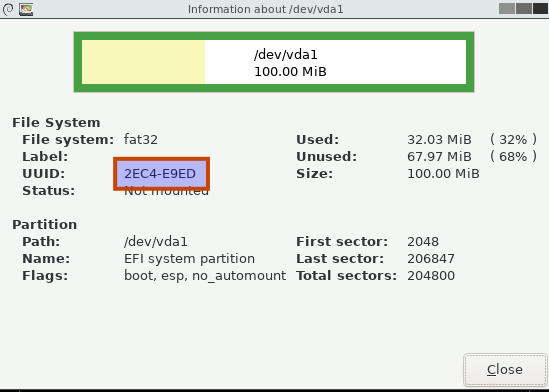
Take note of the UUID and write it down somewhere. You'll need this UUID later when you enlarge the FAT32 file system. If you didn't provide the same UUID when enlarging the FAT32 file system, a different UUID will be assigned. As a result, you will lose your Windows 11 activation because it is now considered a different Windows computer.
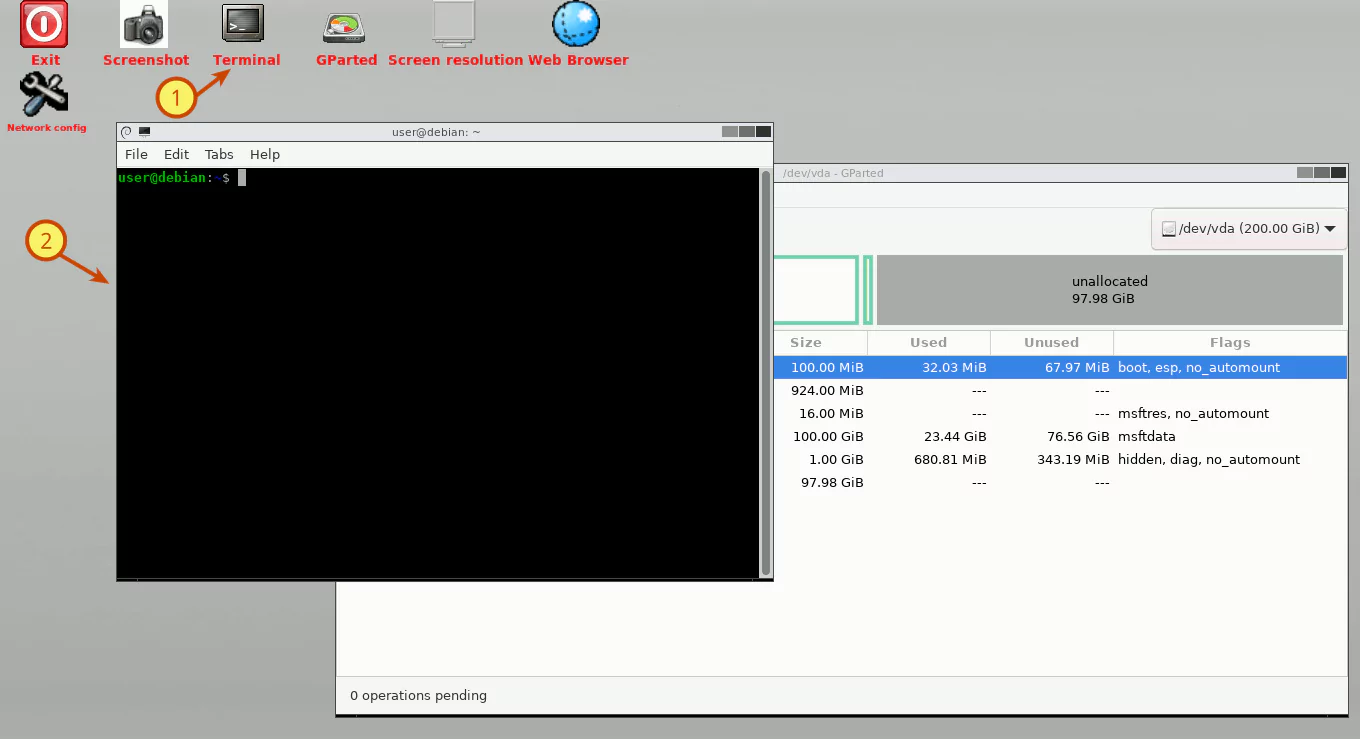
On the desktop, double-click on the terminal icon to open the terminal window.
in the terminal, list your partitions.
$ lsblk -pf
NAME        FSTYPE   FSVER            LABEL        UUID
...
/dev/vda
├─/dev/vda1 vfat     FAT32                         2EC4-E9ED
├─/dev/vda2
├─/dev/vda3 ntfs                                   BA2EC7192EC6CE17
└─/dev/vda4 ntfs                                   60C438D2C438AC62
For me, the EFI System Partition is the first partition, /dev/vda1. Yours will be different. The same UUID is visible here as well.
Mount your EFI System Partition to /mnt.
$ sudo mount -v /dev/vda1 /mntCreate a temporary directory for the ESP backup.
$ sudo mkdir -v /espBackup your ESP files to the newly created directory.
$ sudo rsync -av /mnt/ /esp/Un mount your EFI System Partition from /mnt.
$ sudo umount -v /mntReturn to the GParted GUI manager.
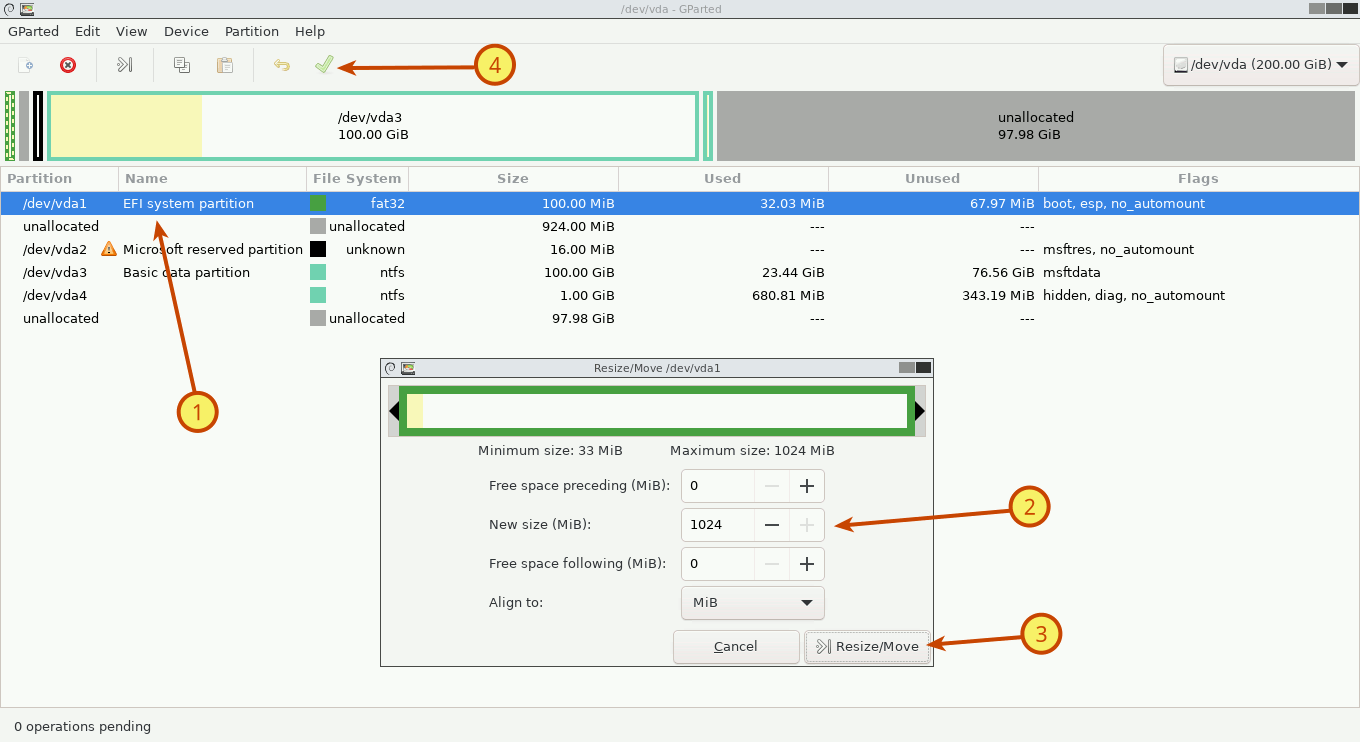
Right-click on the EFI System Partition (for me, it is /dev/vda1) and click on the 'Resize/Move' option.
Change the 'New size' value to 1024 and press [Enter].
Then, press the 'Resize/Move' button and finally press the 'Apply' button to start the resizing process.
As expected, you will receive this error message after enlarging the partition.
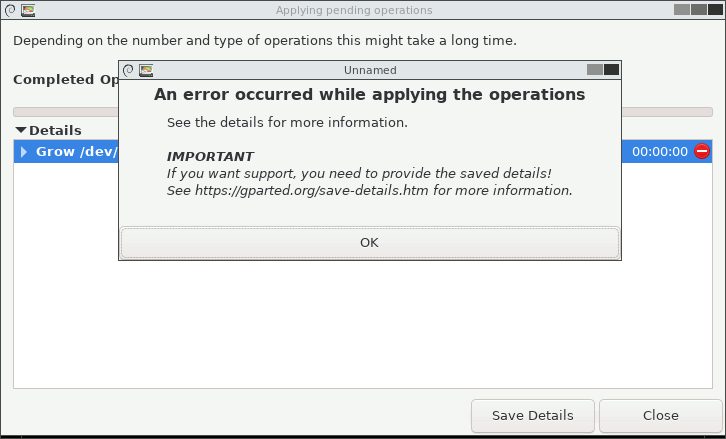
The error occurred because the process was able to enlarge the partition but couldn't enlarge the FAT32 file system. There's no need to worry. Just press the OK button and then the Close button.
Now, go back to the terminal window.
Re-format the ESP (for me, it is /dev/vda1) using the FAT32 file system. Use the same UUID that you wrote down earlier. For me, the UUID is '2EC4-E9ED'. Replace the UUID with your own. You also need to remove the dash (-) from the UUID.
$ sudo mkfs.fat -F 32 -i 2EC4E9ED /dev/vda1Mount your newly formatted EFI System Partition to /mnt.
$ sudo mount -v /dev/vda1 /mntRestore your previous backup from the /esp directory to the /mnt directory.
$ sudo rsync -av /esp/ /mnt/Un mount your EFI System Partition from /mnt.
$ sudo umount -v /mntReturn to the GParted GUI manager again.
Click the GParted Menu, then Refresh Devices. You should now see a properly enlarged EFI System Partition of 1 GiB, with enough free space to accommodate multiple Linux operating systems.
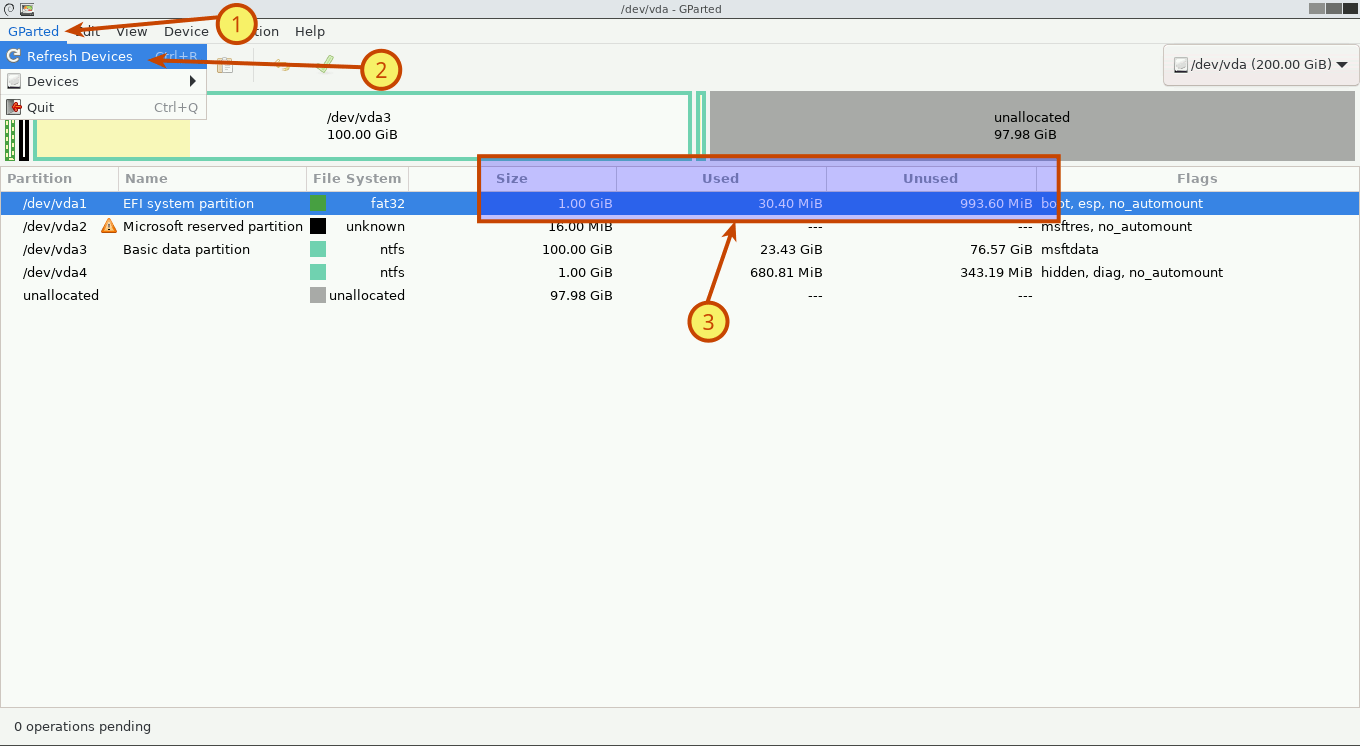
All the partitions have been resized and aligned as desired. You can now shut down your computer.
Unplug the GParted Live USB drive and boot the computer to Windows 11.
First, you should run the chkdsk command to scan the partitions and resolve any issues. So, open the terminal with administrative privileges.
List all volumes by the drive letter and GUID.
PS C:\> wmic volume get capacity,filesystem,name
Capacity      FileSystem  Name
107374178304  NTFS        C:\
1073737728    NTFS        \\?\Volume{f184beba-cc09-4c95-8280-1f2f952259a1}\
1071624192    FAT32       \\?\Volume{d2174588-09d2-4fab-95cb-054fc2549870}\
Check the NTFS file system (WRE) and resolve any issues.
PS C:\> chkdsk "\\?\Volume{f184beba-cc09-4c95-8280-1f2f952259a1}" /fCheck the FAT32 file system (ESP) and resolve any issues. Since the ESP is already mounted, schedule the partition to be checked on the next boot.
PS C:\> chkdsk "\\?\Volume{d2174588-09d2-4fab-95cb-054fc2549870}" /f
The type of the file system is FAT32.

Chkdsk cannot run because the volume is in use by another
process.  Chkdsk may run if this volume is dismounted first.
ALL OPENED HANDLES TO THIS VOLUME WOULD THEN BE INVALID.
Would you like to force a dismount on this volume? (Y/N) N

Chkdsk cannot run because the volume is in use by another
process.  Would you like to schedule this volume to be
checked the next time the system restarts? (Y/N) Y
Check the NTFS file system (Windows 11) and resolve any issues. Since the Windows 11 partition is already mounted, schedule the partition to be checked on the next boot.
PS C:\> chkdsk "C:" /f
The type of the file system is NTFS.
Cannot lock current drive.

Chkdsk cannot run because the volume is in use by another
process.  Would you like to schedule this volume to be
checked the next time the system restarts? (Y/N) Y
Restart the computer.
After the reboot, Windows will begin to check the partitions and resolve any issues. When the issues have been fixed, Windows will restart again and boot normally.
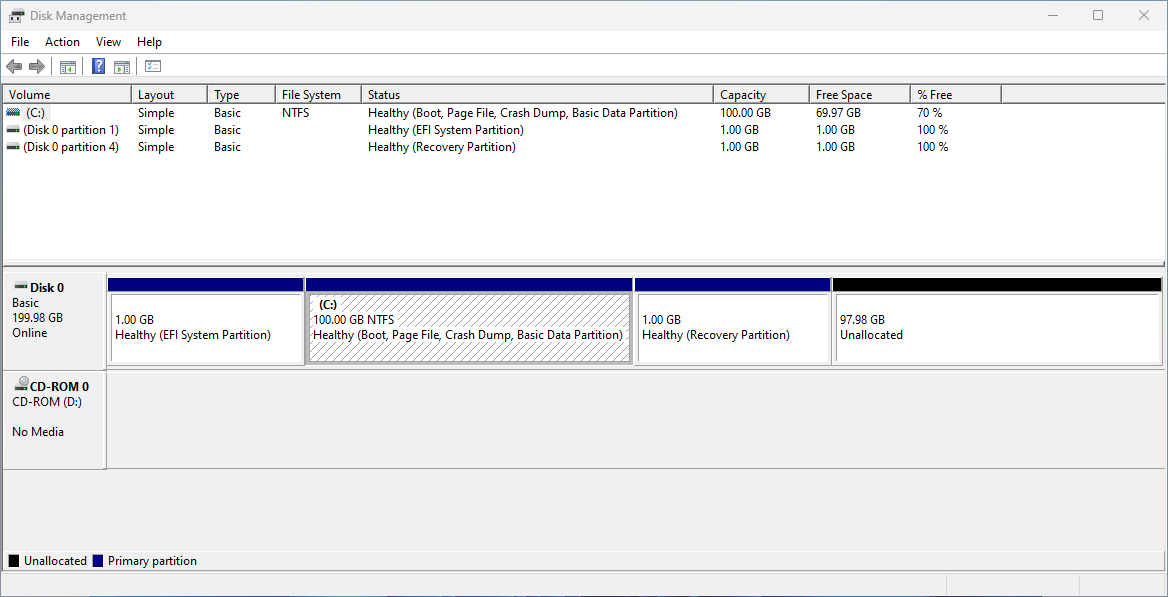
Check your Windows 11 partitions in Disk Management again. Here's how they appear now.
And in the terminal.
PS C:\> diskpart

DISKPART> list disk
  Disk ###  Status         Size     Free     Dyn  Gpt
  --------  -------------  -------  -------  ---  ---
  Disk 0    Online          200 GB    97 GB        *

DISKPART> select disk 0

DISKPART> list partition
  Partition ###  Type              Size     Offset
  -------------  ----------------  -------  -------
  Partition 1    System            1024 MB  1024 KB
  Partition 2    Reserved            16 MB  1025 MB
  Partition 3    Primary            100 GB  1041 MB
  Partition 4    Recovery          1024 MB   101 GB

DISKPART> exit

PS C:\> get-volume
DriveLetter FileSystemType DriveType HealthStatus Operat.. SizeRemaining       Size
----------- -------------- --------- ------------ -------- -------------       ----
C           NTFS           Fixed     Healthy      OK            69.91 GB     100 GB
            FAT32          Fixed     Healthy      OK            993.6 MB 1021.98 MB
            NTFS           Fixed     Healthy      OK           339.18 MB    1024 MB
The status of all partitions is 'Healthy'.
3. Disable Hibernation in Windows 11
It is recommended to disable hibernation on all operating systems in dual/multi-boot systems to avoid data loss.
If you hibernate Windows and then start Linux, or hibernate Linux and then start Windows, you may damage the EFI system partition.
Open the terminal with admin privileges and run the following command to check if hibernation is enabled or disabled:
PS C:\> (GP "HKLM:\SYSTEM\CurrentControlSet\Control\Session Manager\Power")."HiberbootEnabled"
1
If '1' is returned, Fast Startup is enabled; if '0' is returned, Fast Startup is disabled.
To disable Fast Start/Hibernation on Windows 11, follow these steps:
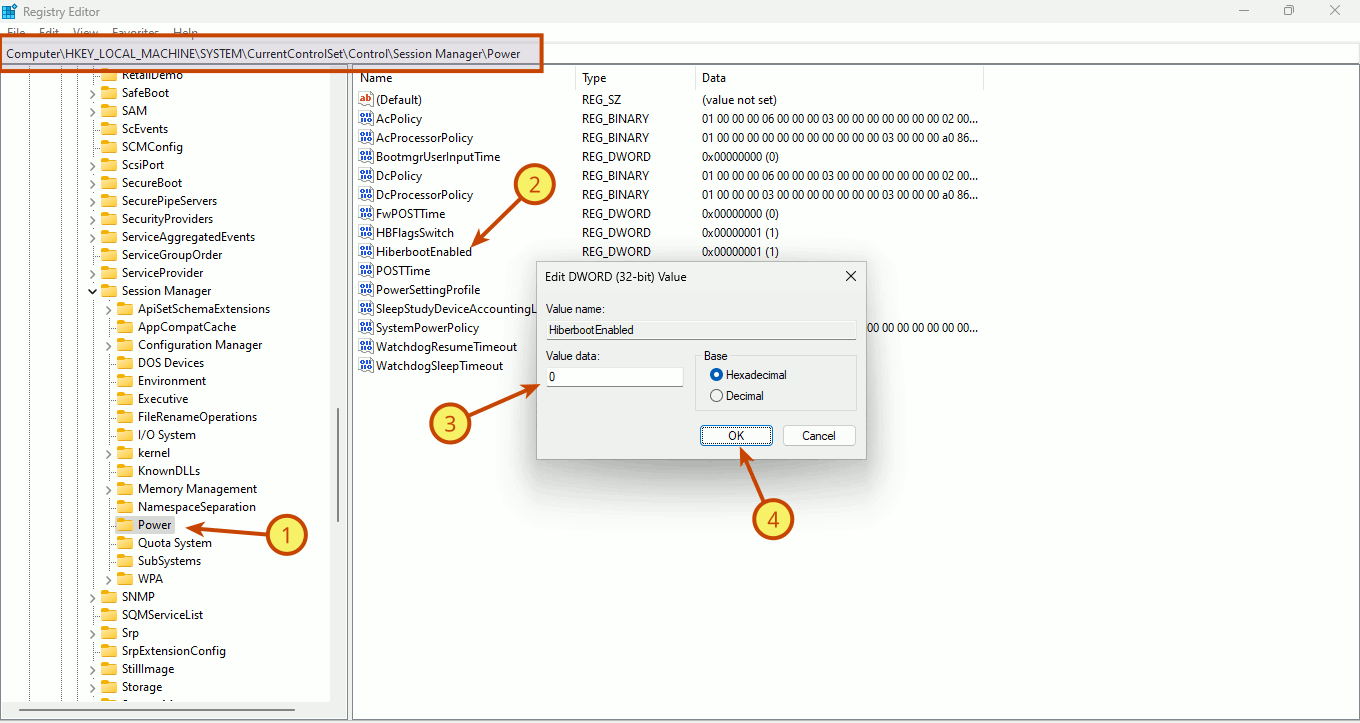
- Enter regedit into the search box and press [Enter] to launch the Registry Editor.
- Browse to: HKEY_LOCAL_MACHINE\SYSTEM\CurrentControlSet\Control\Session Manager\Power.
- Double-click on HiberbootEnabled and change its value from 1 to 0.
Close the Registry Editor window and check again.
PS C:\> (GP "HKLM:\SYSTEM\CurrentControlSet\Control\Session Manager\Power")."HiberbootEnabled"
0
As you can see, the hibernation feature has been disabled. If hibernation is disabled, Fast Start will also be disabled, even if it appears to be enabled. Disabling hibernate overrides Fast Startup is turned on.
Shut down Windows 11 before installing Ubuntu Linux. Rebooting is not sufficient.
4. Install Ubuntu Desktop 24.04 LTS
Boot your system using the Ubuntu Desktop 24.04 LTS installer in UEFI mode.
Next, select your language, keyboard layout, and other preferences.
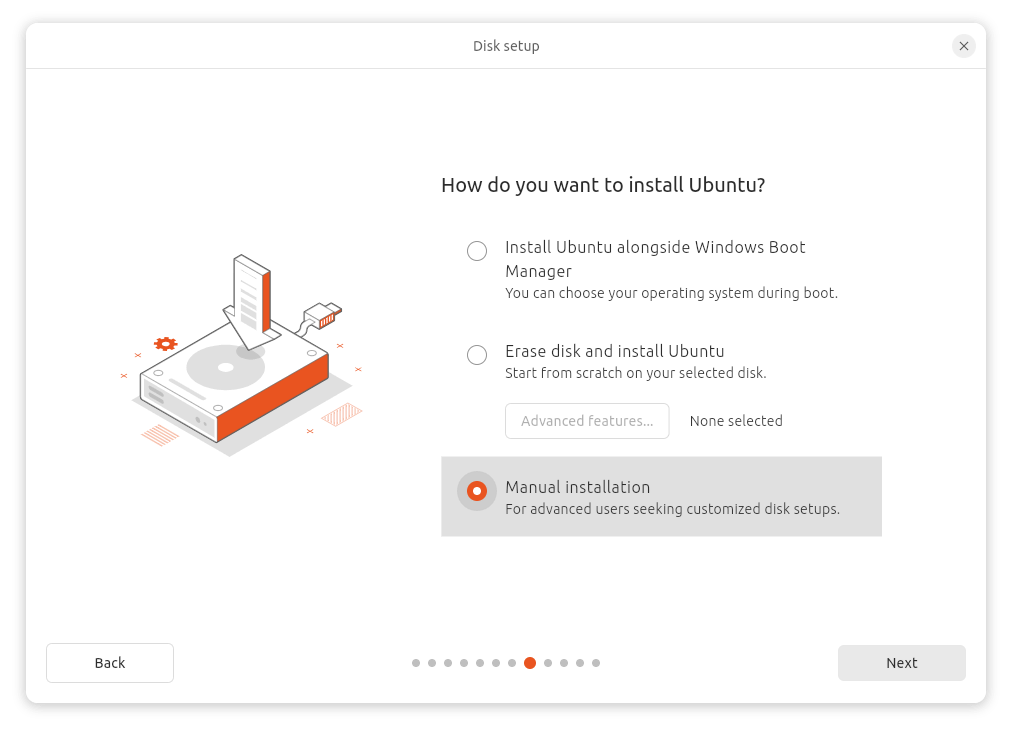
You should now be on the Disk setup screen. Select the Manual installation radio button, then click the Next button to continue.
On the Manual Partitioning screen, you can create and mount the partitions needed to install Ubuntu.
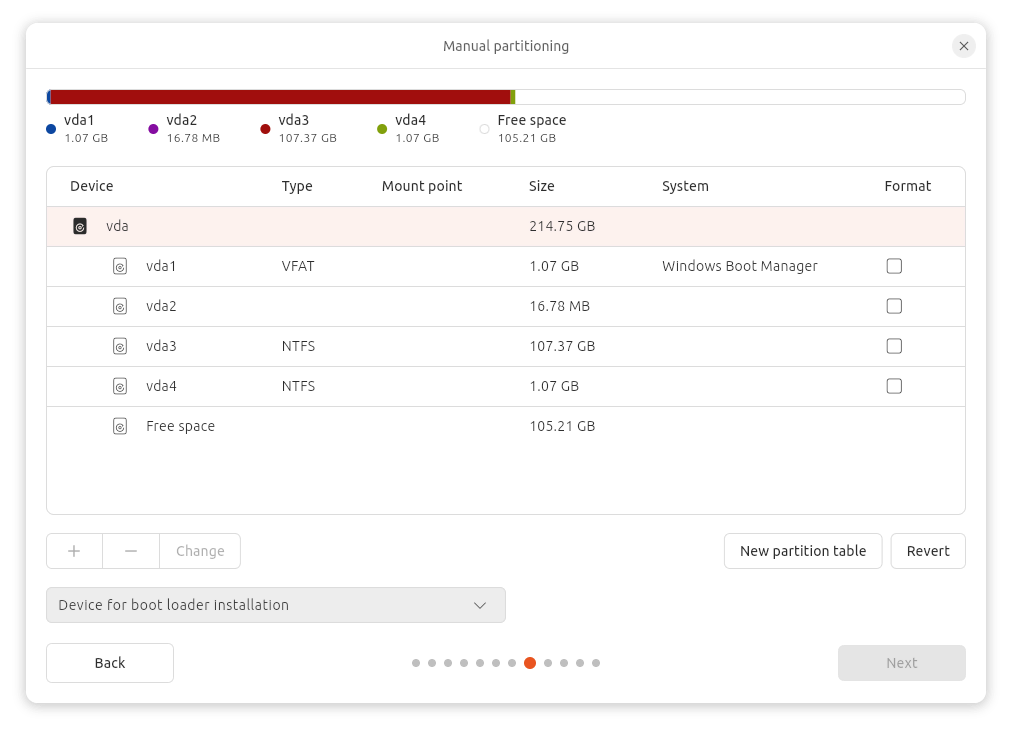
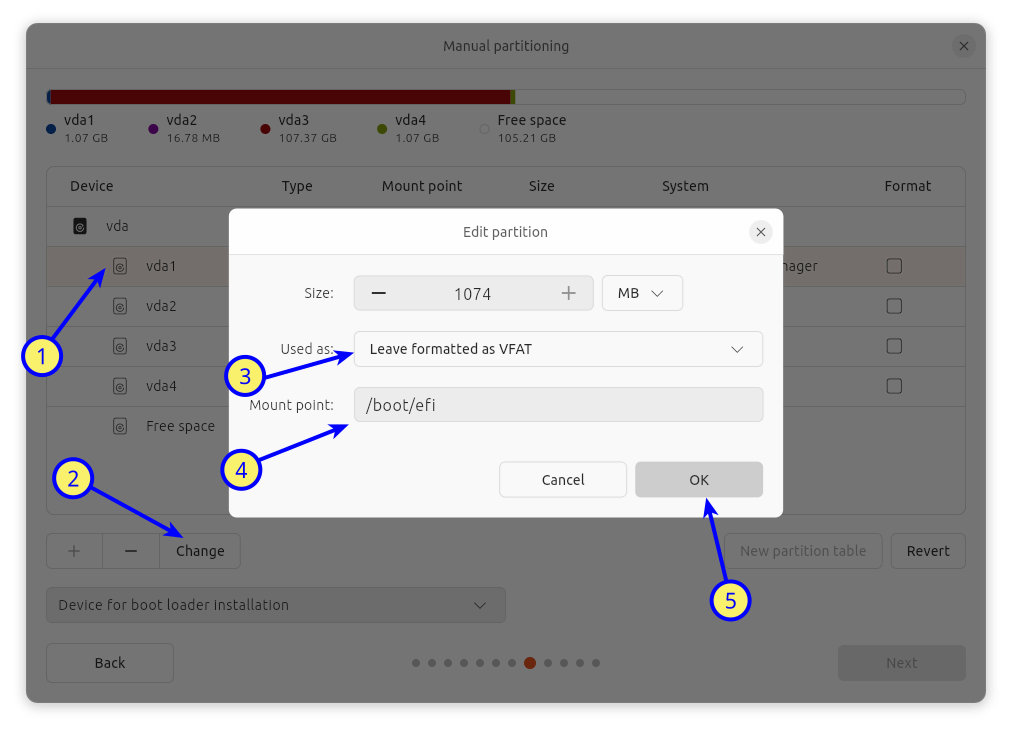
First, you need to mount the EFI System Partition.
Select the EFI System Partition (for me, it is vda1) with VFAT file system type, and click on the Change button. Then, in the 'Edit partition' window, leave the 'Leave formatted as VFAT' option as is. This is critical: do not format it; leave it as is, in VFAT format. Then, set the mount point to '/boot/efi' and click the OK button to finish.
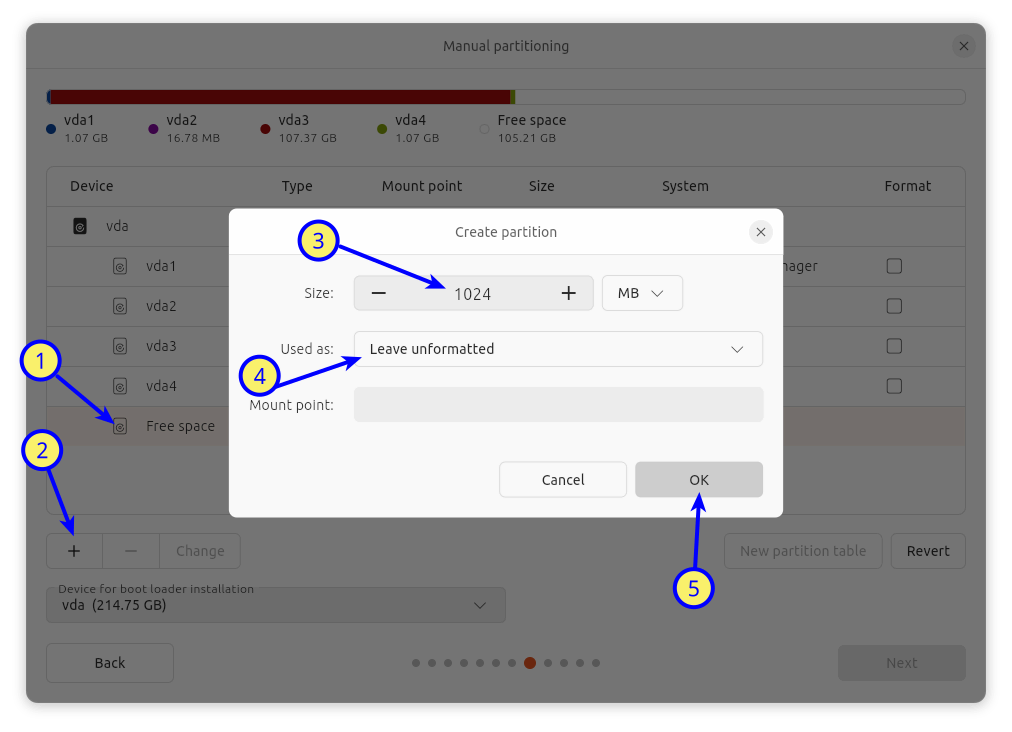
Next, you must create a 1 GiB new partition. This partition won't be used for Ubuntu, but rather for the System Rescue toolkit.
Select the Free Space and click on the + sign to create a partition. Next, set the partition size to 1024 MiB (1 GiB), Used as to Leave unformatted, do not specify a mount point, and then press OK to finish. Once I have finished installing Ubuntu, I will install the System Rescue Toolkit.
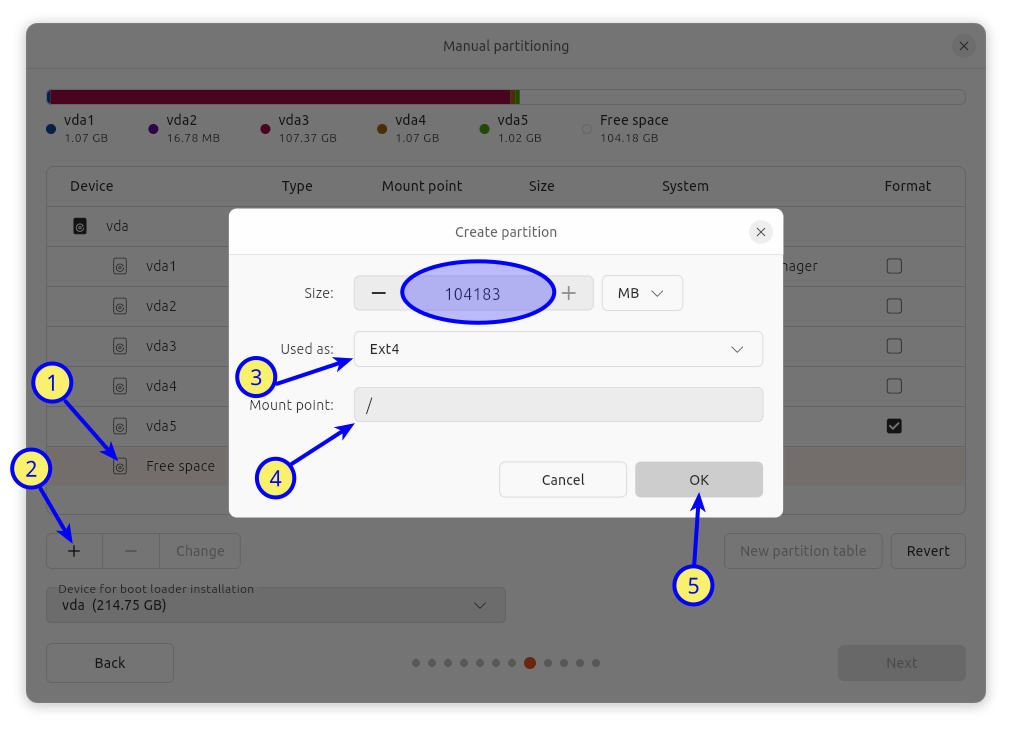
Finally, you must create a partition to install Ubuntu.
Select the Free Space again and click on the + sign to create a partition. I will use all the remaining space. Set the file system to Ext4, the Mount point to '/', and click OK to finish.
All of the partitions required to install Ubuntu have been created. This is how the final partition layout should look.
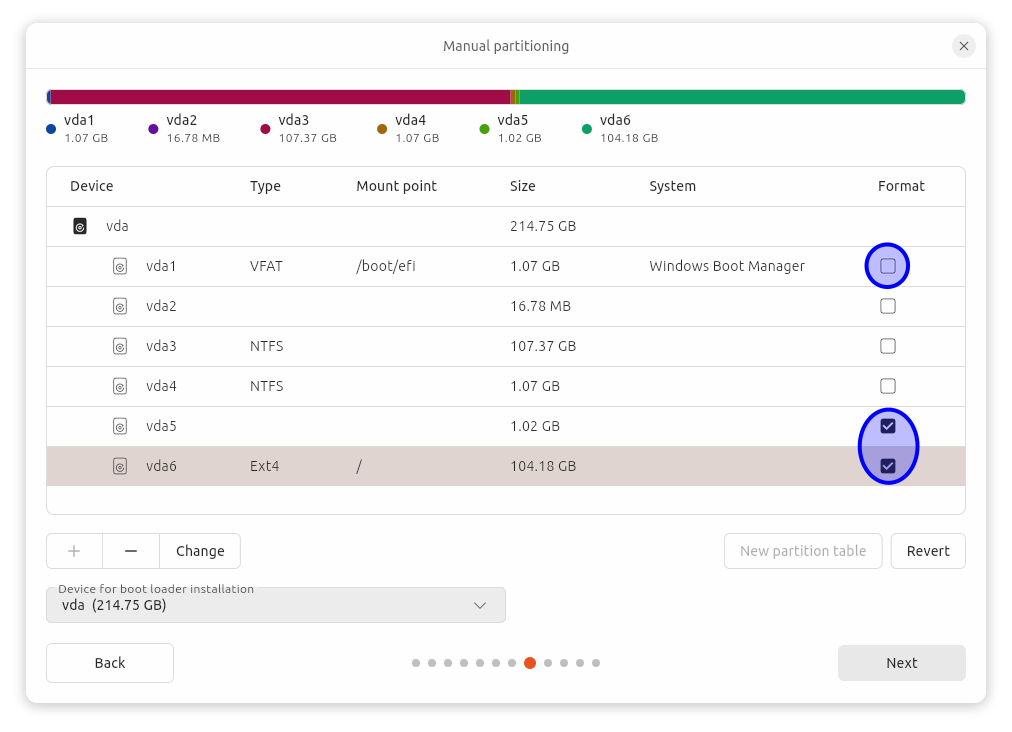
Please take a close look at the VFAT partition; it should not be formatted. Otherwise, you won't be able to boot to Windows 11.
Click the Next button to proceed with the installation. Complete the remaining customization steps, such as creating a new user and password, etc.
The final phase of the installation will begin. After the installation is finished, restart the system.
You will then be logged into Ubuntu Desktop, which features the all-new Gnome 46 desktop interface.
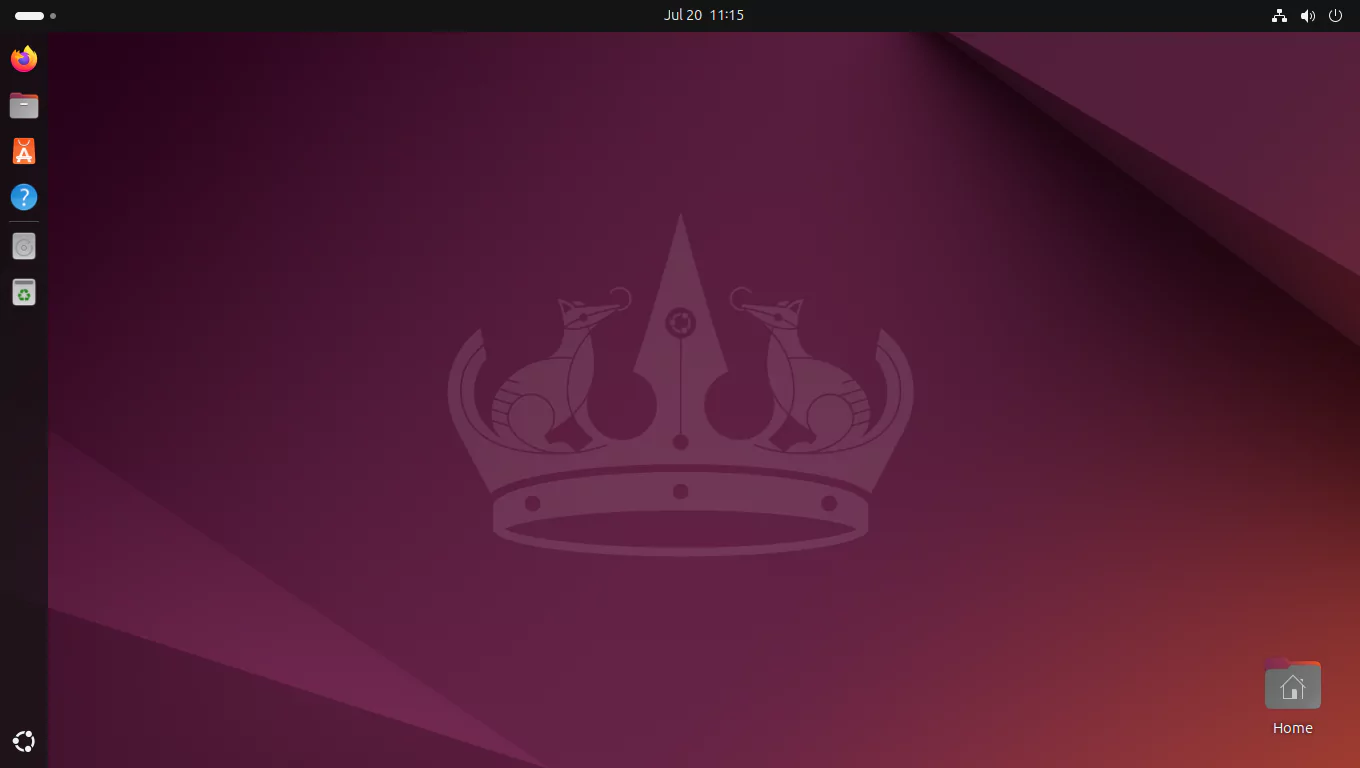
The Ubuntu Desktop 24.04 LTS installation is now complete.
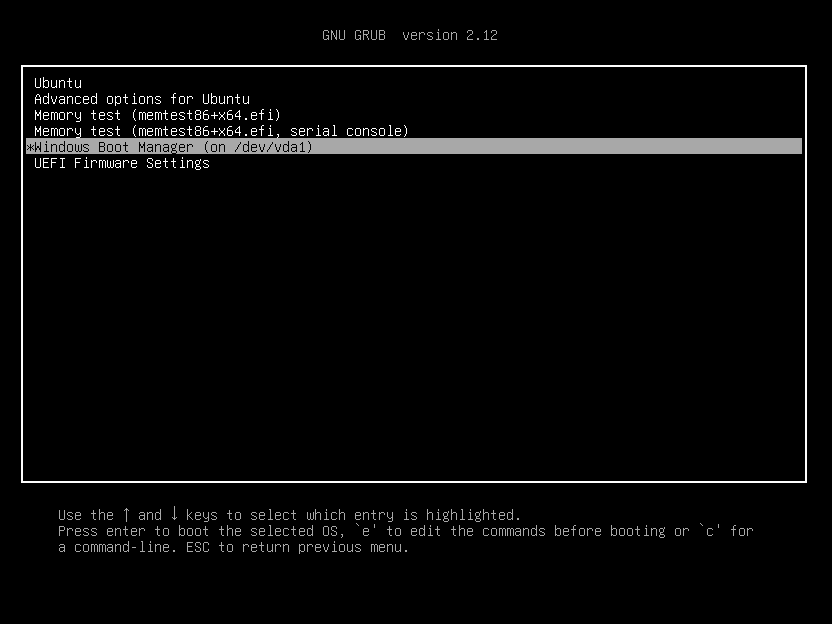
The link to Windows 11 in the GRUB menu has already been added, and you can now boot to Windows 11 if you want.
5. Enable ZRAM on Ubuntu Desktop
zram is a Linux kernel module that creates a compressed block device in RAM. The block device created with zram can then be used for swap.
zram enables Linux to make better use of RAM by storing more pages of memory in the compressed swap. In addition, the zram block device can grow and shrink dynamically as required.
So let's enable zram on Ubuntu.
Check what type of swap Ubuntu is currently using.
$ swapon -v
NAME      TYPE SIZE USED PRIO
/swap.img file   4G   0B   -2
As you can see from the output, Ubuntu is currently using a 4 GiB swap file.
The swap file is located in the root (/) directory.
$ ls -lh /swap.img
-rw------- 1 root root 4.0G Jul 20 08:27 /swap.img
You need to replace the swap file with zram. So first, disable swap.
$ sudo swapoff -v /swap.img
swapoff /swap.img
Delete the swap file.
$ sudo rm -v /swap.img
removed '/swap.img'
Remove the swap file mount information from the /etc/fstab file.
$ sudo sed -i.original '/^\/swap.img/d' /etc/fstabNow that the swap file has been completely disabled and removed, enable the zram.
Install the following package to enable zram swap.
$ sudo apt install zram-configEnable the zram-config service.
$ sudo systemctl enable --now zram-config.serviceCheck once more to see what type of swap Ubuntu is using now.
$ swapon -v
NAME       TYPE      SIZE USED PRIO
/dev/zram0 partition 3.9G   0B    5
As you can see from the output, Ubuntu is now using a 4 GiB (~) zram swap.
Get more information about zram.
$ zramctl
NAME       ALGORITHM DISKSIZE DATA COMPR TOTAL STREAMS MOUNTPOINT
/dev/zram0 lzo-rle       3.9G   4K   73B   12K       2 [SWAP]
The output above shows that the compression algorithm used is lzo-rle.
Find out what other compression methods your system supports.
$ cat /sys/block/zram0/comp_algorithm
lzo [lzo-rle] lz4 lz4hc 842 zstd
Replace the compression algorithm with zstd. zstd compresses data better than lzo-rle.
Insert the line 'echo zstd > /sys/block/zram0/comp_algorithm' into the '/usr/bin/init-zram-swapping' file.
$ sudo sed -i.original \
    '/^echo $mem/i echo zstd > \/sys\/block\/zram0\/comp_algorithm' \
    /usr/bin/init-zram-swapping
Confirm the changes.
$ cat /usr/bin/init-zram-swapping
#!/bin/sh

modprobe zram

# Calculate memory to use for zram (1/2 of ram)
totalmem=`LC_ALL=C free | grep -e "^Mem:" | sed -e 's/^Mem: *//' -e 's/  *.*//'`
mem=$((totalmem / 2 * 1024))

# initialize the devices
echo zstd > /sys/block/zram0/comp_algorithm
echo $mem > /sys/block/zram0/disksize
mkswap /dev/zram0
swapon -p 5 /dev/zram0
Reboot your system.
$ rebootAfter rebooting, check the zram again. As you can see, the compression algorithm is now zstd.
$ swapon -v
NAME       TYPE      SIZE USED PRIO
/dev/zram0 partition 3.9G   0B    5

$ zramctl
NAME       ALGORITHM DISKSIZE DATA COMPR TOTAL STREAMS MOUNTPOINT
/dev/zram0 zstd          3.9G   4K   59B   20K       2 [SWAP]
The ZRAM set up on Ubuntu Desktop is now complete.
6. Enroll the Machine Owner Key
Machine Owner Key (MOK) is an alternative key management system for Secure Boot that enables end users to add their own key to the MOK list. This key can then be used to validate a custom kernel when Secure Boot is enabled.
I will generate a public and private X.509 key pair with RSA-2048 bit strength to store in the MOK list.
Launch the Gnome terminal in Ubuntu. In the /var/lib/shim-signed/mok/ directory, create a new file named mok.cfg.
$ sudo vim /var/lib/shim-signed/mok/mok.cfgAdd the following lines to it. Make the necessary changes to suit your preferences. Changes that are possible are highlighted in amber. The Email address is optional. The flag 'CA:FALSE' indicates that the certificate was not issued by a Certificate Authority and that it was instead self-signed.
[ req ]
default_bits         = 2048
encrypt_key          = no
string_mask          = utf8only
utf8                 = yes
prompt               = no
distinguished_name   = my_dist_name
x509_extensions      = my_x509_exts

[ my_dist_name ]
commonName           = SysGuides Machine Owner Key
emailAddress         = info@sysguides.com

[ my_x509_exts ]
keyUsage             = digitalSignature
extendedKeyUsage     = codeSigning
basicConstraints     = critical,CA:FALSE
subjectKeyIdentifier = hash
Create an X.509 certificate key pair using the 'mok.cfg' file. To enroll the key using the mokutil tool, the X.509 certificate must be in DER format. I will set the validity period to 15 years.
$ sudo openssl req -x509 -sha256 -days 5490 -outform DER \
    -config /var/lib/shim-signed/mok/mok.cfg \
    -keyout /var/lib/shim-signed/mok/MOK.priv \
    -out /var/lib/shim-signed/mok/MOK.der
A pair of public and private keys will be generated.
$ ls -lh /var/lib/shim-signed/mok/
total 12K
-rw-r--r-- 1 root root 492 Jul 22 14:12 mok.cfg
-rw-r--r-- 1 root root 885 Jul 22 14:13 MOK.der
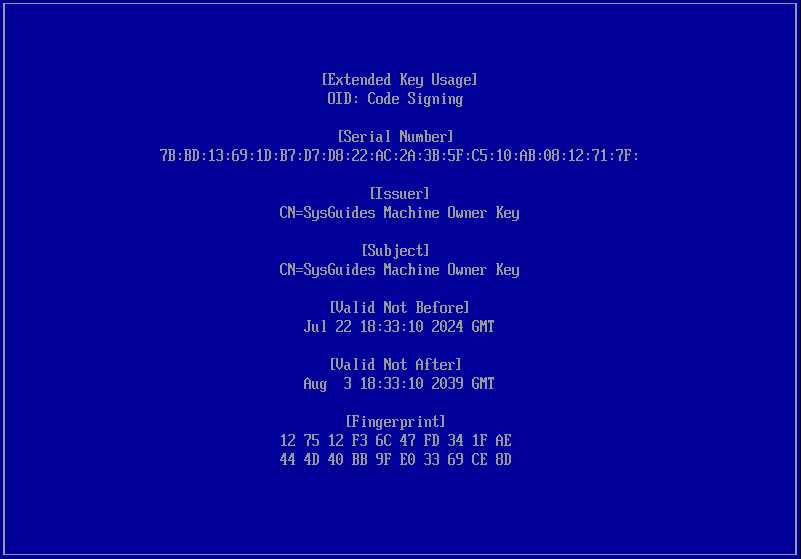
-rw------- 1 root root 1.7K Jul 22 14:13 MOK.privNow, look at the public key. This is what mine looks like.
$ sudo openssl x509 -text -noout -inform DER \
    -in /var/lib/shim-signed/mok/MOK.der

Certificate:
  Data:
    Version: 3 (0x2)
    Serial Number:
        7b:bd:13:69:1d:b7:d7:d8:22:ac:2a:3b:5f:c5:10:ab:08:12:71:7f
    Signature Algorithm: sha256WithRSAEncryption
    Issuer: CN = SysGuides Machine Owner Key, emailAddress = info@sysguides.com
    Validity
        Not Before: Jul 22 18:33:10 2024 GMT
        Not After : Aug  3 18:33:10 2039 GMT
    Subject: CN = SysGuides Machine Owner Key, emailAddress = info@sysguides.com
    Subject Public Key Info:
        Public Key Algorithm: rsaEncryption
            Public-Key: (2048 bit)
            Modulus:
                00:ca:26:e7:b4:53:57:08:3c:7c:16:d7:0e:28:52:
                9c:b7:67:54:fa:26:1b:6b:23:2d:5a:96:37:a0:87:
                2e:5b:2a:a8:10:af:6b:0b:b2:7f:7c:ac:b3:68:21:
                ac:6f:43:9f:56:da:f7:6f:07:fd:1c:0e:08:2d:82:
                3d:f0:0d:d5:e1:dc:8e:ca:dc:0f:b1:a8:55:e7:81:
                c3:5d:0b:8c:19:2b:5e:a7:35:26:49:e6:fb:c9:ce:
                6e:89:16:cc:83:bd:01:6b:09:f4:b7:3e:a6:bf:2d:
                56:dd:03:e7:1d:ce:45:b9:6c:fc:8d:a5:49:2b:40:
                ae:32:38:b8:05:f4:b2:17:63:ef:66:54:1b:1a:ef:
                a5:08:1b:80:55:42:5f:7d:a4:ae:ef:3f:fe:d0:0f:
                37:8c:af:76:4c:d3:08:b8:ad:20:b2:7b:17:16:71:
                07:e8:67:f7:b8:a3:8d:12:4b:4f:6d:f7:0a:28:d0:
                14:f7:a6:a3:bb:93:8a:da:6f:9c:0e:e6:af:48:9c:
                86:b0:ff:ec:13:4b:90:fc:b3:00:bc:9e:a1:de:56:
                d3:f4:51:8a:15:12:57:2c:73:7f:da:f9:4b:f2:55:
                8e:cd:0f:f6:62:16:01:1f:9a:56:82:6e:1d:67:ae:
                e4:16:2b:87:df:15:01:f8:6d:12:8b:73:d7:41:9c:
                e4:99
            Exponent: 65537 (0x10001)
    X509v3 extensions:
        X509v3 Key Usage:
            Digital Signature
        X509v3 Extended Key Usage:
            Code Signing
        X509v3 Basic Constraints: critical
            CA:FALSE
        X509v3 Subject Key Identifier:
            A5:5A:56:0A:F0:6E:69:36:AC:33:02:CC:5B:E8:57:0B:44:99:9E:4A
  Signature Algorithm: sha256WithRSAEncryption
  Signature Value:
      1a:b7:32:cc:ad:4f:61:e6:57:ce:6f:86:6c:de:55:fe:38:96:
      29:56:43:34:a4:b0:36:58:e4:78:6d:35:f9:7e:d2:29:ed:d6:
      a4:6f:24:59:cb:b3:36:fe:12:a3:91:7f:24:44:cf:89:a8:58:
      90:d2:c1:f2:fd:a3:a6:28:68:91:02:13:01:c8:7d:dc:38:90:
      e8:a8:cd:1b:6d:0e:92:a6:c7:f8:a4:ea:24:ca:5c:66:c9:8d:
      31:8f:e1:14:7f:b8:80:e9:d2:f0:0d:17:b7:28:0a:26:78:e0:
      47:67:43:38:2f:1d:2c:31:3c:42:58:b3:1d:45:f3:1c:ae:07:
      4a:22:91:9c:d0:5d:0b:23:56:f0:2c:0d:8c:ba:86:52:f6:b5:
      e9:4a:89:29:12:5a:a0:62:6f:1f:35:d4:86:e2:ab:5b:25:93:
      b9:2d:21:7d:22:1e:f7:ed:31:3e:05:6b:14:a6:9f:0f:06:f5:
      03:71:5d:a6:89:c1:b5:a3:62:3f:19:90:7a:47:8c:7d:99:c9:
      40:b2:70:cc:b6:ed:9f:d8:58:e8:fe:cd:cf:6d:f0:10:d3:7e:
      82:b2:73:21:4d:d4:ae:6d:50:47:f3:8d:74:33:59:02:63:31:
      52:4d:1a:97:a5:c2:20:66:59:16:57:d2:17:a4:19:bd:6a:e4:
      f0:a6:b7:2e
While the certificate needs to be in DER format to enroll the key in MOK, it should be in PEM format to sign the binaries using the sbsign tool. So, convert the certificate from DER to PEM format.
$ sudo openssl x509 \
    -inform DER -in /var/lib/shim-signed/mok/MOK.der \
    -outform PEM -out /var/lib/shim-signed/mok/MOK.pem
Check the certificates.
$ ls -lh /var/lib/shim-signed/mok/
total 16K
-rw-r--r-- 1 root root  492 Jul 22 14:12 mok.cfg
-rw-r--r-- 1 root root  885 Jul 22 14:13 MOK.der
-rw-r--r-- 1 root root 1.3K Jul 22 14:17 MOK.pem
-rw------- 1 root root 1.7K Jul 22 14:13 MOK.priv
Enroll your key using the mokutil tool.
$ sudo mokutil --import /var/lib/shim-signed/mok/MOK.derYou'll be prompted for a one-time password. This password will be used to confirm your key selection in the next step. So enter any password.
Reboot your system.
$ rebootYou will see a blue screen of MOKManager tool. Press any key to perform MOK management.
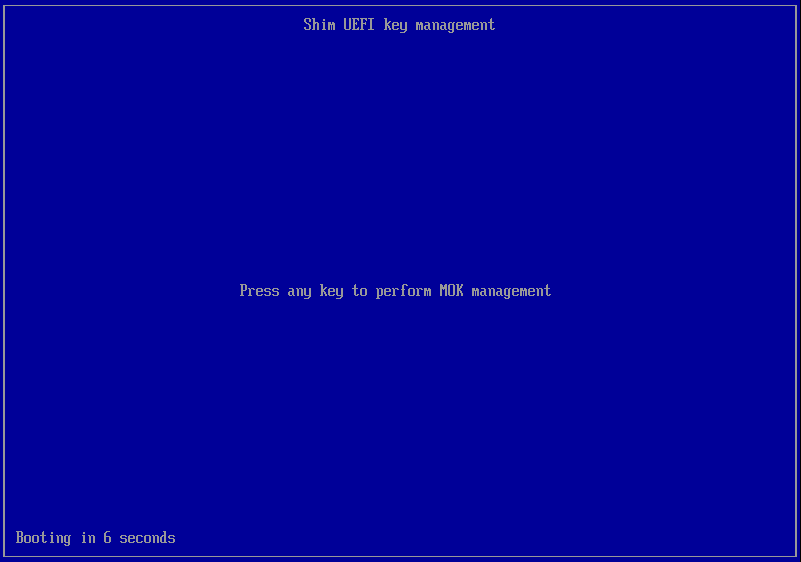
On the following screen, select the 'Enroll MOK' option and press [Enter].
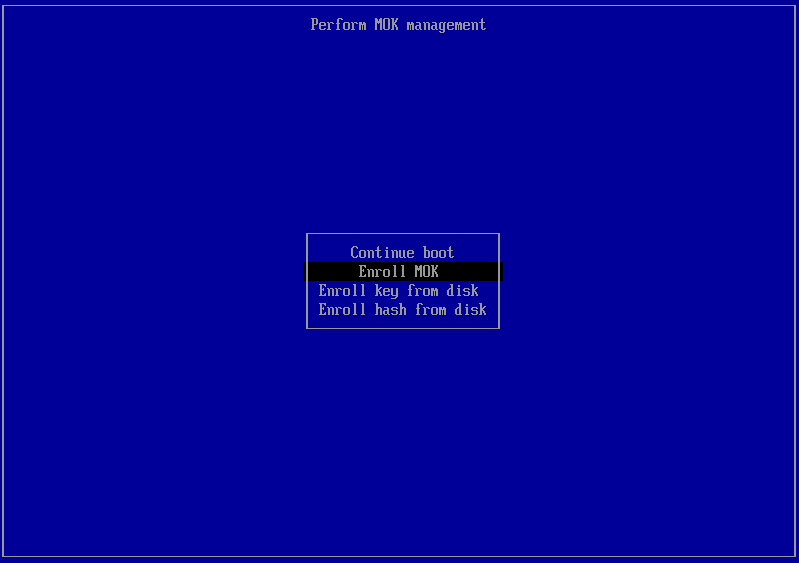
On the following screen, select the 'View key 0' option and press [Enter]. You should now see the details of the key you're about to enroll. Make sure it's the key you created earlier.
Press [Enter]. Next, select the 'Continue' option and press [Enter]. Then, on the 'Enroll the key(s)?' screen, select 'Yes' and press [Enter].
You will be prompted for the password. Enter the one-time password that you provided earlier.
Finally, select the 'Reboot' option to restart the system and continue booting into Ubuntu normally.
Launch the Gnome terminal and run the following command to ensure your key is enrolled:
$ sudo mokutil --list-enrolledYou should see your key.
Your key has been successfully enrolled, and you are now ready to sign any custom kernel.
In the following section, I'll demonstrate how to sign a custom kernel while installing the SystemRescue toolkit.
7. Install System Rescue Toolkit
The SystemRescue toolkit is optional in the dual-boot configuration, but I strongly advise you to install it. If something goes wrong, you don't need to scramble for a USB rescue disk.
It takes up less than 1 GB of space and is extremely useful when you need to manage or repair your system and data after a crash on both Linux and Windows computers.
SystemRescue includes a large number of Linux system utilities. It can be used on both Linux and Windows computers, as well as desktops and servers.
Download the latest SystemRescue ISO from the download page.
Open the Gnome terminal in Ubuntu.
Install the pesign package. It is required to view the signature in the kernel.
$ sudo apt install pesignList the partitions on your disk. As you may recall, I had reserved the /dev/vda5 partition with 1 GiB of space for SystemRescue.
$ lsblk -p /dev/vda
NAME        MAJ:MIN RM  SIZE RO TYPE MOUNTPOINTS
/dev/vda    253:0    0  200G  0 disk
├─/dev/vda1 253:1    0    1G  0 part /boot/efi
├─/dev/vda2 253:2    0   16M  0 part
├─/dev/vda3 253:3    0  100G  0 part
├─/dev/vda4 253:4    0    1G  0 part
├─/dev/vda5 253:5    0  977M  0 part
└─/dev/vda6 253:6    0   97G  0 part /var/snap/firefox/common/host-hunspell
                                     /
Format the /dev/vda5 partition with the EXT4 file system. Replace /dev/vda5 with your own. I'll label the volume 'RESCUE', but you can call it whatever you want.
$ sudo mkfs.ext4 -L RESCUE /dev/vda5Create two temporary directories.
$ sudo mkdir -v /{source,target}Mount the downloaded SystemRescue ISO in the /source directory.
$ sudo mount -vo loop,ro systemrescue-11.01-amd64.iso /sourceMount /dev/vda5 in the /target directory.
$ sudo mount -v /dev/vda5 /targetCopy the whole /sysresccd/ directory from the /source to the root of the /target directory.
$ sudo cp -arv /source/sysresccd/ /target/Check whether SystemRescue's kernel is Secure Boot-signed. If not signed, you will be unable to boot into System Rescue.
$ sudo pesign -S -i /target/sysresccd/boot/x86_64/vmlinuz
No signatures found.
As expected, the kernel is unsigned. If you attempt to boot into System Rescue right now, you will fail. You'll get the Secure Boot Error.
So you should sign the kernel with the key you created in the previous section.
$ sudo sbsign /target/sysresccd/boot/x86_64/vmlinuz \
    --key /var/lib/shim-signed/mok/MOK.priv \
    --cert /var/lib/shim-signed/mok/MOK.pem \
    --output /target/sysresccd/boot/x86_64/vmlinuz
Check for the signature again.
$ sudo pesign -S -i /target/sysresccd/boot/x86_64/vmlinuz
---------------------------------------------
certificate address is 0x71e8cf459208
Content was not encrypted.
Content is detached; signature cannot be verified.
The signer's common name is SysGuides Machine Owner Key
The signer's email address is info@sysguides.com
Signing time: Tue Jul 23, 2024
There were certs or crls included.
---------------------------------------------
As you can see, the kernel now has your signature.
Unmount the temporary directories.
$ sudo umount -v /{source,target}Remove the temporary directories.
$ sudo rmdir -v /{source,target}Now, you must update the boot loader.
Create a file named 50_systemrescue in the /etc/grub.d/ directory.
$ sudo vim /etc/grub.d/50_systemrescueAdd the following lines to it. The filesystem is identified by its label, 'RESCUE'. If you have given the filesystem another label, replace it accordingly. For more information, see this page.
#!/bin/sh
echo "Adding 'System Rescue' entry to the grub..." >&2
exec tail -n +3 $0

menuentry 'System Rescue 11.01' {
  load_video
  insmod gzio
  insmod part_gpt
  insmod part_msdos
  insmod ext2
  search --no-floppy --label RESCUE --set=root
  echo 'Loading System Rescue kernel ...'
  linux /sysresccd/boot/x86_64/vmlinuz archisobasedir=sysresccd archisolabel=RESCUE copytoram setkmap=us
  echo 'Loading System Rescue initramfs ...'
  initrd /sysresccd/boot/x86_64/sysresccd.img
}
Give the file executable permission.
$ sudo chmod +x /etc/grub.d/50_systemrescueFinally, update the grub.
$ sudo update-grubAnd then reboot.
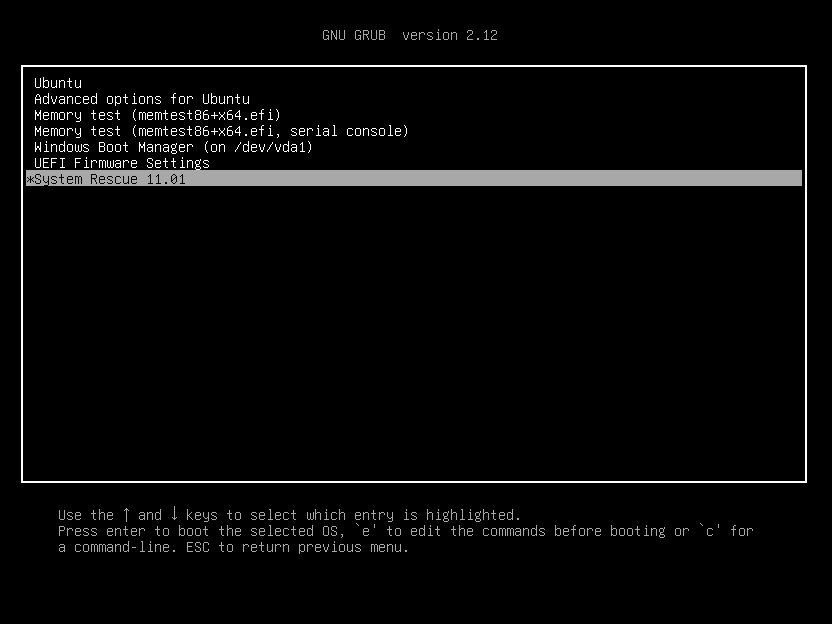
$ sudo rebootThe GRUB menu will now include a link to System Rescue. Select the System Rescue option and press [Enter] to boot to the System Rescue toolkit.
You will now be at the System Rescue Toolkit command-line prompt.
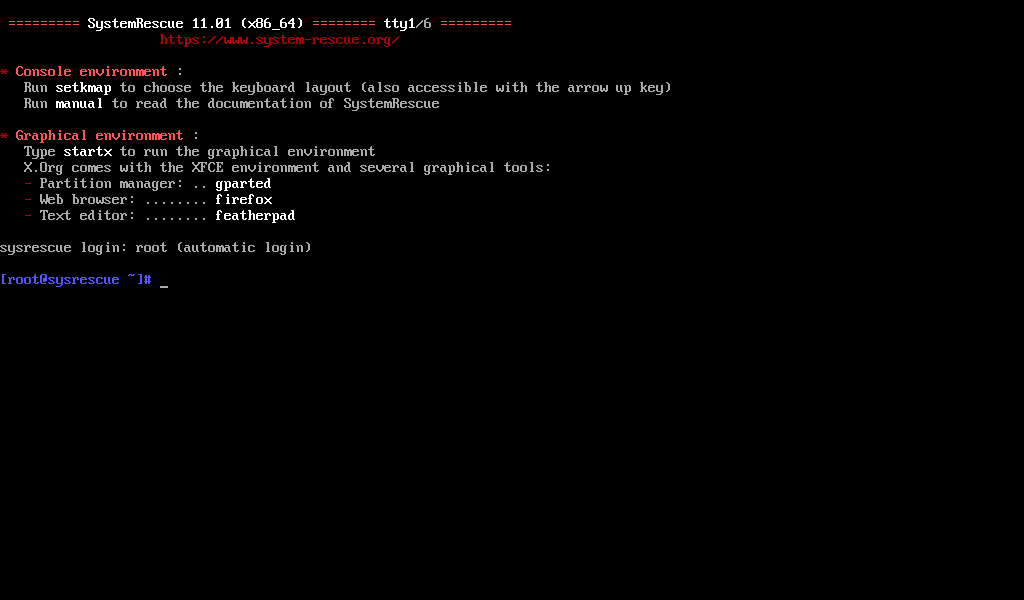
If you prefer to work graphically, type the command startx at the command line prompt. You will then be directed to the graphical interface.
The installation of the System Rescue Toolkit is now complete.
If you ever destroy Grub and get the grub> prompt, do the following to boot into System Rescue:
In the grub prompt, locate the partition where you installed System Rescue Toolkit. For me, it is /dev/vda5 (hd0,gpt5). Yours will be different. Locate the sysresccd/ directory.
grub> ls
(proc) (memdisk) (hd0) (hd0,gpt6) (hd0,gpt5) (hd0,gpt4) (hd0,gpt3) (hd0,gpt2) (hd0,gpt1)

grub> ls (hd0,gpt5)/
lost+found/ sysresccd/
Then enter the following commands at the grub> prompt. You can use the [Tab] key to autocomplete. Replace the label 'RESCUE' with your own.
grub> linux (hd0,gpt5)/sysresccd/boot/x86_64/vmlinuz archisobasedir=sysresccd archisolabel=RESCUE copytoram setkmap=us
grub> initrd (hd0,gpt5)/sysresccd/boot/x86_64/sysresccd.img
grub> boot
You will now be booted to the System Rescue command prompt.
This concludes the tutorial on how to properly dual-boot Windows 11 and Ubuntu. I appreciate you staying with me all the way through. Good bye.