
An updated version of this guide for Fedora Linux 41 is now available. Check it out!
Fedora Linux 40 has been released!
In this guide, I will show you how to install Fedora 40 with LUKS full disk encryption, snapshot, and rollback support.
As a result, if you make a mistake while modifying the system configuration, installing packages, or updating, you won't have to worry about breaking the system. Simply restore the snapshot prior to the problematic change, and you'll be fine.
I will install Fedora Workstation 40 using the command-line interface rather than the default Anaconda GUI installer. The Anaconda installer does not support encrypting the /boot directory. Also, by using a command-line interface, you can perform an advanced installation.
The steps in the guide may appear overwhelming, but they are not. I made sure that almost all commands could be copied and pasted to avoid typos and also save time typing them. You can also use these commands to write a bash script to automate the installation.
If you want to install Fedora 40 without LUKS Full Disk Encryption but still have Full System Rollback, please see my other article, How to Install Fedora 40 with Snapshot and Rollback Support.
So let's get started.
Table of Contents
- 1. Partitions and Subvolumes Layout
- 2. Create Partitions and File Systems
- 3. Create Directories and Subvolumes
- 4. Bootstrap Fedora in a Chroot Environment
- 5. Create a User Account
- 6. Create the Remaining Subvolumes
- 7. Create the fstab File
- 8. Create GRUB Configuration File
- 9. Add Boot Entry, Exit Chroot, and Restart
- 10. Install the Desktop Environment
- 11. Bypass the Additional Passphrase Prompt
- 12. Install and Configure Snapper
- 13. Install and Configure Grub-Btrfs
- 14. Create a System Root Snapshot and Set It as the Default
- 15. Snapper Tests
- 16. Make a Snapshot the New System Root
- 17. Enable Automatic Timeline Snapshots
- 18. Issues and Possible Solutions
- 19. Watch on YouTube
1. Partitions and Subvolumes Layout
For this guide, I will use a hard disk with a capacity of 128 GiB.
I'll create a 600 MiB EFI system partition and use the remaining disk space to create a partition for the Linux file system.
Fedora also creates a SwapOnZRAM during boot, so no separate swap partition is required.
This is how the disk partition looks:
NAME         SIZE  FSTYPE         PARTTYPENAME      MOUNTPOINT
/dev/vda     128G
/dev/vda1    600M  vfat           EFI System        /boot/efi
/dev/vda2  127.4G  btrfs (LUKS)   Linux filesystem  /
First, I will encrypt the Linux partition (/dev/vda2) with LUKS. Next, on the encrypted LUKS partition, I will create a btrfs file system. Then, on the btrfs file system, I'll create the following subvolumes to keep them out of root file system snapshots.
NAME             MOUNTPOINT                 TYPE
[main]           /                          mainvolume
home             /home                      subvolume
opt              /opt                       subvolume
.snapshots       /.snapshots                subvolume
cache            /var/cache                 subvolume
crash            /var/crash                 subvolume
AccountsService  /var/lib/AccountsService   subvolume
gdm              /var/lib/gdm               subvolume
images           /var/lib/libvirt/images    subvolume
machines         /var/lib/machines          subvolume
portables        /var/lib/portables         subvolume
log              /var/log                   subvolume
spool            /var/spool                 subvolume
tmp              /var/tmp                   subvolume
www              /var/www                   subvolume
.snapshots       /home/.snapshots           subvolume
.mozilla         /home/$USER/.mozilla       subvolume
The directories for which subvolumes are created and the reasons for doing so are listed below. For more information, visit this website.
/home
Contains user data. It will be created to keep user data separate while also preventing data loss during system root rollbacks.
/opt
Contains applications installed by a third party. It will be created to prevent these applications from being uninstalled during rollbacks.
/.snapshots, /home/.snapshots
Contains snapshots of the root (/) and home (/home) directories.
/var/cache, /var/crash, /var/tmp
Directories contain temporary files and caches. So they're created to be excluded from snapshots. Fedora mounts /tmp with tmpfs at boot, so a separate subvolume is unnecessary.
/var/log
Contains log files. It will be created to prevent the loss of log data during rollbacks.
/var/spool
Contains data that is awaiting some kind of later processing, such as mail, mail queues, printing, printer spool, and so on. It will be created to prevent the loss of mail, printing, and spool data following a rollback.
/var/www
Web server directory. It will be created to keep hosted web server data separate and prevent data loss during system root rollbacks.
/var/lib/AccountsService, /var/lib/gdm
Contains login user and Gnome display information. These directories must be writable at all times. When you try to boot a snapshot from the GRUB menu, you are booting into a read-only snapshot, which causes the system to hang just before the Gnome login screen appears.
In case you're using a desktop environment other than Gnome, it's necessary to replace the '/var/lib/gdm' with one that's specific to your desktop environment.
For KDE, it is '/var/lib/sddm'.
To find out about other desktop environments, refer to this page.
/var/lib/libvirt/images
The default location for libvirt-managed virtual machine images. It will be created so that virtual machine images are not replaced with older versions during a rollback.
/var/lib/machines, /var/lib/portables
These directories are used for managing containers and portable images.
/home/$USER/.mozilla
By default, Fedora Workstation includes the Firefox web browser. If you take a snapshot of your home directory and later undo any changes, you don't want to lose any new bookmarks, passwords, and other user data.
So, I'll create a subvolume for the '.mozilla' directory. This keeps it separate from the home subvolume and prevents data loss during undo operations.
Depending on your usage, you may also want to consider creating subvolumes in your home directory for the following directories:
- Chrome Browser: /home/$USER/.config/google-chrome
- GnuPG: /home/$USER/.gnupg
- SSH: /home/$USER/.ssh
- Thunderbird Mail: /home/$USER/.thunderbird
2. Create Partitions and File Systems
Boot your system using the Fedora 40 Workstation Live installer in UEFI mode. In the 'Welcome to Fedora' window, click the 'Not Now' button to return to the Gnome desktop. Next, launch Gnome Terminal to begin preparing the system for Fedora 40 installation.
Change to super user.
$ sudo -iThe Fedora 40 Workstation Live installer is missing the gdisk package, which is required to create partitions. So, install it.
# dnf -y install gdiskLocate the disk on which you want to install Fedora.
# lsblk -pd
NAME       MAJ:MIN RM  SIZE RO TYPE MOUNTPOINTS
/dev/loop0   7:0    0    2G  1 loop
/dev/loop1   7:1    0    8G  1 loop
/dev/loop2   7:2    0   32G  0 loop
/dev/sr0    11:0    1  2.1G  0 rom  /run/initramfs/live
/dev/zram0 251:0    0  5.8G  0 disk [SWAP]
/dev/vda   252:0    0  128G  0 disk
For me, it is /dev/vda. Yours might be different.
In the DISK_DEVICE variable, set the name of your disk device.
# export DISK_DEVICE='/dev/vda'Create an EFI System Partition of 600 MiB. I'll name the partition 'ESP', but you can give it any name.
# sgdisk -n1::+600M -t1:EF00 -c1:'ESP' ${DISK_DEVICE}Create a Linux file system partition on which Fedora will be installed. I will use the entire remaining space. I'll name this partition 'LINUX', but you can give it any name.
# sgdisk -n2:: -t2:8300 -c2:'LINUX' ${DISK_DEVICE}List the partitions you just created to ensure that everything is in order.
# sgdisk -p ${DISK_DEVICE}
Disk /dev/vda: 268435456 sectors, 128.0 GiB
...
Total free space is 2014 sectors (1007.0 KiB)

Number  Start (sector)    End (sector)  Size       Code  Name
   1            2048         1230847   600.0 MiB   EF00  ESP
   2         1230848       268435422   127.4 GiB   8300  LINUX
Get the device names for the EFI system partition and the Linux file system partition, and assign them to the appropriate variables.
# export ESP_PRTN="$(fdisk -x ${DISK_DEVICE} \
    | grep -i 'C12A7328-F81F-11D2-BA4B-00A0C93EC93B' \
    | grep 'ESP' \
    | cut -d' ' -f1)"

# export LINUX_PRTN="$(fdisk -x ${DISK_DEVICE} \
    | grep -i '0FC63DAF-8483-4772-8E79-3D69D8477DE4' \
    | grep 'LINUX' \
    | cut -d' ' -f1)"

# echo ${ESP_PRTN} ${LINUX_PRTN}
/dev/vda1 /dev/vda2
Initialize the /dev/vda2 partition as a LUKS device and set the initial passphrase.
# cryptsetup luksFormat ${LINUX_PRTN} \
    --type luks2 \
    --label FEDORA_LUKS \
    --pbkdf pbkdf2 \
    --pbkdf-force-iterations 500000

WARNING!
========
This will overwrite data on /dev/vda2 irrevocably.

Are you sure? (Type 'yes' in capital letters): YES
Enter passphrase for /dev/vda2:
Verify passphrase:
GRUB currently only supports pbkdf2 algorithm. For pbkdf2, the minimum iteration count is 1000 and the maximum is 4294967295. The more powerful your CPU, the higher the iteration count. And, the higher the iteration count, the longer it takes to unlock the LUKS in the GRUB. So I have set the iteration count to 500000. Lowering the iterations reduces security. To get around it, use a stronger passphrase with higher entropy (password entropy > 60 bits is suggested).
Now, open the LUKS device /dev/vda2 and map it to the temporary name tmpluks. I'll map the LUKS device to the proper UUID later. When prompted, enter the LUKS passphrase you just provided.
# cryptsetup luksOpen ${LINUX_PRTN} tmpluks
Enter passphrase for /dev/vda2:
Format the EFI System Partition with the FAT32 file system. I'll name the volume 'EFI', but you may name it whatever you want.
# mkfs.fat -F 32 -n EFI ${ESP_PRTN}Format the mapped device with the BTRFS file system. I'll name the volume 'FEDORA', but you may name it whatever you want.
# mkfs.btrfs -L FEDORA /dev/mapper/tmpluksThis is how your setup should look. The UUIDs will be unique to your system.
# udevadm trigger

# lsblk -po name,size,fstype,fsver,label,uuid ${DISK_DEVICE}
NAME                      SIZE FSTYPE      FSVER LABEL       UUID
/dev/vda                  128G
├─/dev/vda1               600M vfat        FAT32 EFI         10AA-4B95
└─/dev/vda2             127.4G crypto_LUKS 2     FEDORA_LUKS 20bb5f16-3489-439d-8cb3-96f7da6a6c63
  └─/dev/mapper/tmpluks 127.4G btrfs             FEDORA      30cca32b-5982-4069-9ebe-c96d3579125f
Get the UUIDs of the LUKS partition and other file systems and store them in variables. You'll be using these UUIDs frequently.
# export LINUX_PRTN_LUKS_UUID="$(cryptsetup luksUUID ${LINUX_PRTN})"
# export VFAT_FS_UUID="$(lsblk -lnpo uuid ${ESP_PRTN})"
# export BTRFS_FS_UUID="$(lsblk -lnpo uuid /dev/mapper/tmpluks)"

# printf "${VFAT_FS_UUID}\n${LINUX_PRTN_LUKS_UUID}\n${BTRFS_FS_UUID}\n"
10AA-4B95
20bb5f16-3489-439d-8cb3-96f7da6a6c63
30cca32b-5982-4069-9ebe-c96d3579125f
3. Create Directories and Subvolumes
First, mount the LUKS device with the btrfs file system (/dev/mapper/tmpluks) to /mnt. You will receive the SELinux labels warning. The restorecon command will fix this.
# mount -v -o compress=zstd:1 /dev/mapper/tmpluks /mnt
# restorecon -vRF /mnt
Then, create the necessary directories and subvolumes. If you're installing Fedora for the KDE desktop, replace '/mnt/var/lib/gdm' with '/mnt/var/lib/sddm'.
# mkdir -vp /mnt/boot/efi
# mkdir -vp /mnt/var/lib/libvirt

# mount -v ${ESP_PRTN} /mnt/boot/efi

# btrfs subvolume create /mnt/home
# btrfs subvolume create /mnt/opt
# btrfs subvolume create /mnt/.snapshots
# btrfs subvolume create /mnt/var/cache
# btrfs subvolume create /mnt/var/crash
# btrfs subvolume create /mnt/var/lib/AccountsService
# btrfs subvolume create /mnt/var/lib/gdm
# btrfs subvolume create /mnt/var/lib/libvirt/images
# btrfs subvolume create /mnt/var/lib/machines
# btrfs subvolume create /mnt/var/lib/portables
# btrfs subvolume create /mnt/var/log
# btrfs subvolume create /mnt/var/spool
# btrfs subvolume create /mnt/var/tmp
# btrfs subvolume create /mnt/var/www
# btrfs subvolume create /mnt/home/.snapshots
List the subvolumes. It should look something like this.
# btrfs subvolume list /mnt
ID 256 gen 8 top level 5 path home
ID 257 gen 8 top level 5 path opt
ID 258 gen 8 top level 5 path .snapshots
ID 259 gen 8 top level 5 path var/cache
ID 260 gen 8 top level 5 path var/crash
ID 261 gen 8 top level 5 path var/lib/AccountsService
ID 262 gen 8 top level 5 path var/lib/gdm
ID 263 gen 8 top level 5 path var/lib/libvirt/images
ID 264 gen 8 top level 5 path var/lib/machines
ID 265 gen 8 top level 5 path var/lib/portables
ID 266 gen 8 top level 5 path var/log
ID 267 gen 8 top level 5 path var/spool
ID 268 gen 8 top level 5 path var/tmp
ID 269 gen 8 top level 5 path var/www
ID 270 gen 8 top level 256 path home/.snapshots
I'll create the remaining subvolumes once I've set up a user account.
You must modify the permissions of certain directories.
# chmod -c 1777 /mnt/var/tmp
# chmod -c 0700 /mnt/var/lib/{machines,portables}
# chattr -VR +C /mnt/var/lib/libvirt/images
4. Bootstrap Fedora in a Chroot Environment
Create a Fedora system in the /mnt directory using DNF installroot. I'm going to install the basesystem package first, which defines the basic elements of a Fedora system.
# dnf -y --releasever=40 --installroot=/mnt install basesystemBind mount the directories /sys, /dev, and /proc into /mnt. Copy from 'for' to 'done', paste it into the terminal, and hit [Enter].
# for dir in sys dev proc ; do
    mount -v --rbind "/${dir}" "/mnt/${dir}"
    mount -v --make-rslave "/mnt/${dir}"
done
Now that the directories have been bind mounted, install Fedora Minimal in the /mnt directory.
Don't install a full desktop environment such as GNOME or KDE in the chroot environment. During the installation process, the desktop environments will run several scriptlets. The majority of these scriptlets cannot be run in a chroot environment, resulting in an unstable desktop environment.
Once you have exited the chroot environment and booted into Fedora Minimal, you can install your preferred desktop environment.
I've included the Fedora Minimal package group, Hardware Support package group, kernel, language packs, grub, and some other relevant packages.
# dnf --releasever=40 --installroot=/mnt install \
    @minimal-environment @hardware-support kernel linux-firmware langpacks-en \
    glibc-all-langpacks glibc-langpack-en shim-x64 grub2-efi-x64 grub2-common \
    grub2-efi-x64-modules grub2-tools grub2-tools-efi grub2-tools-extra grubby \
    efibootmgr cracklib cracklib-dicts xdg-user-dirs polkit finger cryptsetup \
    systemd-networkd NetworkManager NetworkManager-wifi systemd-container vim \
    tpm2-tss tpm2-tools git make bash-completion gdisk inotify-tools -y
Copy the resolv.conf file from the host to the /mnt/etc/ directory so you can connect to the internet after rebooting. But first, you must delete the existing symbolic link to the resolv.conf file.
# rm -vf /mnt/etc/resolv.conf
# cp -v /etc/resolv.conf /mnt/etc/
Set the timezone, locale, keymap, hostname, and machine-id.
# systemd-firstboot --root=/mnt \
    --locale=en_US.UTF-8 \
    --keymap=us \
    --timezone=US/Eastern \
    --hostname=fedora \
    --setup-machine-id
I have set the keyboard language to US English and the time zone to US. Change the setting according to your location. I've also set the hostname to 'fedora', but you can name it whatever you want.
Use the following commands to find out your locale, keymap, and time zone.
# localectl list-locales
# localectl list-keymaps
# timedatectl list-timezones
While the systemd-firstboot command adds your keymap to the vconsole.conf file, it does not add the console font type. Fedora/RHEL by default uses the console font type 'eurlatgr' for European-based languages written in Latin/Greek letters. So let's include it.
# echo 'FONT=eurlatgr' >> /mnt/etc/vconsole.confRead the file /mnt/usr/lib/kbd/consolefonts/README.eurlatgr for more information. You can find additional font types in the /mnt/usr/lib/kbd/consolefonts directory.
You must also configure the system keyboard mapping for X11 and the virtual console. The most important option is 'X11 Layout' (XkbLayout). It is set by localectl, but because you cannot use localectl in the chroot environment, you must manually create a file to which localectl writes.
First, create a directory /mnt/etc/X11/xorg.conf.d.
# mkdir -vp /mnt/etc/X11/xorg.conf.dCopy and paste the following command from 'cat' to 'EOF' into your terminal, then press the [Enter] key.
# cat <<'EOF' >> /mnt/etc/X11/xorg.conf.d/00-keyboard.conf
Section "InputClass"
        Identifier "system-keyboard"
        MatchIsKeyboard "on"
        Option "XkbLayout" "us"
EndSection
EOF
I have set "us" to refer to the US keymap layout; however, you must select your appropriate code.
To determine your X11 Layout (XkbLayout), run the following command.
# localectl list-x11-keymap-layoutsNext, chroot into the /mnt directory.
# chroot /mnt /bin/bashEnable the fastest mirrors to accelerate package downloads. Copy the command from 'cat' to 'EOF', paste it into your terminal, and hit [Enter].
# cat <<'EOF' >> /etc/dnf/dnf.conf
defaultyes=True
fastestmirror=True
max_parallel_downloads=10
EOF
Clear all previous caches and update the local DNF metadata cache.
# dnf clean all
# dnf makecache
5. Create a User Account
A user account is required to log into the Fedora Linux operating system.
Now that you're in a chroot environment, reinstall the polkit package before creating a user account to ensure that the polkit scriptlets are properly regenerated.
# dnf -y reinstall polkitNow proceed to create a user account.
I'll create a user named 'madhu' with root privileges. Change the user name to something more specific to you.
# useradd madhu -m -c 'Madhu Desai' -G wheel -s /bin/bash
# passwd madhu
Ensure that a user account has been created with the correct information.
# finger madhu
Login: madhu          			Name: Madhu Desai
Directory: /home/madhu              	Shell: /bin/bash
Never logged in.
No mail.
No Plan.
6. Create the Remaining Subvolumes
Now that the user account has been set up, create the remaining subvolumes.
These subvolumes will be created within the user's home directory and will be excluded from the home directory snapshot.
Switch to the user account. For me, it is 'madhu'. Replace this with your own user name.
# su - madhuCreate user home directories.
$ xdg-user-dirs-update

$ ls -lha
total 12K
drwx------. 1 madhu madhu 196 Apr 23 14:55 .
drwxr-xr-x. 1 root  root   30 Apr 23 14:26 ..
-rw-r--r--. 1 madhu madhu  18 Feb  8 19:00 .bash_logout
-rw-r--r--. 1 madhu madhu 144 Feb  8 19:00 .bash_profile
-rw-r--r--. 1 madhu madhu 522 Feb  8 19:00 .bashrc
drwx------. 1 madhu madhu  60 Apr 23 14:55 .config
drwxr-xr-x. 1 madhu madhu   0 Apr 23 14:55 Desktop
drwxr-xr-x. 1 madhu madhu   0 Apr 23 14:55 Documents
drwxr-xr-x. 1 madhu madhu   0 Apr 23 14:55 Downloads
drwxr-xr-x. 1 madhu madhu   0 Apr 23 14:55 Music
drwxr-xr-x. 1 madhu madhu   0 Apr 23 14:55 Pictures
drwxr-xr-x. 1 madhu madhu   0 Apr 23 14:55 Public
drwxr-xr-x. 1 madhu madhu   0 Apr 23 14:55 Templates
drwxr-xr-x. 1 madhu madhu   0 Apr 23 14:55 Videos
Since Firefox comes preinstalled on the Fedora Workstation, I will only create a subvolume for the '.mozilla' directory.
$ sudo btrfs subvolume create ~/.mozillaYou can, however, create additional subvolumes based on your requirements.
If you intend to install Google Chrome, you should also create a subvolume for it.
$ sudo btrfs subvolume create ~/.config/google-chromeIf you intend to install the Mozilla Thunderbird email client, create a subvolume for it.
$ sudo btrfs subvolume create ~/.thunderbirdIf you use the GnuPG encryption and signing tool, you must create a subvolume to avoid losing your keys.
$ sudo btrfs subvolume create ~/.gnupg
$ sudo chmod -c 0700 ~/.gnupg
Similarly, if you use the SSH remote login client, you must create a subvolume to prevent losing your keys.
$ sudo btrfs subvolume create ~/.ssh
$ sudo chmod -c 0700 ~/.ssh
Check your subvolumes. It should display the new subvolumes you've created. In this tutorial, however, I only created the '.mozilla' subvolume in the user's home directory.
$ sudo btrfs subvolume list /
ID 256 gen 35 top level 5 path home
ID 257 gen 12 top level 5 path opt
ID 258 gen  8 top level 5 path .snapshots
ID 259 gen 32 top level 5 path var/cache
ID 260 gen  8 top level 5 path var/crash
ID 261 gen  8 top level 5 path var/lib/AccountsService
ID 262 gen  8 top level 5 path var/lib/gdm
ID 263 gen  9 top level 5 path var/lib/libvirt/images
ID 264 gen  9 top level 5 path var/lib/machines
ID 265 gen  9 top level 5 path var/lib/portables
ID 266 gen 34 top level 5 path var/log
ID 267 gen 32 top level 5 path var/spool
ID 268 gen 31 top level 5 path var/tmp
ID 269 gen  8 top level 5 path var/www
ID 270 gen  8 top level 256 path home/.snapshots
ID 271 gen 35 top level 256 path home/madhu/.mozilla
Once you've finished creating subvolumes based on your needs, change the ownership of the directories to your user name and restore the default SELinux security context.
$ sudo chown -cR $USER:$USER ~/$(ls -A)
$ sudo restorecon -vRF ~/$(ls -A)
Finally, logout and return to root.
$ exit7. Create the fstab File
You need to create /etc/fstab file so that the Fedora operating system will boot without any errors.
Set the mount options for btrfs subvolumes in the OPTIONS variable.
# OPTIONS="compress=zstd:1,x-systemd.device-timeout=0"Get your subvolumes and store them in a SUBVOLUMES array.
# SUBVOLUMES=($(btrfs subvolume list / \
    | awk '!/machines|portables/ {print $9}' \
    | xargs))

# printf '%s\n' "${SUBVOLUMES[@]}"
home
opt
.snapshots
var/cache
var/crash
var/lib/AccountsService
var/lib/gdm
var/lib/libvirt/images
var/log
var/spool
var/tmp
var/www
home/.snapshots
home/madhu/.mozilla
Find the length of the longest element in the SUBVOLMES array.
# MAX_LEN=$(printf '/%s\n' "${SUBVOLUMES[@]}" | wc -L)

# echo ${MAX_LEN}
24
Print the system root mount in /etc/fstab file.
# printf "%-41s %-${MAX_LEN}s %-5s %-s %-s\n" \
    "UUID=${BTRFS_FS_UUID}" \
    "/" \
    "btrfs" \
    "defaults,${OPTIONS}" \
    "0 0" >> /etc/fstab
Print the EFI partition mount in /etc/fstab file.
# printf "%-41s %-${MAX_LEN}s %-5s %-s %-s\n" \
    "UUID=${VFAT_FS_UUID}" \
    "/boot/efi" \
    "vfat" \
    "umask=0077,shortname=winnt" \
    "0 0" >> /etc/fstab
Print the rest of the subvolume mounts in /etc/fstab file. Copy from 'for' to 'done', paste it into the terminal, and hit [Enter].
# for dir in "${SUBVOLUMES[@]}" ; do
    printf "%-41s %-${MAX_LEN}s %-5s %-s %-s\n" \
    "UUID=${BTRFS_FS_UUID}" \
    "/${dir}" \
    "btrfs" \
    "subvol=${dir},${OPTIONS}" \
    "0 0" >> /etc/fstab
    restorecon -RF "/${dir}"
done
Examine the /etc/fstab file. Here's how it should look. The UUID and user name will be unique to your system.
# cat /etc/fstab
UUID=30cca32b-5982-4069-9ebe-c96d3579125f /                        btrfs defaults,compress=zstd:1,x-systemd.device-timeout=0 0 0
UUID=10AA-4B95                            /boot/efi                vfat  umask=0077,shortname=winnt 0 0
UUID=30cca32b-5982-4069-9ebe-c96d3579125f /home                    btrfs subvol=home,compress=zstd:1,x-systemd.device-timeout=0 0 0
UUID=30cca32b-5982-4069-9ebe-c96d3579125f /opt                     btrfs subvol=opt,compress=zstd:1,x-systemd.device-timeout=0 0 0
UUID=30cca32b-5982-4069-9ebe-c96d3579125f /.snapshots              btrfs subvol=.snapshots,compress=zstd:1,x-systemd.device-timeout=0 0 0
UUID=30cca32b-5982-4069-9ebe-c96d3579125f /var/cache               btrfs subvol=var/cache,compress=zstd:1,x-systemd.device-timeout=0 0 0
UUID=30cca32b-5982-4069-9ebe-c96d3579125f /var/crash               btrfs subvol=var/crash,compress=zstd:1,x-systemd.device-timeout=0 0 0
UUID=30cca32b-5982-4069-9ebe-c96d3579125f /var/lib/AccountsService btrfs subvol=var/lib/AccountsService,compress=zstd:1,x-systemd.device-timeout=0 0 0
UUID=30cca32b-5982-4069-9ebe-c96d3579125f /var/lib/gdm             btrfs subvol=var/lib/gdm,compress=zstd:1,x-systemd.device-timeout=0 0 0
UUID=30cca32b-5982-4069-9ebe-c96d3579125f /var/lib/libvirt/images  btrfs subvol=var/lib/libvirt/images,compress=zstd:1,x-systemd.device-timeout=0 0 0
UUID=30cca32b-5982-4069-9ebe-c96d3579125f /var/log                 btrfs subvol=var/log,compress=zstd:1,x-systemd.device-timeout=0 0 0
UUID=30cca32b-5982-4069-9ebe-c96d3579125f /var/spool               btrfs subvol=var/spool,compress=zstd:1,x-systemd.device-timeout=0 0 0
UUID=30cca32b-5982-4069-9ebe-c96d3579125f /var/tmp                 btrfs subvol=var/tmp,compress=zstd:1,x-systemd.device-timeout=0 0 0
UUID=30cca32b-5982-4069-9ebe-c96d3579125f /var/www                 btrfs subvol=var/www,compress=zstd:1,x-systemd.device-timeout=0 0 0
UUID=30cca32b-5982-4069-9ebe-c96d3579125f /home/.snapshots         btrfs subvol=home/.snapshots,compress=zstd:1,x-systemd.device-timeout=0 0 0
UUID=30cca32b-5982-4069-9ebe-c96d3579125f /home/madhu/.mozilla     btrfs subvol=home/madhu/.mozilla,compress=zstd:1,x-systemd.device-timeout=0 0 0
Mount all of the subvolumes listed in the /etc/fstab file.
# mount -va
/                        : ignored
/boot/efi                : already mounted
/home                    : successfully mounted
/opt                     : successfully mounted
/.snapshots              : successfully mounted
/var/cache               : successfully mounted
/var/crash               : successfully mounted
/var/lib/AccountsService : successfully mounted
/var/lib/gdm             : successfully mounted
/var/lib/libvirt/images  : successfully mounted
/var/log                 : successfully mounted
/var/spool               : successfully mounted
/var/tmp                 : successfully mounted
/var/www                 : successfully mounted
/home/.snapshots         : successfully mounted
/home/madhu/.mozilla     : successfully mounted
Check your subvolumes.
# btrfs subvolume list /
ID 256 gen 41 top level 5 path home
ID 257 gen 41 top level 5 path opt
ID 258 gen 41 top level 5 path .snapshots
ID 259 gen 41 top level 5 path var/cache
ID 260 gen 41 top level 5 path var/crash
ID 261 gen 41 top level 5 path var/lib/AccountsService
ID 262 gen 41 top level 5 path var/lib/gdm
ID 263 gen 41 top level 5 path var/lib/libvirt/images
ID 264 gen  9 top level 5 path var/lib/machines
ID 265 gen  9 top level 5 path var/lib/portables
ID 266 gen 41 top level 5 path var/log
ID 267 gen 41 top level 5 path var/spool
ID 268 gen 41 top level 5 path var/tmp
ID 269 gen 41 top level 5 path var/www
ID 270 gen 41 top level 256 path home/.snapshots
ID 271 gen 41 top level 256 path home/madhu/.mozilla
Your setup should now look somewhat like this.
# lsblk -p ${DISK_DEVICE}
NAME                    MAJ:MIN RM   SIZE RO TYPE  MOUNTPOINTS
/dev/vda                252:0    0   128G  0 disk
├─/dev/vda1             252:1    0   600M  0 part  /boot/efi
└─/dev/vda2             252:2    0 127.4G  0 part
  └─/dev/mapper/tmpluks 253:2    0 127.4G  0 crypt /home/madhu/.mozilla
                                                   /home/.snapshots
                                                   /var/www
                                                   /var/tmp
                                                   /var/spool
                                                   /var/log
                                                   /var/lib/libvirt/images
                                                   /var/lib/gdm
                                                   /var/lib/AccountsService
                                                   /var/crash
                                                   /var/cache
                                                   /.snapshots
                                                   /opt
                                                   /home
                                                   /
8. Create GRUB Configuration File
When you install Fedora using the Anaconda GUI installer, the GRUB configuration file /etc/default/grub is automatically created. Since you are not using the Anaconda installer, you must create this file manually.
I've also added the 'GRUB_ENABLE_CRYPTODISK' and 'SUSE_BTRFS_SNAPSHOT_BOOTING' options to the GRUB configuration file.
When you enable the GRUB_ENABLE_CRYPTODISK option in GRUB, it will check for encrypted disks and generate the extra commands needed to access them during boot.
With the SUSE_BTRFS_SNAPSHOT_BOOTING option in GRUB enabled, snapper snapshots can boot directly from GRUB. This is also useful when rolling back a snapshot.
Copy the command from 'cat' to 'EOF', paste it into your terminal, and hit [Enter].
# cat <<EOF > /etc/default/grub
GRUB_TIMEOUT=5
GRUB_DISTRIBUTOR="\$(sed 's, release .*$,,g' /etc/system-release)"
GRUB_DEFAULT=saved
GRUB_DISABLE_SUBMENU=true
GRUB_TERMINAL_OUTPUT="console"
GRUB_CMDLINE_LINUX="rd.luks.uuid=luks-${LINUX_PRTN_LUKS_UUID} rhgb quiet"
GRUB_DISABLE_RECOVERY="true"
GRUB_ENABLE_BLSCFG=true
GRUB_ENABLE_CRYPTODISK=y
SUSE_BTRFS_SNAPSHOT_BOOTING="true"
EOF
This is how it should look. The UUID will be unique to your system.
# cat /etc/default/grub
GRUB_TIMEOUT=5
GRUB_DISTRIBUTOR="$(sed 's, release .*$,,g' /etc/system-release)"
GRUB_DEFAULT=saved
GRUB_DISABLE_SUBMENU=true
GRUB_TERMINAL_OUTPUT="console"
GRUB_CMDLINE_LINUX="rd.luks.uuid=luks-20bb5f16-3489-439d-8cb3-96f7da6a6c63 rhgb quiet"
GRUB_DISABLE_RECOVERY="true"
GRUB_ENABLE_BLSCFG=true
GRUB_ENABLE_CRYPTODISK=y
SUSE_BTRFS_SNAPSHOT_BOOTING="true"
You must also modify the /boot/efi/EFI/fedora/grub.cfg file now that crypto disk and snapshot booting are enabled.
# sed -i \
    -e "1i cryptomount -u ${LINUX_PRTN_LUKS_UUID//-/}" \
    -e '1i set btrfs_relative_path="yes"' \
    -e 's/ --root-dev-only//g' \
    /boot/efi/EFI/fedora/grub.cfg
This is how it should appear. The UUID in the cryptomount line is that of the /dev/vda2 partition, with no dashes (-).
# cat /boot/efi/EFI/fedora/grub.cfg
cryptomount -u 20bb5f163489439d8cb396f7da6a6c63
set btrfs_relative_path="yes"
search --no-floppy --fs-uuid --set=dev 30cca32b-5982-4069-9ebe-c96d3579125f
set prefix=($dev)/boot/grub2
export $prefix
configfile $prefix/grub.cfg
Update the /boot/grub2/grub.cfg file.
# grub2-mkconfig -o /boot/grub2/grub.cfgHere's how the GRUB BLS should look.
# grubby --info=DEFAULT
index=0
kernel="/boot/vmlinuz-6.8.8-300.fc40.x86_64"
args="ro rd.luks.uuid=luks-20bb5f16-3489-439d-8cb3-96f7da6a6c63 rhgb quiet ${extra_cmdline}"
root="UUID=30cca32b-5982-4069-9ebe-c96d3579125f"
initrd="/boot/initramfs-6.8.8-300.fc40.x86_64.img"
title="Fedora Linux (6.8.8-300.fc40.x86_64) 40 (Forty)"
id="8042e71f317645e98257a9f4960ce1ae-6.8.8-300.fc40.x86_64"
Add the encrypted block device to the /etc/crypttab file so that it is enabled when the system boots.
# echo "luks-${LINUX_PRTN_LUKS_UUID} UUID=${LINUX_PRTN_LUKS_UUID} none discard" > /etc/crypttab

# cat /etc/crypttab
luks-20bb5f16-3489-439d-8cb3-96f7da6a6c63 UUID=20bb5f16-3489-439d-8cb3-96f7da6a6c63 none discard
9. Add Boot Entry, Exit Chroot, and Restart
You now need to add Fedora to the boot entry.
First, get the ESP partition number.
# ESP_NO="$(gdisk -l ${DISK_DEVICE} | grep EF00 | awk '{print $1}')"

# echo ${ESP_NO}
1
And, add Fedora to the boot entry.
# efibootmgr -c -d ${DISK_DEVICE} \
    -p ${ESP_NO} \
    -L Fedora \
    -l "\EFI\fedora\grubx64.efi"
Enable NetworkManager and auditd systemd services.
# systemctl enable NetworkManager
# systemctl enable auditd
Now exit the chroot environment, unmount all mounts, and turn off your computer.
# exit
# umount -vR /mnt
# poweroff
Eject the Fedora Live CD/ISO/USB and boot up the computer.
You will be prompted for the passphrase twice. The first time is before loading GRUB, and the second time is before mounting the root file system. Later in this guide, I will enable the single passphrase prompt.
Depending on your computer's CPU, it may take up to 15 seconds for the GRUB to display the menu. So please be patient.
When you input your passphrase in the first LUKS prompt, no '*' cursor indication appears. So you should assume you have entered your passphrase correctly. Simply enter your LUKS passphrase blindly and hit the [Enter] key.
The Fedora 40 Minimal installation is now complete. The installation will now continue on Fedora Minimal itself.
10. Install the Desktop Environment
You can now install the desktop environment of your choice.
This is the only section where you cannot use the copy and paste feature because the interface is CLI rather than a GUI.
So you'll need to type the commands. Fortunately, the commands you must type are few and simple.
I'll install GNOME 46, which comes with Fedora's official desktop edition, 'Fedora Workstation'.
$ sudo dnf -y group install 'fedora workstation'If you don't want to install GNOME and instead want to install the KDE Plasma 6 desktop environment, use the command below. Make sure you've already created the '/var/lib/sddm' subvolume used by KDE.
$ sudo dnf -y group install 'kde plasma workspaces'Regardless of which desktop environment you have installed, enable boot animation.
To list the themes available for you, run this command.
$ plymouth-set-default-theme -l
bgrt
details
spinner
text
tribar
I'll set the 'spinner' theme as the default.
$ sudo plymouth-set-default-theme spinner -RThe Fedora Workstation 40 installation is now complete. Reboot the system.
$ sudo rebootYou will now be logged into the Fedora Workstation 40 with the all-new Gnome 46 desktop interface.
11. Bypass the Additional Passphrase Prompt
While GRUB requests a passphrase in order to decrypt the encrypted /boot files, this information is not passed on to initramfs. As a result, the root (/) must be unlocked once more during the initramfs stage. This means that the user must enter his passphrase twice.
I'll show you two methods for automatically decrypting your disk without requiring a passphrase: using a key file or TPM2. Choose your preferred method.
But first, you need to gather some data and store it in variables. This ensures that there are no errors and that it is easy to copy and paste.
Change to super user.
$ sudo -iGet the name of your disk device.
# DISK_DEVICE="$(grub2-probe --target=disk /boot/efi)"

# echo ${DISK_DEVICE}
/dev/vda
Get the device name of the Linux file system partition that is LUKS encrypted.
# LINUX_PRTN="$(fdisk -x ${DISK_DEVICE} \
    | grep -i '0FC63DAF-8483-4772-8E79-3D69D8477DE4' \
    | grep 'LINUX' \
    | cut -d' ' -f1)"

# echo ${LINUX_PRTN}
/dev/vda2
Get the UUID of the Linux file system partition that is LUKS encrypted.
# LINUX_PRTN_LUKS_UUID="$(cryptsetup luksUUID ${LINUX_PRTN})"

# echo ${LINUX_PRTN_LUKS_UUID}
20bb5f16-3489-439d-8cb3-96f7da6a6c63
11.1 Using a Key File
If you want to decrypt your LUKS-encrypted volume using a key file, use this method. Secure Boot does not need to be enabled for this.
Create the /etc/cryptsetup-keys.d directory if it does not already exist.
# mkdir -v /etc/cryptsetup-keys.dCreate a key file with 4KiB of random data. The key file has to be in volume.key format.
# dd if=/dev/random \
   of=/etc/cryptsetup-keys.d/luks-${LINUX_PRTN_LUKS_UUID}.key \
   bs=512 count=8
Ensure that only the root user has read access to the key file.
# chmod -c 0400 /etc/cryptsetup-keys.d/luks-${LINUX_PRTN_LUKS_UUID}.keyAttach the newly created key to the encrypted device’s available key slot. When prompted for a passphrase, enter the same LUKS passphrase.
# cryptsetup luksAddKey \
    --pbkdf pbkdf2 \
    --pbkdf-force-iterations 500000 \
    /dev/disk/by-uuid/${LINUX_PRTN_LUKS_UUID} \
    /etc/cryptsetup-keys.d/luks-${LINUX_PRTN_LUKS_UUID}.key
Add the key to /etc/dracut.conf.d/cryptodisk.conf file to include it in the initramfs image.
# echo \
  "install_items+=\" /etc/cryptsetup-keys.d/luks-${LINUX_PRTN_LUKS_UUID}.key \"" \
  > /etc/dracut.conf.d/cryptodisk.conf

# cat /etc/dracut.conf.d/cryptodisk.conf
install_items+=" /etc/cryptsetup-keys.d/luks-20bb5f16-3489-439d-8cb3-96f7da6a6c63.key "
Rebuild the initramfs image.
# dracut -vfReboot the computer to ensure that everything is working properly.
# rebootThe LUKS passphrase should only be asked once before the GRUB menu appears.
11.2 Using TPM2 Method
This method allows you to decrypt your LUKS-encrypted volumes using the TPM on your computer. You must have Secure Boot enabled for this method to work.
Make sure Secure Boot is enabled.
# mokutil --sb-state
SecureBoot enabled
Make sure your computer supports TPM.
# systemd-cryptenroll --tpm2-device=list
PATH        DEVICE      DRIVER
/dev/tpmrm0 MSFT0101:00 tpm_crb
As you can see from the output, my TPM2 device node path is /dev/tpmrm0.
Now enroll your encrypted volume. When prompted for a passphrase, enter the same LUKS passphrase.
# systemd-cryptenroll \
    --wipe-slot tpm2 \
    --tpm2-device /dev/tpmrm0 \
    /dev/disk/by-uuid/${LINUX_PRTN_LUKS_UUID}
According to the systemd-cryptenroll man page, it should be sufficient for most applications to bind against PCR 7, which is also the default. For more information, see man systemd-cryptenroll.
Check that the TPM has been added to the encrypted volume.
# systemd-cryptenroll ${LINUX_PRTN}
SLOT TYPE
   0 password
   1 tpm2
Add the TPM2 device node path to the kernel command line parameter 'rd.luks.options='.
# grubby --update-kernel=ALL \
    --args="rd.luks.options=tpm2-device=/dev/tpmrm0"
Check to see if the TPM2 device node path has been added to the grub kernel parameter.
# grubby --info=DEFAULT
index=0
kernel="/boot/vmlinuz-6.8.8-300.fc40.x86_64"
args="ro rd.luks.uuid=luks-20bb5f16-3489-439d-8cb3-96f7da6a6c63 rhgb quiet ${extra_cmdline} rd.luks.options=tpm2-device=/dev/tpmrm0"
root="UUID=30cca32b-5982-4069-9ebe-c96d3579125f"
initrd="/boot/initramfs-6.8.8-300.fc40.x86_64.img"
title="Fedora Linux (6.8.8-300.fc40.x86_64) 40 (Forty)"
id="8042e71f317645e98257a9f4960ce1ae-6.8.8-300.fc40.x86_64"
Changes should also be reflected in the /etc/crypttab file.
# echo \
  "luks-${LINUX_PRTN_LUKS_UUID} UUID=${LINUX_PRTN_LUKS_UUID} none tpm2-device=/dev/tpmrm0" \
  > /etc/crypttab

# cat /etc/crypttab
luks-20bb5f16-3489-439d-8cb3-96f7da6a6c63 UUID=20bb5f16-3489-439d-8cb3-96f7da6a6c63 none tpm2-device=/dev/tpmrm0
Add the tpm2-tss module to /etc/dracut.conf.d/tpm2.conf file.
# echo 'add_dracutmodules+=" tpm2-tss "' > /etc/dracut.conf.d/tpm2.conf

# cat /etc/dracut.conf.d/tpm2.conf
add_dracutmodules+=" tpm2-tss "
Update the grub.cfg file.
# grub2-mkconfig -o /boot/grub2/grub.cfgRun dracut to rebuild the initramfs.
# dracut -vfFinally, reboot.
# rebootThe LUKS passphrase should only be asked once before the GRUB menu appears.
12. Install and Configure Snapper
Install snapper and the optional package python3-dnf-plugin-snapper. The python3-dnf-plugin-snapper package allows you to create pre and post snapshots every time you install a package on the system with the dnf package manager.
$ sudo dnf -y install snapper python3-dnf-plugin-snapperYou must now create snapper configuration files for the Btrfs volumes located at / and /home.
You normally use the following commands to do this:
$ sudo snapper -c root create-config /
Creating config failed (creating btrfs subvolume .snapshots failed since it already exists).

$ sudo snapper -c home create-config /home
Creating config failed (creating btrfs subvolume .snapshots failed since it already exists).
But, as you can see from the output above, using those commands will result in errors. That's because you've already created the subvolumes /.snapshots and /home/.snapshots.
When you run those commands, this is what happens: A configuration file is created in '/etc/snapper/configs/', a new subvolume and a directory named '.snapshots' are created, and the '/etc/sysconfig/snapper' file is updated.
So I'll do those steps manually.
Create a snapper configuration named root for the btrfs volume at /.
$ sudo cp -v /usr/share/snapper/config-templates/default \
    /etc/snapper/configs/root

$ sudo sed -i \
    -e "s|ALLOW_USERS=\"\"|ALLOW_USERS=\"$USER\"|" \
    -e 's|SYNC_ACL="no"|SYNC_ACL="yes"|' \
    /etc/snapper/configs/root
Create a snapper configuration named home for the btrfs volume at /home.
$ sudo cp -v /usr/share/snapper/config-templates/default \
    /etc/snapper/configs/home

$ sudo sed -i \
    -e 's|SUBVOLUME="/"|SUBVOLUME="/home"|' \
    -e "s|ALLOW_USERS=\"\"|ALLOW_USERS=\"$USER\"|" \
    -e 's|SYNC_ACL="no"|SYNC_ACL="yes"|' \
    /etc/snapper/configs/home
And, update the '/etc/sysconfig/snapper' file.
$ sudo sed -i \
     's|SNAPPER_CONFIGS=""|SNAPPER_CONFIGS="root home"|'  \
    /etc/sysconfig/snapper
Verify that the snapper configuration files were successfully created.
$ sudo snapper list-configs
Config | Subvolume
-------+----------
home   | /home
root   | /
Snapper configurations have been created successfully.
Disable the indexing of the .snapshots directories by updatedb. It is enabled by default, which can cause significant slowdown and excessive memory usage if you have a large number of snapshots.
$ echo 'PRUNENAMES = ".snapshots"' | sudo tee -a /etc/updatedb.confFinally, list the snapshots.
For the root, you may use snapper -c root ls or simply snapper ls. Both provide the same output.
$ snapper ls
 # | Type   | Pre # | Date | User | Cleanup | Description | Userdata
---+--------+-------+------+------+---------+-------------+---------
0  | single |       |      | root |         | current     |
List the snapshots for /home subvolume.
$ snapper -c home ls
 # | Type   | Pre # | Date | User | Cleanup | Description | Userdata
---+--------+-------+------+------+---------+-------------+---------
0  | single |       |      | root |         | current     |
At this stage, you do not have any snapshots, we will create some later.
13. Install and Configure Grub-Btrfs
The grub-btrfs package adds 'Fedora Linux snapshots' to the GRUB menu and allows you to test a snapshot in read-only mode before rolling back to it in read-write mode.
Clone the grub-btrfs repository.
$ git clone https://github.com/Antynea/grub-btrfsThe setup is pre-configured to work with Arch and Gentoo out of the box. You must make a few changes to the grub-btrfs config file to make it work with Fedora.
$ cd grub-btrfs

$ sed -i \
-e '/#GRUB_BTRFS_SNAPSHOT_KERNEL_PARAMETERS/a \
GRUB_BTRFS_SNAPSHOT_KERNEL_PARAMETERS="systemd.volatile=state"' \
-e '/#GRUB_BTRFS_GRUB_DIRNAME/a \
GRUB_BTRFS_GRUB_DIRNAME="/boot/grub2"' \
-e '/#GRUB_BTRFS_MKCONFIG=/a \
GRUB_BTRFS_MKCONFIG=/usr/sbin/grub2-mkconfig' \
-e '/#GRUB_BTRFS_SCRIPT_CHECK=/a \
GRUB_BTRFS_SCRIPT_CHECK=grub2-script-check' \
config
Then install it.
$ sudo make installUpdate grub.cfg and enable the grub-btrfsd.service.
$ sudo grub2-mkconfig -o /boot/grub2/grub.cfg
$ sudo systemctl enable --now grub-btrfsd.service
You will receive the 'No snapshots found' error since you have not yet created any snapshots, but don't worry, it will function properly after you do.
Your grub-btrfs installation is now complete. You may now delete the cloned grub-btrfs repository.
$ cd ..
$ rm -rvf grub-btrfs
14. Create a System Root Snapshot and Set It as the Default
Now that everything in Fedora has been installed and configured, it is time to take a subvolume snapshot of the main volume and set the subvolume as the default ‘/‘ file system. By manually creating a subvolume snapshot of the main volume and making it the default, you can easily rollback without having to specify the snapshot number and the 'ambit' during the rollback when using the snapper tool.
Create a directory named '1' in the /.snapshots directory.
$ sudo mkdir -v /.snapshots/1Create an XML file called info.xml in the /.snapshots/1/ directory. Copy the following command from 'sudo' to 'EOF', paste it into your terminal, and hit the [Enter] button.
$ sudo bash -c "cat > /.snapshots/1/info.xml" <<EOF
<?xml version="1.0"?>
<snapshot>
  <type>single</type>
  <num>1</num>
  <date>$(date -u +"%F %T")</date>
  <description>first root subvolume</description>
</snapshot>
EOF
Verify that the date is set properly and is in the Coordinated Universal Time (UTC) format.
$ cat /.snapshots/1/info.xml
<?xml version="1.0"?>
<snapshot>
  <type>single</type>
  <num>1</num>
  <date>2024-05-06 18:05:22</date>
  <description>first root subvolume</description>
</snapshot>
Now, create a read-write subvolume snapshot of the system root in the /.snapshots/1/ directory.
$ sudo btrfs subvolume snapshot / /.snapshots/1/snapshotGet the subvolid of the /.snapshots/1/snapshot subvolume.
$ SNAP_ID="$(sudo btrfs inspect-internal rootid /.snapshots/1/snapshot)"

$ echo ${SNAP_ID}
272
Using this 'subvolid', set the /.snapshots/1/snapshot subvolume as the default subvolume for the root (/) filesystem.
$ sudo btrfs subvolume set-default ${SNAP_ID} /Confirm that the /.snapshots/1/snapshot subvolume is indeed the default for the / filesystem.
$ sudo btrfs subvolume get-default /
ID 272 gen 148 top level 258 path .snapshots/1/snapshot
Reboot your system.
$ sudo rebootAfter rebooting, check the snapshots in snapper.
$ snapper ls
 # | Type   | Pre # | Date                            | User | Cleanup | Description          | Userdata
---+--------+-------+---------------------------------+------+---------+----------------------+---------
0  | single |       |                                 | root |         | current              |
1* | single |       | Mon 06 May 2024 02:05:22 PM EDT | root |         | first root subvolume |
As you can see, the /.snapshots/1/snapshot subvolume is also visible as snapshot #1 in snapper. The asterisk (*) indicates that this snapshot is the default and is currently active.
The installation of Fedora 40 with LUKS full disk encryption, snapshot, and rollback support is now complete.
You can now begin taking snapshots.
15. Snapper Tests
I'll run some tests here to make sure everything is in working order and that there are no problems.
Test 1: Undo the Changes Made by the DNF Installer
In this test, I will use the dnf package manager to install a small package named ps_mem. I'll check the system after it's installed to see what changes were made. I'll then attempt to undo the changes and see if I can get the system back to its pre-installation state.
Install the ps_mem package. It displays the core memory used per program (not per process).
$ sudo dnf install ps_memRun the ps_mem program to see if it was installed successfully.
$ sudo ps_mem
Private + Shared = RAM used Program
148.0 KiB + 16.5 KiB = 164.5 KiB fusermount3
200.0 KiB + 11.5 KiB = 211.5 KiB inotifywait
256.0 KiB + 16.5 KiB = 272.5 KiB mcelog
...
190.1 MiB + 1.7 MiB = 191.8 MiB packagekitd
220.9 MiB + 22.1 MiB = 243.1 MiB gnome-shell
258.9 MiB + 5.6 MiB = 264.5 MiB gnome-software
---------------------------------
1.3 GiB
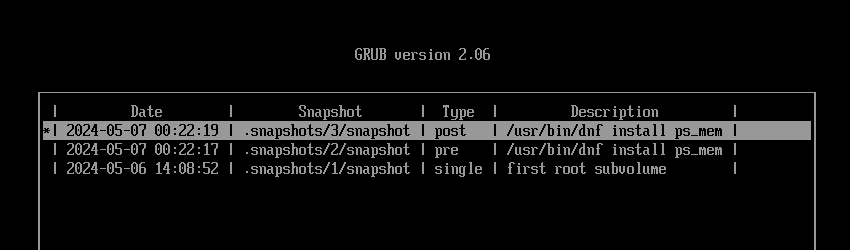
=================================Check the snapper for snapshots.
$ snapper ls
 # | Type   | Pre # | Date                            | User | Cleanup | Description                 | Userdata
---+--------+-------+---------------------------------+------+---------+-----------------------------+---------
0  | single |       |                                 | root |         | current                     |
1* | single |       | Mon 06 May 2024 02:05:22 PM EDT | root |         | first root subvolume        |
2  | pre    |       | Tue 07 May 2024 12:22:17 AM EDT | root | number  | /usr/bin/dnf install ps_mem |
3  | post   |     2 | Tue 07 May 2024 12:22:19 AM EDT | root | number  | /usr/bin/dnf install ps_mem |
As you can see, the ps_mem package has pre (#2) and post (#3) snapshots.
Let's take a look at the changes it made to the system between snapshots #2 and #3.
$ snapper status 2..3
+..... /usr/bin/ps_mem
c..... /usr/lib/sysimage/rpm/rpmdb.sqlite-shm
c..... /usr/lib/sysimage/rpm/rpmdb.sqlite-wal
+..... /usr/share/doc/ps_mem
+..... /usr/share/doc/ps_mem/LICENSE
+..... /usr/share/man/man1/ps_mem.1.gz
c..... /var/lib/dnf/history.sqlite-shm
c..... /var/lib/dnf/history.sqlite-wal
-..... /var/lib/dnf/rpmdb_lock.pid
Now I'll undo the changes.
$ sudo snapper undochange 2..3
create:1 modify:4 delete:4
Check again to ensure that the ps_mem package was successfully uninstalled.
$ sudo ps_mem
sudo: ps_mem: command not found
Cool! The undo was successful. But, because I want to keep the package ps_mem, I'll undo the changes again. This time between snapshots #3 and #2.
$ sudo snapper undochange 3..2
create:4 modify:4 delete:1
Now run ps_mem again to see if it exists.
$ sudo ps_mem
 Private  +   Shared  =  RAM used	Program

148.0 KiB +  16.5 KiB = 164.5 KiB	fusermount3
200.0 KiB +  11.5 KiB = 211.5 KiB	inotifywait
256.0 KiB +  16.5 KiB = 272.5 KiB	mcelog
...
190.1 MiB +   1.7 MiB = 191.8 MiB	packagekitd
220.9 MiB +  22.1 MiB = 243.1 MiB	gnome-shell
258.9 MiB +   5.6 MiB = 264.5 MiB	gnome-software
---------------------------------
                          1.3 GiB
=================================
Test 1 was successful.
Test 2: Undo Any Changes Made to Individual Files
Assume you're configuring something and editing a configuration file. Then you realize you messed up the configuration file. You want to see what changes you made to the original file and possibly wish you could undo the changes.
You can use snapper to undo not only all changes between two snapshots, but also a single file.
In this test, I will simply delete the last line of the /etc/hosts file. Then I'll compare it to the same file in snapshot #3 to see what changed and if I can undo all of the changes and restore it to its original state.
This is how the original /etc/hosts file looks.
$ cat /etc/hosts
# Loopback entries; do not change.
# For historical reasons, localhost precedes localhost.localdomain:
127.0.0.1   localhost localhost.localdomain localhost4 localhost4.localdomain4
::1         localhost localhost.localdomain localhost6 localhost6.localdomain6
# See hosts(5) for proper format and other examples:
# 192.168.1.10 foo.example.org foo
# 192.168.1.13 bar.example.org bar
Now I'll remove the last line.
$ sudo sed -i '$d' /etc/hosts

$ cat /etc/hosts
# Loopback entries; do not change.
# For historical reasons, localhost precedes localhost.localdomain:
127.0.0.1   localhost localhost.localdomain localhost4 localhost4.localdomain4
::1         localhost localhost.localdomain localhost6 localhost6.localdomain6
# See hosts(5) for proper format and other examples:
# 192.168.1.10 foo.example.org foo
Now that I have removed the last line, using the snapper tool, compare the /etc/hosts file with the one in snapshot #3.
$ snapper diff 3..0 /etc/hosts
--- /.snapshots/3/snapshot/etc/hosts	2023-11-29 05:34:49.000000000 -0500
+++ /etc/hosts	2024-05-07 00:28:01.744994870 -0400
@@ -4,4 +4,3 @@
 ::1         localhost localhost.localdomain localhost6 localhost6.localdomain6
 # See hosts(5) for proper format and other examples:
 # 192.168.1.10 foo.example.org foo
-# 192.168.1.13 bar.example.org bar
The number 0 in the command 3..0 represents the current snapshot, while the number 3 represents snapshot #3.
As you can see in the last line, the /etc/hosts file in the current snapshot is missing that line compared to the one in snapshot #3. If you want to learn how to read the output, take a look at the man pages man diff and man snapper.
To replace the /etc/hosts file with the one in snapshot #3, use the following command.
$ sudo snapper undochange 3..0 /etc/hosts
create:0 modify:1 delete:0
Check to see if the /etc/hosts file has indeed been rolled back.
$ cat /etc/hosts
# Loopback entries; do not change.
# For historical reasons, localhost precedes localhost.localdomain:
127.0.0.1   localhost localhost.localdomain localhost4 localhost4.localdomain4
::1         localhost localhost.localdomain localhost6 localhost6.localdomain6
# See hosts(5) for proper format and other examples:
# 192.168.1.10 foo.example.org foo
# 192.168.1.13 bar.example.org bar
Test 2 was successful.
Test 3: Create Manual Pre-Post Snapshots and Undo the Changes
In this test, I will begin by creating manual 'pre' snapshots of the / and /home directories. Then I'll install a small package called Color Picker (gcolor3) from GitHub by compiling it from the source file. When I'm finished, regardless of whether the compiling was successful or not, I'll create 'post' snapshots for the previously created 'pre' snapshots. I'll then look at the changes it made to the system between the pre-post snapshots and, finally, undo everything.
Create a manual 'pre' snapshot for both the / and /home directories.
$ snapper -c root create -t pre -c number -d 'Pre Color Picker'
$ snapper -c home create -t pre -c number -d 'Pre Color Picker'
List the snapshots.
$ snapper ls
 # | Type   | Pre # | Date                            | User  | Cleanup | Description                 | Userdata
---+--------+-------+---------------------------------+-------+---------+-----------------------------+---------
0  | single |       |                                 | root  |         | current                     |
1* | single |       | Mon 06 May 2024 02:05:22 PM EDT | root  |         | first root subvolume        |
2  | pre    |       | Tue 07 May 2024 12:22:17 AM EDT | root  | number  | /usr/bin/dnf install ps_mem |
3  | post   |     2 | Tue 07 May 2024 12:22:19 AM EDT | root  | number  | /usr/bin/dnf install ps_mem |
4  | pre    |       | Tue 07 May 2024 12:33:35 AM EDT | madhu | number  | Pre Color Picker            |

$ snapper -c home ls
 # | Type   | Pre # | Date                            | User  | Cleanup | Description      | Userdata
---+--------+-------+---------------------------------+-------+---------+------------------+---------
0  | single |       |                                 | root  |         | current          |
1  | pre    |       | Tue 07 May 2024 12:33:43 AM EDT | madhu | number  | Pre Color Picker |
Install the pre-requisite packages before compiling the source file.
$ sudo dnf install meson gcc-c++ libhandy-devel libportal-devel \
    libportal-gtk3-devel
Compile the source.
$ git clone https://github.com/Hjdskes/gcolor3.git
$ cd gcolor3
$ meson setup build
$ ninja-build -C build
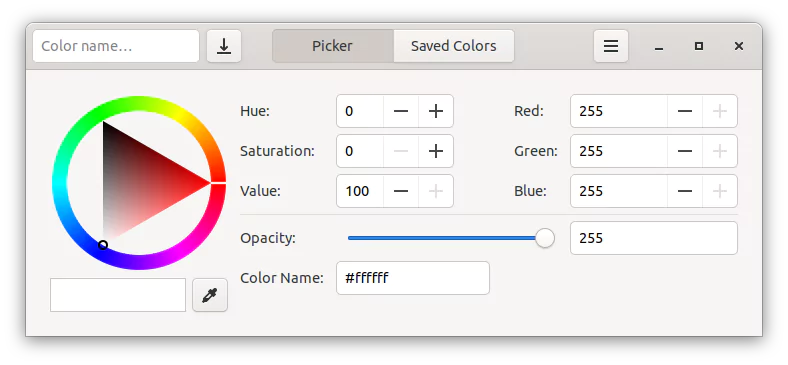
$ sudo ninja-build -C build installMake sure the Color Picker package has been installed properly. Enter gcolor3 into the terminal and hit [ENTER]. The Color Picker app must be open and appear as shown.
Now that you have successfully installed the Color Picker application, close the application and create 'post' snapshots for the / and /home directories.
$ snapper -c root create -t post --pre-number 4 -c number -d 'Post Color Picker'
$ snapper -c home create -t post --pre-number 1 -c number -d 'Post Color Picker'
List the snapshots.
$ snapper -c root ls
 # | Type   | Pre # | Date                            | User  | Cleanup | Description                                                                            | Userdata
---+--------+-------+---------------------------------+-------+---------+----------------------------------------------------------------------------------------+---------
0  | single |       |                                 | root  |         | current                                                                                |
1* | single |       | Mon 06 May 2024 02:05:22 PM EDT | root  |         | first root subvolume                                                                   |
2  | pre    |       | Tue 07 May 2024 12:22:17 AM EDT | root  | number  | /usr/bin/dnf install ps_mem                                                            |
3  | post   |     2 | Tue 07 May 2024 12:22:19 AM EDT | root  | number  | /usr/bin/dnf install ps_mem                                                            |
4  | pre    |       | Tue 07 May 2024 12:33:35 AM EDT | madhu | number  | Pre Color Picker                                                                       |
5  | pre    |       | Tue 07 May 2024 12:36:57 AM EDT | root  | number  | /usr/bin/dnf install meson gcc-c++ libhandy-devel libportal-devel libportal-gtk3-devel |
6  | post   |     5 | Tue 07 May 2024 12:37:44 AM EDT | root  | number  | /usr/bin/dnf install meson gcc-c++ libhandy-devel libportal-devel libportal-gtk3-devel |
7  | post   |     4 | Tue 07 May 2024 12:39:48 AM EDT | madhu | number  | Post Color Picker                                                                      |

$ snapper -c home ls
 # | Type   | Pre # | Date                            | User  | Cleanup | Description       | Userdata
---+--------+-------+---------------------------------+-------+---------+-------------------+---------
0  | single |       |                                 | root  |         | current           |
1  | pre    |       | Tue 07 May 2024 12:33:43 AM EDT | madhu | number  | Pre Color Picker  |
2  | post   |     1 | Tue 07 May 2024 12:39:57 AM EDT | madhu | number  | Post Color Picker |
Review the changes made to the system between the pre and post snapshots.
$ snapper -c root status 4..7
c..... /boot/grub2/grub-btrfs.cfg
c..... /etc/cups/subscriptions.conf
c..... /etc/cups/subscriptions.conf.O
...
c..... /var/lib/dnf/history.sqlite-shm
c..... /var/lib/dnf/history.sqlite-wal
c..... /var/lib/PackageKit/transactions.db

$ snapper -c home status 1..2
c..... /home/madhu/.cache/gnome-software/appstream/components.xmlb
+..... /home/madhu/.config/gcolor3
+..... /home/madhu/.config/gcolor3/config.ini
...
+..... /home/madhu/.local/share/gvfs-metadata/root-267c9227.log
-..... /home/madhu/.local/share/gvfs-metadata/root-c6c739f9.log
c..... /home/madhu/.local/share/ibus-typing-booster/debug.log
This is the total number of files added, removed, or modified.
$ snapper -c root status 4..7 | wc -l
12771

$ snapper -c home status 1..2 | wc -l
278
I'll now undo the changes in the / and /home directories.
$ sudo snapper -c root undochange 4..7
create:0 modify:13 delete:12758

$ sudo snapper -c home undochange 1..2
create:1 modify:3 delete:274
The Color Picker package will be completely removed from the system.
Log out and then log back in.
$ gnome-session-quitCheck again to see if the Color Picker has been completely removed.
$ gcolor3
bash: gcolor3: command not found...
Since you removed the Color Picker package, there is no reason to keep its pre-post snapshots if you do not intend to use it again. So you can delete those snapshots.
$ snapper -c root delete 4-7
$ snapper -c home delete 1-2
Test 3 was successful.
Test 4: Rollback to a Previous Snapshot from the GRUB Menu
In this rollback test, I will delete the most critical files and directories on which the Linux operating system relies. These include Linux kernel and initramfs files in the /boot directory, the /etc directory, which contains all configuration files, and the /usr directory, which contains all drivers, kernel modules, and library files.
Once I delete these files and directories, I will be unable to issue any commands because the Linux OS is pretty much dead, and the system will undoubtedly fail the next time it boots. So I'll hard boot the system and see if I can save the day by rolling back to a working snapshot.
So, before I delete them, here's how they appear.
$ sudo du -sch /boot /etc /usr
136M	/boot
33M	/etc
5.8G	/usr
6.0G	total
Now delete the files and directories.
$ sudo rm -rvf /boot/{vmlinuz,initramfs}* /etc /usrBoom!!! All critical files have been removed. Your Linux system is no longer operational.
Reboot the system.
Your system should now fail to boot and display something like this.
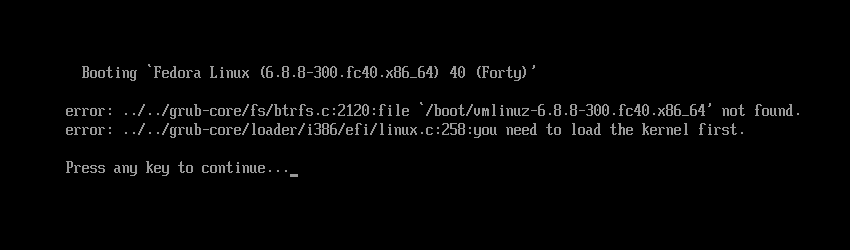
Return to the GRUB menu, and this time boot from snapshot #3.

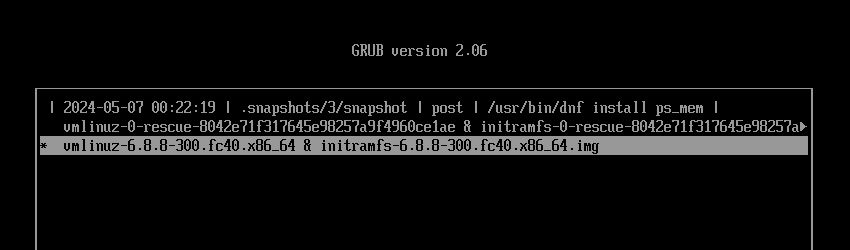
Once you've finished booting, open the terminal.
Check the '/' file system. Because you booted into the snapshot, the file system '/' will be read-only.
$ sudo btrfs property get -ts /
ro=true
Now that everything appears to be operating properly, it is time to roll back this snapshot in read-write mode.
$ snapper ls
 # | Type   | Pre # | Date                            | User | Cleanup | Description                 | Userdata
---+--------+-------+---------------------------------+------+---------+-----------------------------+---------
0  | single |       |                                 | root |         | current                     |
1+ | single |       | Mon 06 May 2024 02:05:22 PM EDT | root |         | first root subvolume        |
2  | pre    |       | Tue 07 May 2024 12:22:17 AM EDT | root | number  | /usr/bin/dnf install ps_mem |
3- | post   |     2 | Tue 07 May 2024 12:22:19 AM EDT | root | number  | /usr/bin/dnf install ps_mem |
As you can see from the output, snapshot #1 has a '+' symbol, indicating that it is the default subvolume, whereas snapshot #3 has a '-' symbol, indicating that it is the currently booted subvolume.
$ sudo snapper rollback
Ambit is classic.
Creating read-only snapshot of default subvolume. (Snapshot 4.)
Creating read-write snapshot of current subvolume. (Snapshot 5.)
Setting default subvolume to snapshot 5.
Now, reboot your system.
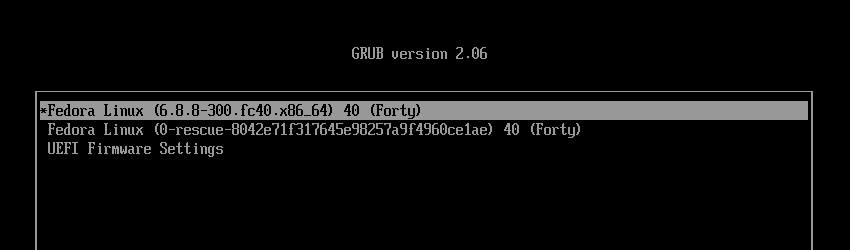
$ sudo rebootThis time, from the GRUB menu, boot normally. Also, notice that the Snapshots menu is missing. This is because of the rollback. We will fix it once we have booted into the operating system.
The first thing you should do after a rollback is to update the grub.cfg file so that the GRUB menu snapshots are always in sync.
So, open the terminal and update the grub.cfg file.
$ sudo grub2-mkconfig -o /boot/grub2/grub.cfg
Generating grub configuration file ...
Adding boot menu entry for UEFI Firmware Settings ...
Detecting snapshots ...
Found snapshot: 2024-05-07 01:19:59 | .snapshots/5/snapshot | single | writable copy of #3         |
Found snapshot: 2024-05-07 00:22:19 | .snapshots/3/snapshot | post   | /usr/bin/dnf install ps_mem |
Found snapshot: 2024-05-07 00:22:17 | .snapshots/2/snapshot | pre    | /usr/bin/dnf install ps_mem |
Found 3 snapshot(s)
Unmount /tmp/grub-btrfs.jxsNgg9oO5 .. Success
done
The GRUB Snapshot menu has now been recreated.
Now, check the system once again.
$ sudo du -sch /boot /etc /usr
136M	/boot
 33M	/etc
5.8G	/usr
6.0G	total

$ sudo btrfs property get -ts /
ro=false

$ snapper ls
 # | Type   | Pre # | Date                            | User | Cleanup | Description                 | Userdata
---+--------+-------+---------------------------------+------+---------+-----------------------------+--------------
0  | single |       |                                 | root |         | current                     |
1  | single |       | Mon 06 May 2024 02:05:22 PM EDT | root | number  | first root subvolume        |
2  | pre    |       | Tue 07 May 2024 12:22:17 AM EDT | root | number  | /usr/bin/dnf install ps_mem |
3  | post   |     2 | Tue 07 May 2024 12:22:19 AM EDT | root | number  | /usr/bin/dnf install ps_mem |
4  | single |       | Tue 07 May 2024 01:19:59 AM EDT | root | number  | rollback backup of #1       | important=yes
5* | single |       | Tue 07 May 2024 01:19:59 AM EDT | root |         | writable copy of #3         |

$ sudo btrfs subvolume get-default /
ID 276 gen 266 top level 258 path .snapshots/5/snapshot
You successfully restored the system with the latest working snapshot in read and write mode.
Test 4 was successful.
16. Make a Snapshot the New System Root
Now that you've tested the snapper undo and rollback features and are hopefully satisfied with the results, you might want to set one of the snapshots as the new default system root and resume normal operating system use.
But first, let me show you how to determine how much space each snapshot takes up on your disk.
$ sudo btrfs filesystem du -s --human-readable /.snapshots/*/snapshot
     Total   Exclusive  Set shared  Filename
  50.69MiB       0.00B    37.49MiB  /.snapshots/1/snapshot
   5.67GiB    32.00KiB     2.96GiB  /.snapshots/2/snapshot
   5.67GiB    52.00KiB     2.96GiB  /.snapshots/3/snapshot
  50.69MiB       0.00B    37.49MiB  /.snapshots/4/snapshot
   5.67GiB   228.00KiB     2.96GiB  /.snapshots/5/snapshot
As you can see from the output above, snapshot #1 has an exclusive size of 0 bytes. This is because, as you may recall, I deleted all of the files recursively. Snapshot #4 is also 0 bytes in size because it is a read-only duplicate of snapshot #1.
To find out how the 'Total' and 'Set shared' values are calculated, see the man page man btrfs-filesystem.
Now, let's return to making a snapshot the new system root.
$ snapper ls
 # | Type   | Pre # | Date                            | User | Cleanup | Description                 | Userdata
---+--------+-------+---------------------------------+------+---------+-----------------------------+--------------
0  | single |       |                                 | root |         | current                     |
1  | single |       | Mon 06 May 2024 02:05:22 PM EDT | root | number  | first root subvolume        |
2  | pre    |       | Tue 07 May 2024 12:22:17 AM EDT | root | number  | /usr/bin/dnf install ps_mem |
3  | post   |     2 | Tue 07 May 2024 12:22:19 AM EDT | root | number  | /usr/bin/dnf install ps_mem |
4  | single |       | Tue 07 May 2024 01:19:59 AM EDT | root | number  | rollback backup of #1       | important=yes
5* | single |       | Tue 07 May 2024 01:19:59 AM EDT | root |         | writable copy of #3         |
The output indicates that snapshot #5 is the default subvolume, and since it is operational, you can simply delete the remaining snapshots and move on.
However, I will use snapshot #2 as the default because it is a 'pre' snapshot that was created just before ps_mem was installed and is clean.
So, first, delete all of the snapshots except #2. You cannot delete snapshot #5 because it is the active one.
$ snapper delete 1
$ snapper delete 3-4

$ snapper ls
 # | Type   | Pre # | Date                            | User | Cleanup | Description                 | Userdata
---+--------+-------+---------------------------------+------+---------+-----------------------------+---------
0  | single |       |                                 | root |         | current                     |
2  | pre    |       | Tue 07 May 2024 12:22:17 AM EDT | root | number  | /usr/bin/dnf install ps_mem |
5* | single |       | Tue 07 May 2024 01:19:59 AM EDT | root |         | writable copy of #3         |
Create a directory named '1' in the /.snapshots directory.
$ sudo mkdir -v /.snapshots/1Copy the info.xml file from /.snapshots/2/ to /.snapshots/1/.
$ sudo cp -v /.snapshots/2/info.xml /.snapshots/1/Edit the /.snapshots/1/info.xml file and change the content from this...
$ sudo cat /.snapshots/1/info.xml
<?xml version="1.0"?>
<snapshot>
  <type>pre</type>
  <num>2</num>
  <date>2024-05-07 04:22:17</date>
  <description>/usr/bin/dnf install ps_mem</description>
  <cleanup>number</cleanup>
</snapshot>
...to this.
$ sudo cat /.snapshots/1/info.xml
<?xml version="1.0"?>
<snapshot>
  <type>single</type>
  <num>1</num>
  <date>2024-05-07 04:22:17</date>
  <description>new root subvolume</description>
</snapshot>
Create a read-write subvolume snapshot of snapshot #2 in the /.snapshots/1/ directory.
$ sudo btrfs subvolume snapshot /.snapshots/2/snapshot /.snapshots/1/snapshotGet the subvolid of the /.snapshots/1/snapshot subvolume.
$ sudo btrfs inspect-internal rootid /.snapshots/1/snapshot
277
Using subvolid 277, set the /.snapshots/1/snapshot subvolume as the default subvolume for the root (/) filesystem.
$ sudo btrfs subvolume set-default 277 /Then reboot.
$ sudo rebootAfter rebooting, confirm that the /.snapshots/1/snapshot subvolume is indeed the default for the / filesystem.
$ sudo btrfs subvolume get-default /
ID 277 gen 308 top level 258 path .snapshots/1/snapshot
And is writable.
$ sudo btrfs property get -ts /
ro=false
Take a look at the snapper now.
$ snapper ls
 # | Type   | Pre # | Date                            | User | Cleanup | Description                 | Userdata
---+--------+-------+---------------------------------+------+---------+-----------------------------+---------
0  | single |       |                                 | root |         | current                     |
1* | single |       | Tue 07 May 2024 12:22:17 AM EDT | root |         | new root subvolume          |
2  | pre    |       | Tue 07 May 2024 12:22:17 AM EDT | root | number  | /usr/bin/dnf install ps_mem |
5  | single |       | Tue 07 May 2024 01:19:59 AM EDT | root |         | writable copy of #3         |
As you can see, snapshot #1 is the default.
You can now delete the remaining snapshots.
$ snapper delete 2-5

$ snapper ls
 # | Type   | Pre # | Date                            | User | Cleanup | Description        | Userdata
---+--------+-------+---------------------------------+------+---------+--------------------+---------
0  | single |       |                                 | root |         | current            |
1* | single |       | Tue 07 May 2024 12:22:17 AM EDT | root |         | new root subvolume |

$ sudo btrfs filesystem du -s --human-readable /.snapshots/*/snapshot
     Total   Exclusive  Set shared  Filename
   5.67GiB     3.16MiB     2.96GiB  /.snapshots/1/snapshot
Update grub.cfg file.
$ sudo grub2-mkconfig -o /boot/grub2/grub.cfgYou're done.
17. Enable Automatic Timeline Snapshots
Now that you've finished everything, you can enable automatic timeline snapshots. When the timeline is enabled, a snapshot is created once every hour. Once per day, the timeline cleanup algorithm cleans up the snapshots.
Automatic Timeline Snapshots are enabled by default in both root and home configurations. Enable it only for the system root and disable it for the home. See the Arch Wiki page on 'Automatic timeline snapshots' for more information.
$ sudo snapper -c home set-config TIMELINE_CREATE=no
$ sudo systemctl enable --now snapper-timeline.timer
$ sudo systemctl enable --now snapper-cleanup.timer
That's all. Every hour from now on, a 'single' snapshot will be created and cleaned up every other day.
$ snapper ls
 # | Type   | Pre # | Date                            | User | Cleanup  | Description        | Userdata
---+--------+-------+---------------------------------+------+----------+--------------------+---------
0  | single |       |                                 | root |          | current            |
1* | single |       | Tue 07 May 2024 12:22:17 AM EDT | root |          | new root subvolume |
2  | single |       | Tue 07 May 2024 03:00:04 AM EDT | root | timeline | timeline           |
3  | single |       | Tue 07 May 2024 04:00:04 AM EDT | root | timeline | timeline           |
To stop timeline snapshots, disable the snapper timers.
$ sudo systemctl disable --now snapper-timeline.timer
$ sudo systemctl disable --now snapper-cleanup.timer
The installation of Fedora 40 with snapshot and rollback support is now complete.
18. Issues and Possible Solutions
Problem 1: Sometimes, after updating Fedora and rebooting, you may encounter a boot error like this:
error: ../../grub-core/script/lexer.c:352:syntax error.
error: ../../grub-core/script/lexer.c:352:Incorrect command.
Issue: This usually occurs when a kernel update has just been released and all of the kernel's supporting files have not yet been propagated to a repository mirror near you.
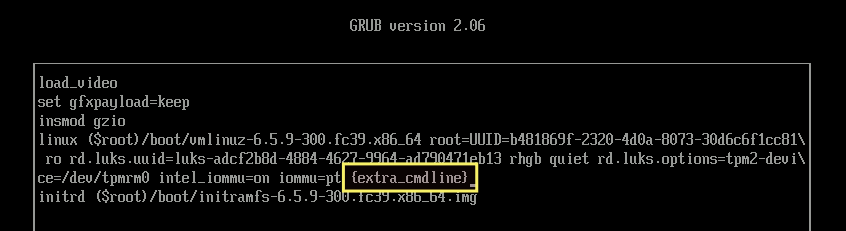
This is caused by the kernel parameter '{extra_cmdline}'. The '{extra_cmdline}' parameter is added to the kernel when you add the 'SUSE_BTRFS_SNAPSHOT_BOOTING=true' key to the /etc/default/grub file.
Solution: From the GRUB menu, select the kernel version you want to boot, and then press 'e' to modify the command.
Go to the line that starts with the word 'linux', and move the parameter '{extra_cmdline}' to the end of the line. The parameter '{extra_cmdline}' should always be at the end of the line.
From this:
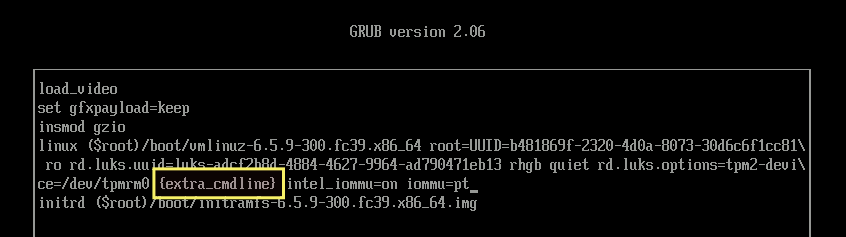
To this:
Then, on your keyboard, press Ctrl+x. You will be successfully booted into the operating system. Next, launch the terminal and execute the following command.
$ sudo grub2-mkconfig -o /boot/grub2/grub.cfgReboot the computer to ensure the problem has been resolved.
Problem 2: When you try to boot from a snapshot from the GRUB menu, you sometimes get an error like this:
error: ../../grub-core/commands/efi/tpm.c:150:unknown TPM error
Issue: The problem appears to be that GRUB does not support TPM 2.0 very well when enabled in UEFI System Settings.
Solution: I looked into it, and it appears that this solution works perfectly. All credit goes to Eric Renfro.
Create a script named 02_tpm in the /etc/grub.d/ directory with the following contents.
# vim /etc/grub.d/02_tpm
#!/usr/bin/sh -e
echo "rmmod tpm"
Set the execute permission on a file.
# chmod +x /etc/grub.d/02_tpmUpdate the grub.cfg file.
# grub2-mkconfig -o /boot/grub2/grub.cfgThis issue should now be resolved.