A virtual machine snapshot is a saved image of a virtual machine's state and data, captured and stored at a specific point in time. By taking a snapshot of a virtual machine, you preserve its state, which means you can easily revert to it in the future if needed.
The libvirt APIs support two types of snapshots with QEMU/KVM: internal and external.
Internal snapshots store all of the snapshot data to the qcow2 virtual disk image of the same guest virtual machine. So, even if you take multiple snapshots of a virtual machine, they are all stored in the same qcow2 disk image file. You can easily create and manage internal snapshots in KVM.
External snapshots, on the other hand, use the copy-on-write (COW) concept. When a snapshot is taken, the original disk image is made read-only, and a new overlay disk image is created. This new overlay disk image will be of type qcow2 and will be set as the virtual machine's default disk.
In this blog, I will only discuss internal snapshots.
Table of Contents
- 1. Create Snapshots
- 2. Revert to Snapshots
- 3. Snapshots Branching
- 4. Delete Snapshots
- 5. Backup VM with Snapshots
1. Create Snapshots
You can take internal snapshots of a virtual machine when it is shut down or while it is running. However, only virtual machines with BIOS firmware are capable of taking both types of snapshots. At the time of writing, virtual machines with UEFI firmware could only take internal snapshots when shut down, not while running.
So, to demonstrate both types of snapshots, I'll be using a Debian Linux distribution that I've created with BIOS firmware.
First, let me check the virtual machines I have.
$ virsh list --all --title
 Id   Name     State      Title
------------------------------------------------------------
 -    debian   shut off   Debian 12.4.0 Xfce BIOS
 -    fedora   shut off   Fedora Workstation 39 Gnome UEFI
 -    rocky    shut off   Rocky Linux 9.3 Server UEFI
 -    ubuntu   shut off   Ubuntu 23.10 Gnome BIOS
As you can see, I have four virtual machines created.
I'm not using the
sudowithvirshcommand to connect to a system-wide instance, because I've already granted the regular user system-wide permissions. If you also want to allow the regular user to connect to a system-wide instance, see the section 'Give the User System-Wide Permission' in my other article 'How Do I Properly Install KVM on Linux'.
To find out which virtual machines already have snapshots, run the following command:
$ virsh list --all --title --with-snapshot
 Id   Name     State      Title
------------------------------------------------------------
 -    fedora   shut off   Fedora Workstation 39 Gnome UEFI
 -    rocky    shut off   Rocky Linux 9.3 Server UEFI
 -    ubuntu   shut off   Ubuntu 23.10 Gnome BIOS
And to find out which virtual machines do not have snapshots, use this:
$ virsh list --all --title --without-snapshot
 Id   Name     State      Title
---------------------------------------------------
 -    debian   shut off   Debian 12.4.0 Xfce BIOS
I just installed the Debian Linux operating system and updated all of its packages. So, I'd like to take a snapshot of the virtual machine's current state. That way, if something goes wrong, I can always revert back to this snapshot.
So I will create a snapshot and give it the simple name 'pkg-updated'. The snapshot name should not include any spaces.
$ virsh snapshot-create-as debian pkg-updated
Domain snapshot pkg-updated created
A snapshot named 'pkg-updated' has been created.
When creating a snapshot, you can include extra information like a description. But I will keep things simple. The full syntax for the snapshot-create-as command is as follows:
$ virsh help snapshot-create-as
  NAME
    snapshot-create-as - Create a snapshot from a set of args

  SYNOPSIS
    snapshot-create-as <domain> [--name <string>] [--description <string>]
    [--print-xml] [--no-metadata] [--halt] [--disk-only] [--reuse-external]
    [--quiesce] [--atomic] [--live] [--validate] [--memspec <string>]
    [[--diskspec] <string>]...
    ...
    ...
To view all snapshots available for the virtual machine, run this command:
$ virsh snapshot-list debian
 Name          Creation Time               State
----------------------------------------------------
 pkg-updated   2024-01-26 11:50:54 +0530   shutoff
As shown here, it displays the snapshot name, time of creation, and the state of the virtual machine when the snapshot was taken, which is shutoff in this case.
To get more information about a specific snapshot, use this command:
$ virsh snapshot-info debian pkg-updated
Name:           pkg-updated
Domain:         debian
Current:        yes
State:          shutoff
Location:       internal
Parent:         -
Children:       0
Descendants:    0
Metadata: yes- Name: The name of the snapshot.
- Domain: The guest virtual machine for which the snapshot is created.
- Current: Is the 'pkg-updated' snapshot the current snapshot? If yes, then any new snapshot taken will be created as a child snapshot under this snapshot.
- State: The state of the virtual machine at the time the snapshot was taken, which in this case is 'shutoff'.
- Location: Where is the snapshot saved? In this case, it is internal, which means it is saved within the virtual disk image of the guest virtual machine.
- Parent: Under which snapshot is this 'pkg-updated' snapshot created? None, as this is the first snapshot created and thus has no parent.
- Children: The number of child snapshots that were taken directly under this 'pkg-updated' snapshot. In this case, 0 because no new child snapshots have been taken yet.
- Descendants: The total number of child snapshots from this snapshot down the tree hierarchy to the last leaf snapshots. 0 because no child snapshots have been taken yet.
- Metadata: Does this snapshot contain metadata? If yes, you'll be able to revert to this snapshot later; otherwise, you won't be able to.
You might also be curious about how much space a snapshot takes. As the snapshot is internal, the data is stored on the virtual disk of the same guest virtual machine.
So, first, locate the virtual disk image of the guest virtual machine.
$ virsh domblklist debian --details
 Type   Device   Target   Source
----------------------------------------------------------------
 file   disk     vda      /var/lib/libvirt/images/debian.qcow2
 file   cdrom    sda      -
Then, run the following command to get the size of the snapshots:
$ sudo qemu-img info /var/lib/libvirt/images/debian.qcow2
...
Snapshot list:
ID   TAG           VM SIZE                DATE     VM CLOCK   ICOUNT
1    pkg-updated       0 B 2024-01-26 11:50:54 00:00:00.000        0
...
As shown here, the size of the snapshot 'pkg-updated' is 0 bytes.
The snapshot XML will be created in the directory with the same name as the virtual machine under /var/lib/libvirt/qemu/snapshot/ directory.
$ sudo ls -lh /var/lib/libvirt/qemu/snapshot/debian/
total 12K
-rw-------. 1 root root 8.2K Jan 26 11:50 pkg-updated.xml
You can view the content of the snapshot XML by using the following command:
$ virsh snapshot-dumpxml debian pkg-updatedOr you can edit the snapshot using this command:
$ virsh snapshot-edit debian pkg-updatedWith the BIOS firmware, you can also take an internal live snapshot while the guest virtual machine is running.
So, start the virtual machine.
$ virsh start debian
Domain 'debian' started
To take a live snapshot of the guest virtual machine, you can use the following command. I will name this snapshot 'desktop-live'.
$ virsh snapshot-create-as debian desktop-live --atomicThe --atomic option ensures that the snapshot either succeeds or fails without any changes. If this flag is not specified, snapshot creation may fail after only a portion of the action has been performed.
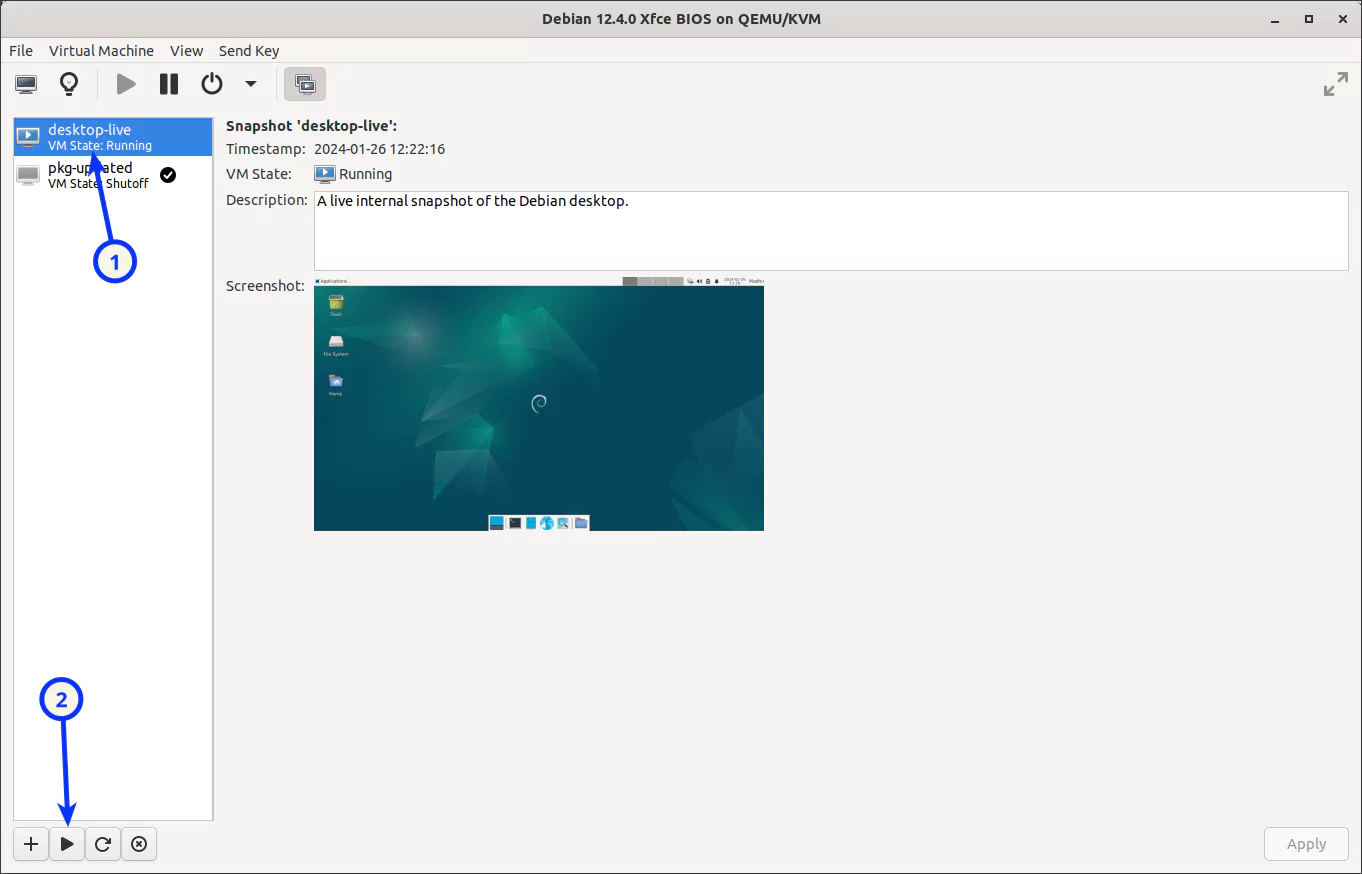
While I took the first snapshot through the command line interface, I will create this live snapshot using the virt-manager graphical application.
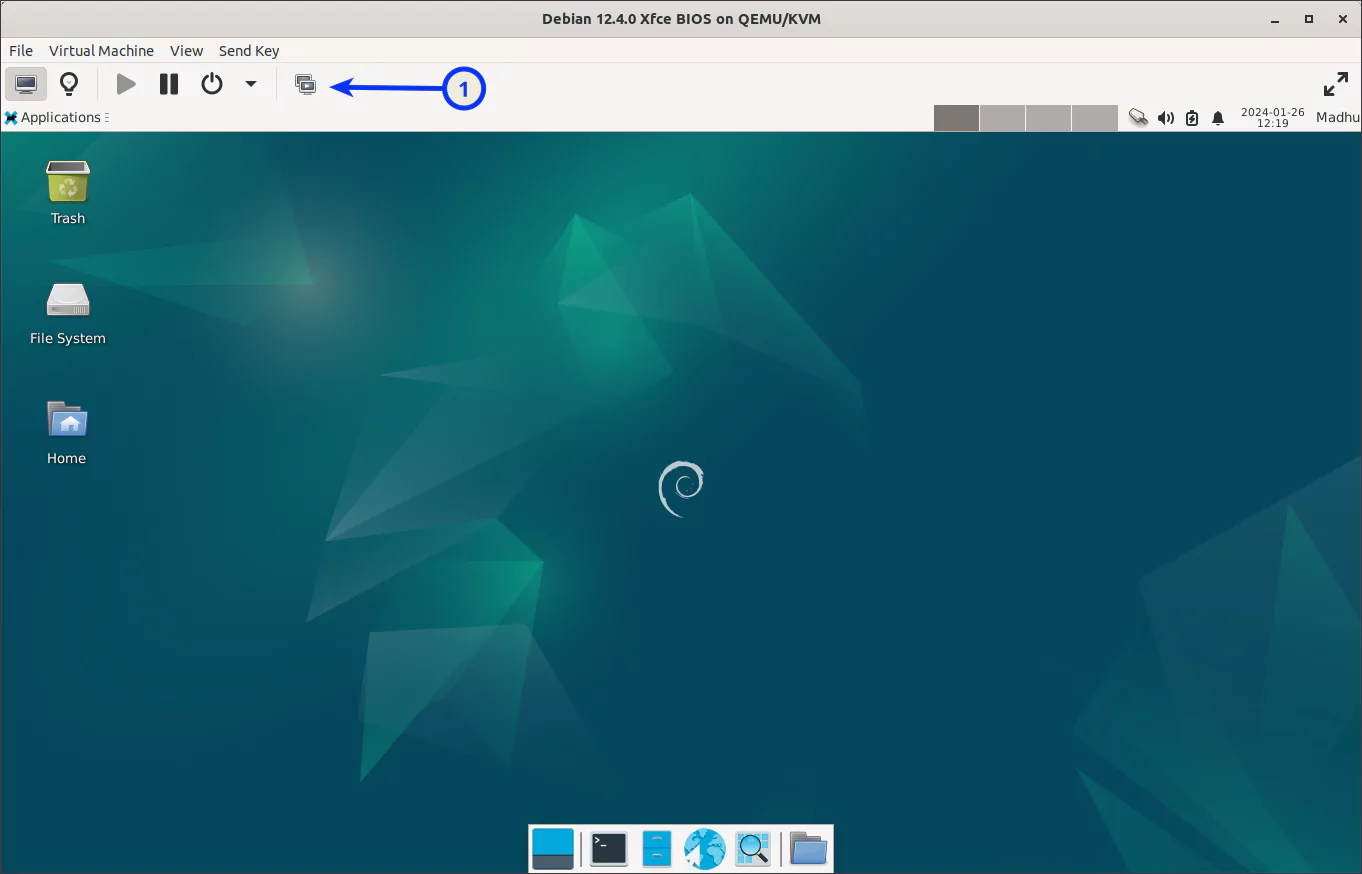
Launch the Virtual Machine Manager (virt-manager) application and double-click the 'debian' virtual machine.
Then, click the 'Manage VM snapshots' button in the toolbar.
Next, click the '+' button in the bottom left corner of the window. Give the snapshot a name, then click the 'Finish' button.
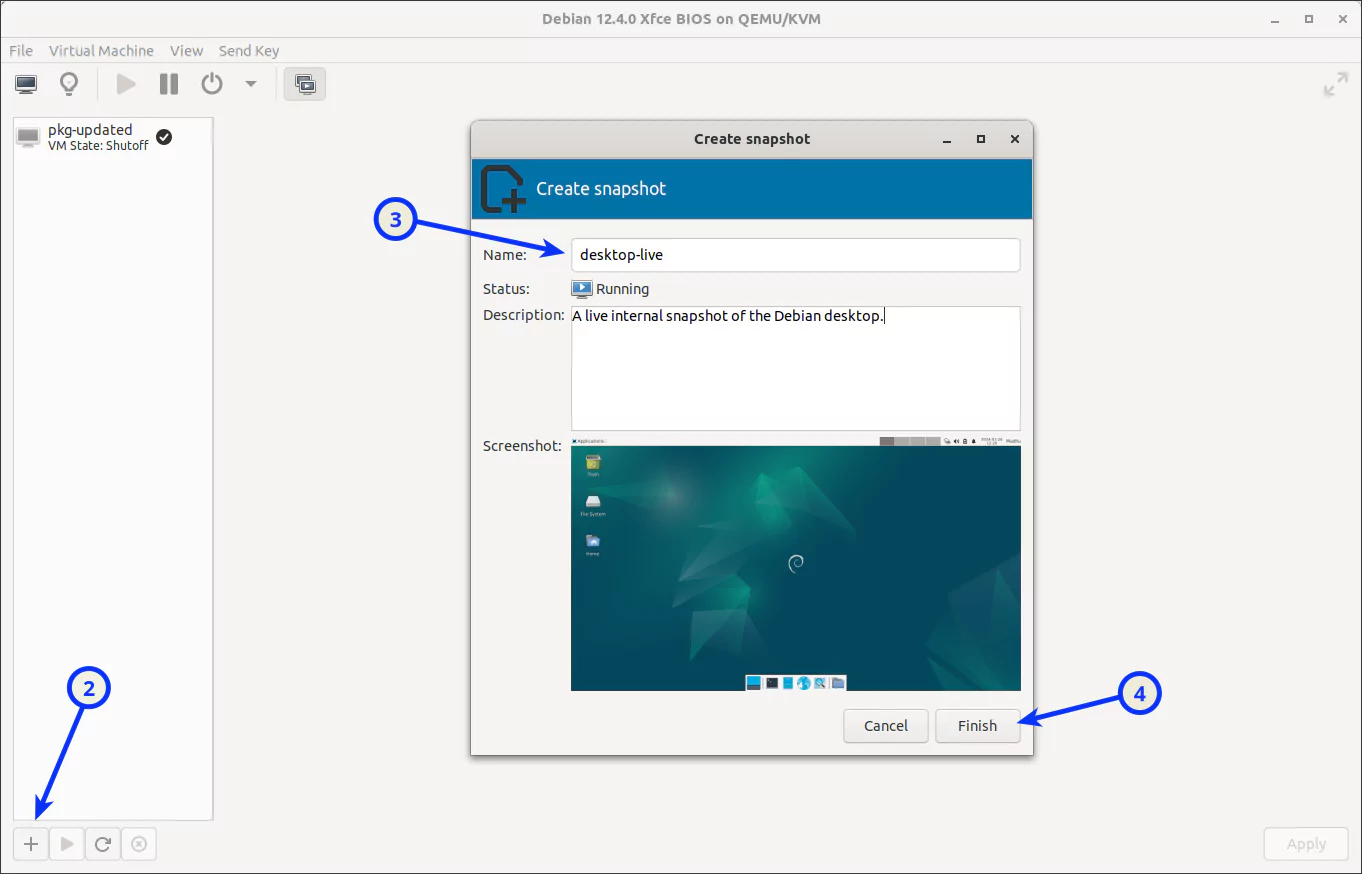
After a long wait, a live snapshot will be created. So, please be patient.
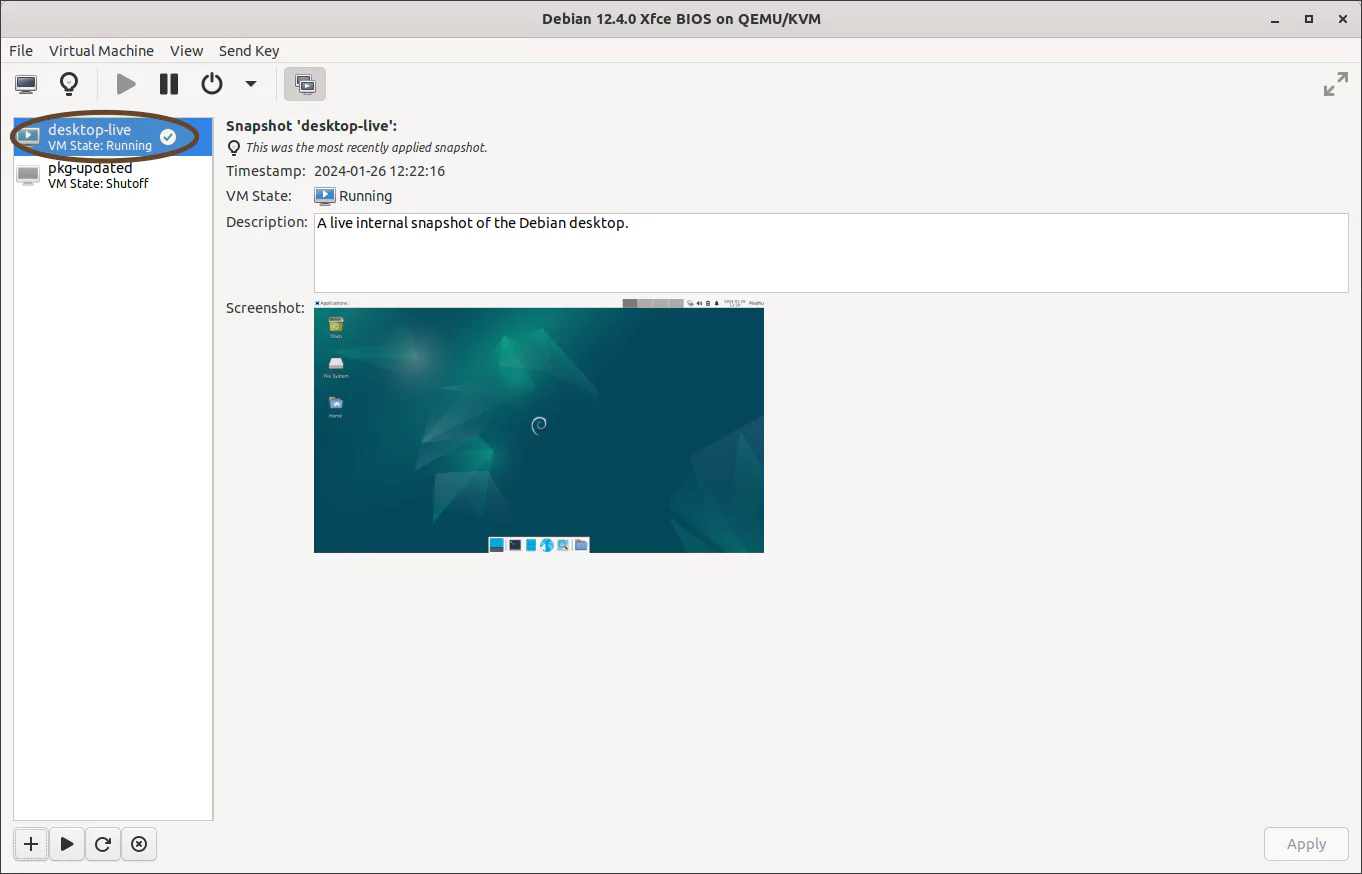
Now, return to the terminal and list all snapshots for the guest virtual machine.
$ virsh snapshot-list debian
 Name           Creation Time               State
-----------------------------------------------------
 desktop-live   2024-01-26 12:22:16 +0530   running
 pkg-updated    2024-01-26 11:50:54 +0530   shutoff
As you can see, a snapshot named 'desktop-live' has been created, with the state as 'running'.
By default, the snapshots are sorted by name. If you want to list the snapshots topologically, so that no child appears before its ancestors, use the --topological option.
$ virsh snapshot-list debian --topological
 Name           Creation Time               State
-----------------------------------------------------
 pkg-updated    2024-01-26 11:50:54 +0530   shutoff
 desktop-live   2024-01-26 12:22:16 +0530   running
You can also use the --tree option.
$ virsh snapshot-list debian --tree
pkg-updated
  |
  +- desktop-live
To check the snapshot sizes, first shut down the guest virtual machine. Other commands besides virsh cannot access the virtual disk image while the virtual machine is running.
$ virsh shutdown debian
Domain 'debian' is being shutdown
Then, check the snapshot sizes. As can be seen below, the 'desktop-live' snapshot size is quite large.
$ sudo qemu-img info /var/lib/libvirt/images/debian.qcow2
...
Snapshot list:
ID   TAG             VM SIZE                DATE     VM CLOCK   ICOUNT
1    pkg-updated         0 B 2024-01-26 11:50:54 00:00:00.000        0
2    desktop-live   1.02 GiB 2024-01-26 12:22:16 00:19:17.986
...
2. Revert to Snapshots
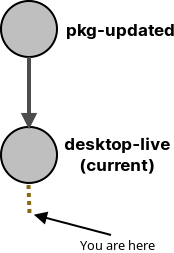
You can revert to any snapshot, including the current one, at any time. Please be aware that this is a destructive action. This means that any changes you make to the guest virtual machine after the last (current) snapshot will be lost.
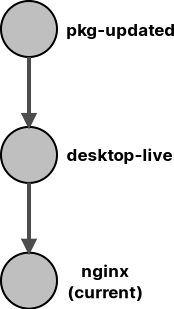
For example, if you want to revert to the 'pkg-updated' snapshot, any changes you made to the guest virtual machine after the 'current' snapshot, in this case the 'desktop-live' snapshot will be lost. This is shown in the diagram below. The data you will lose is denoted by the red dotted line.
To determine which snapshot is the current one, run the following command:
$ virsh snapshot-current debian --name
desktop-live
To revert to the 'pkg-updated' snapshot, run the following command. Any changes made after the 'desktop-live' snapshot will be lost. You will not get a warning.
$ virsh snapshot-revert debian pkg-updated
Domain snapshot pkg-updated reverted
Because the 'pkg-updated' snapshot was taken in the shutdown state, when you revert to it, the guest virtual machine will be in the same state, i.e. shut off.
$ virsh list --all
 Id   Name     State
-------------------------
 -    debian   shut off
 -    fedora   shut off
 -    rocky    shut off
 -    ubuntu   shut off
If you want to revert to a snapshot, but also have the guest virtual machine start, use this command instead.
$ virsh snapshot-revert debian pkg-updated --running
Domain snapshot pkg-updated reverted
If you check the state now, you'll notice that the debian guest virtual machine is running.
$ virsh list --all
Id Name State
-------------------------
2 debian running
- fedora shut off
- rocky shut off
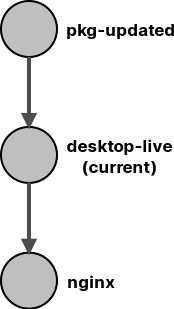
- ubuntu shut offThe current snapshot has changed, and this is how things look now, as shown in a diagram.
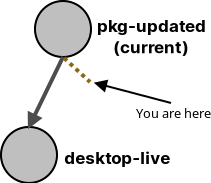
The 'pkg-updated' snapshot is now the current snapshot.
$ virsh snapshot-current debian --name
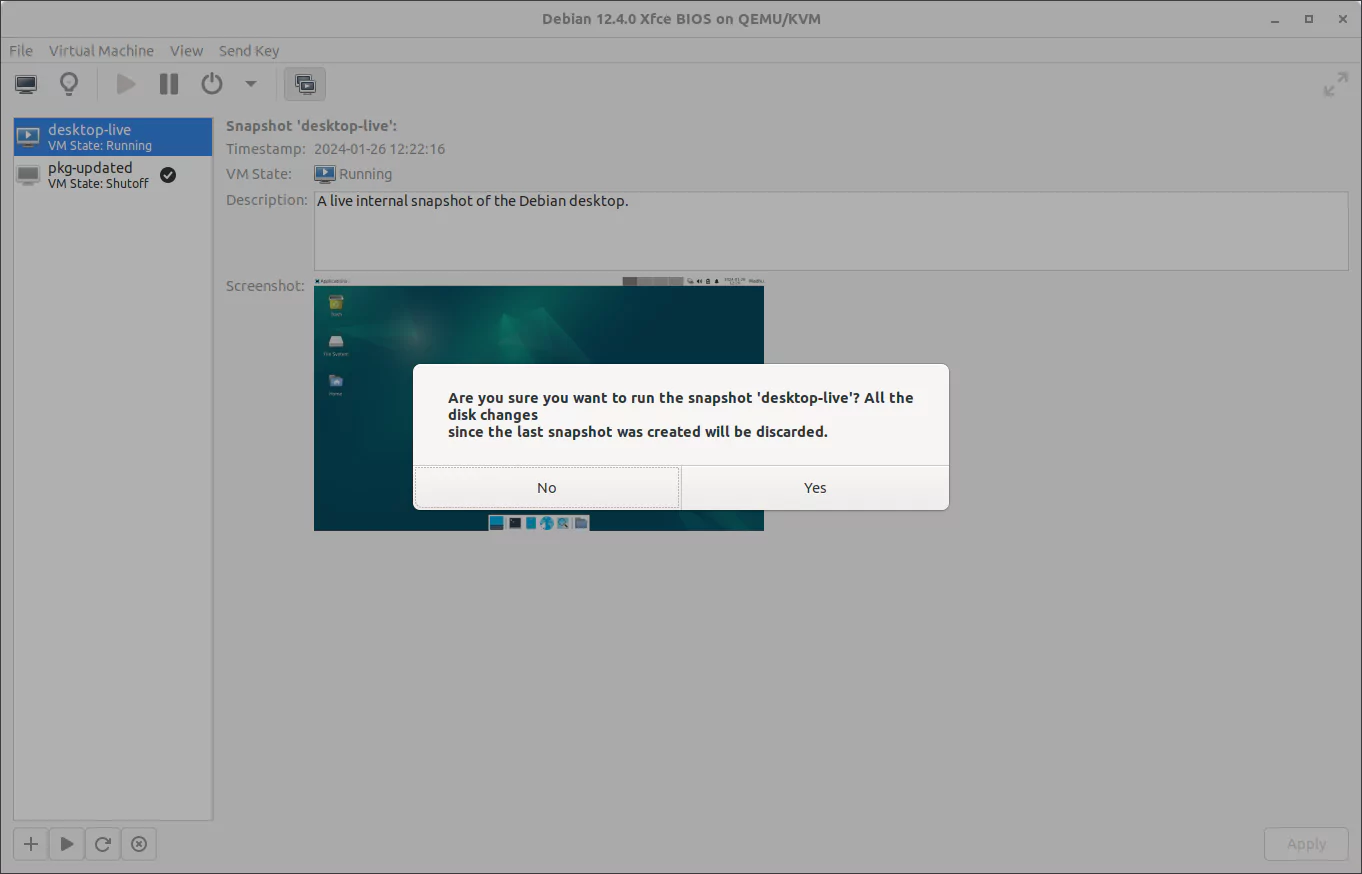
pkg-updatedYou can also use the virt-manager to revert to a snapshot graphically. For example, I will now revert back to the 'desktop-live' snapshot.
Simply select the snapshot you want to revert to and press the 'Play' button.
Here, however, you will receive a warning. To revert, simply press 'Yes'. Any changes you made after the 'pkg-updated' snapshot will be lost (the red dotted line).
You have now reverted to the 'desktop-live' snapshot. Since this snapshot was taken live, the state will be 'running'. This is also the 'current' snapshot now.
$ virsh snapshot-current debian --name
desktop-live

$ virsh list --all
 Id   Name     State
-------------------------
 3    debian   running
 -    fedora   shut off
 -    rocky    shut off
 -    ubuntu   shut off
You're back to this:
Snapshots are also useful when you want to test several scenarios and want to repeatedly revert to a virtual machine state.
For example, with the 'desktop-live' snapshot as your 'current' snapshot, you can use this command to revert to the current snapshot after each test scenario.
$ virsh snapshot-revert debian --current
Domain snapshot desktop-live reverted
With each revert, all of your changes are undone and you can begin a new test scenario from the same baseline.
3. Snapshots Branching
Not only can you create snapshots in a linear way, but you can also create branches.
Snapshot branches are useful if you plan to test multiple scenarios using the same restoration point. You can save the state of each scenario as a separate snapshot.
To create a snapshot branch, follow these steps:
- Pick a snapshot as the restore point.
- Create a test scenario 1.
- Take a snapshot.
- Revert to the restore point.
- Create a test scenario 2.
- Take a snapshot.
To demonstrate this, assume you want to install a web server on Debian Linux. You'd like to test two popular web servers: 'Nginx Web Server' and 'Apache HTTP Server'.
So first, pick your restore point.
As the 'desktop-live' snapshot is also the 'current' snapshot, I will use it as the restore point.
$ virsh snapshot-current debian --name
desktop-live
I'll now install 'Nginx Web Server' on Debian Linux. Once installed, I'll shut down the guest virtual machine and take a snapshot. I will name this snapshot 'nginx'.
$ virsh snapshot-create-as debian nginx
Domain snapshot nginx created
A snapshot named 'nginx' has been created.
$ virsh snapshot-list debian --topological
Name Creation Time State
-----------------------------------------------------
pkg-updated 2024-01-26 11:50:54 +0530 shutoff
desktop-live 2024-01-26 12:22:16 +0530 running
nginx 2024-01-27 18:52:48 +0530 shutoff
$ virsh snapshot-list debian --tree
pkg-updated
|
+- desktop-live
|
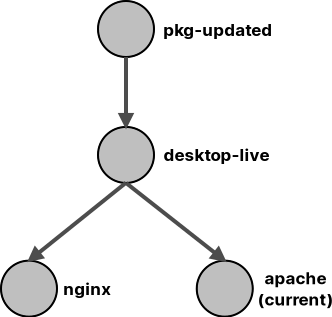
+- nginxThe diagram shows the current state of the snapshots.
Now I will revert back to the 'desktop-live' snapshot.
$ virsh snapshot-revert debian desktop-live
Domain snapshot desktop-live reverted
The 'desktop-live' snapshot is now the 'current' one.
I'm going to install 'Apache HTTP Server' on Debian Linux. After installation, I will shut down the guest virtual machine and take a snapshot. I'll call this snapshot 'apache'.
$ virsh snapshot-create-as debian apache
Domain snapshot apache created
A snapshot named 'apache' has been created.
$ virsh snapshot-list debian --topological
 Name           Creation Time               State
-----------------------------------------------------
 pkg-updated    2024-01-26 11:50:54 +0530   shutoff
 desktop-live   2024-01-26 12:22:16 +0530   running
 apache         2024-01-27 18:58:57 +0530   shutoff
 nginx          2024-01-27 18:52:48 +0530   shutoff

$ virsh snapshot-list debian --tree
pkg-updated
  |
  +- desktop-live
      |
      +- apache
      +- nginx
The diagram depicts the snapshot branches.
Now you can easily revert to any snapshot branches and perform the testing.
Also note that when you create a new snapshot, it will always be created as a child to the snapshot that is currently being set as 'current'.
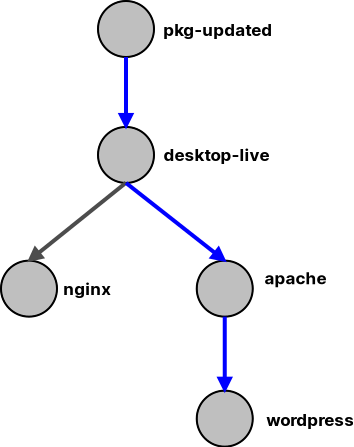
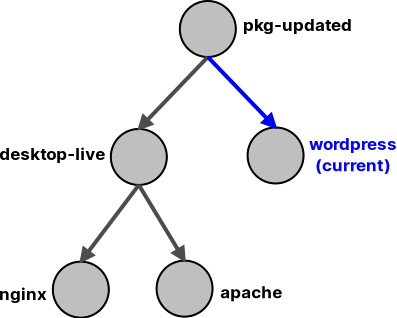
So, if I install the WordPress CMS now and want to create a new snapshot called 'wordpress', it will be created under the 'apache' snapshot because it is the 'current' one.
It will be like this:
But what if I want to create a snapshot 'wordpress' that is not a child of the 'apache' snapshot but rather a separate branch?
Because a snapshot will be created as a child of whichever snapshot is set as 'current', all I have to do is change the 'current' status to another snapshot where I want to create a snapshot.
To demonstrate this, I will first start the guest virtual machine, install the WordPress CMS, and then shut it down.
Check which is the 'current' snapshot.
$ virsh snapshot-current debian --name
apache
Because I want to create a separate branch for WordPress, I simply need to change the 'current' snapshot to another and then take a new snapshot.
I will set the 'pkg-updated' snapshot as the 'current' snapshot.
$ virsh snapshot-current debian pkg-updated
Snapshot pkg-updated set as current

$ virsh snapshot-current debian --name
pkg-updated
Then take a snapshot. I will name this snapshot 'wordpress'.
$ virsh snapshot-create-as debian wordpress
Domain snapshot wordpress created
I now have a separate branch for the 'wordpress' snapshot. This snapshot includes all of the updated packages, as well as the Apache HTTP server. The 'apache' snapshot will remain untouched.
Check the snapshots:
$ virsh snapshot-list debian --topological
 Name           Creation Time               State
-----------------------------------------------------
 pkg-updated    2024-01-26 11:50:54 +0530   shutoff
 wordpress      2024-01-27 19:04:39 +0530   shutoff
 desktop-live   2024-01-26 12:22:16 +0530   running
 apache         2024-01-27 18:58:57 +0530   shutoff
 nginx          2024-01-27 18:52:48 +0530   shutoff

 $ virsh snapshot-list debian --tree
pkg-updated
  |
  +- desktop-live
  |   |
  |   +- apache
  |   +- nginx
  |
  +- wordpress

$ virsh snapshot-info debian pkg-updated
Name:           pkg-updated
Domain:         debian
Current:        no
State:          shutoff
Location:       internal
Parent:         -
Children:       2
Descendants:    4
Metadata:       yes
4. Delete Snapshots
A snapshot can be deleted quite easily.
There are four different scenarios for deleting a snapshot(s).
Scenario 1: You want to delete a snapshot that has no children (leaf nodes).
$ virsh snapshot-list debian --leaves --topological
 Name        Creation Time               State
--------------------------------------------------
 nginx       2024-01-27 18:52:48 +0530   shutoff
 apache      2024-01-27 18:58:57 +0530   shutoff
 wordpress   2024-01-27 19:04:39 +0530   shutoff
You'd like to delete the 'nginx' snapshot.
If the snapshot you want to delete has no child snapshots, only that snapshot will be deleted. There will be no other changes.
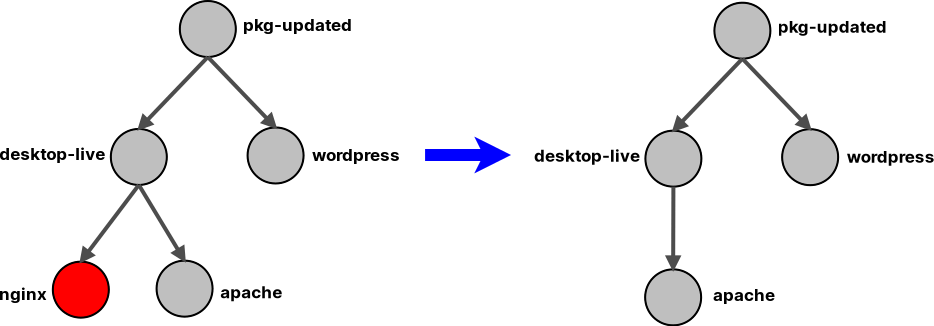
To delete the leaf node snapshot 'nginx', use this command:
$ virsh snapshot-delete debian nginx
Domain snapshot nginx deleted
The 'nginx' snapshot is deleted.
$ virsh snapshot-list debian --tree
pkg-updated
  |
  +- desktop-live
  |   |
  |   +- apache
  |
  +- wordpress
Scenario 2: You want to delete a snapshot that has children. But you want to keep the children, you only want to delete that specific snapshot.
$ virsh snapshot-list debian --no-leaves --topological
 Name           Creation Time               State
-----------------------------------------------------
 pkg-updated    2024-01-26 11:50:54 +0530   shutoff
 desktop-live   2024-01-26 12:22:16 +0530   running
You'd like to delete the 'desktop-live' snapshot.
If the snapshot you want to delete has child snapshots, any changes from the deleted snapshot will be merged into the children.
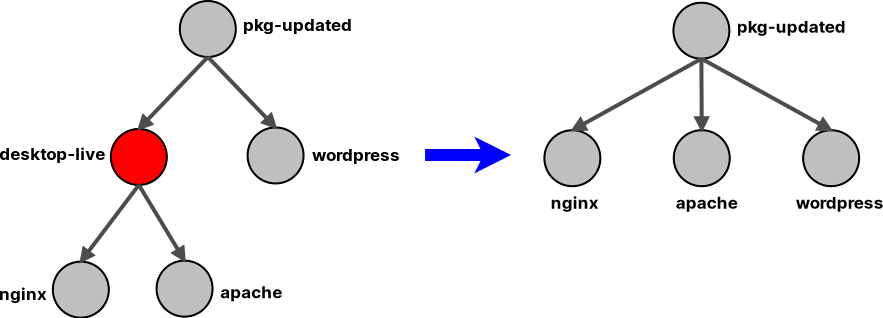
To delete the snapshot 'desktop-live', use this command:
$ virsh snapshot-delete debian desktop-live
Domain snapshot desktop-live deleted
The 'desktop-live' snapshot is deleted.
$ virsh snapshot-list debian --tree
pkg-updated
  |
  +- apache
  +- nginx
  +- wordpress
Scenario 3: You want to delete all of the children of a specific snapshot while keeping the snapshot itself intact.
You want to delete all the children of the 'desktop-live' snapshot.
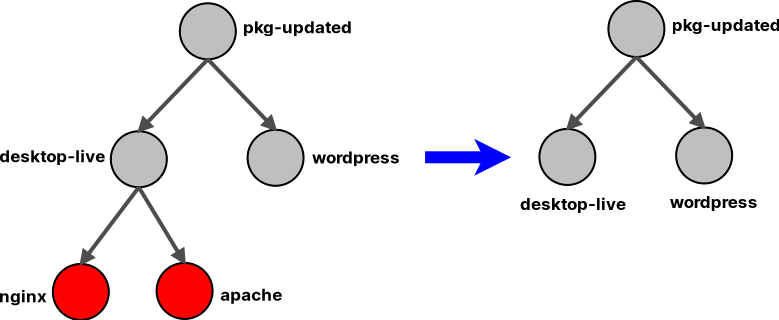
To delete all the children of the 'desktop-live' snapshot, use this command:
$ virsh snapshot-delete debian desktop-live --children-only
Domain snapshot desktop-live children deleted
All the children of the 'desktop-live' snapshot have now been deleted.
$ virsh snapshot-list debian --tree
pkg-updated
  |
  +- desktop-live
  +- wordpress
Scenario 4: You want to delete a snapshot and all its children.
You'd like to delete the 'desktop-live' snapshot and all its children.
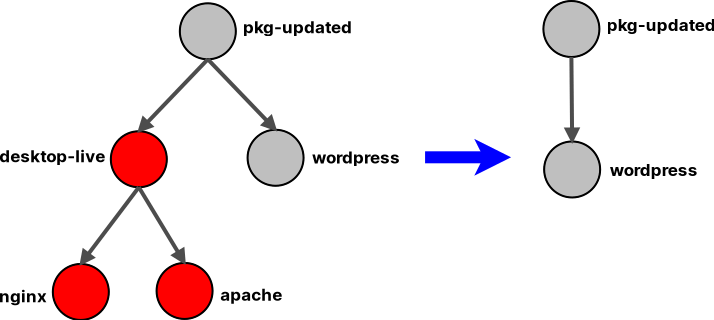
To delete the 'desktop-live' snapshot and all its children, use this command:
$ virsh snapshot-delete debian desktop-live --children
Domain snapshot desktop-live deleted
The 'desktop-live' snapshot and all of its children have been deleted.
$ virsh snapshot-list debian --tree
pkg-updated
  |
  +- wordpress
5. Backup VM with Snapshots
It is a good idea to back up the guest virtual machine and all of its snapshots in case you need them later.
I'll create a directory called 'VMBackup' in the user's home directory and copy all relevant files into it.
$ mkdir -vp ~/VMBackup/DebianTo back up a guest virtual machine with all snapshots, you must copy the main XML file, virtual disk image, and snapshot directory.
$ sudo cp -arv /etc/libvirt/qemu/debian.xml \
    /var/lib/libvirt/images/debian.qcow2 \
    /var/lib/libvirt/qemu/snapshot/debian \
    ~/VMBackup/Debian/
That is it.
If you want to restore the backup, just copy the files back into their original location.
$ sudo cp -av ~/VMBackup/Debian/debian.xml /etc/libvirt/qemu/
$ sudo cp -av ~/VMBackup/Debian/debian.qcow2 /var/lib/libvirt/images/
$ sudo cp -arv ~/VMBackup/Debian/debian /var/lib/libvirt/qemu/snapshot/
If you're using any Red Hat based distro as the host, you also need to restore SELinux security contexts.
$ sudo restorecon -RFv \
    /etc/libvirt/qemu/debian.xml \
    /var/lib/libvirt/images/debian.qcow2 \
    /var/lib/libvirt/qemu/snapshot/debian
And then restart the Libvirt daemon service.
For distributions with the modular libvirt daemon:
$ sudo systemctl restart virtqemud.serviceFor distributions with the monolithic libvirt daemon:
$ sudo systemctl restart libvirtd.serviceIf you want, you can also backup and restore using 'tar' with a compression algorithm of your choice to save space.
In this example, I will use 'tar' with 'zstd', which has some excellent compression ratio.
$ sudo tar -I 'zstd -19 -T0 --long=31' \
    -cvpSf ~/VMBackup/debian.tar.zst \
    /etc/libvirt/qemu/debian.xml \
    /var/lib/libvirt/images/debian.qcow2 \
    /var/lib/libvirt/qemu/snapshot/debian
Check the compressed file's contents by listing it.
$ sudo tar -I 'zstd -19 -T0 --long=31' -tf ~/VMBackup/debian.tar.zst
etc/libvirt/qemu/debian.xml
var/lib/libvirt/images/debian.qcow2
var/lib/libvirt/qemu/snapshot/debian/
var/lib/libvirt/qemu/snapshot/debian/nginx.xml
var/lib/libvirt/qemu/snapshot/debian/desktop-live.xml
var/lib/libvirt/qemu/snapshot/debian/apache.xml
var/lib/libvirt/qemu/snapshot/debian/pkg-updated.xml
var/lib/libvirt/qemu/snapshot/debian/wordpress.xml
And, to restore, run the following command.
$ sudo tar -I 'zstd -19 -T0 --long=31' -xvpSf ~/VMBackup/debian.tar.zst -C /Restore the SELinux security contexts and restart the libvirt daemon service.
That's it.