Install Fedora 36 with LUKS Full Disk Encryption + snapper + grub-btrfs

By

Updated on

, ,

98

Comments

Install Fedora 36 with LUKS Full Disk Encryption - Feature Image

In this post, I will show you how to install Fedora 36 with LUKS Full Disk Encryption (FDE) with snapper, and grub-btrfs, enabling you to do a full system rollback. In this setup, the /boot partition is included in the root file system, enabling you to make a full system rollback including kernels.

Encrypting your laptop or computer's drive with LUKS Full Disk Encryption protects the data on it even if the disk is physically removed from the system. To access the decrypted content on the device, you need to provide a passphrase or key file.

Apart from GNOME 42, another major change in Fedora 36 is the relocation of the RPM database from /var/lib/rpm to /usr/lib/sysimage/rpm. This is an important step towards full support for snapshot and rollback regimes, much like OpenSUSE Linux. Because the RPM database is now stored in /usr, the /usr may be rolled back as a unit without affecting /var. This will prevent any failed or undesired updates of the operating system.

Here's a quick rundown of what to anticipate.

  1. Install Fedora 36 Workstation with a LUKS encrypted BTRFS ‘root file system’ and a separate un-encrypted EXT4 /boot partition, as the Anaconda installer does not support encryption of the /boot partition.
  2. Move the contents of the /boot partition to the ‘root file system,’ and configure GRUB to boot from it.
  3. Remove the old /boot partition and merge the space it used into the main BTRFS volume.
  4. Configure the system to ask for the passphrase only once by providing the key file.
  5. Install and configure snapper to take snapshots of the root file system.
  6. Install and configure grub-btrfs so that you are able to boot from snapshots using the GRUB menu.
  7. Finally, test the 'snapper undochange' and 'snapper rollback' commands to make sure everything is working correctly.

If you prefer to install Fedora 36 without LUKS Full Disk Encryption, please visit my other article ‘How to Install Fedora 36 with Snapper and Grub-Btrfs‘.

So let’s begin.

Table of Contents

1. Disk Layout for Installing Fedora 36 Workstation

I'll be using an 80 GiB hard disk. Because the Fedora Anaconda installer does not allow encryption of the /boot partition, either separately or within the root file system, you must first create a non-encrypted /boot partition separately. This is how the disk partition appears at first.

NAME          SIZE   FSTYPE        LABEL   MOUNTPOINT
/dev/sda       80G                            
├─/dev/sda1   512M   vfat          EFI     /boot/efi
├─/dev/sda2    78G   btrfs(LUKS)   FEDORA  /            
└─/dev/sda3   1.5G   ext4          BOOT    /boot

Once the installation is finished, the /boot partition is moved to the root file system, and the final disk partition looks like this.

NAME          SIZE   FSTYPE        LABEL   MOUNTPOINT
/dev/sda       80G                            
├─/dev/sda1   512M   vfat          EFI     /boot/efi
└─/dev/sda2  79.5G   btrfs(LUKS)   FEDORA  /        

And these are the subvolumes created from the btrfs volume (/dev/sda2).

NAME         MOUNTPOINT     TYPE
[main]       /              mainvolume
home         /home          subvolume 
opt          /opt           subvolume 
tmp          /tmp           subvolume 
var          /var           subvolume 
usr-local    /usr/local     subvolume 
snapshots    /.snapshots    subvolume 

Subvolumes created to exclude directories from snapshots:

/home

Contains the user's data. It is excluded to avoid data loss on rollbacks.

/opt

Third-party products usually get installed here. It is excluded to avoid applications installed in /opt from being uninstalled during rollbacks.

/tmp

The directory contains temporary files that you do not need when taking a snapshot.

/var

This directory holds various variable data, such as logs, and temporary caches. It is also the default location for virtual machine images and databases. Therefore, this subvolume is created to exclude all of this variable data. Copy-On-Write will also be disabled on this directory.

/usr/local

Contains software that was manually installed. It is excluded to prevent these installations from being uninstalled during rollbacks.

2. Install Fedora 36 Workstation

Boot your system using the Fedora 36 Workstation installer in UEFI mode. On the welcome screen, select the Install to Hard Drive option. Next, select your LanguageKeyboard, and configure Time & Date. Following that, from the INSTALLATION SUMMARY screen, select Installation Destination.

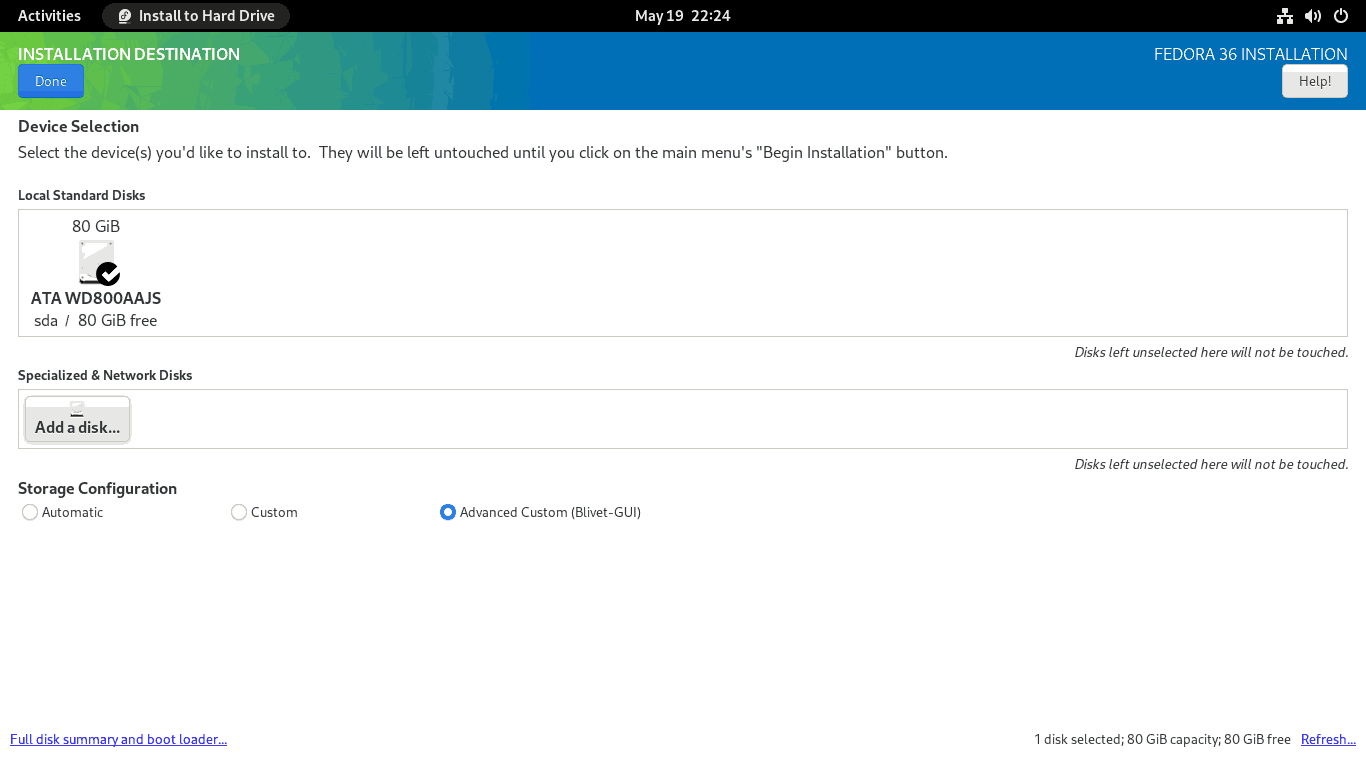
You should now be on the INSTALLATION DESTINATION screen. To proceed, pick the Advanced Custom (Blivet-GUI) radio button and then hit the Done button.

Install Fedora 36 with LUKS Full Disk Encryption - Blivet Screen

You will see the BLIVET GUI PARTITIONING screen. Here you will create partitions, file systems, and btrfs subvolumes necessary to install Fedora 36 Workstation.

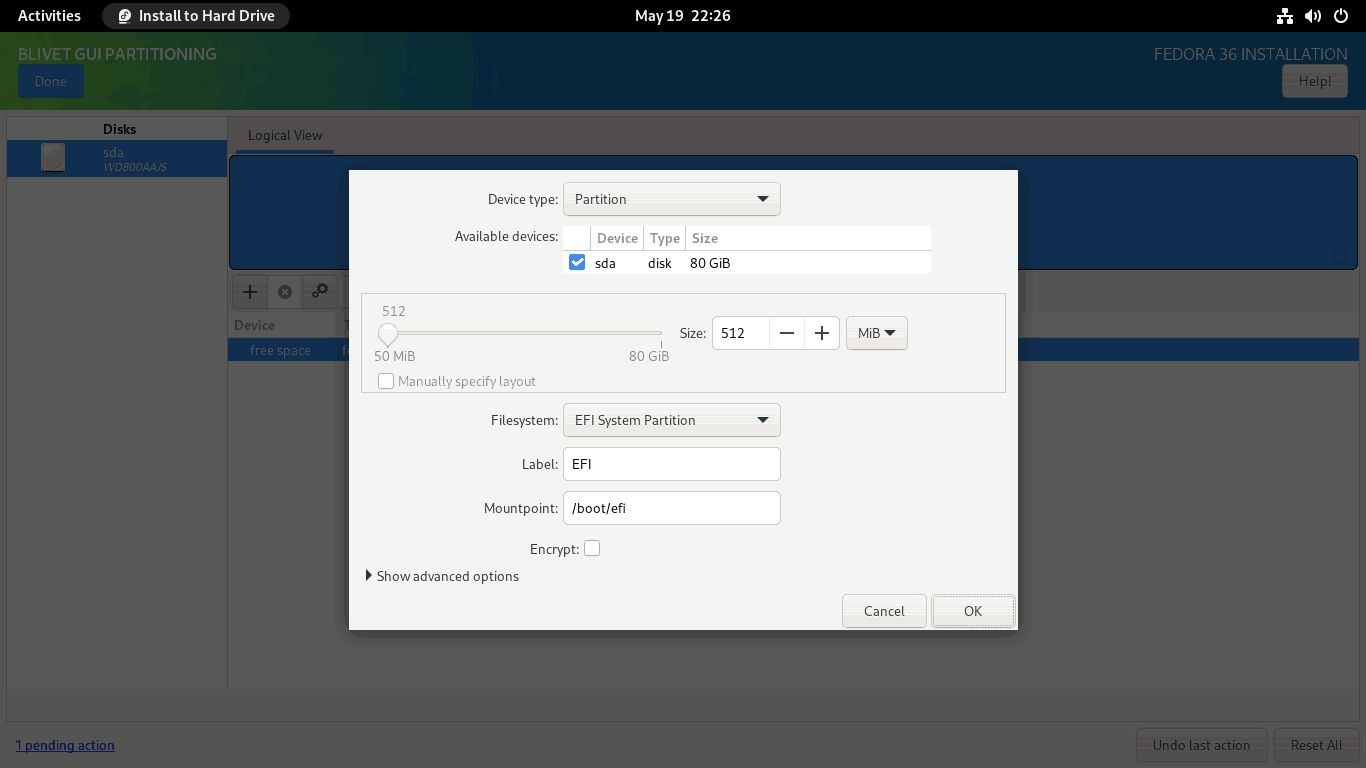
First, you need to create and mount the EFI partition. Select the free space and click the + sign to create a partition.

Install Fedora 36 with LUKS Full Disk Encryption - Blivet Partition

Set the partition Size to 512 MiB, the Filesystem to EFI System Partition, and the Mountpoint to /boot/efi.

Install Fedora 36 with LUKS Full Disk Encryption - EFI Partition

Then, you need to create a btrfs volume where you can create all the subvolumes needed to install Fedora Linux.

Select the free space again and click on the + sign to create a Btrfs volume. (1) Set the Device Type to Btrfs Volume(2) Set the Size of the Btrfs volume. At the end, leave at least 1 GiB for the /boot partition. I’ve left around 1.5 GiB unallocated. (3) Set the name for Btrfs volume. I named the Btrfs volume FEDORA, but you can name it whatever you like. (4) Set the Mountpoint to /, (5) Set the Encryption type to luks1, and (6) provide a strong password (password entropy > 60 bits is suggested). Finally, click on the OK button.

Install Fedora 36 with LUKS Full Disk Encryption - BTRFS Vol

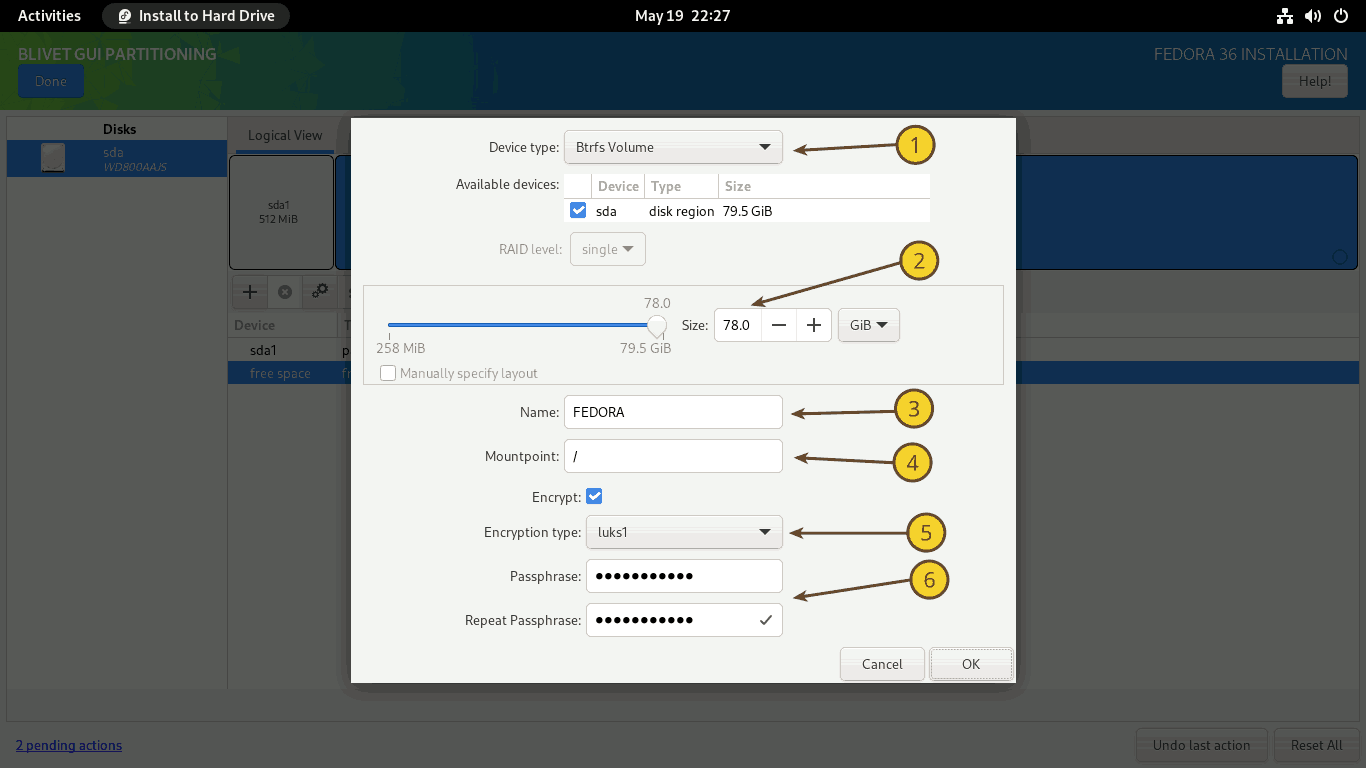
Since support for LUKS2 in GRUB 2.0.6 is limited (Argon2 is not yet supported, only the PBKDF2 is supported), it is recommended to use LUKS1 to encrypt the disk if the /boot directory is in the ‘root file system’ and not on a separate partition. Hopefully, in the next release of GRUB, support for /boot partition encryption using LUKS2 with Argon2i and Argon2id will be added.

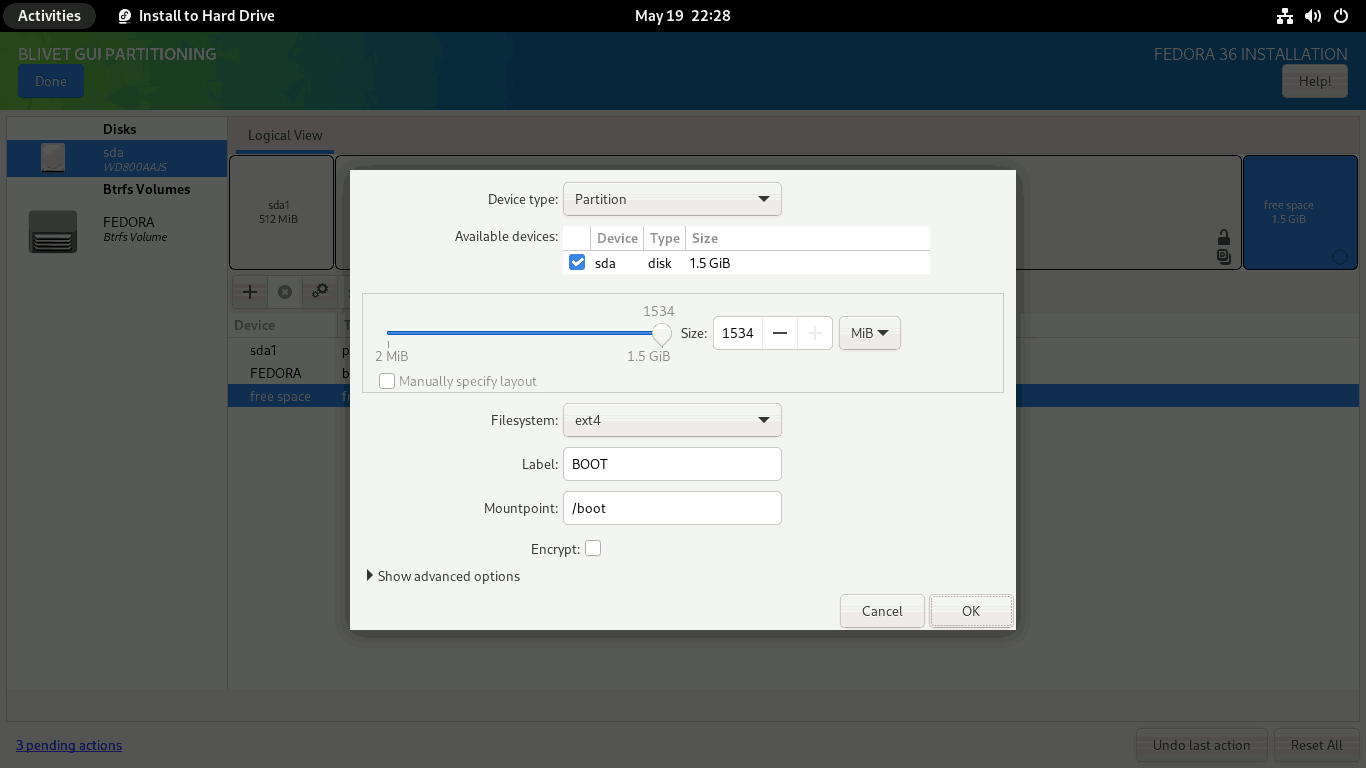
You then need to create and mount the /boot partition. Set the boot partition to use all of the remaining unallocated space (1534 MiB), the Filesystem to ext4, and the Mountpoint to /boot. After the installation is finished, I’ll move the contents of the /boot partition to the main root file system and merge this 1.5 GiB space with the main BTRFS volume.

Install Fedora 36 with LUKS Full Disk Encryption - BOOT Partition

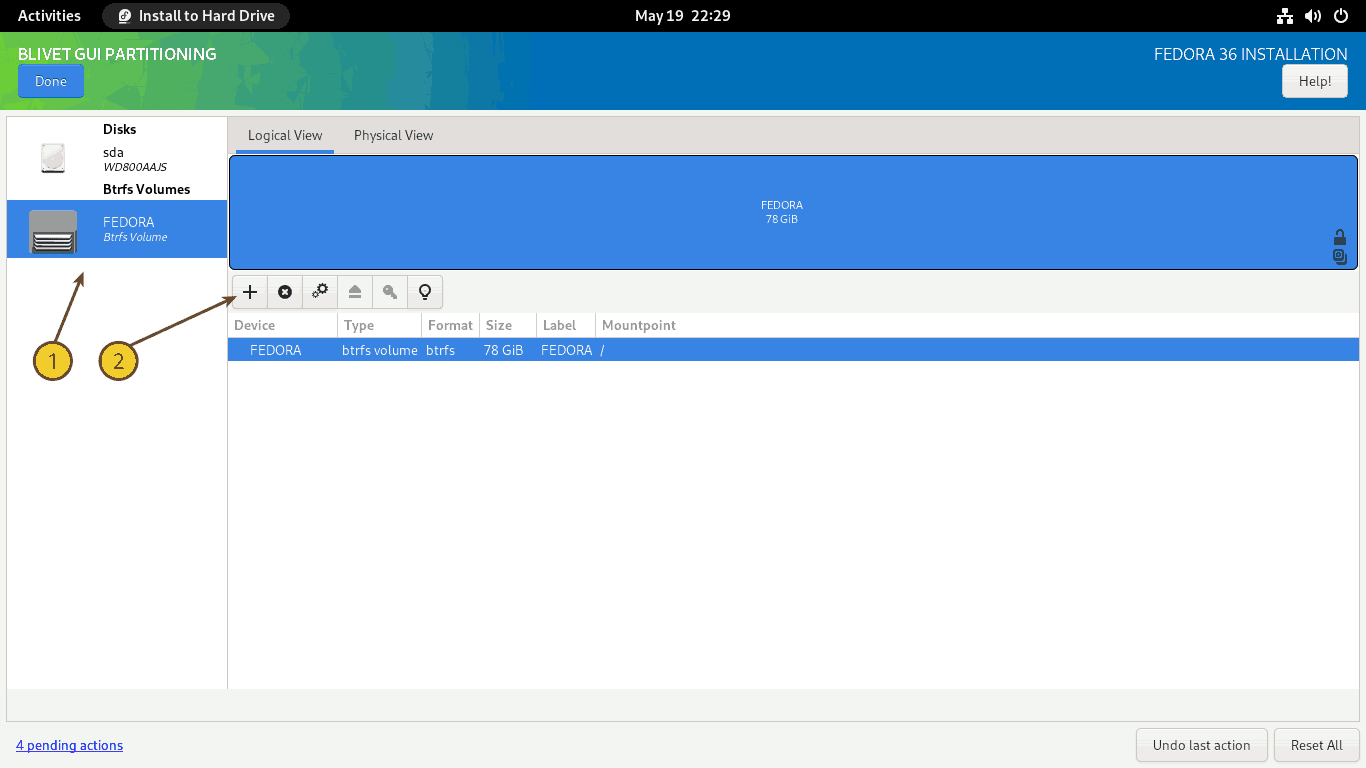
Next, you must create subvolumes. (1) Select the Btrfs Volume from the left panel, and (2) click on the + sign on the right panel.

Install Fedora 36 with LUKS Full Disk Encryption - Create Subvolumes

Subvolumes, unlike standard partitions or LVM logical volumes, do not have a size; instead, they behave like directories with shared space. However, the resemblance of subvolumes to directories ends here. Each subvolume, like a file system, has its own file tree, has its own POSIX namespace, and has its own pool of inodes. This means that hard links cannot be created between the subvolumes. From this point of view, a subvolume begins to look more like a separate file system. Subvolumes are not block devices either.

The Btrfs subvolumes are created in reverse order in the Anaconda installer for some reason. It means that the first specified subvolume is created last, and the last specified subvolume is created first. I will therefore specify the subvolumes in reverse order.

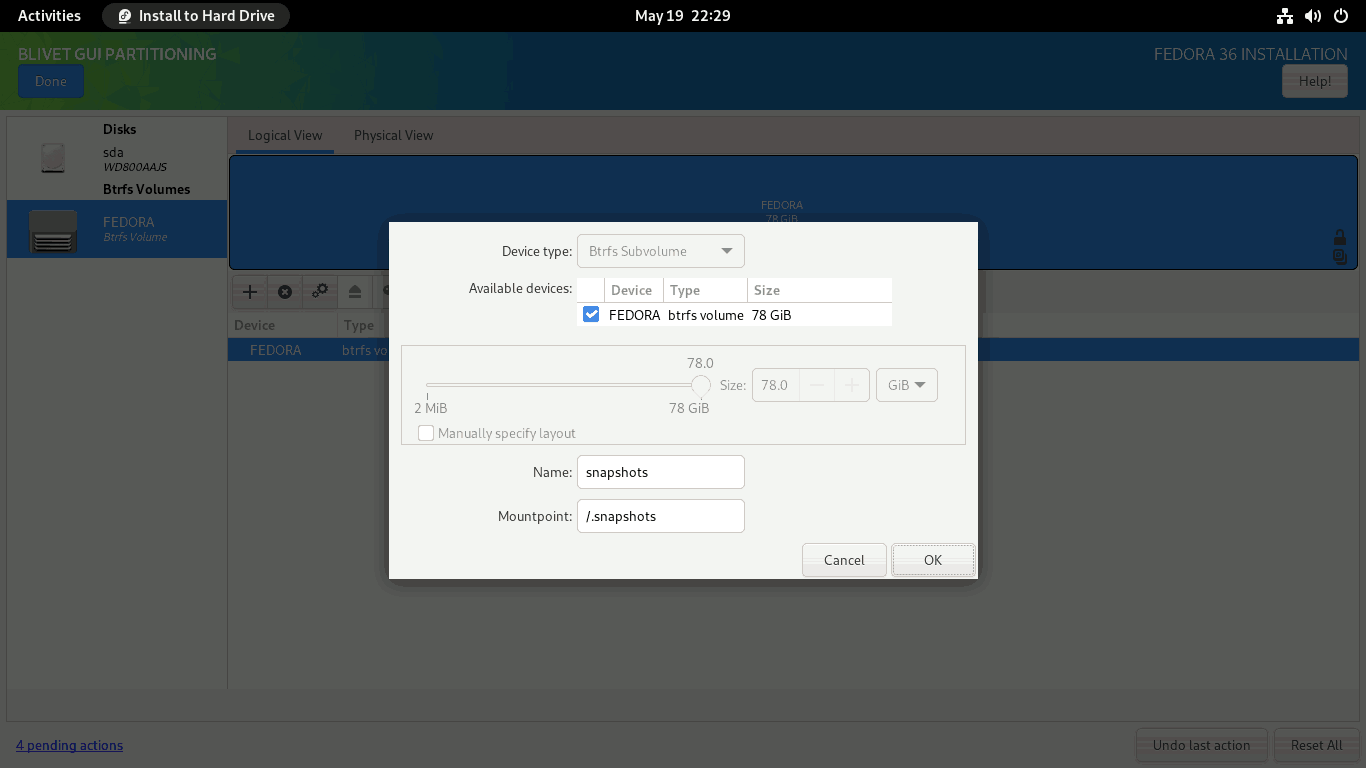
Create snapshots subvolume. Enter the Name as snapshots and Mountpoint as /.snapshots. Click OK to finish.

Install Fedora 36 with LUKS Full Disk Encryption - snapshots subvolume

Repeat the same process for the other subvolumes. I created other subvolumes in the following order: usr-local (/usr/local), var (/var), tmp (/tmp), opt (/opt), and lastly home (/home).

When completed, the subvolumes must look something like this. Click Done to create subvolumes.

Install Fedora 36 with LUKS Full Disk Encryption - Preview Subvolumes

As with the swap partition, Fedora generates a SwapOnZRAM upon startup, so no separate swap partition is needed.

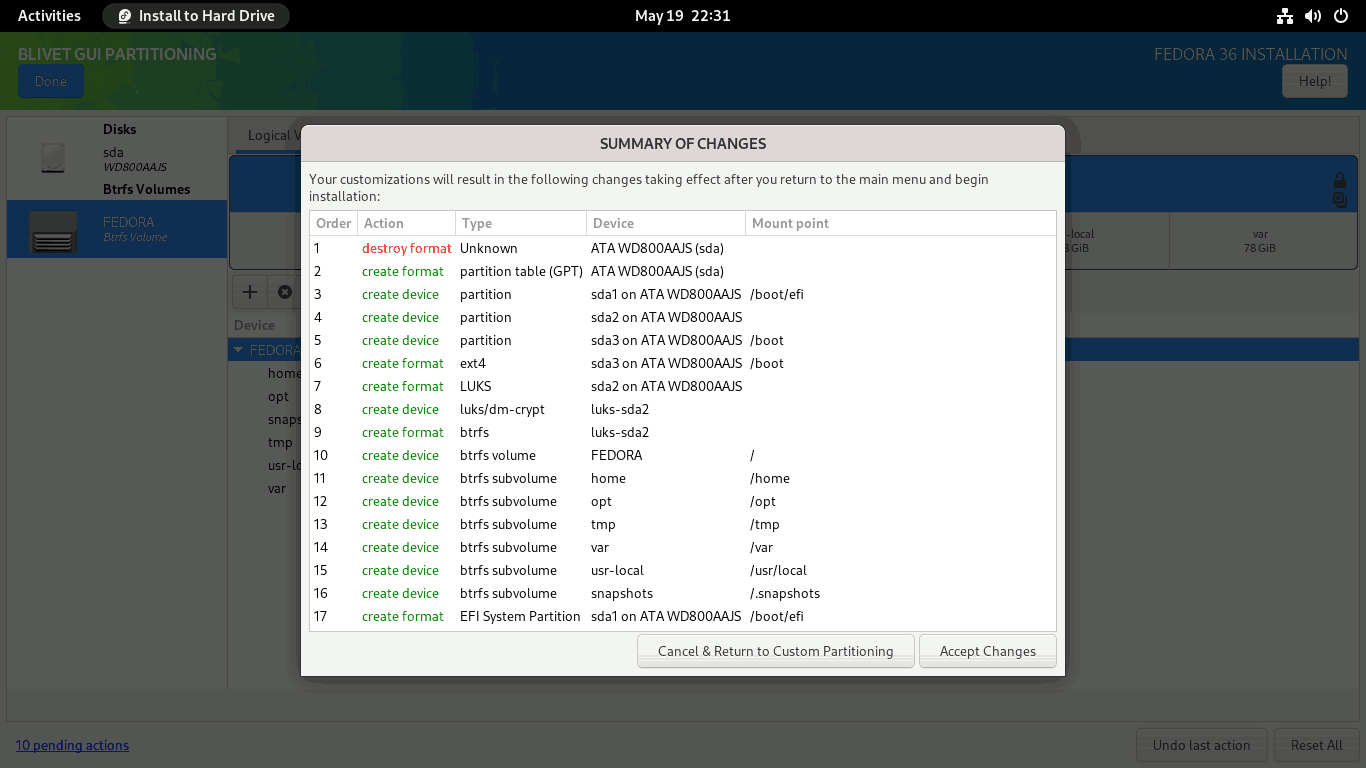
Verify that the partitions and subvolumes are properly defined on the SUMMARY OF CHANGES screen. To finalize the changes, click the Accept Changes button.

Install Fedora 36 with LUKS Full Disk Encryption - Confirm Subvolumes

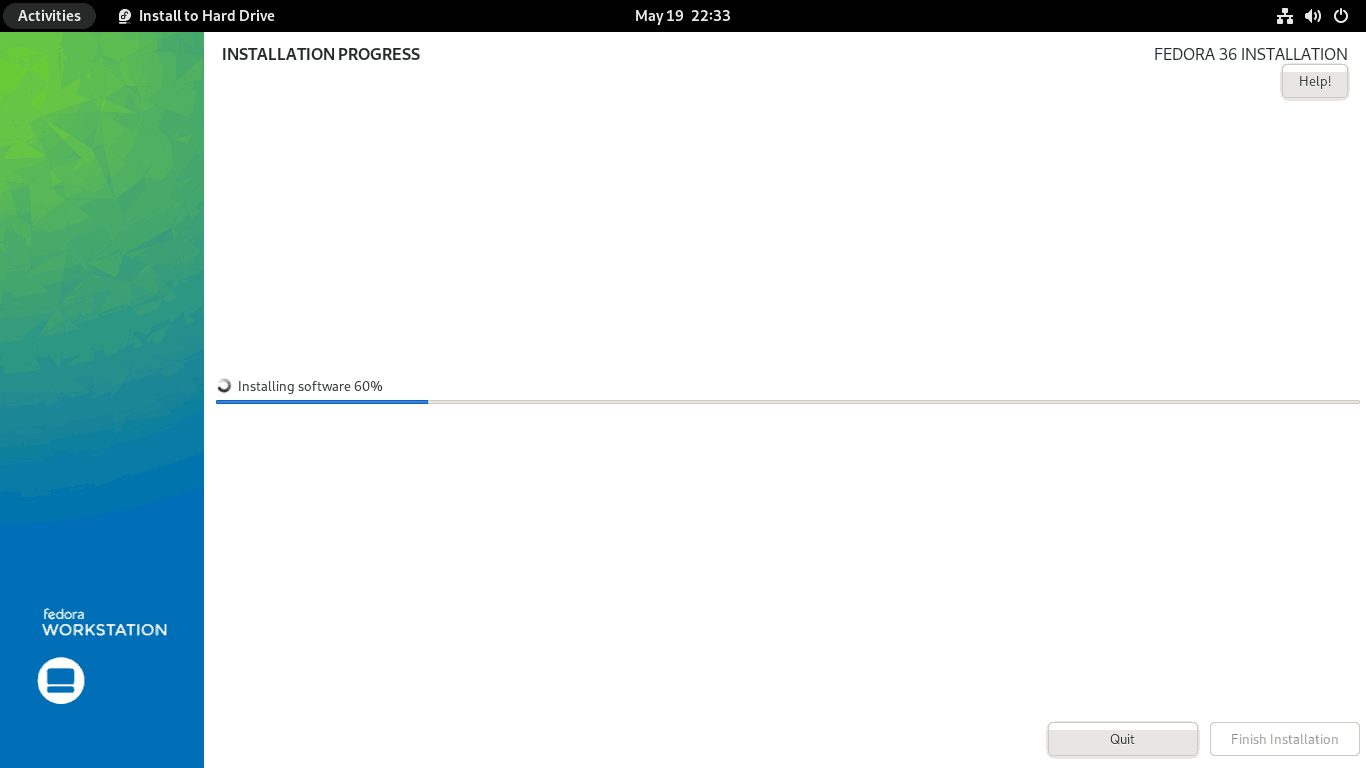
You will be returned to the INSTALLATION SUMMARY screen. Press the Begin Installation button to start the installation process. The installation process will start. Just sit back and relax.

Install Fedora 36 with LUKS Full Disk Encryption - Installation

When the installation is finished, click the Finish installation button and restart the system. After the computer restarts, you will be prompted for the LUKS passphrase.

Install Fedora 36 with LUKS Full Disk Encryption - LUKS1 passphrase

Enter the LUKS passphrase that you provided. The last phase of the installation procedure will start. Click the Start Setup button to complete the remaining customization steps, such as setting a new login, password, and so on.

You will then be logged into the Fedora 36 Workstation with the all-new Gnome 42 desktop interface.

Install Fedora 36 with LUKS Full Disk Encryption - GNOME42

Now, open the Gnome terminal and check your current setup.

List the subvolumes.

# btrfs subvolume list /
ID 256 gen 80 top level 5 path home
ID 257 gen 44 top level 5 path opt
ID 258 gen 80 top level 5 path tmp
ID 259 gen 80 top level 5 path var
ID 260 gen 70 top level 5 path usr-local
ID 261 gen 19 top level 5 path snapshots
ID 262 gen 77 top level 259 path var/lib/machines

Show the BTRFS filesystem.

# btrfs filesystem show /
Label: 'FEDORA'  uuid: e03e52c7-1d69-4f72-b674-5116352637a3
	Total devices 1 FS bytes used 6.57GiB
	devid    1 size 78.00GiB used 8.02GiB path /dev/mapper/luks-6bb9a37b-e6f3-4e21-aeb9-841891d3cd71

List block devices.

# lsblk -pf
NAME                                                      FSTYPE      FSVER LABEL  UUID                                 FSAVAIL FSUSE% MOUNTPOINTS
/dev/sda                                                                                                                               
├─/dev/sda1                                               vfat        FAT32 EFI    818A-7CD7                             497.1M     3% /boot/efi
├─/dev/sda2                                               crypto_LUKS 1            6bb9a37b-e6f3-4e21-aeb9-841891d3cd71                
│ └─/dev/mapper/luks-6bb9a37b-e6f3-4e21-aeb9-841891d3cd71 btrfs             FEDORA e03e52c7-1d69-4f72-b674-5116352637a3   70.6G     8% /var
│                                                                                                                                      /usr/local
│                                                                                                                                      /tmp
│                                                                                                                                      /.snapshots
│                                                                                                                                      /opt
│                                                                                                                                      /home
│                                                                                                                                      /
└─/dev/sda3                                               ext4        1.0   BOOT   2ecae8c7-8cd4-48e9-9faa-dc48d590fbbc    1.2G    10% /boot
/dev/zram0                                                                                                                             [SWAP]

Review /etc/fstab file.

# cat /etc/fstab
UUID=e03e52c7-1d69-4f72-b674-5116352637a3  /            btrfs  defaults,x-systemd.device-timeout=0 0 0 
UUID=e03e52c7-1d69-4f72-b674-5116352637a3  /.snapshots  btrfs  subvol=snapshots,compress=zstd:1,x-systemd.device-timeout=0 0 0 
UUID=2ecae8c7-8cd4-48e9-9faa-dc48d590fbbc  /boot        ext4   defaults        1 2 
UUID=818A-7CD7                             /boot/efi    vfat   umask=0077,shortname=winnt 0 2 
UUID=e03e52c7-1d69-4f72-b674-5116352637a3  /home        btrfs  subvol=home,compress=zstd:1,x-systemd.device-timeout=0 0 0 
UUID=e03e52c7-1d69-4f72-b674-5116352637a3  /opt         btrfs  subvol=opt,compress=zstd:1,x-systemd.device-timeout=0 0 0 
UUID=e03e52c7-1d69-4f72-b674-5116352637a3  /tmp         btrfs  subvol=tmp,compress=zstd:1,x-systemd.device-timeout=0 0 0 
UUID=e03e52c7-1d69-4f72-b674-5116352637a3  /usr/local   btrfs  subvol=usr-local,compress=zstd:1,x-systemd.device-timeout=0 0 0 
UUID=e03e52c7-1d69-4f72-b674-5116352637a3  /var         btrfs  subvol=var,compress=zstd:1,x-systemd.device-timeout=0 0 0 

Review the device LUKS encryption details.

# cryptsetup luksDump /dev/sda2
LUKS header information for /dev/sda2

Version:       	1
Cipher name:   	aes
Cipher mode:   	xts-plain64
Hash spec:     	sha256
Payload offset:	4096
MK bits:       	512
MK digest:     	77 ea cc 07 89 01 a1 11 be 48 a8 4f b3 50 c4 6a b6 c0 bf 80 
MK salt:       	62 39 cf ea 60 73 48 0d 9a 8e 95 7b b3 85 f9 71 
               	d2 fb 9b e7 27 24 51 41 77 56 07 97 1e bf 70 22 
MK iterations: 	86118
UUID:          	6bb9a37b-e6f3-4e21-aeb9-841891d3cd71

Key Slot 0: ENABLED
	Iterations:         	1376082
	Salt:               	e1 b3 30 fb 23 b9 fa e5 a4 c4 4b b1 7e e6 f1 67 
	                      	36 8d d0 51 a0 49 7a d2 5d 7d 81 02 11 36 42 f7 
	Key material offset:	8
	AF stripes:            	4000
Key Slot 1: DISABLED
Key Slot 2: DISABLED
Key Slot 3: DISABLED
Key Slot 4: DISABLED
Key Slot 5: DISABLED
Key Slot 6: DISABLED
Key Slot 7: DISABLED

Because of the Copy-On-Write feature of BTRFS, the performance of qcow2 images and databases suffers when they are on a BTRFS subvolume. Therefore, you need to disable the Copy-On-Write function on the /var directory.

# chattr -R -f +C /var

# lsattr -d /var
---------------C------ /var

3. Move the /boot to the 'root file system'

Now that the installation is complete, transfer the contents of the /boot partition to the 'root file system', and configure GRUB to boot from it.

Unmount the /boot mount recursively.

# umount -vR /boot
umount: /boot/efi unmounted
umount: /boot unmounted

Now mount the /dev/sda3 device into the /mnt directory temporarily.

# mount -v /dev/sda3 /mnt
mount: /dev/sda3 mounted on /mnt.

Copy all boot files from /mnt to the /boot directory.

# cp -arv /mnt/. /boot

Unmount the /dev/sda3 partition from /mnt and delete its entry from the /etc/fstab file. You no longer need the /dev/sda3 partition.

# umount -v /mnt
# sed -i.original '/\/boot.*ext4/d' /etc/fstab
# systemctl daemon-reload
# mount -a

Restore the SELinux labels.

# restorecon -RFv /boot

Enable the CRYPTODISK option in GRUB. When enabled, it will check the encrypted disks and generate the additional commands needed to access them during boot.

# echo "GRUB_ENABLE_CRYPTODISK=y" >> /etc/default/grub
# grub2-mkconfig -o /boot/grub2/grub.cfg

The kernel and initrd paths are configured to look in the parent directory of the previous /boot partition (/dev/sda3). This must be changed to the /boot directory in the ‘root file system’ (/dev/sda2).

# grubby --info=DEFAULT
index=0
kernel="/vmlinuz-5.17.5-300.fc36.x86_64"
args="ro rd.luks.uuid=luks-6bb9a37b-e6f3-4e21-aeb9-841891d3cd71 rhgb quiet"
root="UUID=e03e52c7-1d69-4f72-b674-5116352637a3"
initrd="/initramfs-5.17.5-300.fc36.x86_64.img"
title="Fedora Linux (5.17.5-300.fc36.x86_64) 36 (Workstation Edition)"
id="aa65c3ac5d924efba3b0301f2a0cd167-5.17.5-300.fc36.x86_64"

To do this, first, remove the old Boot Loader Specification (BLS) configuration files.

# rm /boot/loader/entries/*.conf

Then recreate the BLS config file by adding the kernel image.

# kernel-install -v add $(uname -r) /lib/modules/$(uname -r)/vmlinuz

Examine the newly created BLS configuration files. The ‘/boot‘ directory should be added to the kernel and initrd lines.

# grubby --info=DEFAULT
index=0
kernel="/boot/vmlinuz-5.17.5-300.fc36.x86_64"
args="ro rd.luks.uuid=luks-6bb9a37b-e6f3-4e21-aeb9-841891d3cd71 rhgb quiet"
root="UUID=e03e52c7-1d69-4f72-b674-5116352637a3"
initrd="/boot/initramfs-5.17.5-300.fc36.x86_64.img"
title="Fedora Linux (5.17.5-300.fc36.x86_64) 36 (Workstation Edition)"
id="aa65c3ac5d924efba3b0301f2a0cd167-5.17.5-300.fc36.x86_64"

As CRYPTODISK is now enabled, you must make changes to /boot/efi/EFI/fedora/grub.cfg file as well.

Setup access to the encrypted boot device.

# CRYPTOUUID="$(grub2-probe --target=cryptodisk_uuid /)"
# sed -i.backup1 "1i cryptomount -u $CRYPTOUUID" /boot/efi/EFI/fedora/grub.cfg

Replace the old /dev/sda3 device UUID with a LUKS encrypted device UUID where the root file system is mounted.

# OLDBOOTUUID="$(lsblk -dno uuid /dev/sda3)"
# NEWLUKSUUID="$(lsblk -dno uuid /dev/mapper/luks-$(cryptsetup luksUUID /dev/sda2))"
# sed -i.backup2 "s/$OLDBOOTUUID/$NEWLUKSUUID/" /boot/efi/EFI/fedora/grub.cfg

Finally, add /boot to the grub2 path.

# sed -i.backup3 's#($dev)/grub2#($dev)/boot/grub2#' /boot/efi/EFI/fedora/grub.cfg

In the end, your /boot/efi/EFI/fedora/grub.cfg file should look like this.

# cat /boot/efi/EFI/fedora/grub.cfg
cryptomount -u 6bb9a37be6f34e21aeb9841891d3cd71
search --no-floppy --fs-uuid --set=dev e03e52c7-1d69-4f72-b674-5116352637a3
set prefix=($dev)/boot/grub2
export $prefix
configfile $prefix/grub.cfg

The changes are as follows.

  1. Setup access to the encrypted boot device. The UUID here is of the /dev/sda2 partition without dashes.
  2. Change the UUID to the mapped LUKS1 device that contains the root file system.
  3. Insert the '/boot' directory into the ‘set prefix‘ line.

Reboot the computer now to ensure that everything is working correctly. You will be prompted for the passphrase twice. The first time is before loading GRUB, and the second time is before mounting the root file system. Depending on your computer's CPU, it may take up to 30 seconds for the GRUB to display the second passphrase prompt. So please be patient.

4. Delete the /dev/sda3 Partition and Reclaim the Space

You no longer need the /dev/sda3 partition since you moved the boot files to the /boot directory in the root file system. As a result, you may safely delete the /dev/sda3 partition from the partition table and move the 1.5 GiB it occupies to the BTRFS volume (/dev/sda2).

Run the gdisk utility.

# gdisk /dev/sda

On the command input prompt, enter the key p to print the partition table.

Command (? for help): p
Disk /dev/sda: 167772160 sectors, 80.0 GiB
Model: WD800AAJS       
Sector size (logical/physical): 512/512 bytes
Disk identifier (GUID): 748465AC-93DB-4F42-B799-499466E5D0C5
Partition table holds up to 128 entries
Main partition table begins at sector 2 and ends at sector 33
First usable sector is 34, last usable sector is 167772126
Partitions will be aligned on 2048-sector boundaries
Total free space is 4029 sectors (2.0 MiB)

Number  Start (sector)    End (sector)  Size       Code  Name
   1            2048         1050623   512.0 MiB   EF00  EFI System Partition
   2         1050624       164628479   78.0 GiB    8300  
   3       164628480       167770111   1.5 GiB     8300  

Delete partition #3 (/dev/sda3) by pressing the key d and then the number 3.

Command (? for help): d
Partition number (1-3): 3

Command (? for help): p
Disk /dev/sda: 167772160 sectors, 80.0 GiB
Model: WD800AAJS       
Sector size (logical/physical): 512/512 bytes
Disk identifier (GUID): 748465AC-93DB-4F42-B799-499466E5D0C5
Partition table holds up to 128 entries
Main partition table begins at sector 2 and ends at sector 33
First usable sector is 34, last usable sector is 167772126
Partitions will be aligned on 2048-sector boundaries
Total free space is 3145661 sectors (1.5 GiB)

Number  Start (sector)    End (sector)  Size       Code  Name
   1            2048         1050623   512.0 MiB   EF00  EFI System Partition
   2         1050624       164628479   78.0 GiB    8300  

Then, delete partition #2 (/dev/sda2) as well by pressing the key d and then the number 2. Don’t worry, until you permanently write the modifications, the data will not be lost.

Command (? for help): d
Partition number (1-2): 2

Command (? for help): p
Disk /dev/sda: 167772160 sectors, 80.0 GiB
Model: WD800AAJS       
Sector size (logical/physical): 512/512 bytes
Disk identifier (GUID): 748465AC-93DB-4F42-B799-499466E5D0C5
Partition table holds up to 128 entries
Main partition table begins at sector 2 and ends at sector 33
First usable sector is 34, last usable sector is 167772126
Partitions will be aligned on 2048-sector boundaries
Total free space is 166723517 sectors (79.5 GiB)

Number  Start (sector)    End (sector)  Size       Code  Name
   1            2048         1050623   512.0 MiB   EF00  EFI System Partition

Now, create a new partition by pressing the key n. Choose the entire disc space by pressing the [Enter] key four times. Don’t input any values; instead, let it use the defaults. Your data will remain intact with the new expanded size.

Command (? for help): n
Partition number (2-128, default 2): 
First sector (34-167772126, default = 1050624) or {+-}size{KMGTP}: 
Last sector (1050624-167772126, default = 167772126) or {+-}size{KMGTP}: 
Current type is 8300 (Linux filesystem)
Hex code or GUID (L to show codes, Enter = 8300): 
Changed type of partition to 'Linux filesystem'

Command (? for help): p
Disk /dev/sda: 167772160 sectors, 80.0 GiB
Model: WD800AAJS       
Sector size (logical/physical): 512/512 bytes
Disk identifier (GUID): 748465AC-93DB-4F42-B799-499466E5D0C5
Partition table holds up to 128 entries
Main partition table begins at sector 2 and ends at sector 33
First usable sector is 34, last usable sector is 167772126
Partitions will be aligned on 2048-sector boundaries
Total free space is 2014 sectors (1007.0 KiB)

Number  Start (sector)    End (sector)  Size       Code  Name
   1            2048         1050623   512.0 MiB   EF00  EFI System Partition
   2         1050624       167772126   79.5 GiB    8300  Linux filesystem

Finally, hit the w key to permanently save the table to disk and quit.

Command (? for help): w

Final checks complete. About to write GPT data. THIS WILL OVERWRITE EXISTING
PARTITIONS!!

Do you want to proceed? (Y/N): y
OK; writing new GUID partition table (GPT) to /dev/sda.
Warning: The kernel is still using the old partition table.
The new table will be used at the next reboot or after you
run partprobe(8) or kpartx(8)
The operation has completed successfully.

For the changes to take effect, restart the system. After restarting the system, use the following command to reclaim all available space on the BTRFS volume.

# btrfs filesystem resize max /

Now check the space used up by the BTRFS volume.

# btrfs filesystem show /
Label: 'FEDORA'  uuid: e03e52c7-1d69-4f72-b674-5116352637a3
	Total devices 1 FS bytes used 6.69GiB
	devid    1 size 79.50GiB used 8.02GiB path /dev/mapper/luks-6bb9a37b-e6f3-4e21-aeb9-841891d3cd71

List block devices to verify whether the /dev/sda3 partition has actually been removed.

# lsblk -p /dev/sda
NAME                                                      MAJ:MIN RM  SIZE RO TYPE  MOUNTPOINTS
/dev/sda                                                    8:0    0   80G  0 disk  
├─/dev/sda1                                                 8:1    0  512M  0 part  /boot/efi
└─/dev/sda2                                                 8:2    0 79.5G  0 part  
  └─/dev/mapper/luks-6bb9a37b-e6f3-4e21-aeb9-841891d3cd71 253:0    0 79.5G  0 crypt /var
                                                                                    /usr/local
                                                                                    /tmp
                                                                                    /opt
                                                                                    /home
                                                                                    /.snapshots
                                                                                    /

5. Bypass the Additional Passphrase Prompt

While GRUB asks for a passphrase to unlock the encrypted /boot files, this information is not passed on to initramfs. As a result, during the initramfs stage, the root (/) must be unlocked once again. This means that either the user must input his passphrase twice, or the initramfs image itself must include a file with the root partition’s passphrase.

Because the initramfs image will be in the /boot directory of the encrypted root partition (/), the passphrase will be secure when the data is at rest. However, once the data is online, it must be safeguarded by making it read-only for the root user.

So let’s create a key file so that the passphrase is only asked once.

Create /etc/cryptsetup-keys.d directory if it is not already there.

# mkdir /etc/cryptsetup-keys.d

Create a key file with 4KiB of random data. The key file has to be in volume.key format.

# dd if=/dev/random \
    of=/etc/cryptsetup-keys.d/luks-$(cryptsetup luksUUID /dev/sda2).key \
    bs=512 count=8

Ensure that only the root user has read access to the key file.

# chmod 0400 /etc/cryptsetup-keys.d/*.key

Attach the created key to the encrypted device’s available key slot. When prompted for a passphrase, enter the normal LUKS passphrase.

# cryptsetup luksAddKey /dev/sda2 \
    /etc/cryptsetup-keys.d/luks-$(cryptsetup luksUUID /dev/sda2).key

Include the key in the initramfs image as well. To do so, open (or create) the /etc/dracut.conf.d/cryptodisk.conf file.

# vim /etc/dracut.conf.d/cryptodisk.conf

And add the following line.

install_items+=" /etc/cryptsetup-keys.d/* "

Finally, rebuild the initramfs image.

# dracut -vf

Reboot the computer and verify that everything is operating correctly. The LUKS passphrase should only be asked once.

6. Install and Configure snapper for the 'root file system'

Install snapper and the optional package python3-dnf-plugin-snapper. The python3-dnf-plugin-snapper package allows you to generate pre and post snapshots every time you install a package on the system with the dnf command-line tool.

$ sudo dnf install snapper python3-dnf-plugin-snapper

Then you must create a new snapper configuration for the BTRFS volume at '/'. Because you previously created a snapshots subvolume with ID=5 in the /.snapshots directory during Fedora installation, attempting to create a new snapper configuration for '/' now will result in an error. To work around this issue, make the following adjustments before creating a new snapper configuration for the '/'.

Remove the directory /.snapshots.

$ sudo umount /.snapshots
$ sudo rmdir /.snapshots

Now, create a new snapper configuration named root for the BTRFS volume at /.

$ sudo snapper -c root create-config /

This will create a configuration file at /etc/snapper/configs/root, a new subvolume .snapshots, and the directory /.snapshots.

Now that the snapper is configured, delete the /.snapshots subvolume.

$ sudo btrfs subvolume delete /.snapshots

This will remove the newly created subvolume .snapshots and directory /.snapshots, but the configuration file at /etc/snapper/configs/root will be kept.

Create the directory /.snapshots again.

$ sudo mkdir /.snapshots

As you have already linked the /.snapshots directory to the snapshots subvolume in the /etc/fstab file, all you have to do now is reload it.

$ sudo systemctl daemon-reload
$ sudo mount -a

Enable snapshot booting by appending the SUSE_BTRFS_SNAPSHOT_BOOTING="true" option to the /etc/default/grub file.

$ echo 'SUSE_BTRFS_SNAPSHOT_BOOTING="true"' | sudo tee -a /etc/default/grub

Update the grub.cfg file.

$ sudo grub2-mkconfig -o /boot/grub2/grub.cfg

Because snapshot booting is now enabled, you must make modifications to the /boot/efi/EFI/fedora/grub.cfg file as well.

$ sudo sed -i '1i set btrfs_relative_path="yes"' /boot/efi/EFI/fedora/grub.cfg

You’re almost done; all that’s left is for the normal user to be able to list snapshots. Add your username to snapper's root config.

$ sudo snapper -c root set-config ALLOW_USERS=$USER SYNC_ACL=yes

And change the group permission of the /.snapshots directory.

$ sudo chown -R :$USER /.snapshots

Finally, disable the GRUB menu auto-hide feature. When Fedora is the only operating system installed on the system, Fedora implements a feature called ‘Hidden Grub Menu‘. The goal is to keep the interface as simple as possible, providing information only when it is necessary. However, you need to visually see the GRUB menu to verify whether the rollback is executed correctly.

This feature can be disabled by doing the following.

$ sudo grub2-editenv - list
saved_entry=aa65c3ac5d924efba3b0301f2a0cd167-5.17.5-300.fc36.x86_64
menu_auto_hide=1
boot_success=1
boot_indeterminate=0

$ sudo grub2-editenv - unset menu_auto_hide

The snapper configuration is now complete. Now list the snapshots.

$ snapper ls
 # | Type   | Pre # | Date | User | Cleanup | Description | Userdata
---+--------+-------+------+------+---------+-------------+---------
0  | single |       |      | root |         | current     |         

At this stage, you do not have any snapshots, we will create some later.

7. Setup Snapshot Booting from the GRUB Menu

As you have already installed snapper on your system, you can rollback to any snapshot by executing snapper rollback from the functioning system.

But what if you make a mistake and the system fails to boot properly the following time? You might wish to revert to a previous working snapshot. This is where snapshot booting from the GRUB menu comes in handy.

Thanks to Antynea, there is already a package called grub-btrfs, which you can now easily install on your system. The package adds "Fedora Linux snapshots" to the GRUB menu and allows you to boot to a snapshot in read-only mode to test it before rolling back to it in read-write mode.

So let's get grub-btrfs installed.

$ git clone https://github.com/Antynea/grub-btrfs.git
$ cd grub-btrfs
$ sudo make install

To make it work with Fedora, you must make a few adjustments to the grub-btrfs config file. So, open the config file and uncheck the lines listed below. Also, the path to grub2-mkconfig is /usr/sbin/grub2-mkconfig, not /usr/bin/grub2-mkconfig.

$ sudo vim /etc/default/grub-btrfs/config
...
GRUB_BTRFS_SHOW_TOTAL_SNAPSHOTS_FOUND="true"
GRUB_BTRFS_GRUB_DIRNAME="/boot/grub2"
GRUB_BTRFS_MKCONFIG=/usr/sbin/grub2-mkconfig
GRUB_BTRFS_SCRIPT_CHECK=grub2-script-check
...

Update the grub.cfg file. You will receive the 'No snapshots found' error since you have not yet created any snapshots, but don't worry, it will function properly after you do.

$ sudo grub2-mkconfig -o /boot/grub2/grub.cfg

Finally, enable the grub-btrfsd service.

$ sudo systemctl enable --now grub-btrfsd

Your grub-btrfs setup is now complete.

8. Create Snapshots and Test the Undochange and Rollback Features

I'll do two tests here. I'll start by installing a package, then run the snapper undochange command to ensure that all modifications have been undone. Second, I will upgrade to the most current kernel, boot into it, purposely render the system unusable, and then attempt to rollback to the same kernel using the snapper rollback command using the post snapshot of the kernel update in an operational state.

Test 1: Install a package and undo it.

I'm going to install a little package called ps_mem here for testing purposes. I'll inspect the system after it's been installed to see what changes have been done. Then I'll try to undo the changes and see if I can get the system back to where it was before I installed it.

Install the ps_mem package. It displays the core memory used per program (not per process).

$ sudo dnf install ps_mem

Run the ps_mem program.

$ sudo ps_mem
 Private  +   Shared  =  RAM used	Program
144.0 KiB +  23.5 KiB = 167.5 KiB	fusermount
288.0 KiB +  25.0 KiB = 313.0 KiB	mcelog
388.0 KiB +  78.5 KiB = 466.5 KiB	rtkit-daemon
492.0 KiB + 117.0 KiB = 609.0 KiB	gnome-session-ctl
....
....
 29.4 MiB +   6.9 MiB =  36.2 MiB	systemd-journald
 44.0 MiB +   8.0 MiB =  52.0 MiB	gnome-software
191.3 MiB +   1.7 MiB = 193.0 MiB	packagekitd
190.7 MiB +  27.6 MiB = 218.3 MiB	gnome-shell
---------------------------------
                          1.0 GiB
=================================

OK, the ps_mem package has been installed successfully. Check the snapper for snapshots.

$ snapper ls
 # | Type   | Pre # | Date                             | User | Cleanup | Description                 | Userdata
---+--------+-------+----------------------------------+------+---------+-----------------------------+---------
0  | single |       |                                  | root |         | current                     |         
1  | pre    |       | Saturday 21 May 2022 11:47:50 AM | root | number  | /usr/bin/dnf install ps_mem |         
2  | post   |     1 | Saturday 21 May 2022 11:47:55 AM | root | number  | /usr/bin/dnf install ps_mem |

As you can see, the pre (#1) and the post (#2) snapshots have been created for the ps_mem package.

Let me now examine the changes it has made to the system, between snapshots #1 and #2.

$ snapper status 1..2
+..... /boot/grub2/grub.cfg.new
+..... /usr/bin/ps_mem
c..... /usr/lib/sysimage/rpm/rpmdb.sqlite-shm
c..... /usr/lib/sysimage/rpm/rpmdb.sqlite-wal
+..... /usr/share/doc/ps_mem
+..... /usr/share/doc/ps_mem/LICENSE
+..... /usr/share/man/man1/ps_mem.1.gz

Now I’ll undo the changes.

$ sudo snapper undochange 1..2
create:0 modify:2 delete:5

Check to see if the package ps_mem was indeed removed.

$ sudo ps_mem
sudo: ps_mem: command not found

Cool! The undo has been successful. But, because I want to keep the package ps_mem, I’ll undo the changes once again. This time from snapshot #2 to snapshot #1.

$ sudo snapper undochange 2..1
create:5 modify:2 delete:0

$ which ps_mem
/usr/bin/ps_mem

Test 2: Update the kernel and do a rollback.

In this rollback test, I'll update to the most latest kernel available at the time of writing. Then I'll boot into it and delete all of the kernel and initrd files, causing the system to fail the next time it boots. Then I'll check if I can recover the system by rolling back to the post snapshot of the kernel update and save the day.

Check the current kernel version.

$ uname -r
5.17.5-300.fc36.x86_64

Now update to the latest kernel.

$ sudo dnf -y update kernel

After the kernel update is finished, restart the system and check the kernel version.

$ uname -r
5.17.8-300.fc36.x86_64

Also, check the snapper for pre (#3) and post (#4) kernel update snapshots.

$ snapper ls
 # | Type   | Pre # | Date                             | User | Cleanup | Description                   | Userdata
---+--------+-------+----------------------------------+------+---------+-------------------------------+---------
0  | single |       |                                  | root |         | current                       |         
1  | pre    |       | Saturday 21 May 2022 11:47:50 AM | root | number  | /usr/bin/dnf install ps_mem   |         
2  | post   |     1 | Saturday 21 May 2022 11:47:55 AM | root | number  | /usr/bin/dnf install ps_mem   |         
3  | pre    |       | Saturday 21 May 2022 12:28:21 PM | root | number  | /usr/bin/dnf -y update kernel |         
4  | post   |     3 | Saturday 21 May 2022 12:29:26 PM | root | number  | /usr/bin/dnf -y update kernel |

For the sake of the experiment, I’ll now delete all kernel and initrd files and make the system unusable.

$ sudo -i

# rm /boot/{vmlinuz,initramfs}*
rm: remove regular file '/boot/vmlinuz-0-rescue-aa65c3ac5d924efba3b0301f2a0cd167'? y
rm: remove regular file '/boot/vmlinuz-5.17.5-300.fc36.x86_64'? y
rm: remove regular file '/boot/vmlinuz-5.17.8-300.fc36.x86_64'? y
rm: remove regular file '/boot/initramfs-0-rescue-aa65c3ac5d924efba3b0301f2a0cd167.img'? y
rm: remove regular file '/boot/initramfs-5.17.5-300.fc36.x86_64.img'? y
rm: remove regular file '/boot/initramfs-5.17.8-300.fc36.x86_64.img'? y

When I rebooted the system, I got this boot error.

Install Fedora 36 with LUKS Full Disk Encryption - Boot Error

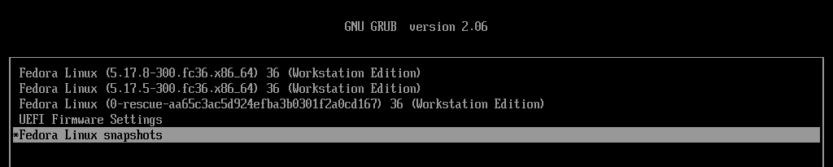
Now I’ll return to the GRUB menu and this time I’ll boot from snapshot #4 with the latest kernel.

Install Fedora 36 with LUKS Full Disk Encryption - Snapshots Menu
Install Fedora 36 with LUKS Full Disk Encryption - Select Snapshot No.4
Install Fedora 36 with LUKS Full Disk Encryption - Select Latest Kernel

Open the terminal and make sure everything is back to normal.

# uname -r
5.17.8-300.fc36.x86_64

# ll /boot/{vmlinuz,initramfs}*
-rw-------. 1 root root 103939016 May 19 22:41 /boot/initramfs-0-rescue-aa65c3ac5d924efba3b0301f2a0cd167.img
-rw-------. 1 root root  19805772 May 20 23:55 /boot/initramfs-5.17.5-300.fc36.x86_64.img
-rw-------. 1 root root  19806036 May 21 12:29 /boot/initramfs-5.17.8-300.fc36.x86_64.img
-rwxr-xr-x. 1 root root  11802352 May 20 21:11 /boot/vmlinuz-0-rescue-aa65c3ac5d924efba3b0301f2a0cd167
-rwxr-xr-x. 1 root root  11802352 Apr 28 21:51 /boot/vmlinuz-5.17.5-300.fc36.x86_64
-rwxr-xr-x. 1 root root  11803056 May 16 06:51 /boot/vmlinuz-5.17.8-300.fc36.x86_64

Because you booted into the snapshot, the ‘/‘ file system is read-only.

# btrfs property get -ts /
ro=true

Now that everything appears to be operating properly, it is time to roll back this snapshot in read-write mode.

# snapper ls
 # | Type   | Pre # | Date                             | User | Cleanup | Description                   | Userdata
---+--------+-------+----------------------------------+------+---------+-------------------------------+---------
0  | single |       |                                  | root |         | current                       |         
1  | pre    |       | Saturday 21 May 2022 11:47:50 AM | root | number  | /usr/bin/dnf install ps_mem   |         
2  | post   |     1 | Saturday 21 May 2022 11:47:55 AM | root | number  | /usr/bin/dnf install ps_mem   |         
3  | pre    |       | Saturday 21 May 2022 12:28:21 PM | root | number  | /usr/bin/dnf -y update kernel |         
4- | post   |     3 | Saturday 21 May 2022 12:29:26 PM | root | number  | /usr/bin/dnf -y update kernel |         

# snapper --ambit classic rollback 4
Ambit is classic.
Creating read-only snapshot of current system. (Snapshot 5.)
Creating read-write snapshot of snapshot 4. (Snapshot 6.)
Setting default subvolume to snapshot 6.

# reboot

After the reboot, check the system once again.

# uname -r
5.17.8-300.fc36.x86_64

# btrfs property get -ts /
ro=false

# snapper ls
 # | Type   | Pre # | Date                             | User | Cleanup | Description                   | Userdata     
---+--------+-------+----------------------------------+------+---------+-------------------------------+--------------
0  | single |       |                                  | root |         | current                       |         
1  | pre    |       | Saturday 21 May 2022 11:47:50 AM | root | number  | /usr/bin/dnf install ps_mem   |         
2  | post   |     1 | Saturday 21 May 2022 11:47:55 AM | root | number  | /usr/bin/dnf install ps_mem   |         
3  | pre    |       | Saturday 21 May 2022 12:28:21 PM | root | number  | /usr/bin/dnf -y update kernel |         
4  | post   |     3 | Saturday 21 May 2022 12:29:26 PM | root | number  | /usr/bin/dnf -y update kernel |         
5  | single |       | Saturday 21 May 2022 12:44:25 PM | root | number  | rollback backup               | important=yes
6* | single |       | Saturday 21 May 2022 12:44:26 PM | root |         | writable copy of #4           |              

# btrfs subvolume get-default /
ID 268 gen 273 top level 261 path snapshots/6/snapshot

# btrfs subvolume list /
ID 256 gen 274 top level 5 path home
ID 257 gen 201 top level 5 path opt
ID 258 gen 274 top level 5 path tmp
ID 259 gen 274 top level 5 path var
ID 260 gen 205 top level 5 path usr-local
ID 261 gen 274 top level 5 path snapshots
ID 262 gen 271 top level 259 path var/lib/machines
ID 263 gen 245 top level 261 path snapshots/1/snapshot
ID 264 gen 247 top level 261 path snapshots/2/snapshot
ID 265 gen 251 top level 261 path snapshots/3/snapshot
ID 266 gen 267 top level 261 path snapshots/4/snapshot
ID 267 gen 266 top level 261 path snapshots/5/snapshot
ID 268 gen 273 top level 261 path snapshots/6/snapshot

# ll /boot/{vmlinuz,initramfs}*
-rw-------. 1 root root 103939016 May 19 22:41 /boot/initramfs-0-rescue-aa65c3ac5d924efba3b0301f2a0cd167.img
-rw-------. 1 root root  19805772 May 20 23:55 /boot/initramfs-5.17.5-300.fc36.x86_64.img
-rw-------. 1 root root  19806036 May 21 13:48 /boot/initramfs-5.17.8-300.fc36.x86_64.img
-rwxr-xr-x. 1 root root  11802352 May 20 21:11 /boot/vmlinuz-0-rescue-aa65c3ac5d924efba3b0301f2a0cd167
-rwxr-xr-x. 1 root root  11802352 Apr 28 21:51 /boot/vmlinuz-5.17.5-300.fc36.x86_64
-rwxr-xr-x. 1 root root  11803056 May 16 06:51 /boot/vmlinuz-5.17.8-300.fc36.x86_64

After a successful rollback, always ensure that the grub.cfg file is updated so that the snapshots on the grub-btrfs menu are always in sync.

# grub2-mkconfig -o /boot/grub2/grub.cfg

You have now successfully reverted to the most recent kernel fully functional with read-write mode.

Both tests were successful.

9. Conclusion

With Fedora 36 installed with LUKS Full Disk Encryption, snapper, and grub-btrfs, you can now be certain that your data at rest is safe, and if you make a mistake, you can easily roll back to a previous functioning snapshot.

You can also better secure your machine from Evil Maid attacks by using UEFI Secure Boot custom key enrollment and a self-signed kernel and bootloader. Check out my other blog 'Enable Fedora UEFI Secure Boot with Custom Keys and Self-Signed Bootloader, Kernel, and Modules' on how to do this.

If you want to configure the snapper to take snapshots of the home subvolume as well, or if you want to configure the snapper to take snapshots at predetermined intervals, see the Arch Wiki webpage for further information.

Watch on YouTube

Thank you for engaging with this content.

If you like my work and want to thank me or encourage me to do more, you can buy me a coffee! The coffee will give me the "kick" I need to work even harder to bring you even more interesting Linux guides and articles.

Comments

98 responses to “Install Fedora 36 with LUKS Full Disk Encryption + snapper + grub-btrfs”

  1. Julien Avatar
    Julien

    Hello,
    Very complete guide. Nice work!
    I have a small problem for my part: after finishing your guide, despite the fact that I followed all your instructions, the grub menu is displayed only in an extremely brief way without the presence of the line "Fedora Snapshots" after entering the password at the start of the computer. Where can the problem come from and how to solve it?
    Sincerely,

    1. Madhu Desai Avatar

      Hello, Julien. The grub-btrfs package has been updated. Please take a look at the updated version of this article. Check out this page "How to Install Fedora 37 with LUKS Full Disk Encryption, Snapper, and Grub-Btrfs for Full System Rollback" for a text version, and this YouTube video for a video version.

  2. Ciril Avatar
    Ciril

    Hello,

    Really nice guide, but i something missconfigured. I can use snapper in GNOME (terminal) but i missing snapper snapshots in GRUB.
    When i push command: sudo grub2-mkconfig -o /boot/grub2/grub.cfg
    i get error:

    Generating grub configuration file ...
    Adding boot menu entry for UEFI Firmware Settings ...
    Detecting snapshots ...
    /etc/grub.d/41_snapshots-btrfs: line 569: /boot/grub/grub-btrfs.new: No such file or directory

    If you could help.

    Best Regards
    Ciril

    1. Madhu Desai Avatar

      Hi, Ciril. Check out the latest Fedora 37 article on installing and configuring snapper and grub-btrfs. It will fix your problems.
      How to Install Fedora 37 with LUKS Full Disk Encryption, Snapper, and Grub-Btrfs for Full System Rollback

  3. Frank Avatar
    Frank

    Thanks a lot for this guide ! Great work !!!
    I tried it with a release candidate of the upcoming Fedora 37 and everything still seems to work. I just have to wait for 1.5 minutes after entering the boot passphrase before the process continues (Lenovo P15 Gen1 with i7-10750H).
    Any idea how to shorten this wait time ?

    1. Madhu Desai Avatar

      Hello, Frank. Check the comment section where I addressed this issue. I'm currently working on an updated version of this article that will be posted this weekend, and it will address this issue as well as other changes.

  4. P T Avatar
    P T

    Hello - first off thank you for such a detailed and thoughtful guide on a rather niche topic! It would take me weeks to figure this all out by myself.

    I followed everything to the letter, but I'm a bit stuck on step 3. When I reboot, I'm prompted to enter the passphrase after "Attempting to decrypt master key.. \ Enter passphrase for (the new luks uuid)". After typing it in, pressing enter, and waiting ~30 seconds, I get dumped into a > grub prompt. Is this an indication of something obviously wrong or should I just start over?

    Thanks again!

    1. Madhu Desai Avatar

      Hi P T, Sorry for the delay in responding. Please double-check the UUIDs in your /etc/fstab and /boot/efi/EFI/fedora/grub.cfg files. You most likely set the incorrect UUIDs.

      1. P T Avatar
        P T

        Yep! I think that was the issue. I started from scratch and followed the youtube tutorial instead, perhaps I didn't remove the dashes or maybe even a whitespace issue. All is well now - thanks again!

        1. Madhu Desai Avatar

          I'm glad things worked out for you. But, I suggest you wait another 2-3 days as I'm about to publish a slightly updated version of this article.

  5. M P Avatar
    M P

    Just want to note that I setup my sub-volumes differently and had to change a step for this to work.

    I don’t set the mount point as / for the btrfs partition but rather create an @ subvolume and mount it at /.

    This effectively moved my boot partition so above where we changed /boot/efi/EFI/fedora/grub.cfg, I had to change the line from “set prefix=($dev)/boot/grub” to “set prefix=($dev)/@/boot/grub”. I guess this is because ($dev) is the btrfs partition’s root, not necessarily my “root” (i.e. /)

    1. M P Avatar
      M P

      I also needed to add rootflags=subvol=@ (my root subvolume is @) to kernel parameters via GRUB_CMD_LINUX in etc/default/grub

      another issue is that my grub theme wasnt detected. It is detected at time of running grub2-mkconfig, since @ is already mounted at /. But at boot time this is not yet mounted so the theme could not be found. This can be remedied by manually editing the grub.cfg file but is not a good idea since it would be overwritten when udating grub.cfg. So I did a small ugly workaround by creating a soft symlink of my boot folder to my btrfs root.

      1. Madhu Desai Avatar

        Hi M P, You must have the /boot within the main / volume to perform a full system rollback. Otherwise, the kernel updates are left behind and when the system is rolled back, the rollback will be incomplete.

        Anyway, I'm working on three new Fedora 37 articles: snapper, LUKS1, and LUKS2. The LUKS2 version will roll back the / volume without the /boot partition, but it will provide solid encryption with LUKS2.

        I plan to post all three guides in the first week of November, so I recommend you wait until then.

  6. Michail Avatar
    Michail

    Hello, I am immensely grateful for your work. I would also like to know how to set up automatic unlock by key file from a flash drive.

    1. Madhu Desai Avatar

      Hello, Michail. I've never set up automatic unlock by key file from a USB drive myself. But I'll let you know when I give it a shot myself. I have my hands full this week. In the meantime, please visit these websites.

      https://blog.fidelramos.net/software/unlock-luks-usb-drive
      https://gist.github.com/da-n/4c77d09720f3e5989dd0f6de5fe3cbfb

  7. Eli Avatar
    Eli

    Hi there, have a couple questions:

    1. Can I do this with luks2 instead of luks1 or does it have to be manually upgraded after installation?
    2. How do I tab to a new line, specifically at the bottom of the command line? I keep accidentally deleting text.
    1. Madhu Desai Avatar

      Hi Eli, Because the /boot directory is within the '/' file system, you must use LUKS1 to encrypt the '/' file system. LUKS2 functionality in GRUB 2.0.6 is restricted (Argon2i and Argon2id are not supported). If you wish to encrypt the '/' filesystem while the /boot directory is included within it, you must wait until the next release of GRUB (v2.11).

      I didn't get your second point.

      1. Eli Avatar
        Eli

        Thanks for the answer on the first point. What I meant was I seem to be having an issue with creating a new line in the terminal. After putting in a certain command it doesn't allow me to clear the screen or move to a new command line. This may just be a very situational "me" problem so you might not know what I'm talking about, but if you do some help would be appreciated.

        1. Madhu Desai Avatar

          Hi Eli. No, I have not encountered this issue while encrypting volumes using LUKS. However, I have encountered situations similar to that while connecting to consoles or after executing certain terrible scripts. I just typed the command reset. It will take care of everything at the terminal for me.

          1. Eli Avatar
            Eli

            Thanks anyway, I'll try what u reccomended

  8. curie Avatar
    curie

    How difficult to transform it luks2 encryption and separate boot partition

    1. Madhu Desai Avatar

      Hello, Curie. Converting it to LUKS2 will require some effort. I recommend that you first create a test VM and test it. The procedure would be as follows.

      1. Create a new boot partition and format it with ext4.
      2. Unmount the EFI partition and recursively move all contents of the /boot directory to the new boot partition.
      3. Remove the luks key.
      4. Update the files /etc/fstab, /etc/default/grub, and /boot/efi/EFI/fedora/grub.cfg to reflect the changes.
      5. Regenerate grub.cfg, BLS config file, and initramfs files.
      6. Finally, boot into any system rescue CD and run the command 'cryptsetup convert' to convert LUKS1 to LUKS2. For more information, check man 8 cryptsetup.

      I could have skipped some steps, but you'll find out when you try it on a VM.

      1. curie Avatar
        curie

        thank you for the reply. I was stuck at step 2 but I manage to recover to original state.

        Can I do all those steps in a Live-CD fedora?

        1. Madhu Desai Avatar

          Probably you could. However, if you work within the system, it will be much easier and less problematic. For step 6, you can use Fedora Live-CD, but please first create a test virtual machine and try it over there. Only when you're certain, run them on a real computer.

          1. curie Avatar
            curie

            What does step 3 "Remove Luks key" actually do? wouldn't that make it no longer decryptable?

          2. Madhu Desai Avatar

            No, remove the LUKS keyfile. Like..
            sudo cryptsetup luksRemoveKey /dev/sda2 --key-file /etc/cryptsetup-keys.d/luks-xxxxxxxx-xxxx-xxxx-xxxx-xxxxxxxxxxxx.key

          3. curie Avatar
            curie

            I'm not quite sure what am I suppose to change for these files.

            4. Update the files /etc/fstab, /etc/default/grub, and /boot/efi/EFI/fedora/grub.cfg to reflect the changes.

            I revisit the steps of this guide, it change some settings alot. It's really not that simple XD

            I'm sorry that I didn't take your advise to experiment first in a virtual machine, I just do it on my machine.

            Still, I appreciate for every effort you have put into this guide.

            Thank you so much

          4. curie Avatar
            curie

            I check my timeshift backup of my previous luks2 setup.

            The grub.cfg in fedora folder. They have many changes.

            Previous Luks 2 setup file is like this.
            search --no-floppy --fs-uuid --set=dev 7d24587a-efd7-41fa-a35f-a3a4748337d2
            set prefix=($dev)/grub2
            export $prefix
            configfile $prefix/grub.cfg

            I'm not sure what "d24587a-efd7-41fa-a35f-a3a4748337d2" this uuid belongs to "/boot" partition or the "/boot/efi" partition.

            I created a EFI partition"/boot/efi" and a boot partition "/boot".

            That was the guide I followed to setup my Luks2 Machine
            https://youtu.be/bN8gGoBaZ5M

          5. Madhu Desai Avatar

            Hi, Curie. Give me one day. I'll test it myself on a virtual machine and post the steps.

          6. curie Avatar
            curie

            That's Okay, I'm very happy for the help.

            I'm comparing file to file, line to line, making them looking identical to my old Luks2 Machine.

            I think it's gonna think.

            I'll report back if I have good news right away.

          7. Curie Avatar
            Curie

            Okay

            Pretty sure, I did something wrong. I did all the steps, convert to luks2 successfully, I have also backup the header, no worries.

            But after reboot, grub menu shows and when I select to boot that kernel, it says

            "error:.. /.. /grub-core/script/lexer.c:352:syntax error
            error:.. /.. /grub-core/script/lexer.c:352:incorrect command"

            I think it's not a big deal as long as it's a grub problem, it seems solvable. At least my data is safe.

          8. curie Avatar
            curie

            All good now, I just delete /boot/grub2/grub.cfg and reconfig /boot/efi/EFI/fedora/grub2.cfg

            reinstall grub2-efi and run grub2.mkconfig again.

            it's able to boot now.

            Thank you for your help

          9. Madhu Desai Avatar

            I am so glad things worked out well for you.

  9. smithy Avatar
    smithy

    Thanks. All Good!!

  10. smithy Avatar
    smithy

    Thnaks. I have been through the system and can not find any device or any other things that the UUID f85b46c4 xxxxxxxx xxxxxxxx xxxxxxxx belongs to. Checked the files you indicated and found all to be normal.
    Decided to try removing the UUID mentioned at boot time to see what happened. On boot up entered "e" at the Grub screen. Deleted out the arg "rd.md.uuid= f85b46c4 xxxxxxxx xxxxxxxx xxxxxxxx" and alllowed the computer to continue to boot. It came up with no errors and operates normally.
    Now I have to check as to how to edit the grub file. Need to check and get clear in my mind the differences between grub2 and grub files as to which to edit and how to make sure they work as they should.

    Yes the ssd flag in showing in the subvolumes.

    Thanks

    1. Madhu Desai Avatar

      Hi Smithy. From your earlier comment (lsblk -pf), the UUID f85b46c4-xx333 belongs to RAID /dev/md126 (/boot partition). So open the /etc/default/grub file with your favorite text editor, and remove the code rd.md.uuid=f85b46c4:xxxx:xxx... from the GRUB_CMDLINE_LINUX line. Then update the grub file.
      grub2-mkconfig -o /boot/grub2/grub.cfg

      Then reboot the system. You should be fine.

  11. smithy Avatar
    smithy

    Thanks. Sorry to be a pest. I thought I had it all going ok. However on a reboot there is a very very long delay after the Grub menu appears before anything shows on the screen. When it does there is a messages to say a disk does not exist.

    /dev/disk/by-id/md-UUID f85b46c4 xxxxxxxx xxxxxxxx xxxxxxxx Does Not exist.

    There is a txt file available which I have saved.
    If I then do a Cntrl D the system boots normally and runs.
    By running grubby --info=DEFAULT the UUID indicated on the first screen is fiund as the last entry in the line that starts

    args="ro rd.md.uuid=xxxxxxxx:xxxxxxxx:xxxxxxxx:xxxxxxxx rd.luks.uuid=luks-xxxxxxxx-xxxx-xxxx-xxxx-xxxxxxxxxxxx rd.md.uuid=f85b46c4:xxxxxxxx:xxxxxxxx.xxxxxxxx.xxxxxxxx rhgb quiet"

    Not sure how to possibly fix this tried to use dracut to regenerate the initramfs as suggested on the screen but appears to have has no effect.

    I know this is not part of the article but do you have any thiughts on optomising the fstab parameters for when NVMEs or SSDs are used/

    Thanks

    1. Madhu Desai Avatar

      It is not a problem; if you have any questions, please do not hesitate to ask.

      The order in the args argument doesn't matter, so it's not an issue. Check that the UUIDs are correctly specified everywhere by running the commands lsblk -pf and cryptsetup luksUUID /dev/md127. Perhaps a UUID was given incorrectly somewhere.

      Regarding optimization in fstab, if you have NVMe/SSD, it should be identified and included automatically. Execute the following command to test if the ssd flag is added to subvolumes.
      mount | grep 'luks-'

      You can also add the option discard=async to each subvolume in /etc/fstab. Check man 5 btrfs for more details.

  12. smithy Avatar
    smithy

    Couple of last things

    First. I have snapper working and doing everything as per your article however i notice that if I install an application from gnome software package it does not register when ai do a snapper -ls however if I use Sudo dnf install... or # dnf install the action is registered and can be listed via snapper -ls

    I wanted to run neofetch, which is not installed via the live DVD. Typing at $ neofetch I was asked if I wanted to insatlled the package to give that command. I answered Y and the package was installed No root password was asked for When I looked in snapper ls the installation was not registered.

    Is this the way snapper works? seems I can not roll back if one of applications fail when installed from gnome software or just from the terminal like neofetch.

    I assume that if I have used dnf to install neofetch snapper would list it.

    This relates to;

    # cryptsetup luksDump /dev/md127 | grep -B1 Iterations

    I get two listing for iterations,
    Key Slot 0 ENABLED
    Iterations 1600,000

    Key Slot 1: ENABLED
    Iterations 6574144

    How do I reduce the number of iterations for KeySlot 1? This uses a keyfile generated to stop the passphrase from being asked for twice. on boot. Is there any value in reducing the number of iterations in key-slot 1?

    A big improvement was made in boot time when I reduced the number of Iterations for key-slot 0 as per your message.

    Thanks

    1. Madhu Desai Avatar
      Madhu Desai

      Unfortunately, snapper only creates pre-post snapshots when you install packages from dnf only. That too, because you have installed the python3-dnf-plugin-snapper package. If you hadn't installed the python3-dnf-plugin-snapper package, snapper wouldn't even have created the pre-post snapshots even when you installed packages from dnf.

      What you can do is manually create pre and post snapshots when installing packages from the Gnome software center.

      Create a 'pre' snapshot before installing a package from the Gnome software center.

      sudo snapper -c root create -t pre -p -d "Before installing neofetch"
      

      Make a note of the 'pre' snapshot number. Go to the Gnome software center, install the package, and then create the 'post' snapshot.

      sudo snapper -c root create -t post --pre-number <pre snapshot number> -d "After installing neofetch"
      

      Regarding reducing the number of iterations for KeySlot 1, perform the following:

      First, delete the keyfile from KeySlot 1.

      sudo cryptsetup luksRemoveKey /dev/md127 --key-file /etc/cryptsetup-keys.d/luks-xxxxxxxx-xxxx-xxxx-xxxx-xxxxxxxxxxxx.key
      

      Check if the keyfile has been removed from KeySlot 1.

      sudo cryptsetup luksDump /dev/md127
      

      Add the keyfile again, this time with new iterations.

      sudo cryptsetup luksAddKey /dev/md127 /etc/cryptsetup-keys.d/luks-xxxxxxxx-xxxx-xxxx-xxxx-xxxxxxxxxxxx.key --pbkdf-force-iterations 1600000 --force-password
      

      Then, rebuild the initramfs image.

      sudo dracut -vf
      

      I hope this is helpful.

      1. smithy Avatar
        smithy

        Thanks. Understand the way to generate snapper records using gnome software.
        I am having an issue with resetting the number of iterations.
        on executing the Add the key file again and entering the passphrase I have been using I get a message:

        Failed to open key file

        The cryptsetup-key.d was set up with 4KiB of random data during the bypass the additional PassPhrase Promt setup

        the luks--xxxxxxxx-xxxx-xxxx-xxxx-xxxxxxxxxxxx I took from the UUID as given in the listing from
        sudo cryptsetup luksDump /dev/md127

        what I missed?

        1. Madhu Desai Avatar

          Sorry, I made a typo (again 😞). It should end with ".key." So, it should be like luks–xxxxxxxx-xxxx-xxxx-xxxx-xxxxxxxxxxxx.key

  13. smithy Avatar
    smithy

    Thanks.
    I had entered the passphrass blindly and pressed enter, in the past and nothing happened.

    I have just now rebooted the computer from as I left it the other day after I did all the actions to move /boot.
    I got the same screen as I indicated before. Enetred the passphase blindly and pressed enter.
    Nothing.

    Then about some time later, no idea how long but it seemed like a couple of minutes I got a GUI screen asking for the passphrase. Entered it and eureka we have touch down.

    It did not do that before.

    How can I ever thank you for being so helpful and putting up with an oldie. Much appreciated. I will now proceed to getting snapshot and Bypass the additional Passphrase promt set up and going.

    Thaanks again I have to say your articles are top notch

    Thanks G

    1. Madhu Desai Avatar
      Madhu Desai

      I'm glad everything worked out well for you.

      If you think it is taking too long after entering the initial LUKS pass, try the following actions.

      First, find out the number of iterations in the key slot 0. (Here /dev/md126 is where / partition is located)

      # cryptsetup luksDump /dev/md126 | grep -B1 Iterations
      Key Slot 0: ENABLED
      	Iterations:     	1430526
      

      Then reduce the value by half or quarter. I'll set the iteration to 350000 here (approx quarter).
       

      # cryptsetup luksChangeKey /dev/md126 --key-slot 0 --pbkdf-force-iterations 350000 --force-password
      

      First, enter your old passphrase, and then enter your new passphrase. The new passphrase may also be the same as the previous one.

      Then restart. After you enter your initial passphrase, it should now take a fourth of the time it used to. 

      1. smithy Avatar
        smithy

        I found the number of iterations to be 6533182. I will reduce this shortly. I did not fine the file on /dev/md26 but on /dev/md127 on my system. When I tried to use /dev/md126 first it indicated it was not a LUKS device.

        I have learnt so much thanks.

        I do not think I will delete /dev/md126 (equavilent to /dev/sda3 in your article) and reclaim the space as I am not pushed for space.at this time. I may just look at perhaps using gparted to disable it instead.

        I'll get on and get snapshot set up and see what happens. The I'll add my data storage drive in and hopefully have a fully working system.

        Again many thanks

        G

      2. smithy Avatar
        smithy

        I found the last function "--force-passphrase" did not works as it was unkown I think it should be "--force-password" as that is what I could find under Usage for cryptsetup. Seemed to work.

        1. Madhu Desai Avatar

          Oh!  It was a typing mistake. Thank you for the correction.

      3. smithy Avatar
        smithy

        Just as an aside, How would one change the number of iterations in any other slot that was used, if the need arose?
        Thanks

  14. smithy Avatar
    smithy

    Enter passphrase for
    md/FEDORA (14c2b330c12e428781b0c9f9369aac15d

    The above is what is displayed on the screen after the reboot from trying to move the /boot.. Clearly itis asking for the the passphrase but when I type on teh keyboard nothing happens, it as as if it is locked.

    after some time the screen just shows

    GRUB> and one can type in characters again.

    I do not know if it is relevant but today I looked at the /etc/fstab file.

    In one I had recorded before any changes were made to move the /boot partition I notices that there were UUIDs for each of the btrfs subvolumes plus a UUID Different to the subvolume UUIDs, for /boot and another UUID for /boot/efi.

    in the /etc/fstab file after the actions to move the /boot partion to /(root) were done I noticed that ther /etc/fstsab file had NO UUID for /boot or any entry for /boot. (not sure if there is or should be a UUID for /boot after it has been moved to /.

    Just trying to find out why the standard LUKS passphrase screen does not appear on the reboot.

    1. Madhu Desai Avatar
      Madhu Desai

      Hi Smithy. When you get the following passphrase prompt,

      Enter passphrase for
      md/FEDORA (14c2b330c12e428781b0c9f9369aac15d)
      

      Simply input your LUKS passphrase and press the [ENTER] button blindly. This first LUKS prompt does not show a "*" cursor indicator. So you just have to assume that you typed your passphrase properly. If you entered your passphrase correctly, you will be able to boot; otherwise, you will see a grub: prompt.

      As with the /etc/fstab, here's how it looks on my machine.

      cat /etc/fstab
      UUID=377e8e6f-071b-4f44-a2a7-6b38f094c10b /                       btrfs   defaults,x-systemd.device-timeout=0 0 0
      UUID=377e8e6f-071b-4f44-a2a7-6b38f094c10b /.snapshots             btrfs   subvol=snapshots,compress=zstd:1,x-systemd.device-timeout=0 0 0
      UUID=E192-EE2B                            /boot/efi               vfat    umask=0077,shortname=winnt 0 2
      UUID=377e8e6f-071b-4f44-a2a7-6b38f094c10b /home                   btrfs   subvol=home,compress=zstd:1,x-systemd.device-timeout=0 0 0
      UUID=377e8e6f-071b-4f44-a2a7-6b38f094c10b /opt                    btrfs   subvol=opt,compress=zstd:1,x-systemd.device-timeout=0 0 0
      UUID=377e8e6f-071b-4f44-a2a7-6b38f094c10b /tmp                    btrfs   subvol=tmp,compress=zstd:1,x-systemd.device-timeout=0 0 0
      UUID=377e8e6f-071b-4f44-a2a7-6b38f094c10b /usr/local              btrfs   subvol=usr-local,compress=zstd:1,x-systemd.device-timeout=0 0 0
      UUID=377e8e6f-071b-4f44-a2a7-6b38f094c10b /var                    btrfs   subvol=var,compress=zstd:1,x-systemd.device-timeout=0 0 0
      
      
  15. Smithy Avatar
    Smithy

    Thank you for getting back. I really do appreciate you time in looking at this.
    I took a copy of the cat /etc/default/grub and cat /boot/efi/EFI/fedora/grub.cfg files before and after I did the /Boot changes.

    [root@fedora /]# cat /proc/mdstat
    Personalities : [raid1]
    md125 : active raid1 nvme1n1p1[1] nvme0n1p1[0]
     626624 blocks super 1.0 [2/2] [UU]
     bitmap: 0/1 pages [0KB], 65536KB chunk
    
    md126 : active raid1 nvme0n1p3[0] nvme1n1p3[1]
     1570816 blocks super 1.2 [2/2] [UU]
     bitmap: 0/1 pages [0KB], 65536KB chunk
    
    md127 : active raid1 nvme0n1p2[0] nvme1n1p2[1]
     943586304 blocks super 1.2 [2/2] [UU]
     bitmap: 0/8 pages [0KB], 65536KB chunk
    

    unused devices:

    [root@fedora /]# lsblk -pf
    NAME FSTYPE FSVER LABEL UUID FSAVAIL FSUSE% MOUNTPOINTS
    /dev/sda
    /dev/sdb
    /dev/sdc
    /dev/sdd
    /dev/sr0 iso9660 Joliet Extension Fedora-WS-Live-36-1-5 2022-05-04-21-36-58-00 0 100% /run/media/gorden/Fedora-WS-Live-36-1-5
    /dev/zram0 [SWAP]
    /dev/nvme0n1
    ├─/dev/nvme0n1p1 linux_raid_member 1.0 localhost-live:efi 3b2d393a-30eb-791b-869d-dc5bc7153b45
    │ └─/dev/md125 vfat FAT32 EFI 05DE-C48B 596.9M 2% /boot/efi
    ├─/dev/nvme0n1p2 linux_raid_member 1.2 localhost-live:FEDORA 4faf106c-19de-6066-0fcd-c378f0b7f349
    │ └─/dev/md127 crypto_LUKS 1 1b986e55-cc40-4e2a-9f6a-fbda72b40123
    │ └─/dev/mapper/luks-1b986e55-cc40-4e2a-9f6a-fbda72b40123
    │ btrfs fc86c9ad-b1ee-4e88-b82e-2848514d9c38 891.3G 1% /var
    │ /usr/local
    │ /tmp
    │ /opt
    │ /.snapshots
    │ /home
    │ /
    └─/dev/nvme0n1p3 linux_raid_member 1.2 localhost-live:boot f85b46c4-f131-96f1-8cf0-aff9dca3113e
     └─/dev/md126 ext4 1.0 BOOT 4262e738-07b8-4041-a13d-38175119c8f6 1.2G 11% /boot
    /dev/nvme1n1
    ├─/dev/nvme1n1p1 linux_raid_member 1.0 localhost-live:efi 3b2d393a-30eb-791b-869d-dc5bc7153b45
    │ └─/dev/md125 vfat FAT32 EFI 05DE-C48B 596.9M 2% /boot/efi
    ├─/dev/nvme1n1p2 linux_raid_member 1.2 localhost-live:FEDORA 4faf106c-19de-6066-0fcd-c378f0b7f349
    │ └─/dev/md127 crypto_LUKS 1 1b986e55-cc40-4e2a-9f6a-fbda72b40123
    │ └─/dev/mapper/luks-1b986e55-cc40-4e2a-9f6a-fbda72b40123
    │ btrfs fc86c9ad-b1ee-4e88-b82e-2848514d9c38 891.3G 1% /var
    │ /usr/local
    │ /tmp
    │ /opt
    │ /.snapshots
    │ /home
    │ /
    └─/dev/nvme1n1p3 linux_raid_member 1.2 localhost-live:boot f85b46c4-f131-96f1-8cf0-aff9dca3113e
     └─/dev/md126 ext4 1.0 BOOT 4262e738-07b8-4041-a13d-38175119c8f6 1.2G 11% /boot
    [root@fedora /]# exit
    exit
    

    before changes to move /Boot to root

    [root@fedora /]# cat /etc/default/grub
    GRUB_TIMEOUT=5
    GRUB_DISTRIBUTOR="$(sed 's, release .*$,,g' /etc/system-release)"
    GRUB_DEFAULT=saved
    GRUB_DISABLE_SUBMENU=true
    GRUB_TERMINAL_OUTPUT="console"
    GRUB_CMDLINE_LINUX="rd.md.uuid=4faf106c:19de6066:0fcdc378:f0b7f349 rd.luks.uuid=luks-1b986e55-cc40-4e2a-9f6a-fbda72b40123 rd.md.uuid=f85b46c4:f13196f1:8cf0aff9:dca3113e rhgb quiet"
    GRUB_DISABLE_RECOVERY="true"
    GRUB_ENABLE_BLSCFG=true
    [root@fedora /]# exit
    exit
    
    [root@fedora /]# cat /boot/efi/EFI/fedora/grub.cfg
    search --no-floppy --fs-uuid --set=dev 4262e738-07b8-4041-a13d-38175119c8f6
    set prefix=($dev)/grub2
    
    export $prefix
    configfile $prefix/grub.cfg
    [root@fedora /]# exit
    exit
    

    Now the last two files after making the changes to move the /Boot to root

    [root@fedora /]# cat /etc/default/grub
    GRUB_TIMEOUT=5
    GRUB_DISTRIBUTOR="$(sed 's, release .*$,,g' /etc/system-release)"
    GRUB_DEFAULT=saved
    GRUB_DISABLE_SUBMENU=true
    GRUB_TERMINAL_OUTPUT="console"
    GRUB_CMDLINE_LINUX="rd.md.uuid=4faf106c:19de6066:0fcdc378:f0b7f349 rd.luks.uuid=luks-1b986e55-cc40-4e2a-9f6a-fbda72b40123 rd.md.uuid=f85b46c4:f13196f1:8cf0aff9:dca3113e rhgb quiet"
    GRUB_DISABLE_RECOVERY="true"
    GRUB_ENABLE_BLSCFG=true
    GRUB_ENABLE_CRYPTODISK=y
    
    [root@fedora /]# cat /boot/efi/EFI/fedora/grub.cfg
    cryptomount -u 1b986e55cc404e2a9f6afbda72b40123
    search --no-floppy --fs-uuid --set=dev fc86c9ad-b1ee-4e88-b82e-2848514d9c38
    set prefix=($dev)/boot/grub2
    
    export $prefix
    configfile $prefix/grub.cfg
    

    I hope this helps. I have not rebooted the machine to see if it works but going on past experience I would say no. I will leave it like this now till you have commented.

    Again thanks you very much.

    G

    1. Madhu Desai Avatar
      Madhu Desai

      Looks good to me. I checked against my machine, and other than /boot and / are in reverse, everything seems fine.

      In your previous comment, you said

      “Attempting to decrypt master key….

      Enter passphrase for md/FEDORA (14c2b330c12e428781b0c9f9369aac15d)”

      and no action is accepted from the keyboard. The number given is the /dev/mapper/luks UUID.

      What do you mean by that? You are supposed to provide the LUKS passphrase and hit <ENTER> there. Is it not accepting LUKS passwords entered via the keyboard?

  16. smithy Avatar
    smithy

    Thanks I appreciate your time and patience. I have tried a couple more times and end up with the same result. On reboot after the move of /boot has been done, I get a message on the screen

    "Attempting to decrypt master key....
    Enter passphrase for md/FEDORA (14c2b330c12e428781b0c9f9369aac15d)"

    and no action is accepted from the keyboard. The number given is the /dev/mapper/luks UUID.
    After a short time the screen changes to

    "GNU GRUB version 2.06
    minimal BASH-like line editing is supported. For the first word, TAB list possible command completions. Anywhere else TAB lists possible device or file completions.

    grub>"

    I have copied and pasted the commands you provided in your response to me and I have also done an installation while recording the input and output of each action. I can send this file if you are interested in looking at it. The recording starts once the system has booted for the first time.
    G

    1. Madhu Desai Avatar

      That's too bad it didn't work out for you. Could you please provide me with the output of the following commands so that I can check for any anomalies?
      cat /proc/mdstat
      lsblk -pf
      cat /etc/default/grub
      cat /boot/efi/EFI/fedora/grub.cfg

  17. smithy Avatar
    smithy

    Thanks I have managed to resolve the hardware issues. Followed the instructions to the letter however when I reboot I get the following;

    "Attempting to decrypt master key
    Enter passphase for md/FEDORA (5274948689bc4f138c84513bcbd1650a)"

    I can not key anything in and get no further.

    The only difference I could find in going through the set up was that when I did a
    #btrfs filesystem show /
    The result showed;

    "Label: 'none' uuid: ....."

    The article shows FEDORA for the label
    I am not sure if this is significant.
    Anyway I can not reboot. after the move the /boot to theroot file system instructions.
    Thanks

    1. Madhu Desai Avatar

      'FEDORA' is simply a label for the BTFS volume. It doesn't matter if you label your btrfs volume or not. Regarding moving the /boot partition, I'm not sure what you did wrong, but when I tried it, it worked well.

  18. smithy Avatar
    smithy

    Thanks for the information. I think as a result of the first command indicated on your reference layout #'cat /proc/mdstat' a problem has shown up with one of the nvme SSd units. It is showing nothing like your set up. It is giving me a

    MD124 inactive nvme1n1p1(S)
    and then funny partition set up in MD125 through MD127

    eg
    MD 125 shows Active Raid1 nvme1n1p2[1] nvme1n1p1[0]
    resync delayed

    MD127 is showing an active raid1 nvmeon1p2[0] nvme1n1p3[1]
    and a resync of 23.7% before proceeding.

    MD 126 is showing an active raid1 nvme0n1p3[0] nvme1n1p4 [1]
    with no other comment.

    So I need to get to the bottom of this Seems there may be ah hardware issue

    Thanks
    G

  19. Smithy Avatar
    Smithy

    I have installed Fedora 36 Workstation as per the instruction contain in the link you sent;
    https://postimg.cc/gallery/5Lrc7Jb

    This has resulted in a set up as follows

    Partition 1 (sda1) NVME0n1p1 + NVME1n1p1 efi /boot/efi efi system partition

    MD126 as RAID array dev/md/efi

    Partition 2 (sda2) NVME0n1p2 + NVME1n1p2 FEDORA / LUKS1 btrfs volume

    MD No Raid md array shown

    Partition 3 (sda3) NVME0n1p3 + NVME1n1p3 BOOT /boot ext4

    MD127 as RAID array dev/md/boot

    DATA btrfs volume
    DATA sda + sdb Data /data LUKS2 btrfs volume

    md125 as Raid array dev/md/DATA

    Notes;
    Drives shown in the brackets above equates to the same partitions in the article, “Install Fedora 36 with LUKS Full Disk Encryption + Snapper + grub-btrfs.”
    The btrfs Volume Fedora has the sub volumes.
    home, opt,snapshots, tmp, usr-local, and var
    the btrfs volume DATA has the sub volumes,
    data-1, data-2, data-3 and data-4

    When I look at
    # btrfs subvolume list /
    I get the same response as shown in the article except that the number after “gen” is different

    When I look at # btrfs filesystem show /
    I get the;
    Total devices as 2 (different Gbytes used but expected).
    Then I get two lines of devid
    devid 1 size 900.00GiB used 8.01Gib path /dev/mapper/luks-400c66a9- xxxxxxxxx
    devid 2 size 900.00GiB used 8.01Gib path /dev/mapper/luks-c4740f85- xxxxxxxxx

    Looking at
    # lsblk -pf I can see the list of block devices. (a screen shot can be provided if required)

    Also looking at
    # cat /dev/etc/fstab shows the set up as I would expect given the Raid configuration. (a screen shot can be provided if required).

    From now on I have the problem;

    # cryptsetup luksDump dev/sda2

    What to designate the partition as for the original sda2 in the article given we have a raid btrfs volume with no MD designation. I did try to use the UUID as given for “devid” 1 as indicated above but it did not work. I am not sure how to enter the two UUIDs

    As this was only looking for a review I have not worried about it too much however I am having issues trying to carry out section 3 of the article. (article not written for a RAID situation , I appreciate that but I am trying to adapt it accordingly.

    Where it says # mount -v /dev/sda3 /mnt I have used /dev/md127 as the raid array

    I assume this is correct.

    The later in the same section
    #OLDBOOTUUID = …….. /dev/sda3 I have used /dev/md127 as the raid array.

    And have the same issue, as above for sda2 in the line starting
    # NEWLUKSUUID=”……. dev/sda2))”

    I have not had any success in trying the move the /boot to the root file system. On reboot just get to grub> on the screen.

    Is moving the /boot to the root file system possible in a raid configuration?

    Are there any implications when using a Raid system in setting up Snapper.

    I would be grateful for your comments.

    Thanks
    Note Unfortunatley the TXt hads lost the formatting so I hope it can be understood other wise I have a PDF copy available

    1. Madhu Desai Avatar
      Madhu Desai

      Hello, Smithy. I was busy, so I couldn't answer your comment. I apologize for that.

      After reading your comment, I tried again to install Fedora with this slight modification. This works perfectly.

      Link to the gallery:

      Fedora36-RAID1-LUKS1-NVMe Gallery

      For your reference, here is my layout:

      # cat /proc/mdstat 
      Personalities : [raid1] 
      md125 : active raid1 nvme0n1p1[0] nvme0n2p1[1]
         524224 blocks super 1.0 [2/2] [UU]
         bitmap: 0/1 pages [0KB], 65536KB chunk
      
      md126 : active raid1 nvme0n1p3[0] nvme0n2p3[1]
         1568768 blocks super 1.2 [2/2] [UU]
         bitmap: 0/1 pages [0KB], 65536KB chunk
      
      md127 : active raid1 nvme0n1p2[0] nvme0n2p2[1]
         39812096 blocks super 1.2 [2/2] [UU]
         bitmap: 1/1 pages [4KB], 65536KB chunk
          
      # mdadm -Q /dev/md125
      /dev/md125: 511.94MiB raid1 2 devices, 0 spares. Use mdadm --detail for more detail.
      
      # mdadm -Q /dev/md126
      /dev/md126: 1532.00MiB raid1 2 devices, 0 spares. Use mdadm --detail for more detail.
      
      # mdadm -Q /dev/md127
      /dev/md127: 37.97GiB raid1 2 devices, 0 spares. Use mdadm --detail for more detail.
      

      And these are all the commands I used.

      # umount -vR /boot
      # mount -v /dev/md126 /mnt
      # cp -arv /mnt/. /boot
      # umount -v /mnt
      # sed -i.original '/\/boot.*ext4/d' /etc/fstab
      # systemctl daemon-reload
      # mount -a
      # restorecon -RFv /boot
      # echo "GRUB_ENABLE_CRYPTODISK=y" >> /etc/default/grub
      # grub2-mkconfig -o /boot/grub2/grub.cfg
      # rm /boot/loader/entries/*.conf
      # kernel-install -v add $(uname -r) /lib/modules/$(uname -r)/vmlinuz
      # CRYPTOUUID="$(grub2-probe --target=cryptodisk_uuid /)"
      # sed -i.backup1 "1i cryptomount -u $CRYPTOUUID" /boot/efi/EFI/fedora/grub.cfg
      # OLDBOOTUUID="$(lsblk -dno uuid /dev/md126)"
      # NEWLUKSUUID="$(lsblk -dno uuid /dev/mapper/luks-$(cryptsetup luksUUID /dev/md127))"
      # sed -i.backup2 "s/$OLDBOOTUUID/$NEWLUKSUUID/" /boot/efi/EFI/fedora/grub.cfg
      # sed -i.backup3 's#($dev)/grub2#($dev)/boot/grub2#' /boot/efi/EFI/fedora/grub.cfg
      

      Worked well for me.

  20. Yakun Avatar
    Yakun

    Thanks a lot for this helpful tutorial. Would it be fine with you to create a separate tutorial to use snapper without the encryption of /boot folder? Personally, I would like to avoid the encryption of /boot considering the time it takes to decrypt and the necessity to use LUKS1.

    1. Madhu Desai Avatar

      Hello, Yakun. It is quite simple to install Fedora without encrypted /boot. All you have to do is create three partitions: sda1 (/boot/efi) of 512MiB, sda2 (/boot) of 1GiB, and sda3 (remaining space) for the BTRFS volume with LUKS2 encryption. Install Fedora normally using the Anaconda installer, as described in section 2, with LUKS2 encryption, and snapper/grub-btrfs as described in sections 6 and 7.

      1. Yakun Avatar
        Yakun

        Thank you very much and sorry for the late replying.

        I have tried with your approach to create the sub-volumes to include .snapshots directly after installation of fedora. It is easier for me to follow your approach to create the sub-volumes, otherwise, I have to do it correctly later for the snapper backup parts.

        I encountered one issue after the successful steps following your snapper creation instructions. The issue is after installing nvidia driver, which update the grub I think, I need to rerun the grub2-mkconfig -o /boot/grub2/grub.cfg command again, otherwise, after rebooting, there will be a error in booting, which complaining about the syntax error in grub.

        Btw, may I ask whether you have a recommendation of tutorials or videos about the linux system (like grub, kernel) explanations? Thanks.

        1. Madhu Desai Avatar

          Yes, depending on the system, installing Nvidia drivers might be a headache. So, before attempting to install an Nvidia driver, I always take a manual 'pre' snapshot. When the installation is complete, whether it is successful or not, I will take a 'post' snapshot of the corresponding 'pre' snapshot. If successful, I will simply remove the pre-post snapshots; if unsuccessful, I will undo the change from pre-post snapshots and try again.

          As for the tutorial, I found the following very useful.
          GNU GRUB Manual 2.06
          Managing, monitoring, and updating the kernel

  21. Matt Avatar
    Matt

    Thank you so much for this tutorial. Is it possible to change my luks encryption password when booting? I'd like to change it to something easier to remember.

    1. Madhu Desai Avatar
      Madhu Desai

      Hello, Matt. You can change your password by following the steps below.

      First, remove your key file.

      # cryptsetup luksRemoveKey --key-file /etc/cryptsetup-keys.d/luks-xxxxx-xxxx.key /dev/sda2
      

      Next, change your password for key slot 0. (If your password is less than 8 characters, use --force-password)

      # cryptsetup luksChangeKey --key-slot 0 --force-password /dev/sda2
      

      Then add your key file back.

      # cryptsetup luksAddKey /dev/sda2 /etc/cryptsetup-keys.d/luks-$(cryptsetup luksUUID /dev/sda2).key
      

      Dracut.

      # dracut -vf
      

      and reboot. Hope it will work for you.

      1. Matt Avatar
        Matt

        Thank you! I didn't see a response email so I forgot to say that sooner. Sadly I'm having troubles with Fedora and my internet on my laptop so I'm going to try PopOS. However after entering the encryption password and entering into the UEFI to tell it to boot into my live USB it requires loading the kernel first. Is this due to this encryption? Do you know how I can do what I'm trying? Should I remove the key file from your instructions above and leave it at that?

  22. smithy Avatar
    smithy

    Thanks for the links re setting up the RAID1 systems I worked through it and got anaconda set up with RAID1 in the2 nvmes for the system using the layout as suggested inhttps://postimg.cc/gallery/5Lrc7Jb
    I set the hard disk sba and sdb as A RAID1 separate btrfs volume. All worked.
    How ever I seem to have made an error some where on trying to shift the /boot partiotion in tot he / partition. I think I have made an error in the cross referenceing of the "sda2 and sda3 in your article Install Fedora 36 with LUKS FullDisk Encryption + Snapper Grub-btrfs" to the mvme prtitions I found that I had to use /dev/mapper127 in place of sda3 and was not sure what to use for sda2 when I can to set 3 Move the /boot to the 'rootf file system"
    the fist indication I got that soemthing perhaps as fifferent was when I ran the "grubby --info=DEFAULT after recreatingt eh BLA. I noticed the index showed index=1 where as your article indicates 0.
    Thinkig that this was perhasp a sysyem difference thing I pressed on and when I looked at what the /boot/efi/EFI/fedora/grub.cfg file should look like there was no UUID after cryptomount -u in the first line.

    When try to boot the system I just get to the Grub prompt grub>
    I was wondering if you could point me in the right direction as to what designation I should use in place of sda2 and sda3 when it comes to the two nvme items in the raid configurations
    the NVMe units are shown as nvme0n nvme1n These for the /boot partition are shown as /dev/mapper127 the / partion is shown as /dev/(long serisls if numbers0

    nvme0n1p2 and nvmw1n1p2 for / /dev/luksxxxxxxxxxxxxxx
    nvme0n1p3 and nvme1n1p3 for /boot /dev.mapper127

    thank you for your patience

    GRS

    1. Madhu Desai Avatar

      Hello, Smithy. Sorry for the delay in responding. As you're using a BTRFS RAID1 volume with two disks, I'm assuming you'll need to define each one separately. I haven't used RAID much personally. For example, in the /boot/efi/EFI/fedora/grub.cfg file, you must include the UUIDs of both devices manually, something like this.
      cryptomount -u xxxxxxx xxxxxxx

      Hope it helps.

  23. smithy Avatar
    smithy

    I have found the above article extremely useful, however I would like to set up my system such that the btrfs group volume as indicated above is configurted also as RAID1 system using the two NVMe 1TB I have. I also want to set up as a separate btrfs volume (if needed) a RAID1 system using the two hard disks sda and sdb with 4 sub volumes. I wonder if it possible to point me in the right direction as to how to set up the raid 1 system using the NVMe devices. All with LUKs encryption. Can I have Luk1 for the NVMe Btrfs grpoup volume and Luks2 for the btrfs group volume on the Hard disks
    Thanks

    1. Madhu Desai Avatar

      Hi Smithy. You can easily set up RAID1 using the Fedora anaconda installer. Certain changes must be made to the way partitions and subvolumes are created and defined. Please refer to the screenshots I've attached. Is a sample for 80GiB 2 NVMe disks.
      https://postimg.cc/gallery/5Lrc7Jb

      Follow this instruction to set up btrfs raid1 on sda and sdb disks.
      https://btrfs.wiki.kernel.org/index.php/Using_Btrfs_with_Multiple_Devices

      Yes, you can have LUKS1 for NVMe and LUKS2 for sda/sdb drives.

  24. Curie Avatar
    Curie

    TPM is a annoying thing.

    Now if i want to use snapper in grub.
    It does not show kernel in the snapshots menu.

    Due to tpm module not able to load
    "tpm.c(148) : Grub unkown TPM error

    Please press Any Key..... "

    "you need to load to module first"

    The Internet says reinstall grub and disable tpm in the UEFI.

    I tried "rmmod tpm" but no module was found.

    And I don't want to disable it cause I need it to unlock Windows bitlocker.

    1. Madhu Desai Avatar

      Hello, Curie. I'm not familiar with TPM, and I don't use Microsoft Windows either. But I looked it up and found this link, which may be useful. Could you please have a look at it and see if it helps?

      TPM Data-at-rest encryption with LUKS

      Also look at
      man systemd-cryptenroll

  25. Curie Avatar
    Curie

    Okay, I've run the test for my system

    Surface Book 2: i7-8650u // 16gb ram // 256gb ssd

    01: keyboard on //
    02: password //
    03: decrypt /boot //
    04: gdm shows //
    05: desktop login

    Before changing iterations: 170,000
    01 00:06.22 00:06.22
    02 00:13.61 00:07.39
    03 01:10.19 00:56.58
    04 01:31.72 00:21.53
    05 01:40.89 00:09.17

    Iter-time 500

    01 00:06.35 00:06.35
    02 00:15.11 00:08.76
    03 00:30.93 00:15.82
    04 00:49.46 00:18.53
    05 00:56.48 00:07.02

    That's about one third of the difference.

    I will change it back to 4000, I guess
    Or probably just encrypt without /boot

    I think encrypt just / is secure enough.

    If grub gives a graphical ui or Tell me what's doing with verbose and blanking cursor, I would love to encrypt /boot in the future, even if it takes 2 minutes to unlock.

  26. Curie Avatar
    Curie

    Friendly notice

    BTW, this page is not showing in Google search. Even if I search the exact title "fedora-36-with-luks-full-disk-encryption"

    Maybe you can work on something to make it work, then, more people can reach your website, so useful that many people get helped.

    1. Madhu Desai Avatar

      Thanks. Because this is a new article, I believe it will take some time for Google's search bot to present it on the first page. Also, because my website is also new, the Google search engine usually prioritizes well-established websites on its first page of results.

      Anyway, thank you for bringing it to my attention. I'll keep a watch on it and, if necessary, adjust the SEO keywords.

  27. Madhu Desai Avatar

    Did you run 'grub2-mkconfig -o /boot/grub2/grub.cfg' before trying the rollback?

  28. Curie Avatar
    Curie

    I'm curious. Why not set btrfs sub-volume
    /root, name as "@" and Mount Point to "/" ;
    /home, name as "@home" and Mount Point to "/home

    Like most people does

    1. Madhu Desai Avatar

      You can also use names such as @ and @home. I just followed Fedora's naming conventions.

  29. Curie Avatar
    Curie

    When I go into grub-btrfs, and select a snapshots, I don't get the options which you have shown in the picture.

    There is no kernel to select, only the top option, and when I select it just says "press any key to continue"

    Also I cannot dual boot to Windows in grub mebu

    1. Madhu Desai Avatar
      Madhu Desai

      Try again after running 'grub2-mkconfig -o /boot/grub2/grub.cfg'.

  30. Madhu Desai Avatar
    Madhu Desai

    Go ahead, you won't have any trouble with secure boot.

  31. Curie Avatar
    Curie

    About the sub-volume order things is no-longer exists with the latest Fedora36 installer that I am using right now.

    **FIX**
    " there are some problems in the article at here. Even the order problem hasn't fixed, with the order you gave, won't get the result from your picture shown.

    "Repeat the same process for the other subvolumes. I created other sub-volumes in the following order: usr-local (/usr/local), var (/var), tmp (/tmp), opt (/opt), and lastly home (/home)."
    **FIX**

    I just installed fedora 36, and just create sub-volume by this order and get the result of your picture showing.

    "/var > /usr/local > /tmp > /.snapshots > /opt > /home

    1. Madhu Desai Avatar

      Interesting. I've installed multiple systems with Fedora 36 in the last week, and I always got it correct when I created subvolumes in reverse order. What does your 'btrfs subvolume list /' show?

      1. curie Avatar
        curie

        ” there are some problems in the article at here. Even the order problem hasn’t fixed, with the order you gave, won’t get the result from your picture shown.

        What I meant here, was that your guide was written wrongly?
        because what shown in the picture was:

        " /home > /opt > /.snapshots > /tmp > /usr/local > /var "

        **TO FIX** Whereas your guide in text says: **TO FIX**

        " /.snapshots > /usr/local > /var > /tmp > /opt > /home"

        **TO FIX****TO FIX****TO FIX****TO FIX****TO FIX****TO FIX**

        which is completely different from the picture you've shown
        it does not follow the order, no matter reverse or sticking to

        “/var > /usr/local > /tmp > /.snapshots > /opt > /home"

        1. Madhu Desai Avatar

          You're referring to the 8th image. No need to worry about that. It makes no difference how the subvolumes are ordered in that image. It changes from system to system. That is why I used the phrase "something like this" in my post.

          What matters is what is shown in the 9th image (Summary of Changes), as well as the command 'btrfs subvolume list /'.

      2. curie Avatar
        curie

        I've not yet complete the installation, I'm still doing some research before deciding to go this way. I was hoping the /boot decryption won't take that long (30sec)

        1. Madhu Desai Avatar
          Madhu Desai

          I suggest you install Fedora and see how long it takes to display the GRUB menu. If you are unhappy with the time it takes, please let me know; you can later cut the time in half by using --iter-time 1000 and a fourth by using --iter-time 500.

          1. curie Avatar
            curie

            Without changing anything, it takes 1 minute to unlock. unbelievable.

            I thought my CPU wasn't that bad (Surface Book2: i7 8650U)

          2. Madhu Desai Avatar
            Madhu Desai

            It takes roughly 29 seconds on the old Intel i3-4130 4th Gen. I'm not sure why this happens. If you wish to change the iteration time, see the comments section of my other article 'Install Fedora 35 with LUKS Full Disk Encryption (FDE)', where I explain how to do so without losing data.

          3. curie Avatar
            curie

            Also, there is one big drawback by encrypting /boot and boot with grub.

            When I type the passphrase to unlock, I have no idea whether the keyboard is on, ready to use or not. Usually takes about 5 sec before I can type anything, IDK why grub does that.

            Because of the delay of keyboard, the passphrase entered was wrong and grub fallback to rescue mode. IDK what to do other than reboot again.

            *****Drawbacks******

            (1) If only /root is encrypted. DM-CRYPT will give you 3 chance to input the passphrase again if there is typo.
            (2) Also comes with a beautiful fedora ui & **cursor indicator** extremely important, it tells me I'm able to type my password into the prompt... grub doesn't give you that.

            other than that, I've no complaints. I've the ARTICLE and VIDEO both. I helps me a lot going through all these steps.

            ONCE AGAIN, THANK YOU

  32. Curie Avatar
    Curie

    I've also read another 35 guide from you and mentioned about decrypting the boot takes 30secs or so.

    (1) If I follow this 36 guide, does it take that long to decrypt when booting?
    (2) If I want a shorter boot time, is it better for me to put /boot in a different partition?

    1. Madhu Desai Avatar

      (1) It all depends on your CPU. If you have a fast CPU, it will take less time.
      (2) Because GRUB only supports LUKS1, it makes no difference whether it is on a separate /boot partition or within the root file system.

  33. Curie Avatar
    Curie

    Hello there, my friend,

    I love your guides, it's very detailed and suitable to me.

    I've 2 questions in regard to your guides ("Install Fedora 36 with LUKS Full Disk Encryption + snapper + grub-btrfs" & "Enable Fedora UEFI Secure Boot with Custom Keys and Self-Signed Bootloader, Kernel, and Modules"
    (1) Is it possible to upgrade to luks2 from luks1 with th cryptsetup command, once Grub released support for luks2 with Argon2?

    (2) Can it use this guide with other bootloader installed like refind & systemd-boot.
    I also want to install other customized kernel & module, dual boot windows.

    Thank you for your hard work.

    1. Madhu Desai Avatar

      Hi, Curie. I'm happy you liked the guides. Regarding your queries,

      (1) Yes, you can upgrade to LUKS2 from LUKS1 using cryptsetup without losing your data.
      (2) From what I recall, the LUKS1 limitation only applies to GRUB. I haven't tried refind, but it should support LUKS2 booting. Please double-check, as I don't know much about refind.

      1. curie Avatar
        curie

        (1) nice, happy to hear that
        (2) the reason why I want to use refind or systemd-boot:

        Refind: GRUB has a vertical boot menu which is not convenient for my keyboard layout. Is easier for me to use <LEFT/RIGHT> key to select. And REFIND gives me that option

        Systemd-Boot: Based on my experience, systemd-boot has extremely short boot time. And easy to configure

        However, after reading the information you gave, I learned GRUB has the advantage of a) unlocking /boot || b) boot btrfs snapshots || c) support luks

        Thanks to your guide, I've learned a lot. Also, I'm considering to go back to Grub 😀

      2. curie Avatar
        curie

        I've been using Timeshift for a year now because of the easy gui.

        But I just find out the big advantage of using snapper. which is read-only snapshots. Which is very important for actual backup and copying it to a external drive. That's what Timeshift's limitation.

        I'll switch to snapper from now on

        1. Madhu Desai Avatar

          Yes indeed, snapper is much more powerful and flexible than time shift.