Fedora 36 Workstation includes a lot of new changes, such as GNOME 42, the relocation of the RPM database from /var to /usr to enable snapshot and rollback regime, and a slew of other improvements that make working with Fedora 36 even more delightful. So, in this blog post, I will show how to properly install Fedora 36 with snapper and grub-btrfs packages that support snapshots and rollbacks.
The relocation of the RPM database from /var/lib/rpm to /usr/lib/sysimage/rpm is an important step toward fully supporting snapshot and rollback regimes, as OpenSUSE Linux does.
The RPM database contains details of installed packages and their metadata. It is also used by RPM to clean up packages once they have been uninstalled. Users can also query the database for information about the packages and the files they include.
Having the RPM database stored in the /usr means when the system is rolled back, the /usr may be rolled back as a unit, without having to change /var. This will prevent any failed or undesired updates of the operating system.
The DNF database location, however, has not been migrated to /usr in Fedora 36. It is still held back in /var/lib/dnf. This means if you rollback a snapshot, the dnf history will be out of sync with what is actually installed/removed from the OS, and the command dnf history will return an error. It's not a big deal if you don't use dnf history, I guess. DNF's history will remain in /var until DNF is updated to version 5.
If you prefer to install Fedora 36 with LUKS Full Disk Encryption, please visit my other article ‘Install Fedora with LUKS Full Disk Encryption and Snapper with Full System Rollback‘.
Table of Contents
- 1. Disk Layout for Installing Fedora 36
- 2. Install Fedora 36 Workstation
- 3. Install and Configure Snapper
- 4. Setup Snapshot Booting from the GRUB Menu
- 5. Create Snapshots and Test the Undochange and Rollback Features
- 6. Conclusion
- Watch on YouTube
1. Disk Layout for Installing Fedora 36
I'll be using an 80 GiB hard disk, and this is how the disk partition looks.
NAME            SIZE    FSTYPE   LABEL     MOUNTPOINT
/dev/sda         80G
├─/dev/sda1     512M    vfat     EFI       /boot/efi
└─/dev/sda2    79.5G    btrfs    FEDORA    /
And these are the subvolumes created from the btrfs volume (/dev/sda2).
NAME         MOUNTPOINT     TYPE
[main]       /              mainvolume
home         /home          subvolume
opt          /opt           subvolume
tmp          /tmp           subvolume
var          /var           subvolume
usr-local    /usr/local     subvolume
snapshots    /.snapshots    subvolume
Subvolumes created to exclude directories from snapshots:
/home
Contains the user's data. It is excluded to avoid data loss on rollbacks.
/opt
Third-party products usually get installed here. It is excluded to avoid applications installed in /opt from being uninstalled during rollbacks.
/tmp
The directory contains temporary files that you do not need when taking a snapshot.
/var
This directory holds various variable data, such as logs, and temporary caches. It is also the default location for virtual machine images and databases. Therefore, this subvolume is created to exclude all of this variable data. Copy-On-Write will also be disabled on this directory.
/usr/local
Contains software that was manually installed. It is excluded to prevent these installations from being uninstalled during rollbacks.
2. Install Fedora 36 Workstation
Boot your system using the Fedora 36 Workstation installer in UEFI mode. On the welcome screen, select the Install to Hard Drive option. Next, select your Language, Keyboard, and configure Time & Date. Following that, from the INSTALLATION SUMMARY screen, select Installation Destination.
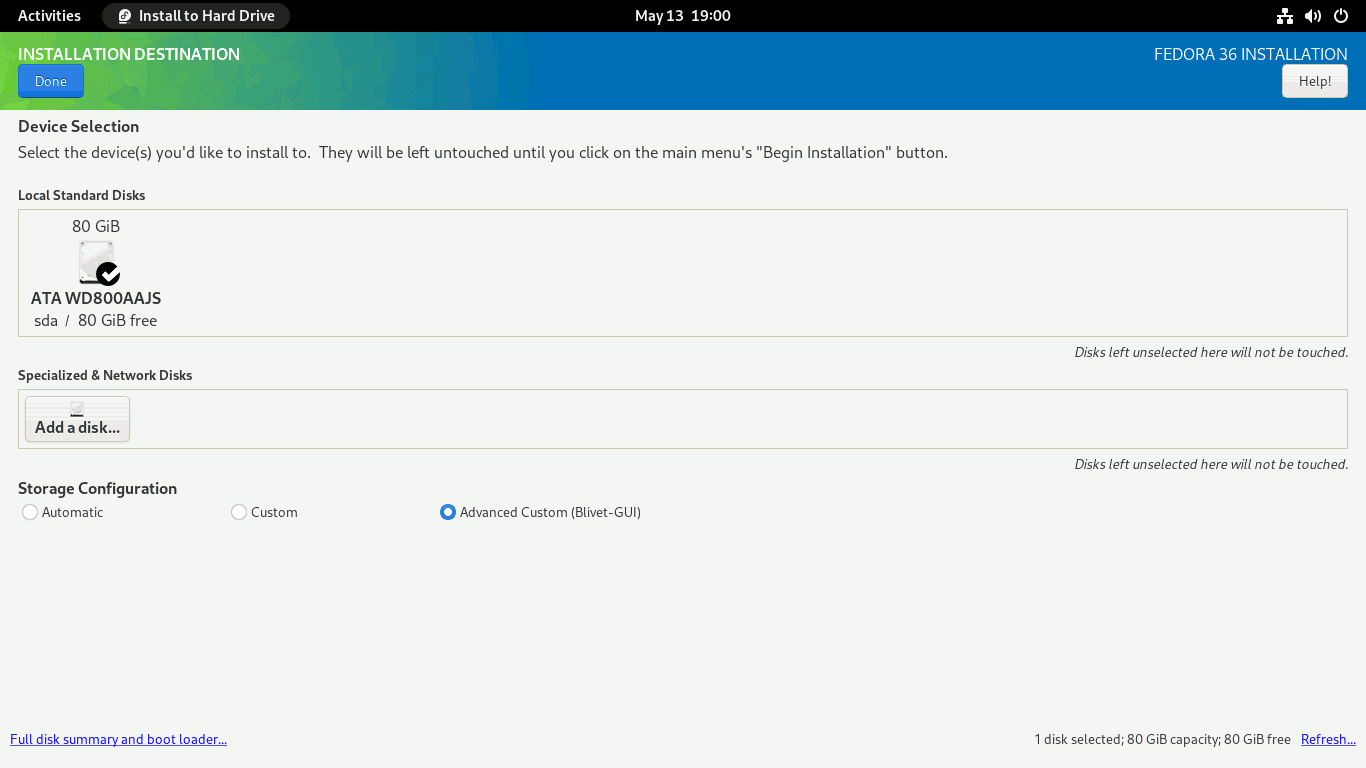
You should now be on the INSTALLATION DESTINATION screen. To proceed, pick the Advanced Custom (Blivet-GUI) radio button and then hit the Done button.
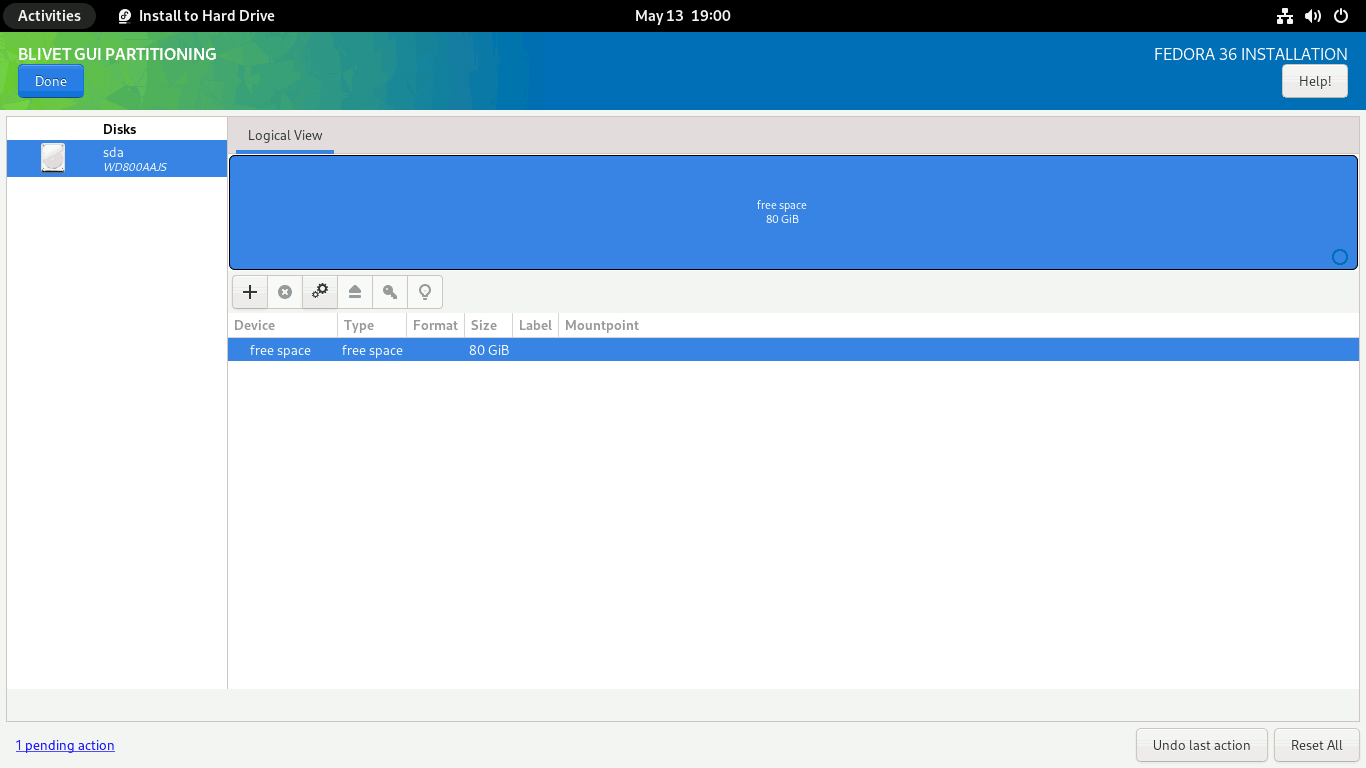
You will see the BLIVET GUI PARTITIONING screen. Here you will create partitions, file systems, and btrfs subvolumes necessary to install Fedora 36 Workstation.
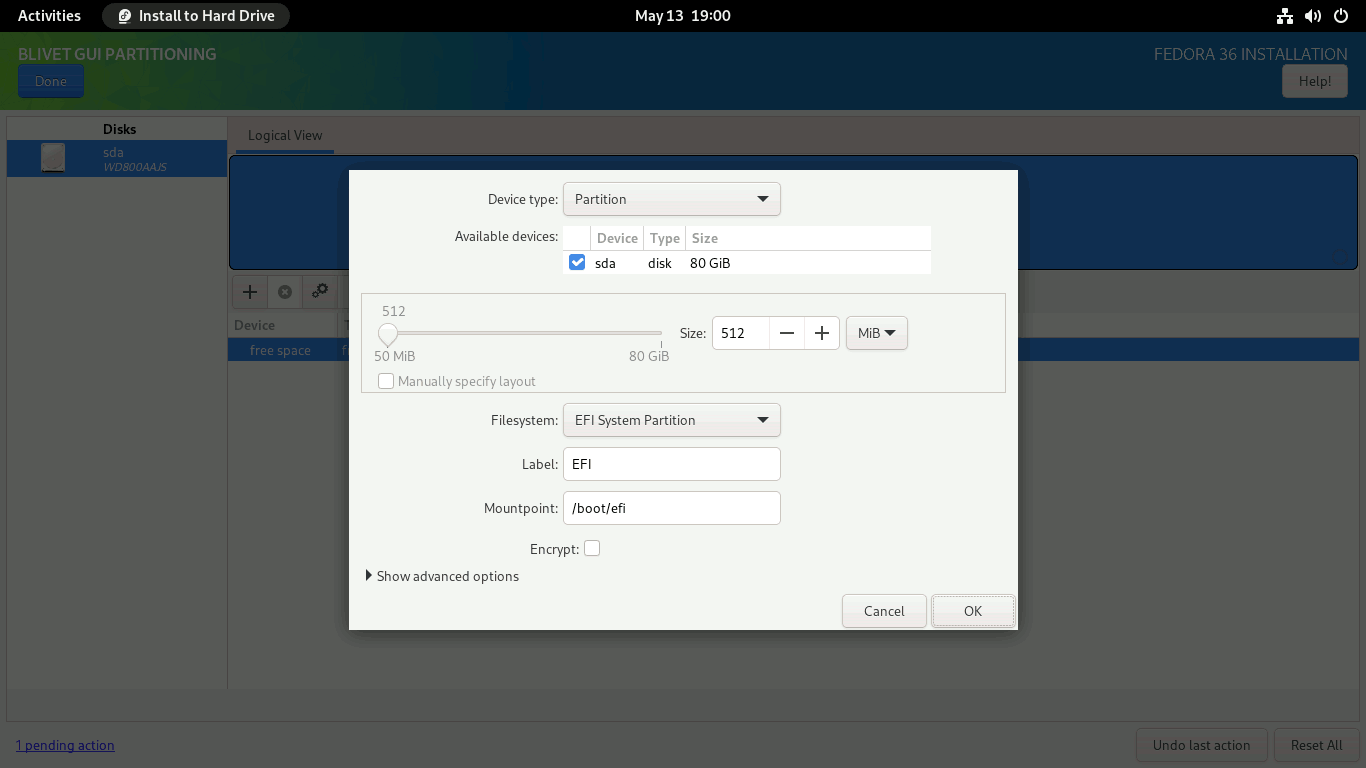
First, you need to create and mount the EFI partition. Select the free space and click the + sign to create a partition.
Set the partition Size to 512 MiB, the Filesystem to EFI System Partition, and the Mountpoint to /boot/efi.
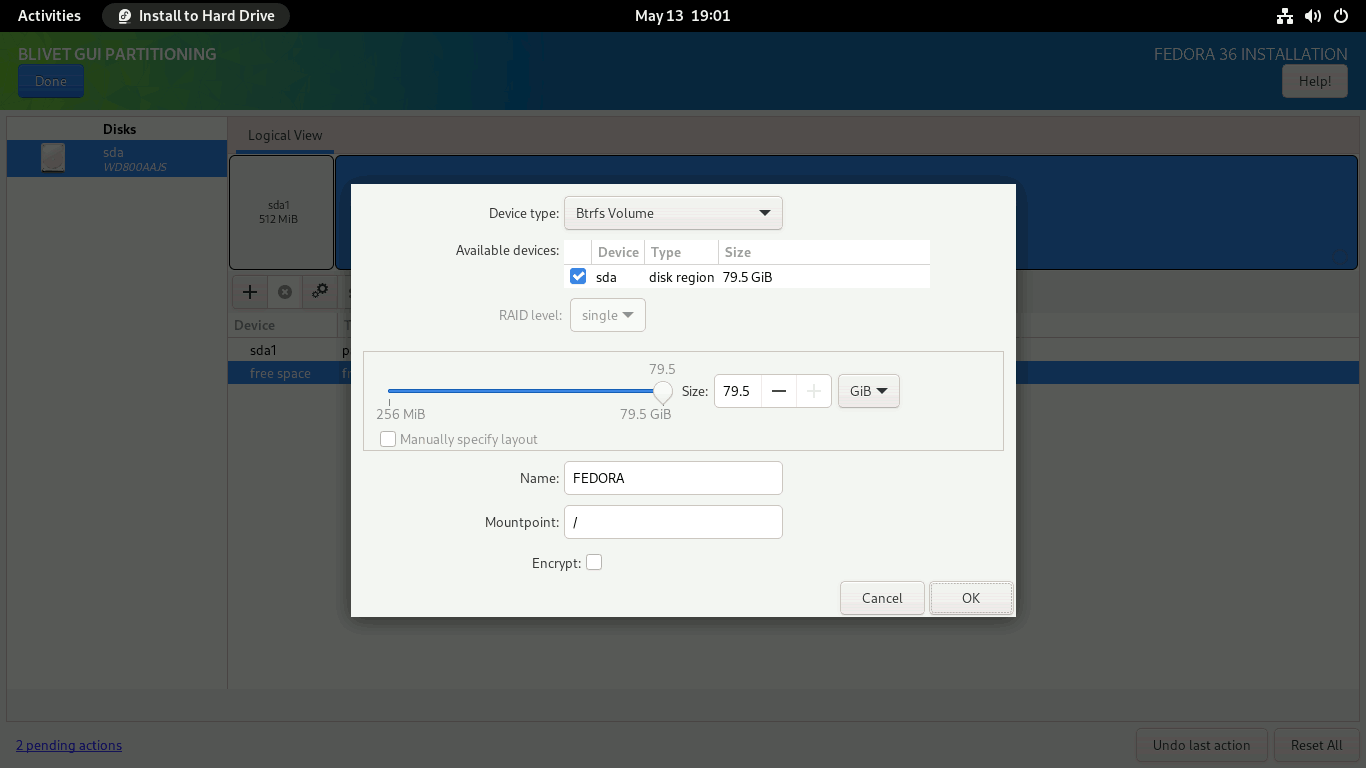
Then, you need to create a btrfs volume where you can create all the subvolumes needed to install Fedora Linux.
Select the free space again and click on the + sign to create a Btrfs volume. Set the Device Type to Btrfs Volume. Set the volume name for Btrfs. I named the Btrfs volume FEDORA, but you can name it whatever you like. Set the Mountpoint to / and click on the OK button.
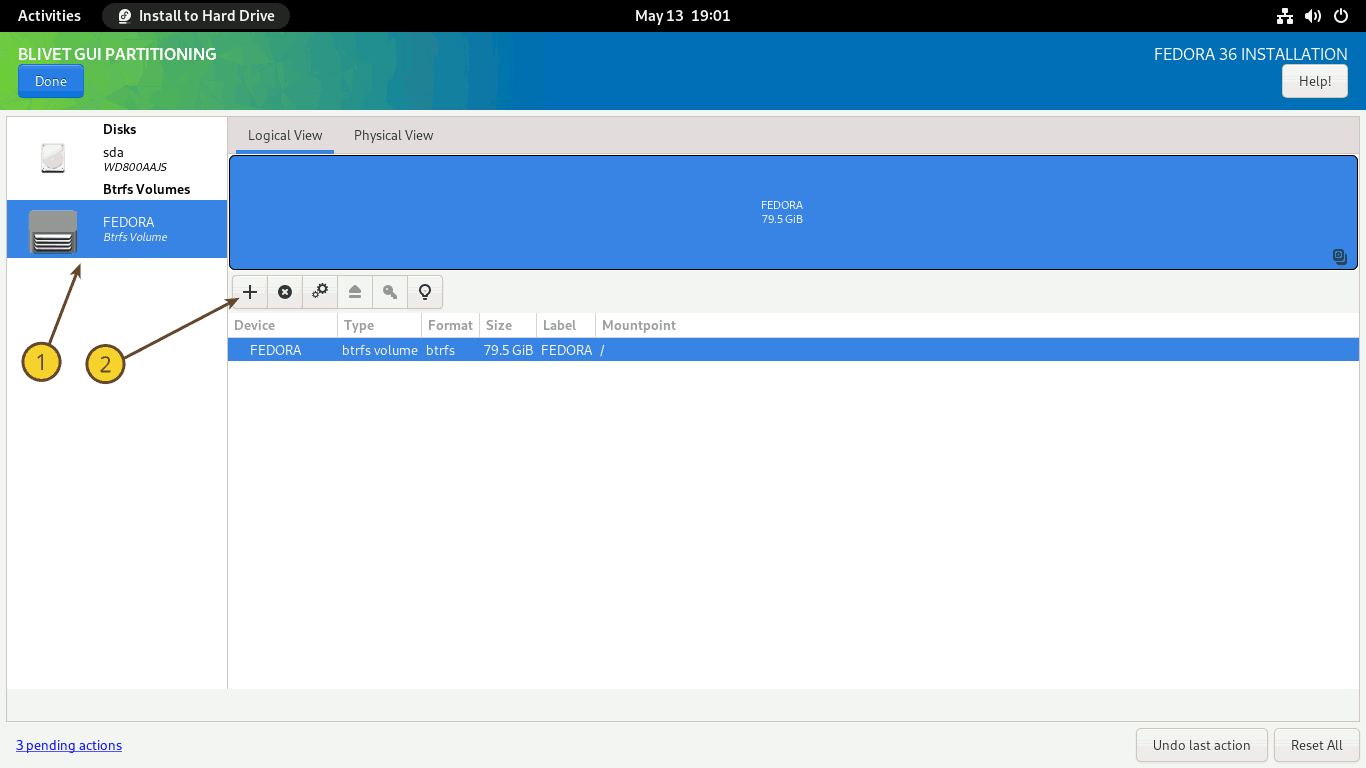
Next, you must create subvolumes. (1) Select the Btrfs Volume from the left panel, and (2) click on the + sign on the right panel.
Subvolumes, unlike standard partitions or LVM logical volumes, do not have a size; instead, they behave like directories with shared space. However, the resemblance of subvolumes to directories ends here. Each subvolume, like a file system, has its own file tree, has its own POSIX namespace, and has its own pool of inodes. This means that hard links cannot be created between the subvolumes. From this point of view, a subvolume begins to look more like a separate file system. Subvolumes are not block devices either.
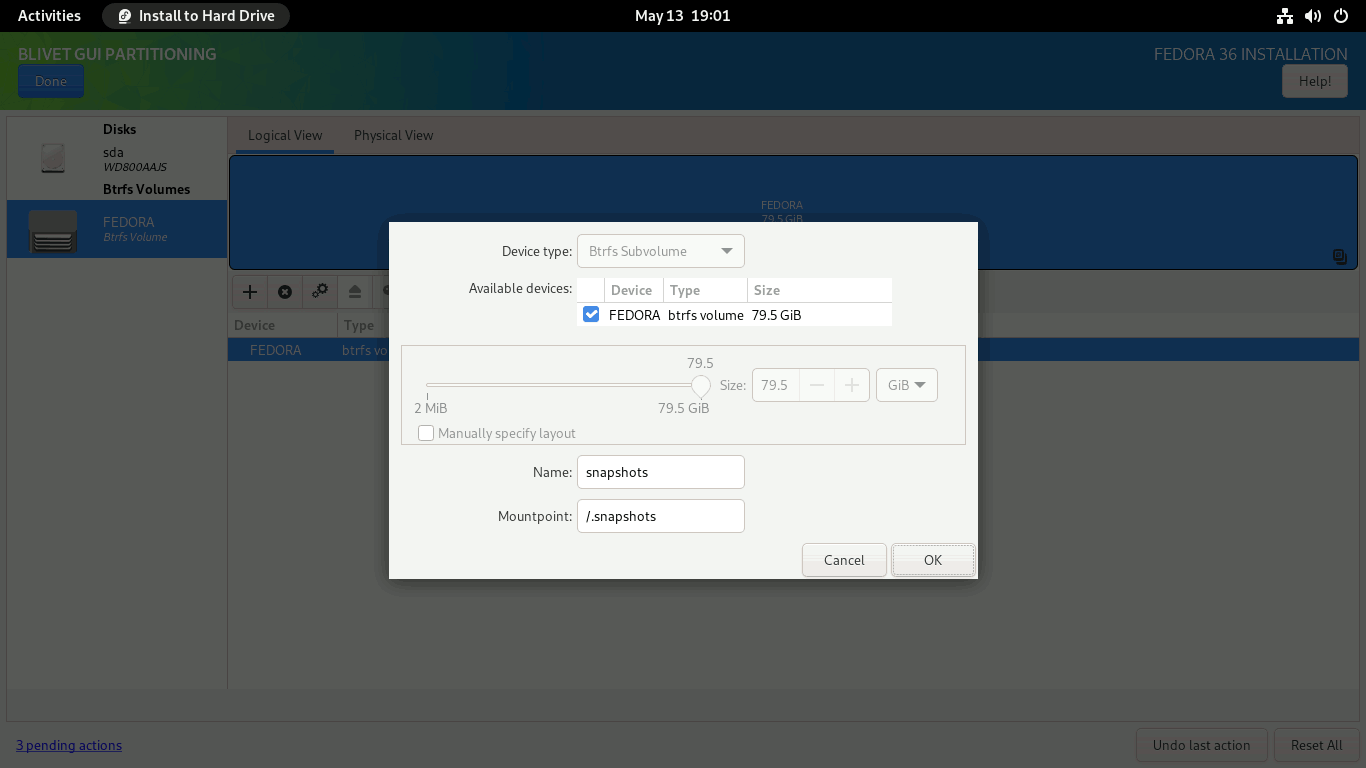
The Btrfs subvolumes are created in reverse order in the Anaconda installer for some reason. It means that the first specified subvolume is created last, and the last specified subvolume is created first. I will therefore specify the subvolumes in reverse order.
Create snapshots subvolume. Enter the Name as snapshots and Mountpoint as /.snapshots. Click OK to finish.
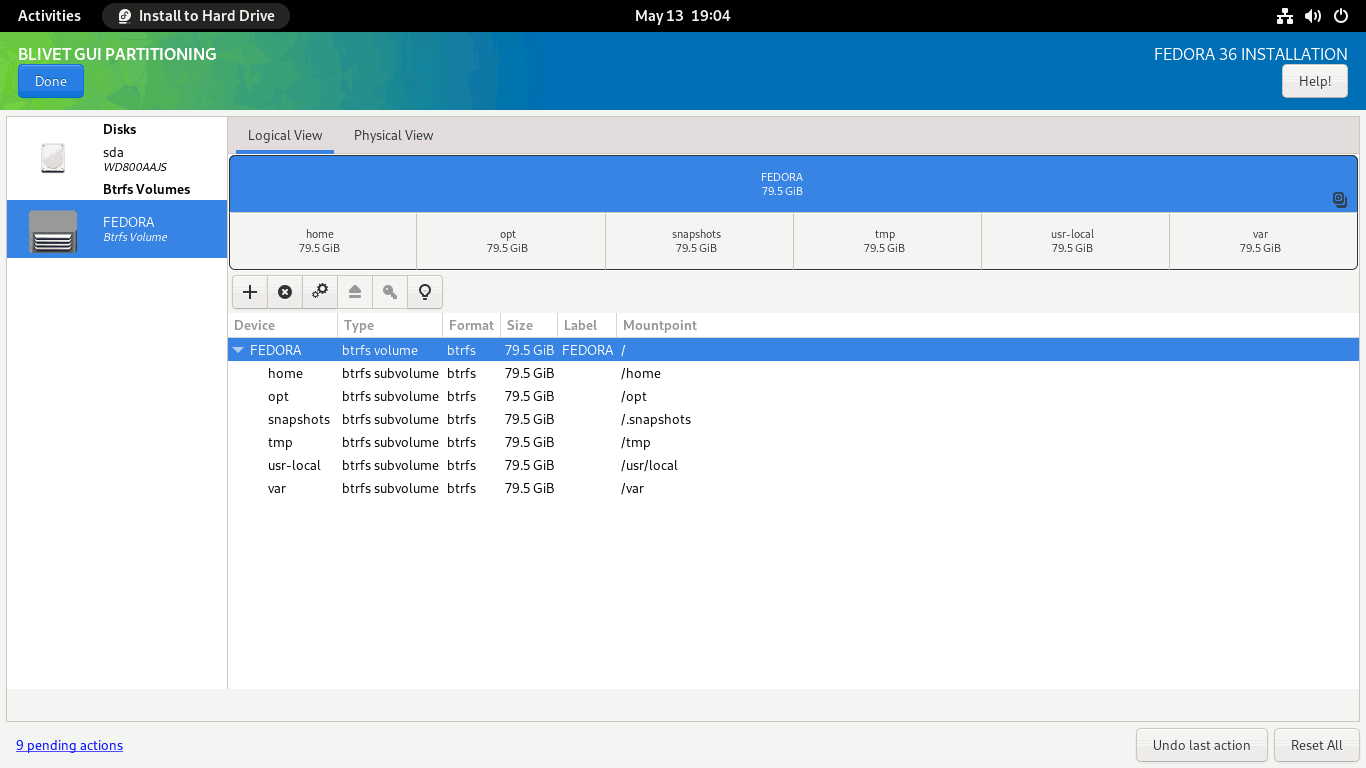
Repeat the same process for the other subvolumes. I created other subvolumes in the following order: usr-local (/usr/local), var (/var), tmp (/tmp), opt (/opt), and lastly home (/home).
When completed, the subvolumes must look something like this. Click Done to create subvolumes.
As with the swap partition, Fedora generates a SwapOnZRAM upon startup, so no separate swap partition is needed.
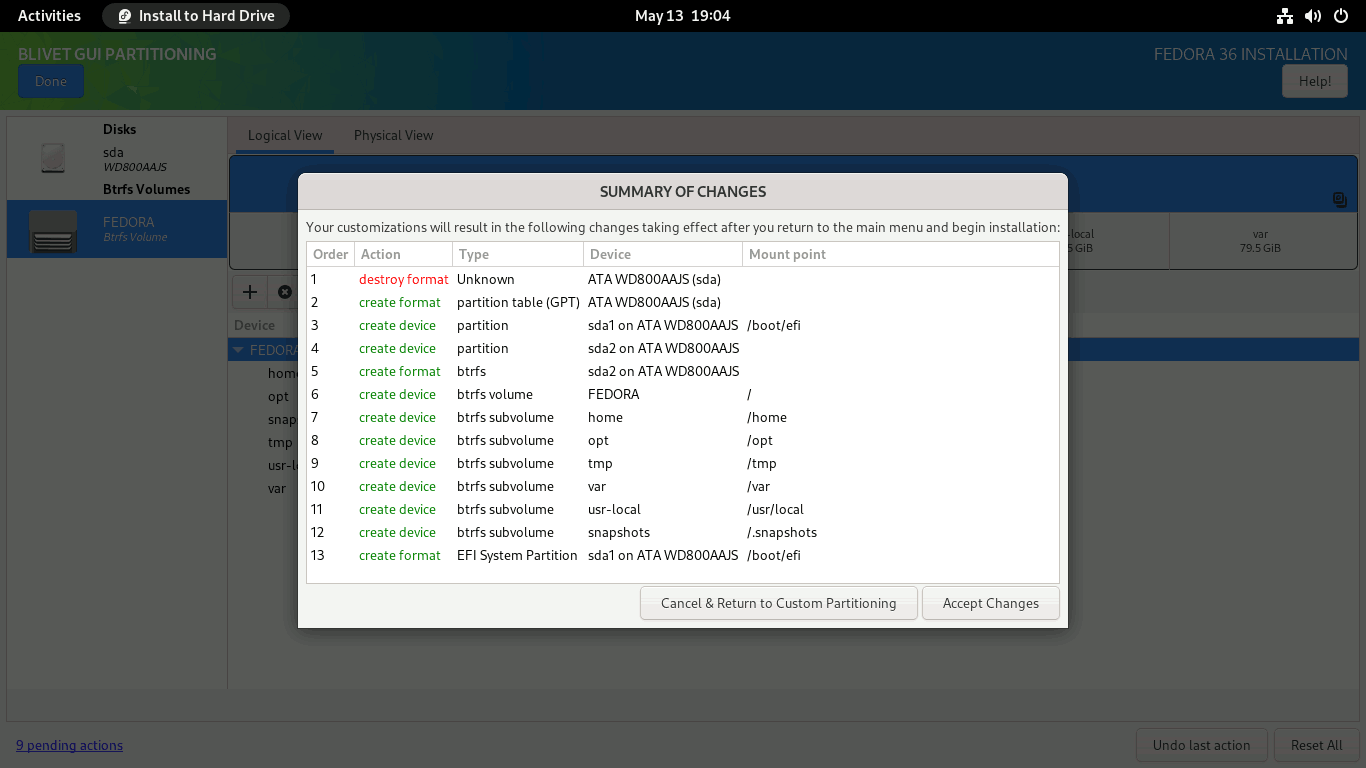
Verify that the partitions and subvolumes are properly defined on the SUMMARY OF CHANGES screen. To finalize the changes, click the Accept Changes button.
You will be returned to the INSTALLATION SUMMARY screen. Press the Begin Installation button to start the installation process. The installation process will start. Just sit back and relax.
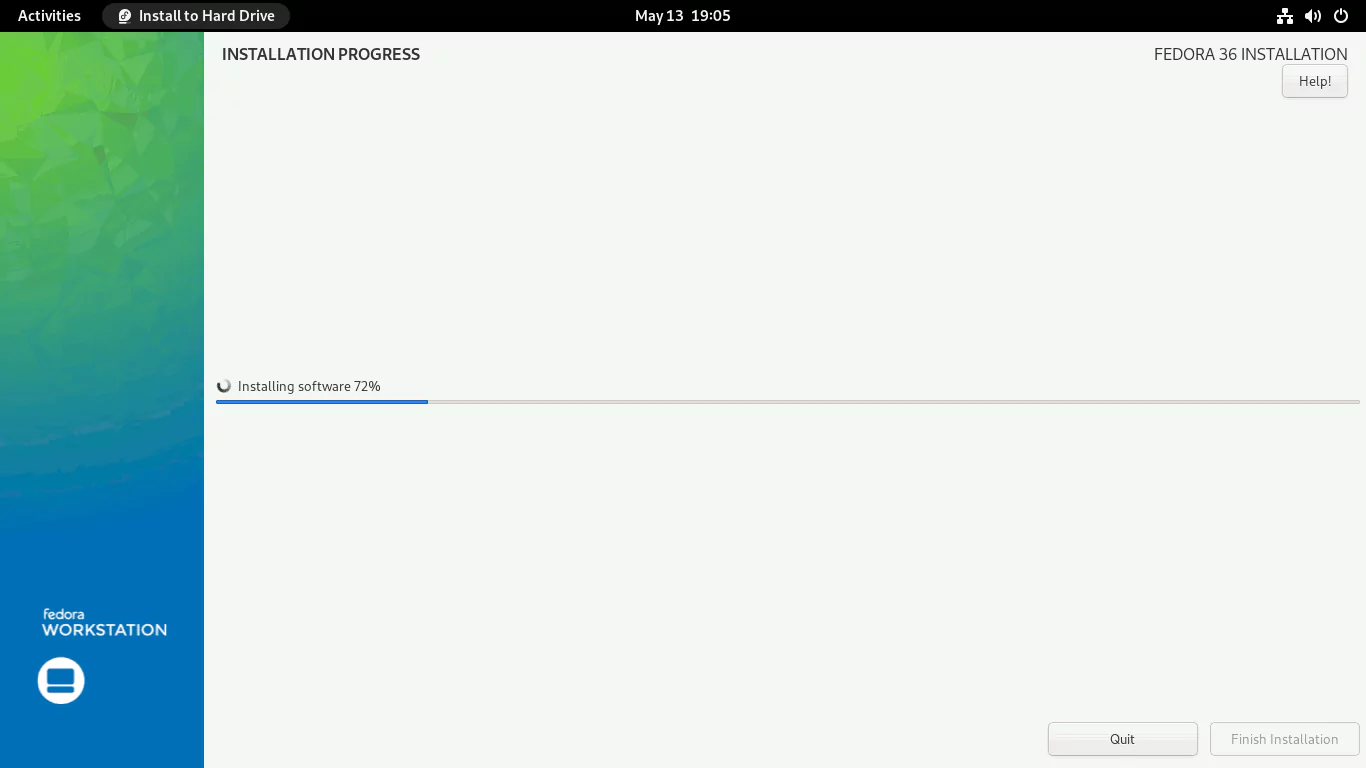
When the installation is finished, click the Finish installation button and restart the system.
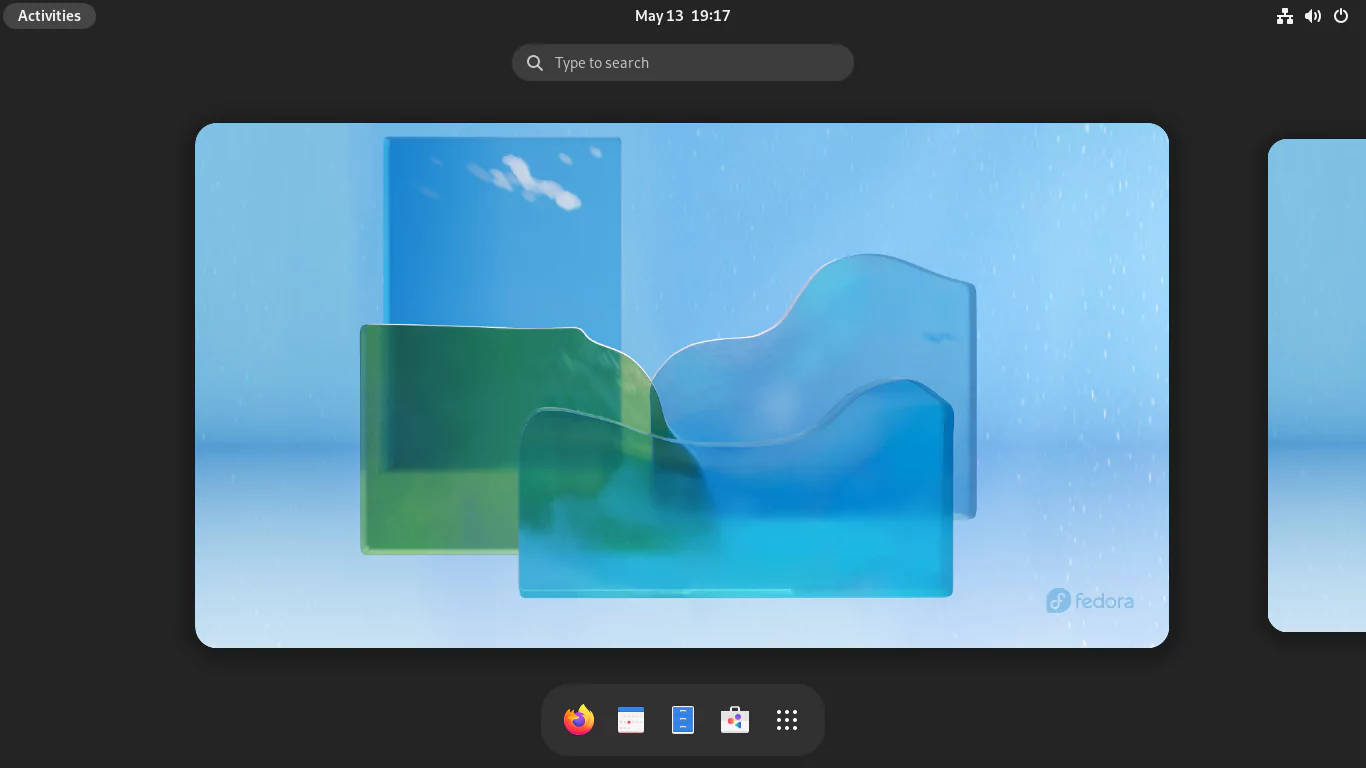
The last phase of the installation procedure will start. Click the Start Setup button to complete the remaining customization steps, such as setting a new login, password, and so on.
You will then be logged into the Fedora 36 Workstation with the all-new Gnome 42 desktop interface.
Now, open the Gnome terminal and check your current setup.
# btrfs subvolume list /
ID 256 gen 79 top level 5 path home
ID 257 gen 42 top level 5 path opt
ID 258 gen 79 top level 5 path tmp
ID 259 gen 79 top level 5 path var
ID 260 gen 65 top level 5 path usr-local
ID 261 gen 19 top level 5 path snapshots
ID 262 gen 77 top level 259 path var/lib/machines

# btrfs filesystem show /
Label: 'FEDORA'  uuid: e4ddd045-7253-4de2-a7ad-546dcd39c9c9
	Total devices 1 FS bytes used 4.86GiB
	devid    1 size 79.50GiB used 8.02GiB path /dev/sda2

# lsblk -p
NAME        MAJ:MIN RM  SIZE RO TYPE MOUNTPOINTS
/dev/sda      8:0    0   80G  0 disk
├─/dev/sda1   8:1    0  512M  0 part /boot/efi
└─/dev/sda2   8:2    0 79.5G  0 part /var
                                     /usr/local
                                     /tmp
                                     /opt
                                     /home
                                     /.snapshots
                                     /
/dev/zram0  252:0    0  3.8G  0 disk [SWAP]

# cat /etc/fstab
UUID=E892-9EC3                            /boot/efi    vfat    umask=0077,shortname=winnt 0 2
UUID=e4ddd045-7253-4de2-a7ad-546dcd39c9c9 /            btrfs   defaults        0 0
UUID=e4ddd045-7253-4de2-a7ad-546dcd39c9c9 /home        btrfs   subvol=home,compress=zstd:1 0 0
UUID=e4ddd045-7253-4de2-a7ad-546dcd39c9c9 /opt         btrfs   subvol=opt,compress=zstd:1 0 0
UUID=e4ddd045-7253-4de2-a7ad-546dcd39c9c9 /tmp         btrfs   subvol=tmp,compress=zstd:1 0 0
UUID=e4ddd045-7253-4de2-a7ad-546dcd39c9c9 /var         btrfs   subvol=var,compress=zstd:1 0 0
UUID=e4ddd045-7253-4de2-a7ad-546dcd39c9c9 /usr/local   btrfs   subvol=usr-local,compress=zstd:1 0 0
UUID=e4ddd045-7253-4de2-a7ad-546dcd39c9c9 /.snapshots  btrfs   subvol=snapshots,compress=zstd:1 0 0
Because of the Copy-On-Write feature of BTRFS, the performance of qcow2 images and databases suffers when they are on a BTRFS subvolume. Therefore, you need to disable the Copy-On-Write function on the /var directory.
# chattr -R -f +C /var

# lsattr -d /var
---------------C------ /var
Enable snapshot booting by appending the SUSE_BTRFS_SNAPSHOT_BOOTING="true" option to the /etc/default/grub file.
# echo 'SUSE_BTRFS_SNAPSHOT_BOOTING="true"' >> /etc/default/grubUpdate the grub.cfg file.
# grub2-mkconfig -o /boot/grub2/grub.cfgBecause snapshot booting is now enabled, you must make modifications to the /boot/efi/EFI/fedora/grub.cfg file as well. Add set btrfs_relative_path="yes" to the file at the beginning.
# sed -i '1i set btrfs_relative_path="yes"' /boot/efi/EFI/fedora/grub.cfgAnd reboot.
# reboot3. Install and Configure Snapper
Install snapper and the optional package python3-dnf-plugin-snapper. The python3-dnf-plugin-snapper package allows you to generate pre and post snapshots every time you install a package on the system with the dnf command-line tool.
$ sudo dnf install snapper python3-dnf-plugin-snapperThen you must create a new snapper configuration for the Btrfs volume at '/'. Because you previously created a snapshots subvolume with ID=5 in the /.snapshots directory during Fedora installation, attempting to create a new snapper configuration for '/' now will result in an error. To work around this issue, make the following adjustments before creating a new snapper configuration for the '/'.
Remove the directory /.snapshots.
$ sudo umount /.snapshots
$ sudo rmdir /.snapshots
Now, create a new snapper configuration named root for the Btrfs volume at /.
$ sudo snapper -c root create-config /This will create a configuration file at /etc/snapper/configs/root, a new subvolume .snapshots, and the directory /.snapshots.
Now that the snapper is configured, delete the /.snapshots subvolume.
$ sudo btrfs subvolume delete /.snapshots
Delete subvolume (no-commit): '//.snapshots'
This will remove the newly created subvolume .snapshots and directory /.snapshots, but the configuration file at /etc/snapper/configs/root will be kept.
Create the directory /.snapshots again.
$ sudo mkdir /.snapshotsAs you have already linked the /.snapshots directory to the snapshots subvolume in the /etc/fstab file, all you have to do now is reload it.
$ sudo systemctl daemon-reload
$ sudo mount -a
Your setup must look something like this.
$ lsblk -p
NAME        MAJ:MIN RM  SIZE RO TYPE MOUNTPOINTS
/dev/sda      8:0    0   80G  0 disk
├─/dev/sda1   8:1    0  512M  0 part /boot/efi
└─/dev/sda2   8:2    0 79.5G  0 part /.snapshots
                                     /tmp
                                     /var
                                     /usr/local
                                     /home
                                     /opt
                                     /
/dev/zram0  252:0    0  3.8G  0 disk [SWAP]
You’re almost done; all that’s left is for the normal user to be able to list snapshots. Add your username to snapper's root config.
$ sudo snapper -c root set-config ALLOW_USERS=$USER SYNC_ACL=yesAnd change the group permission of the /.snapshots directory.
$ sudo chown -R :$USER /.snapshotsFinally, disable the GRUB menu auto-hide feature. When Fedora is the only operating system installed on the system, Fedora implements a feature called ‘Hidden Grub Menu‘. The goal is to keep the interface as simple as possible, providing information only when it is necessary. However, you need to visually see the GRUB menu to verify whether the rollback is executed correctly.
This feature can be disabled by doing the following.
$ sudo grub2-editenv - list
saved_entry=fcd7b7b3e277487a87495bd46b701d74-5.17.5-300.fc36.x86_64
menu_auto_hide=1
boot_success=1

$ sudo grub2-editenv - unset menu_auto_hide
The snapper configuration is now complete. Now list the snapshots.
$ snapper ls
 # | Type   | Pre # | Date | User | Cleanup | Description | Userdata
---+--------+-------+------+------+---------+-------------+---------
0  | single |       |      | root |         | current     |
At this stage, you do not have any snapshots, we will create some later.
4. Setup Snapshot Booting from the GRUB Menu
As you have already installed snapper on your system, you can rollback to any snapshot by executing snapper rollback from the functioning system.
But what if you make a mistake and the system fails to boot properly the following time? You might wish to revert to a previous working snapshot. This is where snapshot booting from the GRUB menu comes in handy.
Thanks to Antynea, there is already a package called grub-btrfs, which you can now easily install on your system. The package adds "Fedora Linux snapshots" to the GRUB menu and allows you to boot to a snapshot in read-only mode to test it before rolling back to it in read-write mode.
So let's get grub-btrfs installed.
$ git clone https://github.com/Antynea/grub-btrfs.git
$ cd grub-btrfs
$ sudo make install
To make it work with Fedora, you must make a few adjustments to the grub-btrfs config file. So, open the config file and uncheck the lines listed below. Also, the path to grub2-mkconfig is /usr/sbin/grub2-mkconfig, not /usr/bin/grub2-mkconfig.
$ sudo vim /etc/default/grub-btrfs/config
...
GRUB_BTRFS_SHOW_TOTAL_SNAPSHOTS_FOUND="true"
GRUB_BTRFS_GRUB_DIRNAME="/boot/grub2"
GRUB_BTRFS_MKCONFIG=/usr/sbin/grub2-mkconfig
GRUB_BTRFS_SCRIPT_CHECK=grub2-script-check
...
Update the grub.cfg file. You will receive the 'No snapshots found' error since you have not yet created any snapshots, but don't worry, it will function properly after you do.
$ sudo grub2-mkconfig -o /boot/grub2/grub.cfg
Finally, enable the grub-btrfsd service.
$ sudo systemctl enable --now grub-btrfsdYour grub-btrfs setup is now complete.
5. Create Snapshots and Test the Undochange and Rollback Features
I'll do two tests here. I'll start by installing a package, then run the snapper undochange command to ensure that all modifications have been undone. Second, I will upgrade to the most current kernel, boot into it, purposely render the system unusable, and then attempt to rollback to the same kernel using the snapper rollback command using the post snapshot of the kernel update in an operational state.
Test 1: Install a package and undo it.
I'm going to install a little package called ps_mem here for testing purposes. I'll inspect the system after it's been installed to see what changes have been done. Then I'll try to undo the changes and see if I can get the system back to where it was before I installed it.
Install the ps_mem package. It displays the core memory used per program (not per process).
$ sudo dnf install ps_memRun the ps_mem program.
$ sudo ps_mem
 Private  +   Shared  =  RAM used	Program

288.0 KiB +  28.0 KiB = 316.0 KiB	mcelog
384.0 KiB +  81.5 KiB = 465.5 KiB	rtkit-daemon
492.0 KiB + 123.0 KiB = 615.0 KiB	gnome-session-ctl
364.0 KiB + 266.0 KiB = 630.0 KiB	alsactl
564.0 KiB +  99.5 KiB = 663.5 KiB	low-memory-monitor
588.0 KiB + 108.0 KiB = 696.0 KiB	gdm-wayland-session
...
...
 13.6 MiB +  13.7 MiB =  27.3 MiB	Xwayland
 25.4 MiB +   2.6 MiB =  28.0 MiB	firewalld
 15.3 MiB +  13.8 MiB =  29.0 MiB	gsd-xsettings
191.7 MiB +  27.8 MiB = 219.5 MiB	gnome-shell
---------------------------------
                        735.9 MiB
=================================
OK, the ps_mem package has been installed successfully. Check the snapper for snapshots.
$ snapper ls
 # | Type   | Pre # | Date                             | User | Cleanup | Description                 | Userdata
---+--------+-------+----------------------------------+------+---------+-----------------------------+---------
0  | single |       |                                  | root |         | current                     |
1  | pre    |       | Saturday 14 May 2022 08:25:05 PM | root | number  | /usr/bin/dnf install ps_mem |
2  | post   |     1 | Saturday 14 May 2022 08:25:09 PM | root | number  | /usr/bin/dnf install ps_mem |
As you can see, the pre (#1) and the post (#2) snapshots have been created for the ps_mem package.
Let me now examine the changes it has made to the system, between snapshots #1 and #2.
$ snapper status 1..2
+..... /boot/grub2/grub.cfg.new
+..... /usr/bin/ps_mem
c..... /usr/lib/sysimage/rpm/rpmdb.sqlite-shm
c..... /usr/lib/sysimage/rpm/rpmdb.sqlite-wal
+..... /usr/share/doc/ps_mem
+..... /usr/share/doc/ps_mem/LICENSE
+..... /usr/share/man/man1/ps_mem.1.gz
Now I'll undo the changes.
$ sudo snapper undochange 1..2
create:0 modify:2 delete:5
Check to see if the package ps_mem was indeed removed.
$ sudo ps_mem
sudo: ps_mem: command not found
Cool! The undo has been successful. But, because I want to keep the package ps_mem, I’ll undo the changes once again. This time from snapshot #2 to snapshot #1.
$ sudo snapper undochange 2..1
create:5 modify:2 delete:0

$ which ps_mem
/usr/bin/ps_mem
Test 2: Update the kernel and do a rollback.
In this rollback test, I'll update to the most latest kernel available at the time of writing. Then I'll boot into it and delete all of the kernel and initrd files, causing the system to fail the next time it boots. Then I'll check if I can recover the system by rolling back to the post snapshot of the kernel update and save the day.
Check the current kernel version.
$ uname -r
5.17.5-300.fc36.x86_64
Now update to the latest kernel.
$ sudo dnf -y update kernelAfter the kernel update is finished, restart the system and check the kernel version.
$ uname -r
5.17.6-300.fc36.x86_64
Also, check the snapper for pre (#3) and post (#4) kernel update snapshots.
$ snapper ls
 # | Type   | Pre # | Date                             | User | Cleanup | Description                   | Userdata
---+--------+-------+----------------------------------+------+---------+-------------------------------+---------
0  | single |       |                                  | root |         | current                       |
1  | pre    |       | Saturday 14 May 2022 08:25:05 PM | root | number  | /usr/bin/dnf install ps_mem   |
2  | post   |     1 | Saturday 14 May 2022 08:25:09 PM | root | number  | /usr/bin/dnf install ps_mem   |
3  | pre    |       | Saturday 14 May 2022 09:12:53 PM | root | number  | /usr/bin/dnf -y update kernel |
4  | post   |     3 | Saturday 14 May 2022 09:14:03 PM | root | number  | /usr/bin/dnf -y update kernel |
For the sake of the experiment, I’ll now delete all kernel and initrd files and make the system unusable.
$ sudo -i

# rm /boot/{vmlinuz,initramfs}*
rm: remove regular file '/boot/vmlinuz-0-rescue-fcd7b7b3e277487a87495bd46b701d74'? y
rm: remove regular file '/boot/vmlinuz-5.17.5-300.fc36.x86_64'? y
rm: remove regular file '/boot/vmlinuz-5.17.6-300.fc36.x86_64'? y
rm: remove regular file '/boot/initramfs-0-rescue-fcd7b7b3e277487a87495bd46b701d74.img'? y
rm: remove regular file '/boot/initramfs-5.17.5-300.fc36.x86_64.img'? y
rm: remove regular file '/boot/initramfs-5.17.6-300.fc36.x86_64.img'? y
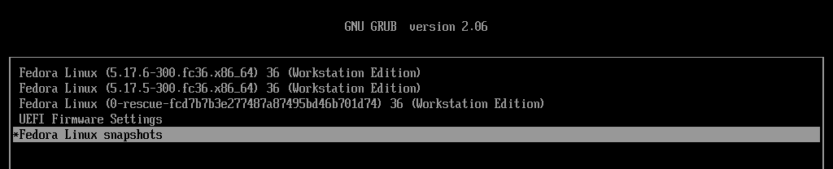
When I rebooted the system, I got this boot error.

Now I'll return to the GRUB menu and this time I'll boot from snapshot #4 with the latest kernel.


Open the terminal and make sure everything is back to normal.
# uname -r
5.17.6-300.fc36.x86_64

# ll /boot/{vmlinuz,initramfs}*
-rw-------. 1 root root 103939016 May 13 19:13 /boot/initramfs-0-rescue-fcd7b7b3e277487a87495bd46b701d74.img
-rw-------. 1 root root  19170409 May 13 19:14 /boot/initramfs-5.17.5-300.fc36.x86_64.img
-rw-------. 1 root root  18872943 May 14 21:13 /boot/initramfs-5.17.6-300.fc36.x86_64.img
-rwxr-xr-x. 1 root root  11802352 May 13 19:11 /boot/vmlinuz-0-rescue-fcd7b7b3e277487a87495bd46b701d74
-rwxr-xr-x. 1 root root  11802352 Apr 28 21:51 /boot/vmlinuz-5.17.5-300.fc36.x86_64
-rwxr-xr-x. 1 root root  11798960 May  9 21:35 /boot/vmlinuz-5.17.6-300.fc36.x86_64
Because you booted into the snapshot, the '/' file system is read-only.
# btrfs property get -ts /
ro=true
Now that everything appears to be operating properly, it is time to roll back this snapshot in read-write mode.
# snapper ls
 # | Type   | Pre # | Date                             | User | Cleanup | Description                   | Userdata
---+--------+-------+----------------------------------+------+---------+-------------------------------+---------
0  | single |       |                                  | root |         | current                       |
1  | pre    |       | Saturday 14 May 2022 08:25:05 PM | root | number  | /usr/bin/dnf install ps_mem   |
2  | post   |     1 | Saturday 14 May 2022 08:25:09 PM | root | number  | /usr/bin/dnf install ps_mem   |
3  | pre    |       | Saturday 14 May 2022 09:12:53 PM | root | number  | /usr/bin/dnf -y update kernel |
4- | post   |     3 | Saturday 14 May 2022 09:14:03 PM | root | number  | /usr/bin/dnf -y update kernel |

# snapper --ambit classic rollback 4
Ambit is classic.
Creating read-only snapshot of current system. (Snapshot 5.)
Creating read-write snapshot of snapshot 4. (Snapshot 6.)
Setting default subvolume to snapshot 6.

# reboot
After the reboot, check the system once again.
# uname -r
5.17.6-300.fc36.x86_64

# btrfs property get -ts /
ro=false

# snapper ls
 # | Type   | Pre # | Date                             | User | Cleanup | Description                   | Userdata
---+--------+-------+----------------------------------+------+---------+-------------------------------+--------------
0  | single |       |                                  | root |         | current                       |
1  | pre    |       | Saturday 14 May 2022 08:25:05 PM | root | number  | /usr/bin/dnf install ps_mem   |
2  | post   |     1 | Saturday 14 May 2022 08:25:09 PM | root | number  | /usr/bin/dnf install ps_mem   |
3  | pre    |       | Saturday 14 May 2022 09:12:53 PM | root | number  | /usr/bin/dnf -y update kernel |
4  | post   |     3 | Saturday 14 May 2022 09:14:03 PM | root | number  | /usr/bin/dnf -y update kernel |
5  | single |       | Saturday 14 May 2022 10:55:47 PM | root | number  | rollback backup               | important=yes
6* | single |       | Saturday 14 May 2022 10:55:48 PM | root |         | writable copy of #4           |

# btrfs subvolume get-default /
ID 268 gen 330 top level 261 path snapshots/6/snapshot

# btrfs subvolume list /
ID 256 gen 329 top level 5 path home
ID 257 gen 214 top level 5 path opt
ID 258 gen 327 top level 5 path tmp
ID 259 gen 330 top level 5 path var
ID 260 gen 229 top level 5 path usr-local
ID 261 gen 328 top level 5 path snapshots
ID 262 gen 322 top level 259 path var/lib/machines
ID 263 gen 225 top level 261 path snapshots/1/snapshot
ID 264 gen 227 top level 261 path snapshots/2/snapshot
ID 265 gen 260 top level 261 path snapshots/3/snapshot
ID 266 gen 316 top level 261 path snapshots/4/snapshot
ID 267 gen 315 top level 261 path snapshots/5/snapshot
ID 268 gen 330 top level 261 path snapshots/6/snapshot

# ll /boot/{vmlinuz,initramfs}*
-rw-------. 1 root root 103939016 May 13 19:13 /boot/initramfs-0-rescue-fcd7b7b3e277487a87495bd46b701d74.img
-rw-------. 1 root root  19170409 May 13 19:14 /boot/initramfs-5.17.5-300.fc36.x86_64.img
-rw-------. 1 root root  18872943 May 14 21:13 /boot/initramfs-5.17.6-300.fc36.x86_64.img
-rwxr-xr-x. 1 root root  11802352 May 13 19:11 /boot/vmlinuz-0-rescue-fcd7b7b3e277487a87495bd46b701d74
-rwxr-xr-x. 1 root root  11802352 Apr 28 21:51 /boot/vmlinuz-5.17.5-300.fc36.x86_64
-rwxr-xr-x. 1 root root  11798960 May  9 21:35 /boot/vmlinuz-5.17.6-300.fc36.x86_64
You have now successfully reverted to the most recent kernel fully functional with read-write mode.
After a successful rollback, always ensure that the grub.cfg file is updated so that the snapshots on the grub-btrfs menu are always in sync.
# grub2-mkconfig -o /boot/grub2/grub.cfgBoth tests were successful.
6. Conclusion
You have now successfully configured Fedora to properly roll back to any snapshots. Going from here, you can next configure the home subvolume to take snapshots from the snapper command-line tool. You can also configure the timer to take snapshots at predetermined intervals. Visit the Arch Wiki’s Snapper page for more information.