
I have posted an updated version of this post. I've made it copy and paste friendly. I strongly advise you to use the updated version rather than this.
How to Install Fedora 40 with LUKS Full Disk Encryption, Snapshot, and Rollback Support
Fedora Linux 39 has been released! Fedora 39 brings numerous performance and security improvements, as well as hardware support. This release also includes the latest Gnome 45 desktop with improved styling.
In this guide, I will show you how to install Fedora 39 with full disk encryption, snapshot, and rollback support. As a result, if you make a mistake with system configuration changes, package installations, or updates, you won’t have to worry about losing data. Simply restore the snapshot before your problematic change, and you’ll be fine.
In my previous post on how to install Fedora 37 with LUKS full disk encryption, I used Fedora’s default Anaconda installer. The Anaconda installer does not support encrypting the /boot directory. As a result, I had to first create a separate ext4 /boot partition, then after installation, move the contents of the /boot partition to the / volume, then delete the /boot partition, and finally merge the deleted space to the / volume. These are far too many steps.
So, instead of using the standard GUI Anaconda installer, I’ll install Fedora via the command line interface with DNF installroot and chroot environment. This will be straightforward, with no unnecessary steps.
I have updated this post for Fedora 39, which was originally intended for Fedora 38. In terms of btrfs snapshot and rollback support, nothing has changed between Fedora 38 and Fedora 39.
In case you’ve already followed a previous version of this tutorial and want to upgrade to Fedora 39, go straight to the section on upgrading at the end of this article and upgrade from Fedora 38 to Fedora 39. You don’t have to do anything else.
Here’s a quick rundown of what needs to be done:
- Boot from the Fedora 39 Workstation Live installation media. Create the necessary partitions on the disk where Fedora 39 will be installed.
- Enable LUKS encryption on the partition where Fedora will be installed, and then format all the partitions with the appropriate Linux file systems.
- Create and mount all necessary directories and subvolumes for Fedora installation in the /mnt directory.
- Install a minimal Fedora distribution in the /mnt directory.
- Finish the minimal installation by creating all of the required configuration files.
- Boot from Fedora Minimal and configure TPM2 or a key file to automatically decrypt your disk.
- Install the GNOME Desktop Environment.
- Create any additional subvolumes that are required based on your desktop environment choice.
- Install and configure the snapper tool so that you can create, delete, and compare snapshots, as well as undo changes made between snapshots.
- Install and configure the grub-btrfs tool so that you can boot to any snapshot from the GRUB menu.
- Take a subvolume snapshot of the main volume and set the subvolume as the default ‘/‘ file system to make rollback much easier when using the snapper tool.
- And finally, enable automatic timeline snapshots of the ‘/‘ file system using the snapper tool.
If you want to install Fedora 38/39 without LUKS Full Disk Encryption but still have Full System Rollback, please see my other article, How to Install Fedora 38/39 with Snapshot and Rollback Support.
Although it appears to be overwhelming, it is not. I’ll walk you through every step of the installation process.
So let's get started.
Table of Contents
- 1. Disk and Subvolumes Layout for Fedora
- 2. Create Partitions and File Systems
- 3. Create Directories and Subvolumes
- 4. Bootstrap a Fedora System in a Chroot Environment
- 5. Create a User Account
- 6. Create the /etc/fstab File
- 7. Enable Crypto Disk and Snapshot Booting
- 8. Bypass the Additional Passphrase Prompt
- 9. Install the Desktop Environment
- 10. Install and Configure Snapper
- 11. Install and Configure Grub-Btrfs
- 12. Create a System Root Snapshot and Set It as the Default
- 13. Snapper Tests
- 14. Make a Snapshot the New System Root
- 15. Enable Automatic Timeline Snapshots
- 16. Issues and Possible Solutions
- 17. Upgrade Fedora 38 to Fedora 39
- 18. Watch on YouTube
1. Disk and Subvolumes Layout for Fedora
I'll use a hard disk with a capacity of 100 GIB. Fedora 39 suggests that the ESP be at least 500 MiB in size. So I'll create a 512 MiB EFI System Partition. You can, however, increase the size if necessary. I'll create a btrfs volume with the remaining disk space. Fedora creates a SwapOnZRAM during boot, so no separate swap partition is required.
This is how the disk partition looks.
NAME           SIZE   FSTYPE  LABEL    MOUNTPOINT
/dev/vda       100G
├─/dev/vda1    512M   vfat    EFI      /boot/efi
└─/dev/vda2   99.5G   btrfs   FEDORA   /
The system root will be installed on the LUKS encrypted btrfs main volume (/dev/vda2). Then, on the system root, I'll create the following subvolumes to keep them out of root file system snapshots. In the end, this is how the disk layout looks.
NAME              MOUNTPOINT                 TYPE
[main]            /                          mainvolume
home              /home                      subvolume
opt               /opt                       subvolume
cache             /var/cache                 subvolume
crash             /var/crash                 subvolume
log               /var/log                   subvolume
spool             /var/spool                 subvolume
tmp               /var/tmp                   subvolume
www               /var/www                   subvolume
AccountsService   /var/lib/AccountsService   subvolume
gdm               /var/lib/gdm               subvolume
images            /var/lib/libvirt/images    subvolume
.mozilla          /home/$USER/.mozilla       subvolume
The directories for which subvolumes are created and the reasons for doing so are listed below.
/home
Contains user data. It is created to keep user data separate and also to avoid loss of user data on system root rollbacks. To learn more about /home, check this link: /home.
/opt
Contains applications installed by a third party. It is excluded to prevent these applications from being uninstalled during rollbacks. To learn more about /opt, check this link: /opt.
/var/cache, /var/crash, /var/tmp
Directories contain temporary files and caches. So they are created to be excluded from snapshots. Fedora also mounts /tmp with tmpfs at boot, so a separate subvolume for /tmp is unnecessary. To learn more, check these links: /var/cache, /var/crash, /var/tmp, /tmp.
/var/log
Contains log files. It is created to avoid the loss of log data during rollbacks. To learn more about /var/log, check this link: /var/log.
/var/spool
Contains data that is awaiting some kind of later processing such as mail, mail queues, printing, printer spool, and so on. Created to avoid a loss of mail, printing, and spool data after a rollback. To learn more about /var/spool, check this link: /var/spool.
/var/www
Web server directory. It is created to keep hosted web server data separate and to avoid data loss on system root rollbacks.
/var/lib/AccountsService, /var/lib/gdm
Contains login user and Gnome display information. These directories must be writable at all times. When you try to boot a snapshot from the GRUB menu, you are booting into a read-only snapshot, which causes the system to hang just before the Gnome login screen appears.
In case you're using a desktop environment other than Gnome, it's necessary to replace the '/var/lib/gdm' with one that's specific to your desktop environment.
For KDE, it is '/var/lib/sddm'.
For XFCE, it might be '/var/lib/lightdm' and '/var/lib/lightdm-data'. I haven't tested.
To find out about other desktop environments, refer to this page.
/var/lib/libvirt/images
The default location for libvirt-managed virtual machine images. Excluded to avoid replacing virtual machine images with older versions during a rollback.
/home/$USER/.mozilla
By default, Fedora Workstation includes the Firefox browser. If you take a snapshot of your home directory and later undo any changes, you don't want to lose any new bookmarks, passwords, and other user data.
So, I'll create a new subvolume for the '.mozilla' directory. This keeps it separate from the home subvolume and prevents data loss during undo operations.
If you use the Chrome web browser, create a subvolume for the '/home/$USER/.config/google-chrome' directory.
Depending on your usage, you may also want to consider creating subvolumes in your home directory for the following directories:
- GnuPG: /home/$USER/.gnupg
- SSH: /home/$USER/.ssh
- Thunderbird Mail: /home/$USER/.thunderbird
2. Create Partitions and File Systems
Boot your system using the Fedora 39 Workstation Live installer in UEFI mode. In the 'Welcome to Fedora' window, click the 'Not Now' button to return to the Gnome desktop. Next, launch Gnome Terminal to begin preparing the system for Fedora 39 installation.
Locate the disk on which you want to install Fedora. For me, it is /dev/vda. Yours might be different.
$ sudo -i

# lsblk -pd
NAME       MAJ:MIN RM  SIZE RO TYPE MOUNTPOINTS
/dev/loop0   7:0    0  1.9G  1 loop
/dev/loop1   7:1    0  7.6G  1 loop
/dev/loop2   7:2    0   32G  0 loop
/dev/sr0    11:0    1    2G  0 rom  /run/initramfs/live
/dev/zram0 251:0    0  3.8G  0 disk [SWAP]
/dev/vda   252:0    0  100G  0 disk
The Fedora 39 Workstation Live installer is missing the gdisk package, which is necessary for creating partitions. So, install it.
# dnf -y install gdiskCreate an EFI System Partition of 512 MiB. I'll name the partition 'EFI', but you can give it any name.
# sgdisk -n 1::+512M -t 1:ef00 -c 1:'EFI' /dev/vdaCreate a Linux filesystem partition on which Fedora will be installed. I will use the entire remaining space. I'll name this partition 'Fedora 39', but you can give it any name.
# sgdisk -n 2:: -t 2:8300 -c 2:'Fedora 39' /dev/vdaList the partitions you just created to ensure that everything is in order.
# sgdisk -p /dev/vda
Disk /dev/vda: 209715200 sectors, 100.0 GiB
...
Total free space is 2014 sectors (1007.0 KiB)

Number  Start (sector)    End (sector)  Size       Code  Name
   1            2048         1050623   512.0 MiB   EF00  EFI
   2         1050624       209715166   99.5 GiB    8300  Fedora 39
Format the /dev/vda1 partition with the FAT32 file system. I'll name the volume 'EFI', but you may name it whatever you want.
# mkfs.fat -F 32 -n EFI /dev/vda1Initialize the /dev/vda2 partition as a LUKS device and set the initial passphrase.
# cryptsetup luksFormat --type luks2 --label FEDORA_LUKS \
    --pbkdf pbkdf2 --pbkdf-force-iterations 500000 /dev/vda2

WARNING!
========
This will overwrite data on /dev/vda2 irrevocably.

Are you sure? (Type 'yes' in capital letters): YES
Enter passphrase for /dev/vda2:
Verify passphrase:
GRUB currently only supports pbkdf2 algorithm. For pbkdf2, the minimum iteration count is 1000 and the maximum is 4294967295. The more powerful your CPU, the higher the iteration count. And, the higher the iteration count, the longer it takes to unlock the LUKS in the GRUB. So I have set the iteration count to 500000. Lowering the iterations reduces security. To get around it, use a stronger passphrase with higher entropy (password entropy > 60 bits is suggested).
Now, open the LUKS device /dev/vda2 and map it to the temporary name tmpluks. I'll map the LUKS device with the proper UUID later. When prompted, enter the LUKS passphrase you provided.
# cryptsetup luksOpen /dev/vda2 tmpluks
Enter passphrase for /dev/vda2:
Format the mapped device with the btrfs file system. I'll name the volume FEDORA, but you may name it whatever you want.
# mkfs.btrfs -L FEDORA /dev/mapper/tmpluksThis is how your setup should look. The UUIDs will be unique to your system.
# udevadm trigger

# lsblk -p -o name,fstype,fsver,label,uuid /dev/vda
NAME                    FSTYPE      FSVER LABEL       UUID
/dev/vda
├─/dev/vda1             vfat        FAT32 EFI         26CB-F6DD
└─/dev/vda2             crypto_LUKS 2     FEDORA_LUKS adcf2b8d-4884-4627-9964-ad790471eb13
  └─/dev/mapper/tmpluks btrfs             FEDORA      b481869f-2320-4d0a-8073-30d6c6f1cc81
3. Create Directories and Subvolumes
First, mount /dev/mapper/tmpluks to the /mnt directory.
# mount -v -o compress=zstd:1 /dev/mapper/tmpluks /mnt
# restorecon -RFv /mnt
Then, create the necessary directories and subvolumes. As previously stated, these subvolumes are created on the system root to avoid being included in the rollback regime because some of these directories contain temporary files and caches, others contain data that you do not want to lose if you rollback the system root, and some should be in Read-Write mode when booting into a Read-only snapshot.
# mkdir -vp /mnt/boot/efi
# mkdir -vp /mnt/var/lib/libvirt

# mount -v /dev/vda1 /mnt/boot/efi

# btrfs subvolume create /mnt/home
# btrfs subvolume create /mnt/opt

# btrfs subvolume create /mnt/var/cache
# btrfs subvolume create /mnt/var/crash
# btrfs subvolume create /mnt/var/log
# btrfs subvolume create /mnt/var/spool
# btrfs subvolume create /mnt/var/tmp
# btrfs subvolume create /mnt/var/www

# btrfs subvolume create /mnt/var/lib/libvirt/images
Change the permissions of the directory /mnt/var/tmp.
# chmod 1777 /mnt/var/tmp

# ls -lhd /mnt/var/tmp
drwxrwxrwt. 1 root root 0 Nov  7 10:14 /mnt/var/tmp
When using QCOW2 images as virtual disks in KVM, the IO performance suffers. So disable the CoW feature in the /mnt/var/lib/libvirt/images directory.
# chattr -R +C /mnt/var/lib/libvirt/images

# lsattr -d /mnt/var/lib/libvirt/images
---------------C------ /mnt/var/lib/libvirt/images
List the subvolumes. This is how it should look.
# btrfs subvolume list /mnt
ID 256 gen 8  top level 5 path home
ID 257 gen 9  top level 5 path opt
ID 258 gen 9  top level 5 path var/cache
ID 259 gen 9  top level 5 path var/crash
ID 260 gen 9  top level 5 path var/log
ID 261 gen 10 top level 5 path var/spool
ID 262 gen 11 top level 5 path var/tmp
ID 263 gen 10 top level 5 path var/www
ID 264 gen 10 top level 5 path var/lib/libvirt/images
I'll create the remaining subvolumes when I install the desktop environment.
4. Bootstrap a Fedora System in a Chroot Environment
Create a Fedora system in the /mnt directory using DNF installroot. I'm going to install the basesystem package first, which defines the basic elements of a Fedora system.
# dnf --releasever=39 --installroot=/mnt install basesystemI'll build a Fedora system for version 39. If you want to install Fedora 38, replace --releasever=39 with --releasever=38.
Bind mount the directories /sys, /dev, and /proc into /mnt. Copy from 'for' to 'done', paste it into the terminal, and hit [Enter].
# for dir in sys dev proc ; do
    mount -v --rbind "/${dir}" "/mnt/${dir}"
    mount -v --make-rslave "/mnt/${dir}"
done
Now that the directories have been bind mounted, install Fedora Minimal in the /mnt directory. I've included Fedora Minimal package groups, kernel, language packs, grub, and some other relevant packages.
# dnf --releasever=39 --best --setopt=install_weak_deps=False --installroot=/mnt \
    install @minimal-environment langpacks-en glibc-langpack-en glibc-all-langpacks \
    kernel grub2-efi-x64 grub2-efi-x64-modules grub2-tools grub2-common shim \
    cryptsetup btrfs-progs grubby polkit vim git inotify-tools make finger \
    tpm2-tss tpm2-tools bash-completion cracklib cracklib-dicts
Replace --releasever=39 with --releasever=38 to install Fedora 38.
Copy the resolv.conf file from the host to the /mnt/etc/ directory so that you can connect to the internet. But first, you must delete the existing symbolic link to the resolv.conf file.
# rm -vf /mnt/etc/resolv.conf
# cp -v /etc/resolv.conf /mnt/etc/
Set the timezone, locale, keymap, hostname, and machine-id.
# systemd-firstboot --root=/mnt \
    --timezone=Asia/Kolkata \
    --locale=en_IN.UTF-8 \
    --keymap=in-eng \
    --hostname=fedora \
    --setup-machine-id
I set the time zone to India and the keyboard language to India English. Change the setting according to your location. I've also set the hostname to 'fedora', but you can name it whatever you want.
To determine your time zone, run the following command.
# timedatectl list-timezonesTo determine your locale, run the following command.
# localectl list-localesTo determine your keymap, run the following command.
# localectl list-keymapsWhile the systemd-firstboot command adds your keymap to the vconsole.conf file, it does not add the console font type. Fedora/RHEL by default uses the console font type 'eurlatgr' for European-based languages written in Latin/Greek letters. So let's include it.
# echo "FONT=eurlatgr" >> /mnt/etc/vconsole.confRead the file /mnt/usr/lib/kbd/consolefonts/README.eurlatgr for more information. You can find additional font types in the /mnt/usr/lib/kbd/consolefonts directory.
You must also configure the system keyboard mapping for X11 and the virtual console. The two most important options are 'X11 Layout' (XkbLayout) and 'X11 Variant' (XkbVariant). It is set by localectl, but because you cannot use localectl in the chroot environment, you must manually create a file to which localectl writes.
First, create a directory /mnt/etc/X11/xorg.conf.d.
# mkdir -vp /mnt/etc/X11/xorg.conf.dCopy and paste the following command from 'cat' to 'EOF' into your terminal, then press the [Enter] key.
# cat <<'EOF' >> /mnt/etc/X11/xorg.conf.d/00-keyboard.conf
Section "InputClass"
        Identifier "system-keyboard"
        MatchIsKeyboard "on"
        Option "XkbLayout" "in"
        Option "XkbVariant" "eng"
EndSection
EOF
To determine your X11 Layout (XkbLayout), run the following command.
# localectl list-x11-keymap-layoutsFor me, It was "in" to refer to India. You must, however, choose your relevant code.
To determine your X11 Variant (XkbVariant), run the following command. You can use the layout code obtained from the previous command to limit the output to variants appropriate for the specific layout.
# localectl list-x11-keymap-variants inFor me, it was "eng" for English. Yours could be different depending on your layout.
Finally, chroot into the /mnt directory.
# chroot /mnt /bin/bash5. Create a User Account
Now that you're in a chroot environment, reinstall the polkit package before creating a user account so that the polkit's scripts are properly regenerated.
Enable the fastest mirrors to speed up package downloads. Copy the command from cat to EOF, paste it into your terminal, and hit [Enter].
# cat <<'EOF' >> /etc/dnf/dnf.conf
defaultyes=True
fastestmirror=True
max_parallel_downloads=10
EOF
Clear all previous caches and update the local DNF metadata cache.
# dnf clean all
# dnf makecache
Reinstall the polkit package.
# dnf -y reinstall polkitAfter reinstalling the polkit package, proceed to create a user account.
A user account is required for logging into the Fedora Linux operating system. I'll create a user called 'madhu' with root privileges. Change the user name to something more specific to you.
# useradd madhu --comment 'Madhu Desai' --create-home --groups wheel \
    --shell /bin/bash
Set the user password.
# passwd madhuEnsure that a user account has been created with the correct information
# finger madhu
Login: madhu          			Name: Madhu Desai
Directory: /home/madhu              	Shell: /bin/bash
Never logged in.
No mail.
No Plan.
6. Create the /etc/fstab File
You need to create /etc/fstab file so that the Fedora operating system will boot without any errors.
Set the btrfs subvolume mount options.
# OPTIONS="compress=zstd:1,x-systemd.device-timeout=0"Get the UUID of your EFI partition.
# EFI_UUID="$(grub2-probe --target=fs_uuid /boot/efi)"Get the UUID of your btrfs system root.
# ROOT_UUID="$(grub2-probe --target=fs_uuid /)"Get your subvolmes.
# SUBVOLUMES=($(btrfs subvolume list / | awk '!/machines|portables/ {print $9}' | xargs))Print system root mount in /etc/fstab file.
# printf "%-41s %-24s %-5s %-s %-s\n" \
    "UUID=${ROOT_UUID}" \
    "/" \
    "btrfs" \
    "defaults,${OPTIONS}" \
    "0 0" >> /etc/fstab
Print EFI partition mount in /etc/fstab file.
# printf "%-41s %-24s %-5s %-s %-s\n" \
    "UUID=${EFI_UUID}" \
    "/boot/efi" \
    "vfat" \
    "umask=0077,shortname=winnt" \
    "0 0" >> /etc/fstab
Print the rest of the subvolume mounts in /etc/fstab file. Copy from 'for' to 'done', paste it into the terminal, and hit [Enter].
# for dir in "${SUBVOLUMES[@]}" ; do
    printf "%-41s %-24s %-5s %-s %-s\n" \
    "UUID=${ROOT_UUID}" \
    "/${dir}" \
    "btrfs" \
    "subvol=${dir},${OPTIONS}" \
    "0 0" >> /etc/fstab
    restorecon -RF "/${dir}"
done
Examine your /etc/fstab file. This is what it should look like. The UUID will be unique to your system.
# cat /etc/fstab
UUID=b481869f-2320-4d0a-8073-30d6c6f1cc81 /                        btrfs defaults,compress=zstd:1,x-systemd.device-timeout=0 0 0
UUID=26CB-F6DD                            /boot/efi                vfat  umask=0077,shortname=winnt 0 0
UUID=b481869f-2320-4d0a-8073-30d6c6f1cc81 /home                    btrfs subvol=home,compress=zstd:1,x-systemd.device-timeout=0 0 0
UUID=b481869f-2320-4d0a-8073-30d6c6f1cc81 /opt                     btrfs subvol=opt,compress=zstd:1,x-systemd.device-timeout=0 0 0
UUID=b481869f-2320-4d0a-8073-30d6c6f1cc81 /var/cache               btrfs subvol=var/cache,compress=zstd:1,x-systemd.device-timeout=0 0 0
UUID=b481869f-2320-4d0a-8073-30d6c6f1cc81 /var/crash               btrfs subvol=var/crash,compress=zstd:1,x-systemd.device-timeout=0 0 0
UUID=b481869f-2320-4d0a-8073-30d6c6f1cc81 /var/log                 btrfs subvol=var/log,compress=zstd:1,x-systemd.device-timeout=0 0 0
UUID=b481869f-2320-4d0a-8073-30d6c6f1cc81 /var/spool               btrfs subvol=var/spool,compress=zstd:1,x-systemd.device-timeout=0 0 0
UUID=b481869f-2320-4d0a-8073-30d6c6f1cc81 /var/tmp                 btrfs subvol=var/tmp,compress=zstd:1,x-systemd.device-timeout=0 0 0
UUID=b481869f-2320-4d0a-8073-30d6c6f1cc81 /var/www                 btrfs subvol=var/www,compress=zstd:1,x-systemd.device-timeout=0 0 0
UUID=b481869f-2320-4d0a-8073-30d6c6f1cc81 /var/lib/libvirt/images  btrfs subvol=var/lib/libvirt/images,compress=zstd:1,x-systemd.device-timeout=0 0 0
Mount all of the subvolumes listed in the /etc/fstab file.
# mount -va
/                        : ignored
/boot/efi                : already mounted
/home                    : successfully mounted
/opt                     : successfully mounted
/var/cache               : successfully mounted
/var/crash               : successfully mounted
/var/log                 : successfully mounted
/var/spool               : successfully mounted
/var/tmp                 : successfully mounted
/var/www                 : successfully mounted
/var/lib/libvirt/images  : successfully mounted
Check your subvolumes.
# btrfs subvolume list /
ID 256 gen 55 top level 5 path home
ID 257 gen 55 top level 5 path opt
ID 258 gen 55 top level 5 path var/cache
ID 259 gen 55 top level 5 path var/crash
ID 260 gen 55 top level 5 path var/log
ID 261 gen 55 top level 5 path var/spool
ID 262 gen 55 top level 5 path var/tmp
ID 263 gen 55 top level 5 path var/www
ID 264 gen 55 top level 5 path var/lib/libvirt/images
ID 265 gen 32 top level 5 path var/lib/portables
Your setup should now look somewhat like this.
# lsblk -p /dev/vda
NAME                    MAJ:MIN RM  SIZE RO TYPE  MOUNTPOINTS
/dev/vda                252:0    0  100G  0 disk
├─/dev/vda1             252:1    0  512M  0 part  /boot/efi
└─/dev/vda2             252:2    0 99.5G  0 part
  └─/dev/mapper/tmpluks 253:2    0 99.5G  0 crypt /var/lib/libvirt/images
                                                  /var/www
                                                  /var/tmp
                                                  /var/spool
                                                  /var/log
                                                  /var/crash
                                                  /var/cache
                                                  /opt
                                                  /home
                                                  /
7. Enable Crypto Disk and Snapshot Booting
Enable crypto disk and snapshot booting to allow encrypted /boot and snapper snapshots to boot directly from GRUB.
When you enable the GRUB_ENABLE_CRYPTODISK option in GRUB, it will check for encrypted disks and generate the extra commands needed to access them during boot.
With the SUSE_BTRFS_SNAPSHOT_BOOTING option in GRUB enabled, snapper snapshots can boot directly from GRUB. This is also useful when rolling back a snapshot.
Get the UUID of your LUKS partition.
# LUKS_DEV_UUID="$(cryptsetup luksUUID /dev/vda2)"

# echo $LUKS_DEV_UUID
adcf2b8d-4884-4627-9964-ad790471eb13
First, create a /etc/default/grub file with the UUID of your LUKS partition in it.
Copy the command from cat to EOF, paste it into your terminal, and hit [Enter].
# cat <<EOF > /etc/default/grub
GRUB_TIMEOUT=5
GRUB_DISTRIBUTOR="\$(sed 's, release .*$,,g' /etc/system-release)"
GRUB_DEFAULT=saved
GRUB_DISABLE_SUBMENU=true
GRUB_TERMINAL_OUTPUT="console"
GRUB_CMDLINE_LINUX="rd.luks.uuid=luks-$LUKS_DEV_UUID quiet"
GRUB_DISABLE_RECOVERY="true"
GRUB_ENABLE_BLSCFG=true
GRUB_ENABLE_CRYPTODISK=y
SUSE_BTRFS_SNAPSHOT_BOOTING="true"
EOF
This is how it should look. The UUID will be unique to your system.
# cat /etc/default/grub
GRUB_TIMEOUT=5
GRUB_DISTRIBUTOR="$(sed 's, release .*$,,g' /etc/system-release)"
GRUB_DEFAULT=saved
GRUB_DISABLE_SUBMENU=true
GRUB_TERMINAL_OUTPUT="console"
GRUB_CMDLINE_LINUX="rd.luks.uuid=luks-adcf2b8d-4884-4627-9964-ad790471eb13 quiet"
GRUB_DISABLE_RECOVERY="true"
GRUB_ENABLE_BLSCFG=true
GRUB_ENABLE_CRYPTODISK=y
SUSE_BTRFS_SNAPSHOT_BOOTING="true"
You must also modify the /boot/efi/EFI/fedora/grub.cfg file now that crypto disk and snapshot booting are enabled.
# sed -i "1i cryptomount -u ${LUKS_DEV_UUID//-/}" /boot/efi/EFI/fedora/grub.cfg
# sed -i '1i set btrfs_relative_path="yes"' /boot/efi/EFI/fedora/grub.cfg
# sed -i 's/--root-dev-only//g' /boot/efi/EFI/fedora/grub.cfg
This is how it should appear. The UUID in the cryptomount line is that of the /dev/vda2 partition, with no dashes (-).
# cat /boot/efi/EFI/fedora/grub.cfg
set btrfs_relative_path="yes"
cryptomount -u adcf2b8d488446279964ad790471eb13
search --no-floppy --fs-uuid --set=dev b481869f-2320-4d0a-8073-30d6c6f1cc81
set prefix=($dev)/boot/grub2
export $prefix
configfile $prefix/grub.cfg
Then, update the grub.cfg file.
# grub2-mkconfig -o /boot/grub2/grub.cfgThis is how the GRUB BLS should appear.
# grubby --info=DEFAULT
index=0
kernel="/boot/vmlinuz-6.5.9-300.fc39.x86_64"
args="ro rd.luks.uuid=luks-adcf2b8d-4884-4627-9964-ad790471eb13 quiet ${extra_cmdline}"
root="UUID=b481869f-2320-4d0a-8073-30d6c6f1cc81"
initrd="/boot/initramfs-6.5.9-300.fc39.x86_64.img"
title="Fedora Linux (6.5.9-300.fc39.x86_64) 39 (Thirty Nine)"
id="7615546df2f845a38fa3f1a06a5f127d-6.5.9-300.fc39.x86_64"
Add the encrypted block device to the /etc/crypttab file so that it is enabled when the system boots.
# echo "luks-${LUKS_DEV_UUID} UUID=${LUKS_DEV_UUID} none discard" >> /etc/crypttab

# cat /etc/crypttab
luks-adcf2b8d-4884-4627-9964-ad790471eb13 UUID=adcf2b8d-4884-4627-9964-ad790471eb13 none discard
Enable NetworkManager and auditd systemd services.
# systemctl enable NetworkManager
# systemctl enable auditd
Execute the following command so that the SELinux contexts are relabeled on the next boot.
# fixfiles onbootNow exit the chroot environment, unmount all mounts, and restart your computer.
# exit
# umount -vR /mnt
# reboot
The system will reboot twice. The first time it boots, it relabels SELinux contexts, and the second time it logs in to the operating system.
You will also be prompted for the passphrase twice. The first time is before loading GRUB, and the second time is before mounting the root file system. In the following section, I will enable the single passphrase prompt.
Depending on your computer's CPU, it may take up to 15 seconds for the GRUB to display the menu. So please be patient.
When you input your passphrase in the first LUKS prompt, no "*" cursor indication appears. So you should assume you have entered your passphrase correctly. Simply enter your LUKS passphrase blindly and hit the [Enter] key.
The Fedora Minimal installation is now complete.
You may now remove the Fedora Live installation media. From now on, the configuration will be performed on Fedora 39 Minimal itself.
8. Bypass the Additional Passphrase Prompt
While GRUB requests a passphrase in order to decrypt the encrypted /boot files, this information is not passed on to initramfs. As a result, the root (/) must be unlocked once more during the initramfs stage. This means that the user must enter his passphrase twice.
I'll show you two methods for automatically decrypting your disk without requiring a passphrase: using a key file or TPM2. Choose your preferred method.
8.1 Using a Key File
If you want to decrypt your LUKS-encrypted volumes using a key file, use this method. SecureBoot does not need to be enabled for this.
First, change to super user.
$ sudo -iCreate the /etc/cryptsetup-keys.d directory if it does not already exist.
# mkdir -v /etc/cryptsetup-keys.dCreate a key file with 4KiB of random data. The key file has to be in volume.key format.
# dd if=/dev/random \
   of=/etc/cryptsetup-keys.d/luks-$(cryptsetup luksUUID /dev/vda2).key \
   bs=512 count=8
Ensure that only the root user has read access to the key file.
# chmod 0400 /etc/cryptsetup-keys.d/*.keyAttach the created key to the encrypted device’s available key slot. When prompted for a passphrase, enter the same LUKS passphrase.
# cryptsetup luksAddKey \
    --pbkdf pbkdf2 \
    --pbkdf-force-iterations 500000 \
    /dev/vda2 \
    /etc/cryptsetup-keys.d/luks-$(cryptsetup luksUUID /dev/vda2).key
Add the key to /etc/dracut.conf.d/cryptodisk.conf file to include it in the initramfs image.
# echo 'install_items+=" /etc/cryptsetup-keys.d/* "' \
    >> /etc/dracut.conf.d/cryptodisk.conf
Rebuild the initramfs image.
# dracut --verbose --forceReboot the computer to ensure that everything is working properly. The LUKS passphrase should only be asked once before the GRUB menu appears.
# reboot8.2 Using TPM2 Method
This method allows you to decrypt your LUKS-encrypted volumes using the TPM on your computer. You must have SecureBoot enabled for this method to work.
First, change to super user.
$ sudo -iMake sure SecureBoot is enabled.
# mokutil --sb-state
SecureBoot enabled
If it is disabled, you must enable it in the BIOS.
Next, see if your computer supports TPM.
# systemd-cryptenroll --tpm2-device=list
PATH        DEVICE      DRIVER
/dev/tpmrm0 MSFT0101:00 tpm_crb
As you can see from the output, my TPM2 device node path is /dev/tpmrm0.
Get the UUID of your LUKS partition.
# LUKS_DEV_UUID="$(cryptsetup luksUUID /dev/vda2)"

# echo $LUKS_DEV_UUID
adcf2b8d-4884-4627-9964-ad790471eb13
Now enroll your encrypted volume. When prompted for a passphrase, enter the same LUKS passphrase.
# systemd-cryptenroll /dev/disk/by-uuid/${LUKS_DEV_UUID} \
    --tpm2-device=/dev/tpmrm0
? Please enter current passphrase for disk /dev/disk/by-uuid/adcf2b8d-4884-4627-9964-ad790471eb13: ***********
New TPM2 token enrolled as key slot 1.
According to the systemd-cryptenroll man page, it should be sufficient for most applications to bind against PCR 7, which is also the default. For more information, see man systemd-cryptenroll.
Add the TPM2 device node path to the kernel command line parameter 'rd.luks.options='.
# grubby --update-kernel=ALL \
    --args="rd.luks.options=tpm2-device=/dev/tpmrm0"
Check to see if the TPM2 device node path has been added to the grub kernel parameter.
# grubby --info=DEFAULT
index=0
kernel="/boot/vmlinuz-6.5.9-300.fc39.x86_64"
args="ro rd.luks.uuid=luks-adcf2b8d-4884-4627-9964-ad790471eb13 quiet ${extra_cmdline} rd.luks.options=tpm2-device=/dev/tpmrm0"
root="UUID=b481869f-2320-4d0a-8073-30d6c6f1cc81"
initrd="/boot/initramfs-6.5.9-300.fc39.x86_64.img"
title="Fedora Linux (6.5.9-300.fc39.x86_64) 39 (Thirty Nine)"
id="7615546df2f845a38fa3f1a06a5f127d-6.5.9-300.fc39.x86_64"
Changes should also be reflected in the /etc/crypttab file.
# echo "luks-${LUKS_DEV_UUID} UUID=${LUKS_DEV_UUID} - tpm2-device=auto,discard" > /etc/crypttab

# cat /etc/crypttab
luks-adcf2b8d-4884-4627-9964-ad790471eb13 UUID=adcf2b8d-4884-4627-9964-ad790471eb13 - tpm2-device=auto,discard
Update the grub.cfg file.
# grub2-mkconfig -o /boot/grub2/grub.cfgRun dracut to rebuild the initramfs.
# dracut --verbose --forceCheck that the TPM has been added to the encrypted volume.
# systemd-cryptenroll /dev/vda2
SLOT TYPE
   0 password
   1 tpm2
Finally, reboot.
# rebootThe LUKS passphrase should only be asked once before the GRUB menu appears.
9. Install the Desktop Environment
You can now install the desktop environment of your choice.
Change to super user.
$ sudo -iTo find out which desktop environments are available to you, run the following command.
# dnf group list available hidden --idsI will, however, install the GNOME 45 desktop environment that comes with Fedora's official desktop edition 'Fedora Workstation'.
# dnf group install 'Fedora Workstation'Create subvolumes for the directories /var/lib/AccountsService and /var/lib/gdm. These subvolumes are only relevant if you install GNOME desktop. They contain login user information as well as Gnome display information.
Create AccountsService subvolume.
# mv -v /var/lib/AccountsService{,-old}
# btrfs subvolume create /var/lib/AccountsService
# cp -arv /var/lib/AccountsService{-old/.,/}
# restorecon -RFv /var/lib/AccountsService
# rm -rfv /var/lib/AccountsService-old
Create gdm subvolume.
# mv -v /var/lib/gdm{,-old}
# btrfs subvolume create /var/lib/gdm
# cp -arv /var/lib/gdm{-old/.,/}
# restorecon -RFv /var/lib/gdm
# rm -rfv /var/lib/gdm-old
# chmod 1770 /var/lib/gdm
# chown -R gdm:gdm /var/lib/gdm
In the user's home directory, create a subvolume called .mozilla.
# USERNAME="$(id -nu 1000)"

# echo $USERNAME
madhu

# btrfs subvolume create /home/$USERNAME/.mozilla
# chown -R $USERNAME: /home/$USERNAME/.mozilla
# restorecon -RFv /home/$USERNAME/.mozilla
In the /etc/fstab file, add the newly created subvolumes. The updated lines are displayed in amber. Replace UUID and user name with your setup's UUID and user name.
# cat /etc/fstab
UUID=b481869f-2320-4d0a-8073-30d6c6f1cc81 /                        btrfs defaults,compress=zstd:1,x-systemd.device-timeout=0 0 0
UUID=26CB-F6DD                            /boot/efi                vfat  umask=0077,shortname=winnt 0 0
UUID=b481869f-2320-4d0a-8073-30d6c6f1cc81 /home                    btrfs subvol=home,compress=zstd:1,x-systemd.device-timeout=0 0 0
UUID=b481869f-2320-4d0a-8073-30d6c6f1cc81 /opt                     btrfs subvol=opt,compress=zstd:1,x-systemd.device-timeout=0 0 0
UUID=b481869f-2320-4d0a-8073-30d6c6f1cc81 /var/cache               btrfs subvol=var/cache,compress=zstd:1,x-systemd.device-timeout=0 0 0
UUID=b481869f-2320-4d0a-8073-30d6c6f1cc81 /var/crash               btrfs subvol=var/crash,compress=zstd:1,x-systemd.device-timeout=0 0 0
UUID=b481869f-2320-4d0a-8073-30d6c6f1cc81 /var/log                 btrfs subvol=var/log,compress=zstd:1,x-systemd.device-timeout=0 0 0
UUID=b481869f-2320-4d0a-8073-30d6c6f1cc81 /var/spool               btrfs subvol=var/spool,compress=zstd:1,x-systemd.device-timeout=0 0 0
UUID=b481869f-2320-4d0a-8073-30d6c6f1cc81 /var/tmp                 btrfs subvol=var/tmp,compress=zstd:1,x-systemd.device-timeout=0 0 0
UUID=b481869f-2320-4d0a-8073-30d6c6f1cc81 /var/www                 btrfs subvol=var/www,compress=zstd:1,x-systemd.device-timeout=0 0 0
UUID=b481869f-2320-4d0a-8073-30d6c6f1cc81 /var/lib/libvirt/images  btrfs subvol=var/lib/libvirt/images,compress=zstd:1,x-systemd.device-timeout=0 0 0
UUID=b481869f-2320-4d0a-8073-30d6c6f1cc81 /var/lib/AccountsService btrfs subvol=var/lib/AccountsService,compress=zstd:1,x-systemd.device-timeout=0 0 0
UUID=b481869f-2320-4d0a-8073-30d6c6f1cc81 /var/lib/gdm             btrfs subvol=var/lib/gdm,compress=zstd:1,x-systemd.device-timeout=0 0 0
UUID=b481869f-2320-4d0a-8073-30d6c6f1cc81 /home/madhu/.mozilla     btrfs subvol=home/madhu/.mozilla,compress=zstd:1,x-systemd.device-timeout=0 0 0
Reload the /etc/fstab file to mount all filesystems.
# systemctl daemon-reload

# mount -va
/                        : ignored
/boot/efi                : already mounted
/home                    : already mounted
/opt                     : already mounted
/var/cache               : already mounted
/var/crash               : already mounted
/var/log                 : already mounted
/var/spool               : already mounted
/var/tmp                 : already mounted
/var/www                 : already mounted
/var/lib/libvirt/images  : already mounted
/var/lib/AccountsService : successfully mounted
/var/lib/gdm             : successfully mounted
/home/madhu/.mozilla     : successfully mounted
Check your subvolumes.
# btrfs subvolume list /
ID 256 gen 126 top level 5 path home
ID 257 gen 55  top level 5 path opt
ID 258 gen 121 top level 5 path var/cache
ID 259 gen 111 top level 5 path var/crash
ID 260 gen 132 top level 5 path var/log
ID 261 gen 119 top level 5 path var/spool
ID 262 gen 120 top level 5 path var/tmp
ID 263 gen 107 top level 5 path var/www
ID 264 gen 111 top level 5 path var/lib/libvirt/images
ID 265 gen 119 top level 5 path var/lib/portables
ID 266 gen 119 top level 5 path var/lib/machines
ID 267 gen 124 top level 5 path var/lib/AccountsService
ID 268 gen 126 top level 5 path var/lib/gdm
ID 269 gen 127 top level 256 path home/madhu/.mozilla
Your setup should now look somewhat like this.
# lsblk -o name,mountpoints /dev/vda
NAME                                          MOUNTPOINTS
vda
├─vda1                                        /boot/efi
└─vda2
  └─luks-adcf2b8d-4884-4627-9964-ad790471eb13 /home/madhu/.mozilla
                                              /var/lib/gdm
                                              /var/lib/AccountsService
                                              /var/www
                                              /var/tmp
                                              /var/spool
                                              /var/lib/libvirt/images
                                              /var/log
                                              /var/crash
                                              /var/cache
                                              /opt
                                              /home
                                              /
Now that you've installed the desktop environment, enable boot animation and make the spinner theme your default.
# plymouth-set-default-theme spinner -REnable Red Hat Graphical Boot in /etc/default/grub as well.
# sed -i 's/quiet/rhgb quiet/' /etc/default/grubFinally, update the grub.cfg file.
# grub2-mkconfig -o /boot/grub2/grub.cfgFedora Workstation installation is complete. Reboot the system now.
# rebootYou will now be logged into the Fedora 39 Workstation with the all-new Gnome 45 desktop interface.
10. Install and Configure Snapper
Install snapper and the optional package python3-dnf-plugin-snapper. The python3-dnf-plugin-snapper package allows you to create pre and post snapshots every time you install a package on the system with the dnf package manager.
$ sudo dnf install snapper python3-dnf-plugin-snapperCreate new snapper configurations named root and home for the Btrfs volume at / and /home, respectively.
$ sudo snapper -c root create-config /
$ sudo snapper -c home create-config /home
The snapper configuration files will be saved in the /etc/snapper/configs/ directory.
Verify the snapper configuration files have been created.
$ sudo snapper list-configs
Config | Subvolume
-------+----------
home   | /home
root   | /
Allow regular user to use snapper without requiring root privileges. Add your user name to the snapper's root and home configurations to set the ACL on the /.snapshots and /home/.snapshots directories.
$ sudo snapper -c root set-config ALLOW_USERS=$USER SYNC_ACL=yes
$ sudo snapper -c home set-config ALLOW_USERS=$USER SYNC_ACL=yes
Add the newly created snapshot subvolumes to the /etc/fstab file. The updated lines are in amber.
$ sudo vim /etc/fstab
...
UUID=b481869f-2320-4d0a-8073-30d6c6f1cc81 /home/madhu/.mozilla     btrfs subvol=home/madhu/.mozilla,compress=zstd:1,x-systemd.device-timeout=0 0 0
UUID=b481869f-2320-4d0a-8073-30d6c6f1cc81 /.snapshots              btrfs subvol=.snapshots,compress=zstd:1,x-systemd.device-timeout=0 0 0
UUID=b481869f-2320-4d0a-8073-30d6c6f1cc81 /home/.snapshots         btrfs subvol=home/.snapshots,compress=zstd:1,x-systemd.device-timeout=0 0 0
Reload the /etc/fstab file.
$ sudo systemctl daemon-reload
$ sudo mount -va
Your subvolumes will look like this.
$ sudo btrfs subvolume list /
ID 256 gen 176 top level 5 path home
ID 257 gen 55  top level 5 path opt
ID 258 gen 168 top level 5 path var/cache
ID 259 gen 137 top level 5 path var/crash
ID 260 gen 177 top level 5 path var/log
ID 261 gen 163 top level 5 path var/spool
ID 262 gen 166 top level 5 path var/tmp
ID 263 gen 137 top level 5 path var/www
ID 264 gen 137 top level 5 path var/lib/libvirt/images
ID 265 gen 162 top level 5 path var/lib/portables
ID 266 gen 162 top level 5 path var/lib/machines
ID 267 gen 162 top level 5 path var/lib/AccountsService
ID 268 gen 164 top level 5 path var/lib/gdm
ID 269 gen 127 top level 256 path home/madhu/.mozilla
ID 270 gen 174 top level 5 path .snapshots
ID 271 gen 174 top level 256 path home/.snapshots
And your setup should look something like this.
$ lsblk -o name,mountpoints /dev/vda
NAME                                          MOUNTPOINTS
vda
├─vda1                                        /boot/efi
└─vda2
  └─luks-adcf2b8d-4884-4627-9964-ad790471eb13 /home/.snapshots
                                              /.snapshots
                                              /home/madhu/.mozilla
                                              /var/www
                                              /var/tmp
                                              /var/spool
                                              /var/log
                                              /var/lib/libvirt/images
                                              /var/lib/gdm
                                              /var/lib/AccountsService
                                              /var/crash
                                              /var/cache
                                              /opt
                                              /home
                                              /
Disable the indexing of the .snapshots directories by updatedb. It is enabled by default, which can cause significant slowdown and excessive memory usage if you have a large number of snapshots.
$ echo 'PRUNENAMES = ".snapshots"' | sudo tee -a /etc/updatedb.confList the snapshots for / volume. For the root, you may use snapper -c root ls or simply snapper ls. Both provide the same output.
$ snapper ls
 # | Type   | Pre # | Date | User | Cleanup | Description | Userdata
---+--------+-------+------+------+---------+-------------+---------
0  | single |       |      | root |         | current     |
List the snapshots for /home subvolume.
$ snapper -c home ls
 # | Type   | Pre # | Date | User | Cleanup | Description | Userdata
---+--------+-------+------+------+---------+-------------+---------
0  | single |       |      | root |         | current     |
At this stage, you do not have any snapshots, we will create some later.
11. Install and Configure Grub-Btrfs
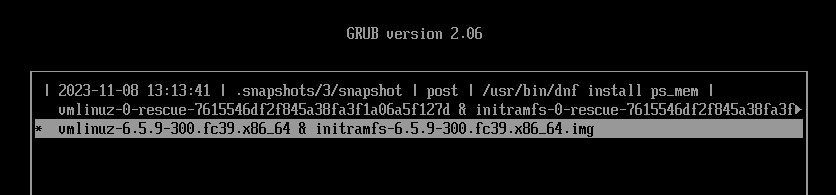
The grub-btrfs package adds 'Fedora Linux snapshots' to the GRUB menu and allows you to test a snapshot in read-only mode before rolling back to it in read-write mode.
Clone the grub-btrfs repository.
$ git clone https://github.com/Antynea/grub-btrfsThe setup is pre-configured to work with Arch and Gentoo out of the box. You must make a few changes to the grub-btrfs config file to make it work with Fedora.
$ cd grub-btrfs

$ sed -i '/#GRUB_BTRFS_SNAPSHOT_KERNEL/a GRUB_BTRFS_SNAPSHOT_KERNEL_PARAMETERS="systemd.volatile=state"' config
$ sed -i '/#GRUB_BTRFS_GRUB_DIRNAME/a GRUB_BTRFS_GRUB_DIRNAME="/boot/grub2"' config
$ sed -i '/#GRUB_BTRFS_MKCONFIG=/a GRUB_BTRFS_MKCONFIG=/sbin/grub2-mkconfig' config
$ sed -i '/#GRUB_BTRFS_SCRIPT_CHECK=/a GRUB_BTRFS_SCRIPT_CHECK=grub2-script-check' config
Then install it.
$ sudo make installUpdate grub.cfg and enable the grub-btrfsd.service.
$ sudo grub2-mkconfig -o /boot/grub2/grub.cfg
$ sudo systemctl enable --now grub-btrfsd.service
You will receive the 'No snapshots found' error since you have not yet created any snapshots, but don't worry, it will function properly after you do.
Your grub-btrfs installation is now complete. You may now delete the cloned grub-btrfs repository.
$ cd ..
$ rm -rvf grub-btrfs
12. Create a System Root Snapshot and Set It as the Default
Now that everything in Fedora has been installed and configured, it is time to take a subvolume snapshot of the main volume and set the subvolume as the default ‘/‘ file system. By manually creating a subvolume snapshot of the main volume and making it the default, you can easily rollback without having to specify the snapshot number and the 'ambit' during the rollback when using the snapper tool.
Create a directory named '1' in the /.snapshots directory.
$ sudo mkdir -v /.snapshots/1Create an XML file called info.xml in the /.snapshots/1/ directory. Copy the following command from 'sudo' to 'EOF', paste it into your terminal, and hit the <Enter> button.
$ sudo bash -c "cat > /.snapshots/1/info.xml" <<EOF
<?xml version="1.0"?>
<snapshot>
  <type>single</type>
  <num>1</num>
  <date>$(date -u +"%F %T")</date>
  <description>first root subvolume</description>
</snapshot>
EOF
Verify that the date is set properly and is in the Coordinated Universal Time (UTC) format.
$ cat /.snapshots/1/info.xml
<?xml version="1.0"?>
<snapshot>
  <type>single</type>
  <num>1</num>
  <date>2023-11-08 07:28:14</date>
  <description>first root subvolume</description>
</snapshot>
Now, create a read-write subvolume snapshot of the system root in the /.snapshots/1/ directory.
$ sudo btrfs subvolume snapshot / /.snapshots/1/snapshotGet the subvolid of the /.snapshots/1/snapshot subvolume.
$ sudo btrfs inspect-internal rootid /.snapshots/1/snapshot
272
Using subvolid 272, set the /.snapshots/1/snapshot subvolume as the default subvolume for the root (/) filesystem.
$ sudo btrfs subvolume set-default 272 /And reboot your system.
$ sudo rebootAfter rebooting, confirm that the /.snapshots/1/snapshot subvolume is indeed the default for the / filesystem.
$ sudo btrfs subvolume get-default /
ID 272 gen 218 top level 270 path .snapshots/1/snapshot
Now check the snapshots in snapper.
$ snapper ls
 # | Type   | Pre # | Date                                   | User | Cleanup | Description          | Userdata
---+--------+-------+----------------------------------------+------+---------+----------------------+---------
0  | single |       |                                        | root |         | current              |
1* | single |       | Wednesday 08 November 2023 12:58:14 PM | root |         | first root subvolume |
As you can see, the /.snapshots/1/snapshot subvolume is also visible as snapshot #1 in snapper. The asterisk (*) indicates that this snapshot is the default and is currently active.
The installation of Fedora 39 with LUKS full disk encryption, snapshot, and rollback support is now complete. You can now begin taking snapshots.
13. Snapper Tests
I'll run some tests here to make sure everything is in working order and that there are no problems.
Test 1: Undo the Changes Made by the DNF Installer
In this test, I will use the dnf package manager to install a small package named ps_mem. I'll check the system after it's installed to see what changes were made. I'll then attempt to undo the changes and see if I can get the system back to its pre-installation state.
Install the ps_mem package. It displays the core memory used per program (not per process).
$ sudo dnf install ps_memRun the ps_mem program to see if it was installed successfully.
$ sudo ps_mem
 Private  +   Shared  =  RAM used	Program

148.0 KiB +  16.5 KiB = 164.5 KiB	fusermount3
200.0 KiB +  13.5 KiB = 213.5 KiB	inotifywait
292.0 KiB +  15.5 KiB = 307.5 KiB	mcelog
...
 48.3 MiB +   6.3 MiB =  54.6 MiB	gnome-software
234.1 MiB +  24.2 MiB = 258.3 MiB	gnome-shell
367.5 MiB +   2.0 MiB = 369.6 MiB	packagekitd
---------------------------------
                          1.3 GiB
=================================
Check the snapper for snapshots.
$ snapper ls
# | Type | Pre # | Date | User | Cleanup | Description | Userdata
---+--------+-------+----------------------------------------+------+---------+-----------------------------+---------
0 | single | | | root | | current |
1* | single | | Wednesday 08 November 2023 12:58:14 PM | root | | first root subvolume |
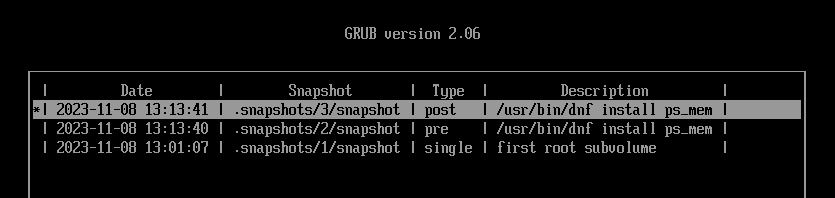
2 | pre | | Wednesday 08 November 2023 01:13:40 PM | root | number | /usr/bin/dnf install ps_mem |
3 | post | 2 | Wednesday 08 November 2023 01:13:41 PM | root | number | /usr/bin/dnf install ps_mem |As you can see, the ps_mem package has pre (#2) and post (#3) snapshots.
Let's take a look at the changes it made to the system between snapshots #2 and #3.
$ snapper status 2..3
+..... /usr/bin/ps_mem
c..... /usr/lib/sysimage/rpm/rpmdb.sqlite-shm
c..... /usr/lib/sysimage/rpm/rpmdb.sqlite-wal
+..... /usr/share/doc/ps_mem
+..... /usr/share/doc/ps_mem/LICENSE
+..... /usr/share/man/man1/ps_mem.1.gz
c..... /var/lib/dnf/history.sqlite-shm
c..... /var/lib/dnf/history.sqlite-wal
-..... /var/lib/dnf/rpmdb_lock.pid
Now I'll undo the changes.
$ sudo snapper undochange 2..3
create:1 modify:4 delete:4
Check again to ensure that the ps_mem package was successfully uninstalled.
$ sudo ps_mem
sudo: ps_mem: command not found
Cool! The undo was successful. But, because I want to keep the package ps_mem, I'll undo the changes again. This time between snapshots #3 and #2.
$ sudo snapper undochange 3..2
create:4 modify:4 delete:1
Now run ps_mem again to see if it exists.
$ sudo ps_mem
 Private  +   Shared  =  RAM used	Program

148.0 KiB +  16.5 KiB = 164.5 KiB	fusermount3
200.0 KiB +  13.5 KiB = 213.5 KiB	inotifywait
292.0 KiB +  15.5 KiB = 307.5 KiB	mcelog
...
 48.3 MiB +   6.3 MiB =  54.6 MiB	gnome-software
234.1 MiB +  24.2 MiB = 258.3 MiB	gnome-shell
367.5 MiB +   2.0 MiB = 369.6 MiB	packagekitd
---------------------------------
                          1.3 GiB
=================================
Test 1 is successful.
Test 2: Undo Any Changes Made to Individual Files
Assume you're configuring something and editing a configuration file. Then you realize you messed up the configuration file. You want to see what changes you made to the original file and possibly wish you could undo the changes.
You can use snapper to undo not only all changes between two snapshots, but also a single file.
In this test, I will simply delete the last line of the /etc/hosts file. Then I'll compare it to the same file in snapshot #3 to see what changed and if I can undo all of the changes and restore it to its original state.
This is how the original /etc/hosts file looks.
$ cat /etc/hosts
# Loopback entries; do not change.
# For historical reasons, localhost precedes localhost.localdomain:
127.0.0.1   localhost localhost.localdomain localhost4 localhost4.localdomain4
::1         localhost localhost.localdomain localhost6 localhost6.localdomain6
# See hosts(5) for proper format and other examples:
# 192.168.1.10 foo.mydomain.org foo
# 192.168.1.13 bar.mydomain.org bar
Now I'll remove the last line.
$ sudo sed -i '$d' /etc/hosts

$ cat /etc/hosts
# Loopback entries; do not change.
# For historical reasons, localhost precedes localhost.localdomain:
127.0.0.1   localhost localhost.localdomain localhost4 localhost4.localdomain4
::1         localhost localhost.localdomain localhost6 localhost6.localdomain6
# See hosts(5) for proper format and other examples:
# 192.168.1.10 foo.mydomain.org foo
Using snapper, compare the /etc/hosts file with the one in snapshot #3.
$ snapper diff 3..0 /etc/hosts
--- /.snapshots/3/snapshot/etc/hosts	2023-07-25 05:30:00.000000000 +0530
+++ /etc/hosts	2023-11-08 13:21:53.905775069 +0530
@@ -4,4 +4,3 @@
 ::1         localhost localhost.localdomain localhost6 localhost6.localdomain6
 # See hosts(5) for proper format and other examples:
 # 192.168.1.10 foo.mydomain.org foo
-# 192.168.1.13 bar.mydomain.org bar
The number 0 in the command 3..0 represents the current snapshot, while the number 3 represents snapshot #3.
As you can see in the last line, the /etc/hosts file in the current snapshot is missing that line compared to the one in snapshot #3. If you want to learn how to read the output, take a look at the man pages man diff and man snapper.
To replace the /etc/hosts file with the one in snapshot #3, use the following command.
$ sudo snapper undochange 3..0 /etc/hosts
create:0 modify:1 delete:0
Check to see if the /etc/hosts file has indeed been rolled back.
$ cat /etc/hosts
# Loopback entries; do not change.
# For historical reasons, localhost precedes localhost.localdomain:
127.0.0.1   localhost localhost.localdomain localhost4 localhost4.localdomain4
::1         localhost localhost.localdomain localhost6 localhost6.localdomain6
# See hosts(5) for proper format and other examples:
# 192.168.1.10 foo.mydomain.org foo
# 192.168.1.13 bar.mydomain.org bar
Test 2 is successful.
Test 3: Create Manual Pre-Post Snapshots and Undo the Changes
In my previous article, I performed a manual pre-post snapshots test for installing a package with Gnome Software. The concept for both tests is the same. If you want, you can also run that test.
In this test, I will begin by creating manual 'pre' snapshots of the / and /home directories. Then I'll install a small package called Color Picker (gcolor3) from GitHub by compiling it from the source file. When I'm finished, regardless of whether the compiling was successful or not, I'll create 'post' snapshots for the previously created 'pre' snapshots. I'll then look at the changes it made to the system between the pre-post snapshots and, finally, undo everything.
Create a manual 'pre' snapshot for both the / and /home directories.
$ snapper -c root create -t pre -c number -d 'Pre Color Picker'
$ snapper -c home create -t pre -c number -d 'Pre Color Picker'
List the snapshots.
$ snapper ls
 # | Type   | Pre # | Date                                   | User  | Cleanup | Description                 | Userdata
---+--------+-------+----------------------------------------+-------+---------+-----------------------------+---------
0  | single |       |                                        | root  |         | current                     |
1* | single |       | Wednesday 08 November 2023 12:58:14 PM | root  |         | first root subvolume        |
2  | pre    |       | Wednesday 08 November 2023 01:13:40 PM | root  | number  | /usr/bin/dnf install ps_mem |
3  | post   |     2 | Wednesday 08 November 2023 01:13:41 PM | root  | number  | /usr/bin/dnf install ps_mem |
4  | pre    |       | Wednesday 08 November 2023 01:29:23 PM | madhu | number  | Pre Color Picker            |

$ snapper -c home ls
 # | Type   | Pre # | Date                                   | User  | Cleanup | Description      | Userdata
---+--------+-------+----------------------------------------+-------+---------+------------------+---------
0  | single |       |                                        | root  |         | current          |
1  | pre    |       | Wednesday 08 November 2023 01:29:33 PM | madhu | number  | Pre Color Picker |
Install the pre-requisite packages before compiling the source file.
$ sudo dnf install meson gcc-c++ libhandy-devel libportal-devel \
    libportal-gtk3-devel
Compile the source.
$ git clone https://github.com/Hjdskes/gcolor3.git
$ cd gcolor3
$ meson setup build
$ ninja-build -C build
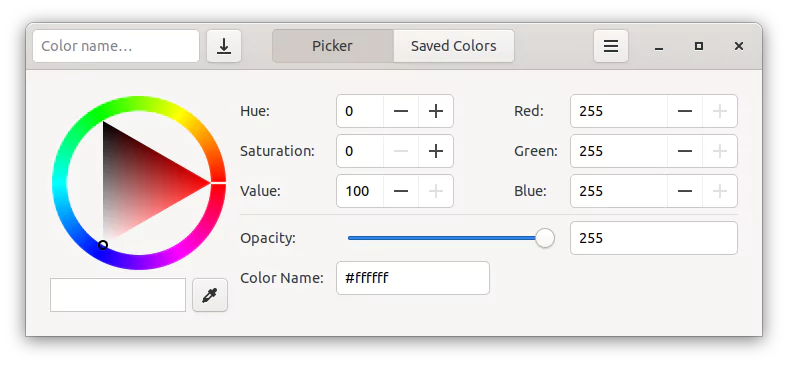
$ sudo ninja-build -C build installMake sure the Color Picker package has been installed properly. Enter gcolor3 into the terminal and hit <Enter>. The Color Picker app must be open and appear as shown.
Now that you have successfully installed the Color Picker application, close the application and create 'post' snapshots for the / and /home directories.
$ snapper -c home create -t post --pre-number 1 -c number -d 'Post Color Picker'
$ snapper -c root create -t post --pre-number 4 -c number -d 'Post Color Picker'
List the snapshots.
$ snapper -c root ls
 # | Type   | Pre # | Date                                   | User  | Cleanup | Description                                                                            | Userdata
---+--------+-------+----------------------------------------+-------+---------+----------------------------------------------------------------------------------------+---------
0  | single |       |                                        | root  |         | current                                                                                |
1* | single |       | Wednesday 08 November 2023 12:58:14 PM | root  |         | first root subvolume                                                                   |
2  | pre    |       | Wednesday 08 November 2023 01:13:40 PM | root  | number  | /usr/bin/dnf install ps_mem                                                            |
3  | post   |     2 | Wednesday 08 November 2023 01:13:41 PM | root  | number  | /usr/bin/dnf install ps_mem                                                            |
4  | pre    |       | Wednesday 08 November 2023 01:29:23 PM | madhu | number  | Pre Color Picker                                                                       |
5  | pre    |       | Wednesday 08 November 2023 01:32:52 PM | root  | number  | /usr/bin/dnf install meson gcc-c++ libhandy-devel libportal-devel libportal-gtk3-devel |
6  | post   |     5 | Wednesday 08 November 2023 01:33:16 PM | root  | number  | /usr/bin/dnf install meson gcc-c++ libhandy-devel libportal-devel libportal-gtk3-devel |
7  | post   |     4 | Wednesday 08 November 2023 01:36:50 PM | madhu | number  | Post Color Picker                                                                      |

$ snapper -c home ls
 # | Type   | Pre # | Date                                   | User  | Cleanup | Description       | Userdata
---+--------+-------+----------------------------------------+-------+---------+-------------------+---------
0  | single |       |                                        | root  |         | current           |
1  | pre    |       | Wednesday 08 November 2023 01:29:33 PM | madhu | number  | Pre Color Picker  |
2  | post   |     1 | Wednesday 08 November 2023 01:36:37 PM | madhu | number  | Post Color Picker |
Review the changes made to the system between the pre and post snapshots.
$ snapper -c home status 1..2
c..... /home/madhu/.cache/gnome-software/appstream/components.xmlb
+..... /home/madhu/.config/gcolor3
+..... /home/madhu/.config/gcolor3/config.ini
...
-..... /home/madhu/.local/share/gvfs-metadata/root-1cb93aa6.log
+..... /home/madhu/.local/share/gvfs-metadata/root-dd9963bb.log
c..... /home/madhu/.local/share/ibus-typing-booster/debug.log

$ snapper -c root status 4..7
c..... /boot/grub2/grub-btrfs.cfg
c..... /etc/ld.so.cache
+..... /usr/bin/brotli
...
c..... /var/lib/dnf/history.sqlite-wal
+..... /var/lib/PackageKit/prepared-update
c..... /var/lib/PackageKit/transactions.db
This is the total number of files added, removed, or modified.
$ snapper -c home status 1..2 | wc -l
278

$ snapper -c root status 4..7 | wc -l
13912
I'll now undo the changes in the / and /home directories.
$ sudo snapper -c home undochange 1..2
create:1 modify:3 delete:274

$ sudo snapper -c root undochange 4..7
create:0 modify:11 delete:13901
The Color Picker package will be completely removed from the system.
Log out and then log back in.
$ gnome-session-quitCheck again to see if the Color Picker has been completely removed.
$ gcolor3
bash: gcolor3: command not found...
Since you removed the Color Picker package, there is no reason to keep its pre-post snapshots if you do not intend to use it again. So you can delete those snapshots.
$ snapper -c home delete 1-2
$ snapper -c root delete 4-7
Test 3 is successful.
Test 4: Rollback to a Previous Snapshot from the GRUB Menu
In this rollback test, I will delete the most critical files and directories on which the Linux operating system relies. These include Linux kernel and initramfs files in the /boot directory, the /etc directory, which contains all configuration files, and the /usr directory, which contains all drivers, kernel modules, and library files.
Once I delete these files and directories, I will be unable to issue any commands because the Linux OS is pretty much dead, and the system will undoubtedly fail the next time it boots. So I'll hard boot the system and see if I can save the day by rolling back to a working snapshot.
So, before I delete them, here's how they appear.
$ sudo du -sch /boot /etc /usr
151M	/boot
33M	/etc
5.6G	/usr
5.8G	total
Now delete the files and directories.
$ sudo rm -rvf /boot/{vmlinuz,initramfs}* /etc /usrBoom!!! All critical files have been removed. Your Linux system is no longer operational. Reboot the system. Your system should now fail to boot and display something like this.

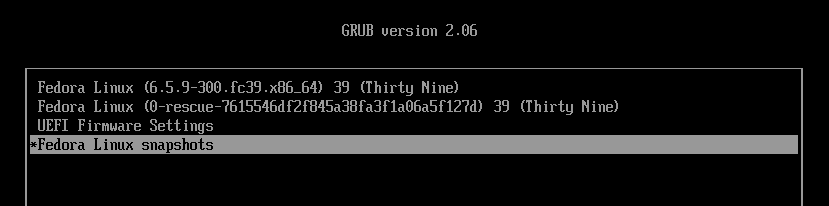
Return to the GRUB menu and this time boot from snapshot #3.
Open the terminal and make sure everything is back to normal.
$ sudo ls /boot /etc /usrBecause you booted into the snapshot, the '/' file system is read-only.
$ sudo btrfs property get -ts /
ro=true
Now that everything appears to be operating properly, it is time to roll back this snapshot in read-write mode.
$ snapper ls
 # | Type   | Pre # | Date                                   | User | Cleanup | Description                 | Userdata
---+--------+-------+----------------------------------------+------+---------+-----------------------------+---------
0  | single |       |                                        | root |         | current                     |
1+ | single |       | Wednesday 08 November 2023 12:58:14 PM | root |         | first root subvolume        |
2  | pre    |       | Wednesday 08 November 2023 01:13:40 PM | root | number  | /usr/bin/dnf install ps_mem |
3- | post   |     2 | Wednesday 08 November 2023 01:13:41 PM | root | number  | /usr/bin/dnf install ps_mem |
As you can see from the output, snapshot #1 has a '+' symbol, indicating that it is the default subvolume, whereas snapshot #3 has a '-' symbol, indicating that it is the currently booted subvolume.
$ sudo snapper rollback
Ambit is classic.
Creating read-only snapshot of default subvolume. (Snapshot 4.)
Creating read-write snapshot of current subvolume. (Snapshot 5.)
Setting default subvolume to snapshot 5.
Now, reboot your system.
$ sudo rebootThe first thing you should do after a rollback is to update the grub.cfg file so that the GRUB menu snapshots are always in sync.
$ sudo grub2-mkconfig -o /boot/grub2/grub.cfgCheck the system once again.
$ sudo du -sch /boot /etc /usr
151M	/boot
33M	/etc
5.6G	/usr
5.8G	total

$ sudo btrfs property get -ts /
ro=false

$ snapper ls
 # | Type   | Pre # | Date                                   | User | Cleanup | Description                 | Userdata
---+--------+-------+----------------------------------------+------+---------+-----------------------------+--------------
0  | single |       |                                        | root |         | current                     |
1  | single |       | Wednesday 08 November 2023 12:58:14 PM | root | number  | first root subvolume        |
2  | pre    |       | Wednesday 08 November 2023 01:13:40 PM | root | number  | /usr/bin/dnf install ps_mem |
3  | post   |     2 | Wednesday 08 November 2023 01:13:41 PM | root | number  | /usr/bin/dnf install ps_mem |
4  | single |       | Wednesday 08 November 2023 01:57:03 PM | root | number  | rollback backup of #1       | important=yes
5* | single |       | Wednesday 08 November 2023 01:57:03 PM | root |         | writable copy of #3         |

$ sudo btrfs subvolume list /
ID 256 gen 311 top level 5 path home
ID 257 gen 55 top level 5 path opt
ID 258 gen 309 top level 5 path var/cache
ID 259 gen 137 top level 5 path var/crash
ID 260 gen 311 top level 5 path var/log
ID 261 gen 309 top level 5 path var/spool
ID 262 gen 311 top level 5 path var/tmp
ID 263 gen 137 top level 5 path var/www
ID 264 gen 137 top level 5 path var/lib/libvirt/images
ID 265 gen 198 top level 5 path var/lib/portables
ID 266 gen 198 top level 5 path var/lib/machines
ID 267 gen 309 top level 5 path var/lib/AccountsService
ID 268 gen 309 top level 5 path var/lib/gdm
ID 269 gen 127 top level 256 path home/madhu/.mozilla
ID 270 gen 311 top level 5 path .snapshots
ID 271 gen 293 top level 256 path home/.snapshots
ID 272 gen 304 top level 270 path .snapshots/1/snapshot
ID 273 gen 230 top level 270 path .snapshots/2/snapshot
ID 274 gen 305 top level 270 path .snapshots/3/snapshot
ID 275 gen 304 top level 270 path .snapshots/4/snapshot
ID 276 gen 311 top level 270 path .snapshots/5/snapshot

$ sudo btrfs subvolume get-default /
ID 276 gen 311 top level 270 path .snapshots/5/snapshot
You successfully restored the system with the latest working snapshot in read and write mode.
Test 4 is successful.
14. Make a Snapshot the New System Root
Now that you've tested the snapper undo and rollback features and are hopefully satisfied with the results, you might want to set one of the snapshots as the new default system root and resume normal operating system use.
But first, let me show you how to determine how much space each snapshot takes up on your disk.
$ sudo btrfs filesystem du -s --human-readable /.snapshots/*/snapshot
     Total   Exclusive  Set shared  Filename
  51.41MiB       0.00B    37.66MiB  /.snapshots/1/snapshot
   5.51GiB    32.00KiB     2.90GiB  /.snapshots/2/snapshot
   5.51GiB    52.00KiB     2.90GiB  /.snapshots/3/snapshot
  51.41MiB       0.00B    37.66MiB  /.snapshots/4/snapshot
   5.51GiB   248.00KiB     2.90GiB  /.snapshots/5/snapshot
As you can see from the output above, snapshot #1 has an exclusive size of 0 bytes. This is because, as you may recall, I deleted all of the files recursively. Snapshot #4 is also 0 bytes in size because it is a read-only duplicate of snapshot #1.
To find out how the 'Total' and 'Set shared' values are calculated, see the man page man btrfs-filesystem.
Now, let's return to making a snapshot the new system root.
$ snapper ls
 # | Type   | Pre # | Date                                   | User | Cleanup | Description                 | Userdata
---+--------+-------+----------------------------------------+------+---------+-----------------------------+--------------
0  | single |       |                                        | root |         | current                     |
1  | single |       | Wednesday 08 November 2023 12:58:14 PM | root | number  | first root subvolume        |
2  | pre    |       | Wednesday 08 November 2023 01:13:40 PM | root | number  | /usr/bin/dnf install ps_mem |
3  | post   |     2 | Wednesday 08 November 2023 01:13:41 PM | root | number  | /usr/bin/dnf install ps_mem |
4  | single |       | Wednesday 08 November 2023 01:57:03 PM | root | number  | rollback backup of #1       | important=yes
5* | single |       | Wednesday 08 November 2023 01:57:03 PM | root |         | writable copy of #3         |
The output indicates that snapshot #5 is the default subvolume, and since it is operational, you can simply delete the remaining snapshots and move on.
However, I will use snapshot #2 as the default because it is a 'pre' snapshot that was created just before ps_mem was installed and is clean.
So, first, delete all of the snapshots except #2. You cannot delete snapshot #5 because it is the active one.
$ snapper delete 1
$ snapper delete 3-4

$ snapper ls
 # | Type   | Pre # | Date                                   | User | Cleanup | Description                 | Userdata
---+--------+-------+----------------------------------------+------+---------+-----------------------------+---------
0  | single |       |                                        | root |         | current                     |
2  | pre    |       | Wednesday 08 November 2023 01:13:40 PM | root | number  | /usr/bin/dnf install ps_mem |
5* | single |       | Wednesday 08 November 2023 01:57:03 PM | root |         | writable copy of #3         |
Create a directory named '1' in the /.snapshots directory.
$ sudo mkdir -v /.snapshots/1Copy the info.xml file from /.snapshots/2/ to /.snapshots/1/.
$ sudo cp -v /.snapshots/2/info.xml /.snapshots/1/Edit the /.snapshots/1/info.xml file and change the content from this...
$ sudo cat /.snapshots/1/info.xml
<?xml version="1.0"?>
<snapshot>
  <type>pre</type>
  <num>2</num>
  <date>2023-11-08 07:43:40</date>
  <description>/usr/bin/dnf install ps_mem</description>
  <cleanup>number</cleanup>
</snapshot>
...to this. Changes are in amber.
$ sudo cat /.snapshots/1/info.xml
<?xml version="1.0"?>
<snapshot>
  <type>single</type>
  <num>1</num>
  <date>2023-11-08 07:43:40</date>
  <description>new root subvolume</description>
</snapshot>
Create a read-write subvolume snapshot of snapshot #2 in the /.snapshots/1/ directory.
$ sudo btrfs subvolume snapshot /.snapshots/2/snapshot /.snapshots/1/snapshotGet the subvolid of the /.snapshots/1/snapshot subvolume.
$ sudo btrfs inspect-internal rootid /.snapshots/1/snapshot
277
Using subvolid 277, set the /.snapshots/1/snapshot subvolume as the default subvolume for the root (/) filesystem.
$ sudo btrfs subvolume set-default 277 /Then reboot.
$ sudo rebootAfter rebooting, confirm that the /.snapshots/1/snapshot subvolume is indeed the default for the / filesystem.
$ sudo btrfs subvolume get-default /
ID 277 gen 338 top level 270 path .snapshots/1/snapshot
And is writable.
$ sudo btrfs property get -ts /
ro=false
Take a look at the snapper now.
$ snapper ls
 # | Type   | Pre # | Date                                   | User | Cleanup | Description                 | Userdata
---+--------+-------+----------------------------------------+------+---------+-----------------------------+---------
0  | single |       |                                        | root |         | current                     |
1* | single |       | Wednesday 08 November 2023 01:13:40 PM | root |         | new root subvolume          |
2  | pre    |       | Wednesday 08 November 2023 01:13:40 PM | root | number  | /usr/bin/dnf install ps_mem |
5  | single |       | Wednesday 08 November 2023 01:57:03 PM | root |         | writable copy of #3         |
As you can see, snapshot #1 is the default. You can now delete the remaining snapshots.
$ snapper delete 2-5

$ snapper ls
 # | Type   | Pre # | Date                                   | User | Cleanup | Description        | Userdata
---+--------+-------+----------------------------------------+------+---------+--------------------+---------
0  | single |       |                                        | root |         | current            |
1* | single |       | Wednesday 08 November 2023 01:13:40 PM | root |         | new root subvolume |

$ sudo btrfs filesystem du -s --human-readable /.snapshots/*/snapshot
     Total   Exclusive  Set shared  Filename
   5.51GiB   312.00KiB     2.90GiB  /.snapshots/1/snapshot
You're done.
15. Enable Automatic Timeline Snapshots
Now that you've finished everything, you can enable automatic timeline snapshots. When the timeline is enabled, a snapshot is created once every hour. Once per day, the timeline cleanup algorithm cleans up the snapshots.
It is enabled by default in both the root and home configurations. Enable it only for the system root and disable it for the home. See the Arch Wiki page on 'Automatic timeline snapshots' for more information.
$ sudo snapper -c home set-config TIMELINE_CREATE=no
$ sudo systemctl enable --now snapper-timeline.timer
$ sudo systemctl enable --now snapper-cleanup.timer
That's all. Every hour from now on, a 'single' snapshot will be created and cleaned up every other day.
$ snapper ls
 # | Type   | Pre # | Date                                   | User | Cleanup  | Description        | Userdata
---+--------+-------+----------------------------------------+------+----------+--------------------+---------
0  | single |       |                                        | root |          | current            |
1* | single |       | Wednesday 08 November 2023 01:13:40 PM | root |          | new root subvolume |
2  | single |       | Wednesday 08 November 2023 02:00:04 PM | root | timeline | timeline           |
To stop timeline snapshots, disable the snapper timers.
$ sudo systemctl disable --now snapper-timeline.timer
$ sudo systemctl disable --now snapper-cleanup.timer
The installation of Fedora 39 with Full Disk Encryption, Snapshot and Rollback Support is now complete.
16. Issues and Possible Solutions
Problem 1: Sometimes, after updating Fedora and rebooting, you may encounter a boot error like this:
error: ../../grub-core/script/lexer.c:352:syntax error.
error: ../../grub-core/script/lexer.c:352:Incorrect command.
Issue: This usually occurs when a kernel update has just been released and all of the kernel's supporting files have not yet been propagated to a repository mirror near you.
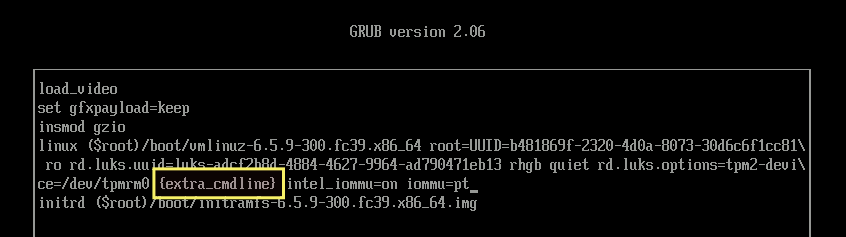
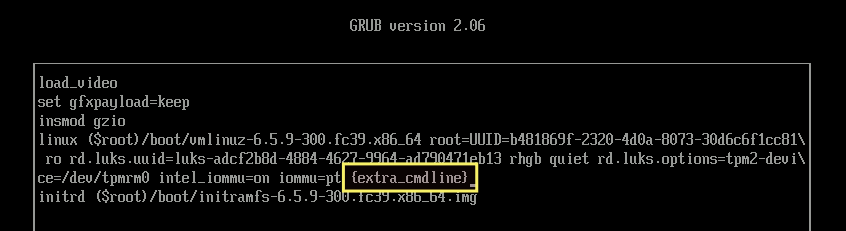
This is caused by the kernel parameter '{extra_cmdline}'. The '{extra_cmdline}' parameter is added to the kernel when you add the 'SUSE_BTRFS_SNAPSHOT_BOOTING=true' key to the /etc/default/grub file.
Solution: From the GRUB menu, select the kernel version you want to boot, and then press 'e' to modify the command.
Go to the line that starts with the word 'linux', and move the parameter '{extra_cmdline}' to the end of the line. The parameter '{extra_cmdline}' should always be at the end of the line.
From this:
To this:
Then, on your keyboard, press Ctrl+x. You will be successfully booted into the operating system. Next, launch the terminal and execute the following command.
$ sudo grub2-mkconfig -o /boot/grub2/grub.cfgReboot the computer to ensure the problem has been resolved.
Problem 2: When you try to boot from a snapshot from the GRUB menu, you sometimes get an error like this:
error: ../../grub-core/commands/efi/tpm.c:150:unknown TPM error
Issue: The problem appears to be that GRUB does not support TPM 2.0 very well when enabled in UEFI System Settings.
Solution: I looked into it, and it appears that this solution works perfectly. All credit goes to Eric Renfro.
Create a script named 02_tpm in the /etc/grub.d/ directory with the following contents.
# vim /etc/grub.d/02_tpm
#!/usr/bin/sh -e
echo "rmmod tpm"
Set the execute permission on a file.
# chmod +x /etc/grub.d/02_tpmUpdate the grub.cfg file.
# grub2-mkconfig -o /boot/grub2/grub.cfgThis issue should now be resolved.
17. Upgrade Fedora 38 to Fedora 39
If you have already followed an earlier version of this tutorial and installed Fedora 38 and are interested in upgrading to Fedora 39, this section is for you.
Update the local DNF metadata cache.
$ sudo dnf makecacheUpdate your Fedora 38 release. This is important. Do not skip this step.
$ sudo dnf upgrade --refreshAfter the updates have been installed, reboot your computer.
$ sudo rebootAfter rebooting, open the terminal and run the following command to upgrade your Fedora 38 operating system to the most recent Fedora 39 version.
$ sudo dnf system-upgrade download --releasever=39Once the upgrades have been downloaded, trigger the upgrade process. This will immediately reboot your computer, with no countdown or confirmation. So, before issuing the following command, close all other programs and save your work.
$ sudo dnf system-upgrade rebootOnce the upgrade process completes, your system will reboot again into the updated release version of Fedora 39.
If you want to learn more about the upgrade process, check out this link.
18. Watch on YouTube
The video was made for Fedora 38, but it is also applicable to Fedora 39. Nothing has changed between Fedora 38 and Fedora 39 in terms of btrfs snapshot and rollback support.